Toyota 22R/RE/REC/RET
Timing Chain Replacement Instructions
The following are instructions on replacing the timing chain in a Toyota 22R/22RE/22RET without removing the head.
Parts needed:
- Timing Chain
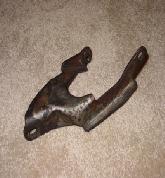
- Chain Guides; metal backed are better than the stock plastic ones, a source below:
- Chain Tensioner
- T-Chain Cover Gasket
- Water Pump Gasket
- Oil Pump O-ring
- Valve Cover Gasket
- Oil Pan Gasket or Toyota Black Form In Place Gasket (FIPG)
- Ultra Grey Silicone
- Can of Carb Cleaner
- 5 quarts of oil
-
Gallon of Anti-freeze
- Toyota Red recommended plus a gallon of distilled water
The hardest step in the replacement will be breaking the bolt that holds the puley to the crankshaft. Best option is to break it loose with the engine's starter, tranny in neutral, wire off the coil. Use a 6-point (sided), 19mm, impact socket and a breaker bar long enough to reach the frame rail, then bump the starter until the bolt breaks free. Best to address this step early on in the process, instead of waiting until the engine is torn half-way down and starter operation is not possible. This is step 18 below. Other options include putting the tranny in 5th gear, engage 4WD if possible, e-brake on, chock the wheels and see if the clutch will hold the engine from turning; or pull the starter and try to jam a pry bar into the flywheel teeth to lock it in place. It is a good idea to place the engine at TDC prior to removing the crank pulley from the engine.
- 1. Drain the anti-freeze from the radiator by opening the small twist valve at the bottom passenger side of the radiator.
- (open the fill cap to vent the system and speed the process)
- 2. Drain the oil.
- (If instructions are needed you shouldn't be doing this)
- 3. Remove the crossover air tube that goes between the airbox and the intake.
- 4. Disconnect the upper and lower radiator hoses on the engine side not on radiator.
- (This way the hoses are out of the way.)
- 5. Remove the Radiator.
-
2 bolts on each side.
- (Lifts right out)
- 6. Remove the fan at base.
-
4 small nuts hold the fan and the cone looking base to the pulley.
- (Be sure and do this before removing the belts.)
- 7. Remove the Distributor.
-
It is a very good idea to ensure the engine is at TDC prior to removing
the distributor. Set #1 piston to the top of it's stroke and the cam
gear mark up (12:00 position) and the crank gear mark down (6:00
position).
- Good idea to scribe a mark to show where it was set before, handy for getting the timing back close after assembling the engine.
- Also note where the rotor ends up when you pull out the distributor. When you reinstall it later, line up the rotor in the proper direction then, when it rotates into position, you'll be sure to be on the right tooth on the drive gear.
- 1 bolt used to adjust timing and hold it in place.
- Set this aside in the engine compartment without removing the wires and be sure to protect the shaft.
- Removing this now makes removing the rest of the accessories much easier.
- Good idea to scribe a mark to show where it was set before, handy for getting the timing back close after assembling the engine.
- 8. Remove the alternator, bracket, & belt.
-
There is a ground wire that goes to the block for now leave this
attached and set the alternator in the bottom of the engine compartment
- (The alternator bracket bolt is one of the bigger 14mm Timing chain cover bolts.)
- 9. Disconnect the rubber cooling system hose from the metal tube that is directly below the power steering pump brackets.
- (This allows the removal of power steering pump on the brackets.)
- 10. Remove the power steering pump along with the brackets and belt.
-
Set it aside in the engine compartment.
- (Three bolts possibly another if it has a brace.
- Now you see why we already removed the Distributor.)
- (Three bolts possibly another if it has a brace.
- 11. Now you have the option of removing the alternator ground wire or leaving it attached.
- 12. Remove the A/C compressor (if present).
-
Actually the A/C compressor can be removed at any point up until now if
it is in the way.
- Early removal gives more room to work.
- Unbolt the compressor and bracket and tie it out of the way, no need to remove the lines or discharge the system.
- Early removal gives more room to work.
- Note:
-
All accessories should be removed at this point.
- Take a break and organize everything.
- 13. Remove the valve cover.
-
Unbolt any emissions stuff that can be removed.
- The cover itself is held on with 4 cap nuts atop washer crowned rubber bushings.
- (Hose and wire spaghetti will vary depending on the emissions setup.)
- The cover itself is held on with 4 cap nuts atop washer crowned rubber bushings.
- 14. Remove the water inlet and outlet tubes bolted to the back of the timing chain cover on both sides of the water pump.
- 15. Remove the Water Pump.
-
Although only the 1 bolt in the middle of the water pump holds the
timing chain cover on it is a lot easier to take it off now.
- There is also one more bolt (not shown in the image below) behind/below the "two water pipe bolts", so there are in total 18 bolts holding the cover in place, be sure all 18 have been removed before attempting to remove the timing chain cover.
-
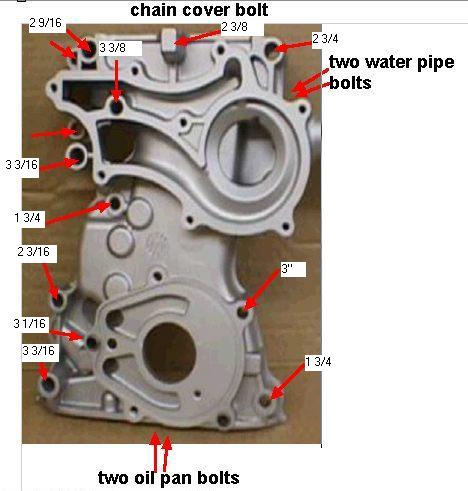
- 16. Here you have two options:
-
Remove the whole oil pan, or just remove the two front bolts.
- On 4WD/IFS trucks, you'll likely have to lower the front differential (without a 4" lift) to be able to remove the pan
- Remove the one horizontal mounting bolt up front and the two vertical mounting bolts in back and use a floor jack to lower the front differential assembly.
- Alternately, you can remove the motor mount bolts (2 per side) then use a cherry picker crane to raise the engine a few inches for clearance to drop the oil pan, if needed.
- If you know or even suspect that a guide is broken, either this time or at some point in the long distant past, drop the pan and clean it out.
- Why? Because that plastic debris can get into the oil pump pickup and cause a loss of oil pressure and since the timing chain tensioner is operated by oil pressure, you may be replacing the timing chain again (if not more) if that happens!!!
- If you know it's clean just remove the two very front bolts.
- On 4WD/IFS trucks, you'll likely have to lower the front differential (without a 4" lift) to be able to remove the pan
- 17. Break loose the bolt holding the distributor drive gear and cam gear on.
- DO NOT REMOVE IT
- 18. Remove the bolt holding the pulley on the crank.
- Do NOT remove the pulley yet!
- 19. Set the engine to Top Dead Center.
-
With the vehicle in neutral turn the crank by until the timing guide 0
(ZERO) is lined up with the notch in the pulley.
- Now you should see that the cam gear notches are at the top and that the raised rib on the crank is also at the top.
- CAUTION: The 22R line of engines are an interference style engine.
-
Meaning if the valves are open when a piston is in the up
position they will collide.
- Therefore you must be VERY careful and keep the cam gear and crank perfectly aligned.
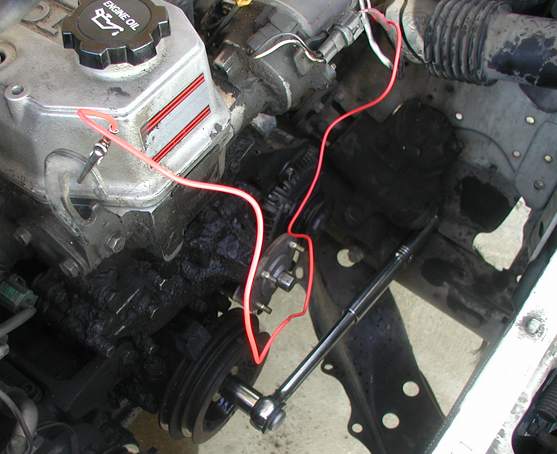
- 20. Put the Vehicle in gear and Remove the pulley from the crank.
- You may need to use a gear puller to break it loose.
- 21. Remove the oil pump.
- (Some of the oil pump bolts also hold the timing chain cover on.)
- 22. Remove the oil pump drive gear.
- (Make note of the way it installs.)
- 23. Remove all remaining bolts on the face of the Timing chain cover.
- 24. Remove the bolt, and distributor drive gear on the front of cam gear.
- (Do not remove the cam gear yet)
- 25. Remove the famed hidden timing chain cover bolt that is not mentioned in any shop manuals even the Toyota shop manual.
-
(Yes I will break the cycle and tell you where it is.)
- Right in front of the cam gear, directly below where the distributor drive gear was is a small pool of oil hiding the bolt.
- (See why it is so easy to miss.)
- Right in front of the cam gear, directly below where the distributor drive gear was is a small pool of oil hiding the bolt.
- 26. Remove the timing chain cover.
-
Tap the sides of the cover with a plastic tipped hammer to break it
loose.
- Clean and inspect the cover for damage.
- Make sure the chain did not eat all the way through to the coolant chamber.
- Clean and inspect the cover for damage.
- 27. Remove the Chain guides and Tensioner.
- 28. Very carefully remove the cam gear and chain.
- *Be sure not to rotate either the cam or crank out of sync or else it is valve crunch time.
- 29. Remove the crank gear.
- *Again be very careful not to rotate the crank.
- 30. Install your new crank gear.
- *Again be very careful not to rotate the crank.
-
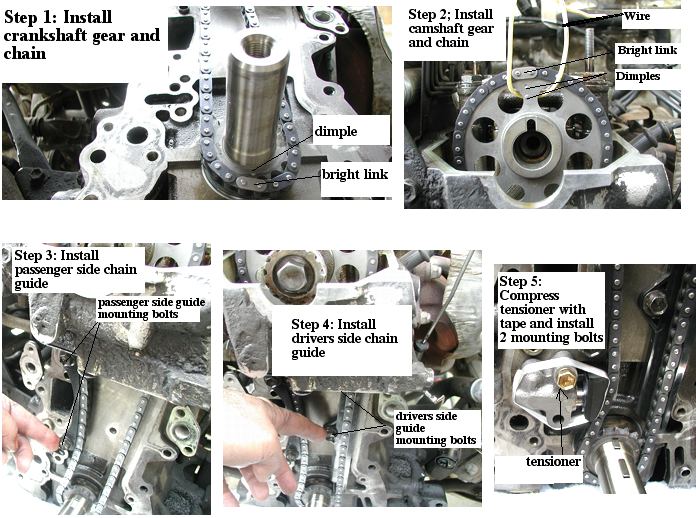
- 31. Install the new cam gear and chain.
-
Put the chain on the cam gear drop it down through the top carefully
putting the chain on the crank gear and lining up the darker links on
the chain with the marks on the gears.
- Read the next paragraph for more on proper chain alignment & tension.
- Read the next paragraph for more on proper chain alignment & tension.
- THIS IS VERY IMPORTANT
-
*Chain tension placement is crucial in making the guide install
easy.
- Since the engine rotates in a clockwise pattern the driver side should have the most tension and the passenger side the slack.
- If you look at the way the guides install you will see the driver's side has virtually no slack and the passenger side has a lot.
- To achieve this you need to find the proper alignment of the chain on the gears then very carefully preload the cam gear/valves by placing a punch in the hole on the top the cam and twisting the cam ever so slightly clock wise to get the cam gear on.
- After it is on, very gently twist it back to the original position which will tighten up the chain on the drivers side.
- Since the engine rotates in a clockwise pattern the driver side should have the most tension and the passenger side the slack.
- 32. Bolt the cam gear and distributor drive gear down to prevent it from popping off.
- However you will have to take it off later to put the hidden timing case bolt back in.
- 33. Install the new passenger side guide.
-
If the chain is on right it should only take a little tug to line up
the bolt holes.
- If necessary you can use the punch to rotate the cam a little.
- Torque the guide bolts to 14-16 ft-lbs.
- If necessary you can use the punch to rotate the cam a little.
- 34. Install the new drivers side guide.
-
If the chain is on right it should only take a little tug to line up
the bolt holes.
- If necessary you can use the punch to rotate the cam a little.
- Torque the guide bolts to 14-16 ft-lbs.
- If necessary you can use the punch to rotate the cam a little.
- 35. Install the new tensioner.
-
Compress it and then bolt it down.
- Bolt torque is critical, 12-14 ft-lbs is the max. you want to use, more and you will distort the tensioner body and cause the tensioner arm to be sticky.
- 36. Clean the timing chain cover.
- Be sure to get all of the old gasket off and wipe down the mating surfaces with carb cleaner to remove the oil residue so the new silicone sticks.
-
37. Clean the block surface where the timing chain cover mounts.
- 38. Install the timing chain cover with new gasket.
-
You can use some silicone sealant or the FIPG where the timing chain
cover meets the head and head gasket if the head was not removed.
Basically you want to seal up the corners.
- Also, several of the timing cover bolts may screw into internal oil passages. For those, it's best to apply some FIPG or other thread sealant to them prior to installing.
- If you find an oil leak near one of the timing cover bolts later, it's easy enough to remove it, clean the threads, apply some sealant and re-install the bolt.
- Also, several of the timing cover bolts may screw into internal oil passages. For those, it's best to apply some FIPG or other thread sealant to them prior to installing.
- 39. Carefully remove the distributor drive gear and put the hidden bolt back in.
- 40. Put the distributor drive gear back on and bolt it down.
-
Line up the rotor to where it was pointing when you removed it and set
the distributor to the mark you made before removal, this will get it
close to the correct timing.
- The rotor should end up about centered on the #1 cylinder contact inside the distributor cap.
- 41. Install the water pump and new gasket.
- 42. Re-attach the coolant inlet and outlets located at sides of water pump on the back of the timing chain cover.
- 43. Tap the oil seal out of the front of the oil pump and install the new one.
- 44. Install the oil pump drive gear.
- 45. Install the oil pump with new O-ring.
- 46. Install the oil pan and new gasket or FIPG
-
If you just removed the two front bolts put them back in.
- 47. Put the valve cover back on with a new gasket. Be sure and reattach any hoses or wires you disconnected.
- 48. If you did disconnect the ground wire off the alternator reconnect it now.
- 49. Install the power steering pump.
- 50. Reattach the upper alternator bracket.
-
See below for the orientation.
- P/S bracket wraps around underneath the water pump outlet pipe/hose.
- The alternator tension brkt. sits int he middle of the p/s bracket
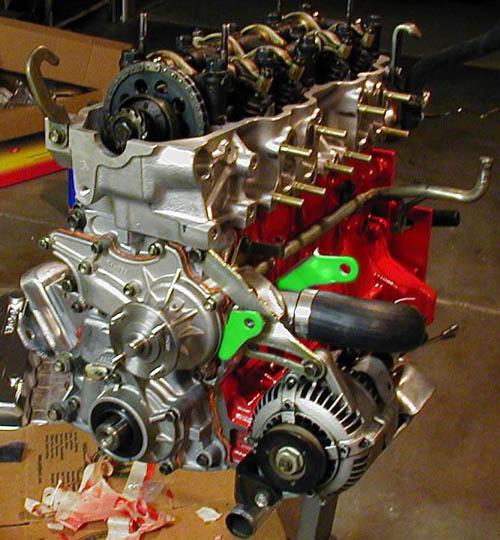
- Note how the brackets and tensioners attach to the various timing cover and head bolts and captive nuts on the other brackets.
Power Steering Bracket P/S and alternator detail - P/S bracket wraps around underneath the water pump outlet pipe/hose.

- 51. Put the coolant hose back on the tubes below the power steering pump.
- Be sure all the hose clamps are oriented to clear the brackets and to allow future removal if the need arises.
- 52. Put the alternator back on the mounts.
- 53. Put the distributor back in and take a guess at the timing.
- Helpful to have scribed a mark where it was before you removed it.
- 54. Put the pulley back on the crank and torque it to 130lbs.
- 55. Put the belts back on the vehicle and adjust them properly.
- 56. Put the radiator back in the vehicle and connect the hoses.
- 57. Fill the vehicle with 60% coolant 40% water.
-
The best way to do this is a gallon of coolant than fill the container
with water and keep adding it as the radiator drops.
- Filling the cooling system can take a while so just be patient.
- It also helps to have the vehicle parked on a slight uphill slope so the radiator is the highest point in the cooling system.
- Filling the cooling system can take a while so just be patient.
- 58. Fill the vehicle with oil.
- 59. Install distributor
-
Install with engine at TDC for a 22R or 5° BTDC for a 22RE/REC/RET
- Set the distributor at the 12 o-clock position
- Upon insertion, it'll turn ~35° CCW and the timing will be close
- Set the distributor at the 12 o-clock position
- 60. Start up the vehicle.
-
The timing is probably off since the distributor was moved.
- To get the vehicle to idle smoothly adjust the distributor freehand or set the timing the right way.
- With the timing test connector (TE+ E+) shorted, set the timing to 5° BTDC on the 22RE engine
- With the vacuum line disconnected from the distributor, 0°BTDC on the 22R engine
- Be sure and watch for good oil pressure and change your oil and filter after about 2000 miles
- And warm the engine up with the radiator cap off and the heater control to full heat until the thermostat opens.
- This will ensure any air pockets are flushed out of the cooling system.
- Top off the coolant as needed before installing the radiator cap.
- To get the vehicle to idle smoothly adjust the distributor freehand or set the timing the right way.
-
---
- Author: Tim Macy
- Edited: Roger Brown
- If you would like to use this document or any of its contents for any publication, ask permission first.
[Click here to download a PDF/Acrobat copy of this page] [Return to the 22RE Engine Mods page...]
Visitor # since 18.MAY.2002
[Last updated: 10.March.2022 ]