Hot Water Shower
Hot Water Shower:
I ran across an ad from R&M Specialty Products in Toyota Trails magazine for their hot water shower kit. This gadget was too cool (should I say hot) to pass up. I thought about doing my own design for one, but time constraints led to ordering one already built. I ordered the basic kit which includes the following:
-
R&M Shower KIt Contents:
- 2" dia. x 12" long copper heat exchanger
- 12V RV water pump (30 PSI shutoff)
- Shower head w/ flow control valve, hose and clamp
- Pump to exchanger hose
- Water pickup to pump hose w/ inlet strainer
- Installation
- Operation
- Cost
- Product Information
- DIY
Installation:
My original plan was to install the heat exchanger under the truck, near the rear heater, tapping into the heater lines there. After getting the unit in hand and looking for a suitable mounting location, I decided this was not an ideal location.
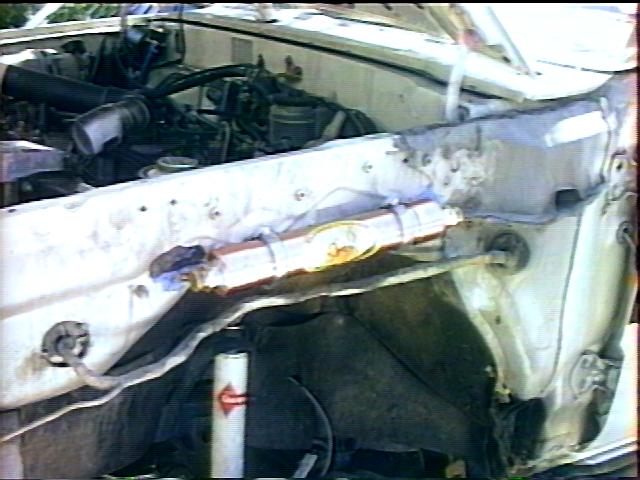 I
found that the driver's side fender was a better location for access. I
pulled out the wheel well liner and fender and verified there was
enough room to mount the exchanger. The heat exchanger comes with two
1/2" hose-barb connections angled out at 45°. To penetrate
through the fender wall far enough, I soldered a 45° 1/2"
copper angle, a 1" long copper nipple and a 1/2" brass hose
barb each of the existing coolant hose connections on the exchanger. I
cut two holes in the fender and mounted the exchanger to the fender
wall with the supplied bracket using an existing threaded hole. I
replaced the single hose between the heater valve to the rear heater
pipe with two lengths of 1/2" heater hose, one from the valve to
the exchanger and one fromt he excahnger to the rear heater pipe. When
the rear heater valve is opened, hot coolant flows through the
exchanger to heat the shower water. Water temperature can be regulated
by adjusting the rear heater valve as well as the flow through the
shower head.
I
found that the driver's side fender was a better location for access. I
pulled out the wheel well liner and fender and verified there was
enough room to mount the exchanger. The heat exchanger comes with two
1/2" hose-barb connections angled out at 45°. To penetrate
through the fender wall far enough, I soldered a 45° 1/2"
copper angle, a 1" long copper nipple and a 1/2" brass hose
barb each of the existing coolant hose connections on the exchanger. I
cut two holes in the fender and mounted the exchanger to the fender
wall with the supplied bracket using an existing threaded hole. I
replaced the single hose between the heater valve to the rear heater
pipe with two lengths of 1/2" heater hose, one from the valve to
the exchanger and one fromt he excahnger to the rear heater pipe. When
the rear heater valve is opened, hot coolant flows through the
exchanger to heat the shower water. Water temperature can be regulated
by adjusting the rear heater valve as well as the flow through the
shower head.
(view of driver's side wheel well - looking up and forward). I used some lengths of 1/2" garden hose to attach to the exchanger and run out of the wheel well to ...
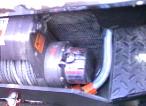
... the winch tray on my front bumper. Quick connect fittings on the hose ends allow quick shower setup. There is enough extra hose (~20') in the basic kit to allow direct pumping from a stream or lake, or a 3-5 gallon bucket will provide enough water for a decent shower in case the water source is too far away to reach with the hose. I actually recommend this technique as you keep soap out of the water source.
The shower is set up as follows:
- Drop the intake hose (w/ strainer) into the water source.
- Connect the other end to the 12V pump inlet.
- Connect the pump outlet hose to one end of the heat exchanger.
- Attach the shower head and hose to the other end of the heat exchanger.
- Clamp the shower head to something (like the raised hood or a tree branch).
- Connect the pump to the batterey and adjust the water temperature to your liking.
Note:
- Save $100 on R&Ms "remote installation kit" and make your own. I bought the shortest length of cheap garden hose I could find and a pair of quick disconnect hose fittings. I cut the hose to length to fit from the heat exchanger to my front bumper, then installed the disconnects. The mating pieces were put on the hoses from the shower kit.
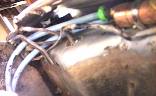
Update:
I had initially plumbed the heat exchanger in-line with the rear heater in my 4Runner, making use of the heater control valve in the center console to adjust shower temperature. I found this a little inconvenient running back and forth, dripping water inside the truck, etc. Plus I wanted to remove the rear heater, since it was prone to leaks and was taking up precious room in the truck. So I put the heat exchanger in place of the rear heater loop. Not wanting it to have coolant flowing all the time, I added a water valve to allow it to be shut off and it made a handy temperature control:
The coolant valve handle is visible in the lower left corner of the above picture. Its in-line with the copper pipe running through the inner fender wall that is in turn soldered to the copper heat exchanger. It is so much easier to adjust the temperature now, since I normally hook the shower head to the up-raised hood and set the shower pump unit on the front bumper.
Operation:
So, how does it work?
- Marvelous, simply marvelous!
I find it best to take a shower right after you pull into camp after a hard, dusty day of wheeling. The engine is hot and the dirt is fresh. It only takes a minute or two to set up. Leave the engine idling to circulate coolant and you can shower until you either pump the lake dry or run out of gas! Alternately, a collapsible bucket will hold enough water for a quick rinse or even shove the pickup hose into a 5 gallon water jug and go to it. If the engine is hot and the t-stat is open, it will take a few minutes to get the 'stat to close a bit to allow full flow to the heater. If using a bucket, just let the water circulate through the system back into the bucket for a few minutes while you get ready. I find a pair of sandals is ideal to wear to keep your feet out of the mud and I carry a pair of swim trunks, a bottle of biodegradable soap and a towel in my "shower kit".
Cost:
  1  R&M Hot Water Shower kit           $259+tax&shipping (1997 pricing)
  -  Misc plumbing supplies              varies
  --------------------------------------------
  Total                                 $300
Project Rating:
 - Some copper pipe sweating may be involved as well a sheet metal cutting.
Product Information:
R&M Specialty Products
P.O. Box 1683, Dept. RCB
Windsor, CA. 95492
+1.707.838.3869
DIY:
There are several options availible in case you want to "roll your own":
- I've heard it is possible to run water through an unused automatic tranny cooler (if your radiator is so equipped). Supposedly, this may result in water too hot to be used directly, but by adding a mixing valve (like your shower at home) to mix hot and cold water, you may be able to make a very cheap water heating setup.
- The other option, is to make a heat exchanger like the R&M unit. It consists of a 12" length of 2" copper tubing for the housing. Two pipe fittings allow hot coolant into the housing. On the ends are two hose fittings with attachments for three small copper tubing coils. The small tubing is coiled inside the housing (approx 3' of tubing each, wound around a form and soldered to the end fittings). The key component in this seup is the hose fitting with the attachments for the small tubing.
![]()


Visitor # 93965 since 28.AUG.2001
[Last updated: 22.March.2021]
![]()