4Crawler Offroad Rock SliderZ: Installation
Save a tree, click here to download an Adobe PDF file of these instructions
Contents:
- Introduction
- Rock Slider Tech
- Recommended Tools
- Installation
- Care and Feeding
- Difficulty and time estimate
Introduction:
Congratulations on your purchase. Be sure to read, understand and follow these directions, prior to starting this installation. There is nothing very difficult with this installation. On some vehicles with 1" or less of body lift, it may be necessary to loosen the body mount bolts to raise the body off the vehicle in order to drill the upper mounting holes. This is not difficult, but since you are going to that effort, it would be a good time to consider installing polyurethane body mount bushings. Chances are your stock rubber body mounts are showing signs of age. If interested in new body mount bushings, feel free to contact me for more information. One tip before you begin, is to locate all the body mount bolts, and give them a shot of penetrating oil for a few days before you plan on installing the bars. This way, they'll come apart a lot easier.
[Return to the top of this page]Rock SliderTech:
Rock SliderZ are designed to protect the rocker panel area of your truck from damage from rocks, trees and other obstacles while driving off-road. The bars attach to the frame and extend out underneath the body seam and extend beyond the outside edge of the body. Similar product that are easily confused with a a rock slider is a nerf or step bar. These products are usually built out of large diameter, thin-wall tubing, and attach to the frame or body with a few bolts. They usually only have a single tube and generally offer little if any protection of the body.
There are two basic schools of thought in rock slider design.
- The first is to make the bar and its attachment to the frame strong enough to provide all the support required for protection. This often entails welding the bars to the frame in order to obtain a rigid enough mount.
- The second is to design the bars to work with the frame and body as a whole to provide the needed protection. Since the bar doesn't have to support the entire vehicle weight on its own, mounting is simplified without compromising protection.
The key design feature of the Rock SliderZ is the dual tube construction. The inner tube is designed to run directly underneath the seam of the body and floor pan, from wheel well to wheel well. The supporting legs go to 1/4" steel mounting plates attached to the frame with either 3/8" Type F self-tapping bolts or M10 grade 8.8 bolts and on some applications washers. Older style Toyota mounting bracket shown below:
 |
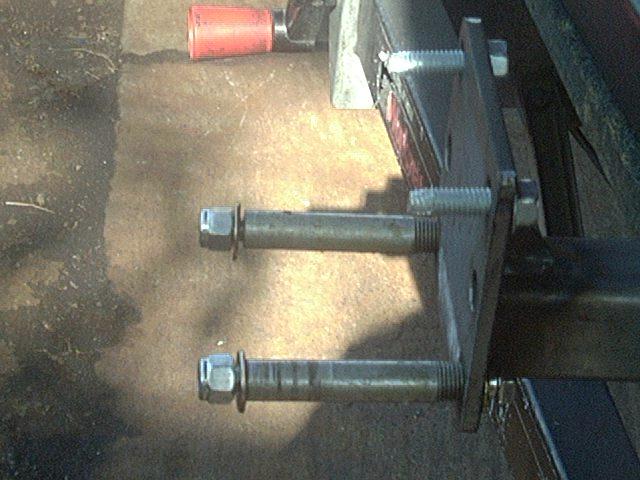 |
| Self-tapping bolts | Sleeved mounting bolts |
The newer style brackets feature 6 mounting holes, for a more flexible installation. The bottom pair of holes should be used, than any two of the upper four holes can be used.
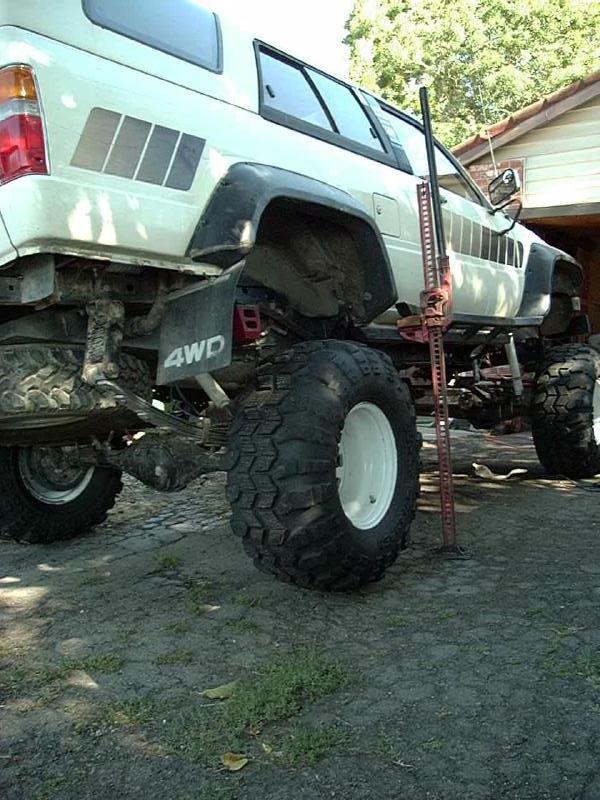
The mounting system is designed to allow some flex in the bars, frame and body, to the point the inner tube makes contact along its full length with the body seam. This distributes any loads over a large area, thus minimizing stress buildups in any one location. In the picture below, you can see my nerf bar stress test, the rear corner of my 4Runner is being lifted off the rear-most end of the bar.
The outer bar is supported by outriggers off the inner bar and it is offset about 2" higher and lines up just a bit outside the widest part of the body. This offers protection of the body panel from vertical obstructions while maximizing ground clearance under the bars.
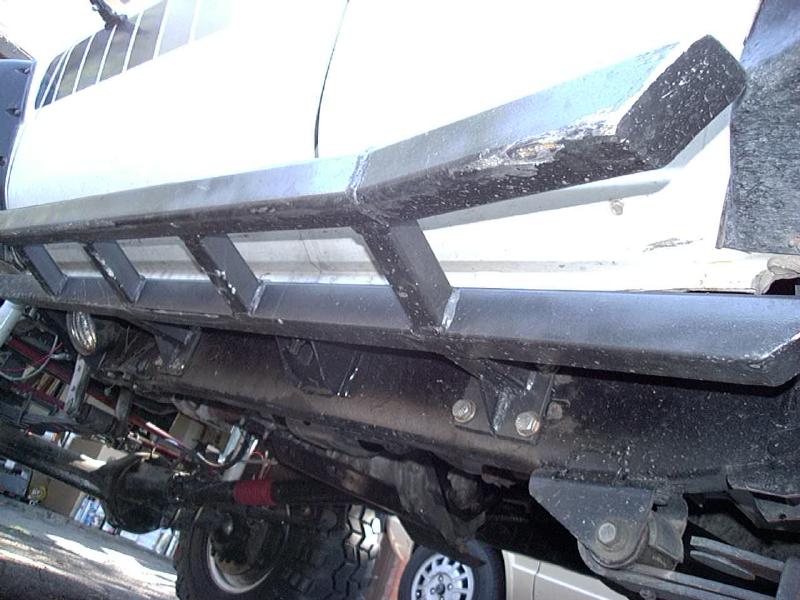
The photo above shows what the bottom of my bars looked like after their trial run over the infamous Fordyce Creek trail in the SIerra Nevada of northern California (home of the SIerra Trek). There are full-length paint scrapes down the length of both the inner and outer bars. Its nothing a shot or two of paint won't fix and I got zero body damage on the trip. I also never got hung up or high centered on the bars, their smooth underside allowed me to slide (nerf surf) over large boulders with ease.
[Return to the top of this page]Recommended Tools:
- A pair of jack stands or wooden blocking to support the sliders in position to mark for the mounting holes
-
On vehicles needing to lift the body:
- A HiLift jack and/or a floor jack and wooden blocking to raise body about an inch to allow access to drill the mounting holes (if needed)
-
On vehicles requiring self-tapping bolts:
- An electric drill and 5/16" (and possibly a 21/64" or 11/32") metal-cutting drill bit will be be needed to drill the pilot holes for the mounting bolts, and if needed a 3/8x16 (NC) thead cutting tap can help to get the self-tapping bolts started
- Some chalk, a center punch and hammer to mark the locations of the holes
-
On sliders with sleeved bolts:
- A 3/8" - 7/16" bit to drill a through hole for the sleeved bolt
- A larger 9/16" - 5/8" bit to drill a clearance hole for the mounting sleeve
- A hack saw to cut the sleeves to length to fit inside the frame
- Some anti-seize compound, grease or oil will ease the bolt installation
- A wrench or socket set to install the mounting bolts
Installation:
Check your kit to ensure all parts are present.
You should have:
-
2 Rock SliderZ
- One passenger side and one driver side
- Mounting bolts and if required, washers, if ordered
Safety First:
Park vehicle, securely block wheels to prevent it from rolling. Since you may be moving the body in relation to the frame, it is a good idea to disconnect the ground cable from the battery to avoid unexpected short circuits. The actual lifting process should go quite easy, the body is only a fraction of the weight of the vehicle. If the body seems to get hung up, don't force it, figure out what is hanging it up before proceeding. Now on to the installation...
~~~~~
Now that you have everything ready to go, try a test fit of the bars. As these instructions cover various types of bars, not all steps may apply to all designs. There is a left and right bar, so if you find a bar does not seem to fit on one side of the vehicle, try it on the other side.
Squeaks and rattles:
The inner tube should no closer than approx. 1/4"- 1/2" below the body seam. Any closer and it can touch the pich weld, this may lead to metal-to-metal contact and possible squeaking and rust if the paint gets worn away. An option for mounting the bars is to slit a length of 3/16" rubber fuel hose and slip that over the length of the pinch weld seam. Then position the bars closer than 1/4" from the tube covered seam. The rubber will quiet any squeaks and protect the contacting surfaces from wear. You can always mount them lower on the frame, especially on models where door opening dictates a lower mounting position.
If the brackets allow, move the bar to a position that affords the needed clearance with the body seam. Due to variation in body types, body mount bushings, and body lifts, you may need to make minor adjustments to get the proper spacing.

I was able to install these bars by myself, using a pair of jack stands and scraps of wood to position the bars in the correct location. If you have a few helpers, have someone hold each end of the bar in position, roughly centered between the wheel wells and roughly parallel to the body seam. You may need to move the bars back and forth and up and down a bit to find where they fit the frame and body best. The fit of the bars to the frame and body is what matters.
-
For the 4/6-bolt mounting brackets
- Use a piece of chalk to mark the location of each mounting hole, or use a scratch awl to trace the outline of the mounting holes in the paint on the frame rail.
-
For the 3-bolt/mount L-brackets, you want to get the under-frame bolts
installed first.
-
Check the bar-body seam clearance.
- If it looks good, go ahead and mark/drill/tap the holes under the frame.
- If needed, you can add washers between the frame and bracket to drop the bar if its going to be too close to the body seam.
- Once you are satisfied with the bottom mounts, you can mark/drill/tap the upper holes and mount the bar for good.
- You should not need to raise the body off the frame to drill the upper holes with the L-brackets.
-
Check the bar-body seam clearance.
- When drilling, you want to run the starter bit (1/8" assumed) about 2000-3000 RPM with light to medium pressure and use some cutting oil to help the bit cut the steel without overheating. Use a light to medium pressure, enough to let the bit make a good cut without bogging down. Be careful not to rock the bit as it drills deeper or once it penetrates the wall of the frame to avoid bit breakage.
-
For the 2-bolt Xterra/Pathfinder mounts, you should remove the factory
step bars, if present, and remove the factory bolts from the frame, if
present.
- It is a good idea to run the factory bolts in and out of the frame holes with some oil or anti-seize compound to clean out the threads.
-
Hold the bar up to the frame (either using jack stands or with two
people)
- Note the bars will only go one one way, if the holes don't line up, that bars is for the other side of the vehicle and start a bolt on each end.
- Then install the center bolts and the remaining bolts on each end.
- Once all the bolts are started, make any minor adjustments and tighten them down, 20 ft-lbs of torque is probably fine. Repeat on the other side and you are done. Be sure to check the bolts for tightness after a few hundred miles.
Now, remove the bar, carefully center punch the holes. If your drill won't allow a straight line access to the upper holes, you'll have to drill those later with the side of the body lifted up approx. 1-2". If you have a right-angle drill and a short drill bit, this may make this step unnecessary. On the 2-3" body lifted trucks, there should be easy access to all the mounting holes.
If you find is necessary to raise the body off the frame, loosen the body (or bed) mount bolts and remove the nuts, on one side of the truck, and lift the side of the body up as if you were installing a body lift. A HiLift jack and block of wood in the rear wheel well makes a good lifting point on the 4Runner or a floor jack and wooden blocking under the floor. You may wish to consult my body lift kit installation instructions:
- http://www.4crawler.com/4x4/ForSale/Docs/BodyLift_HowTo.shtml#4Runner
for details on lifting the body off the frame.
Drill holes on each side to 5/16" dia. If are unsure of the marked bolt hole locations, you can just drill one at each bracket location, temporarily install the bar with one bolt, then mark and drill the remaining bolt holes.
A few tips on using the self-tapping bolts:
-
I find it easiest to insert the bolt in the freshly drilled hole
(without the slider installed) then slowly tighten the bolt, applying
firm pressure on the head to get it started
- Often, there will be additional steel inside the frame, making it thicker than normal. If you hit such a spot, you should redrill that hole to 21/64" or 11/32" if possible or at least rotate the 5/16" drill bit around in the hole to slightly back cut the thicker metal behind the frame.
-
If you have trouble getting the self-tapping bolts to start cutting
threads, try using a 3/8x16 (NC) thread cutting tap to get the threads
started.
- You only want to cut perhaps one turn on the tap once it catches, then remove it and use the self-tapping bolt to form the rest of the threads.
- This is because the tap will cut away the metal as it goes into the frame, while the self-tapping bolt forms the threads as noted below:
-
The bolt forms the threads as it goes in, work-hardening the steel in
the frame as it goes
- You can use some anti-seize compound or oil on the treads to help with the initial installation
-
Keep turning the bolt until is fairly solid, no need to run it all the
way in, you just need enough thread formed to allow the bolt to hold
the bars up
- Don't force the bolt, if it feels like its getting too tight, try backing it out 1/4 turn to clear the threads of metal chips, then repeat the insertion.
- If you hit a really hard spot, remove the bolt and try opening up the hole a bit with the drill bit (see above)
-
Then back out the bolt and go onto the next hole, using a new bolt for
each hole
- Avoid using the same bolt to start all the holes, you may wear out its tapping threads or even fatigue the bolt from the stress of the additional insertions
- For protection against rust, you can apply some silicone sealer to the bolt threads prior to the final installation and/or squeeze some sealer into the threaded bolt hole.
Once all the bolt holes are tapped, put the bars back up and install the bolts, slowly working them tight in an even fashion. Tighten the bolts until the mounting brackets sit fairly flush with the frame. Don't overdo the tightening, good and snug is just fine. The self-tapping bolts are unlikely to back out of the holes and they are mainly loaded in tension under load.

If you raised the body to drill the holes, lower it back down, making sure the body/bed mount bolts drop back in place in the mounting bushings. Re-install the washers and nuts, torque them to 15-20 ft-lb, and recheck them after a few hundred miles. You might also want to HiLift off the sliders a few times, both to get the "hang" of placing the jack and to load up the bars a few times.
IMPORTANT:
Check and tighten the bolts after driving a few hundred miles and after the first off-road trip or two. Its important to not over tighten the bolts, but don't let them loosen up either. Once the sliders seat to the frame, they should stay nice and tight for years. You could try using some thread locking compound or lock washers if desired. Alternately, you can also run a small tack weld along the bottom of each bracket (an inch or so). Make is small so it can be ground out if needed.
If the body seam hits the nerf bars, you could try loosening the bolts and moving the bar a bit lower, there is approx. 1/8" of play in the bolt holes, assuming the holes are placed dead center, or slip a length of 3/16" rubber fuel hose (slit lengthwise) over the pinch weld seam to silence the rattles.
If you want to increase the strength of mounting the bars, you can replace one or both of the lower self-tapping bolts with a bolt through the frame. Choose a bolt location where the back side of the frame is clear of brackets and obstructions and simply drill a 3/8" hole clear through the frame and install a bolt about 1/2" longer than the frame is thick and back up the nut with a large, thick washer. If the hole is relatively close to the bottom the the frame, there is no need to sleeve the bolt hole. If a sleeve is desired, a length of 1/4" - 3/8" schedule 40 water pipe, cut the fit inside the frame will work great. An 9/16" - 11/16" hole needs to be drilled in the outside face of the frame then it should be tack welded in place to keep it in place, or using the pre-tapped mounting brackets, thread the end of the sleeve into the bracket then slide the sleeves into the holes and secure with a combination of self-tapping bolts on top and sleeved bolts on the bottom.
When drilling through the frame and when tightening the thru-bolts, be extra careful to not drill into anything behind the frame, such as brake lines, wiring or the gas tank. If a thru-bolt seems like it'll stick out too far from a nut on the inside of the frame rail, it is perfectly OK to cut the threaded end shorter or install a few extra washers under the head of the bolt to shorten the rear projection.
Painting:
If you ordered the sliders unpainted, thoroughly clean and prep the steel before priming. Oil and grime may be removed with solvent or a good cleaner like Simple Green. Once clean, the steel surface needs to be roughened up before finishing for best adhesion. Leaving the steel out in the elements to weather for a month or so will work, or speed up the process with an acid etch (using something like CLR, LimeAway, or any strong acid). Once prepped, apply a primer coat and let it dry.
If the sliders were ordered primed but unpainted, the POR-15 primer must be thoroughly sanded to provide the top coat with some tooth. An option is to apply a coat of POR-15 Tie Coat primer, available from the POR-15 web site. Apply 2 coat of paint, allow to dry then apply the grip tape if desired. Round the corners on the end of the tape and use a roller to press it firmly onto the top surface of the outer bar.
[Return to the top of this page]Care and Feeding:
Rock SliderZ enjoy a regular intake of rocks, logs and other obstacles. Rocks supply important vitamins and minerals to keep your sliders in top top shape :)
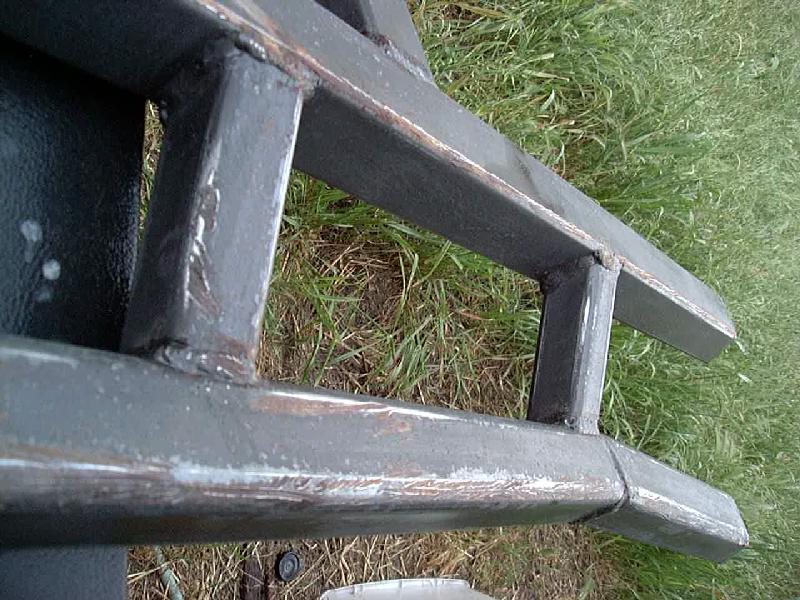
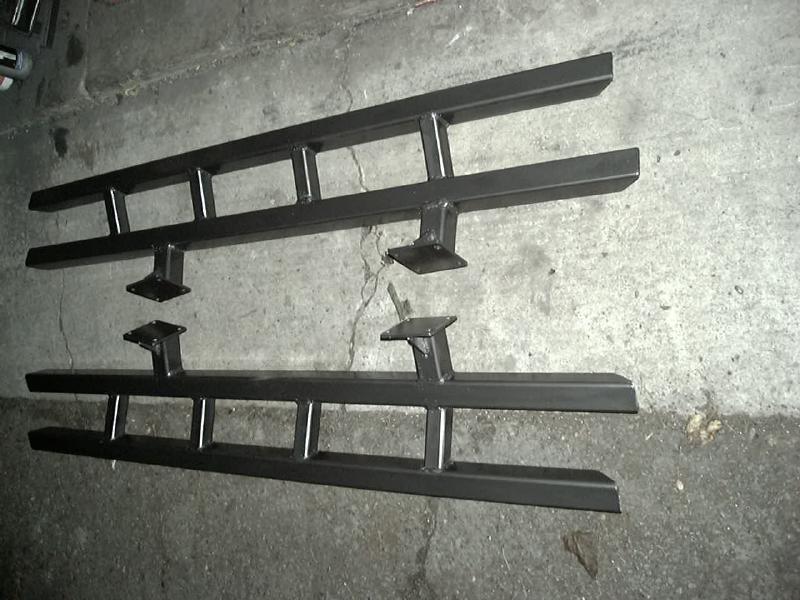
But seriously, over time, you may find the bars will get dinged up from rocks, gravel, and general wear and tear. In the closeup of my bars, above, you'll see some deep gouges in the outer, inner and cross-bracing bars. This is normal, they are doing their job. In order to keep them in good shape, I recommend that you periodically touch up any scrapes and chips. I use a product called Duro/Loctite Extend which is a latex-based rust convertor. Painted on bare or rusty steel, it converts the exposed metal into a black inert compound. A small bottle will last for years. If the bars require more extensive painting, you can always take them off, sand them down and repaint. This is what is depicted in the picture, above. The bars have been sanded down and cleaned in preparation for priming and painting. I use POR-15 primer and chassis top-coat on the pre-painted bars.
[Return to the top of this page]Difficulty and Time Estimate:
If you take your time, measure twice and drill once, you should have no problems installing your Rock SliderZ.
On the infamous "shade tree howler mechanic" banana scale, I rate this project at about 1-2 bananas. It can be done with one person, another pair or two of hands are helpful but not required. Some means of lifting the body/bed may be required, if you can jack up the vehicle to change a tire, this will be a snap. Other than that, simple hand tools and a power drill and 5/16" metal cutting bit for the mounting holes is about it. The entire installation should take about 1 hour per side.
[Return to the top of this page]Rock SliderZ Installation Instructions, v1.02
[Last updated: 23.March.2021]
vVisitor # since 28.AUG.2001
Copyright © - Roger Brown 2000-19 - All Rights Reserved The latest version of this document may be found at: http://www.4crawler.com/4x4/ForSale/Docs/NerfBar_HowTo.shtml