![]()
Polyurethane Suspension Bushings
and other front suspension upgrades
Visitor # 25916 since 19.SEP.2001
![]()
Contents:
[return to my Cheap Tricks page]Polyurethane Control Arm Bushings:
The stock A1 suspension components are mounted to the body with rubber bushings. Over time, the rubber hardens, cracks and vulcanizes itself to the moving components. This can result in a vague feeling to steering input and a reduction in suspension compliance. When I replaced the ball joints a few years ago, I noticed the lower suspension arm felt like it was spring-loaded when disconnected from the strut due to the rubber bonding to the metal.
To remove the rear bushing, I clamped the arm in a vise and used a pipe wrench to twist the rubber off the rear pivot. Liberal amounts of WD-40 helped to loosen the rubber's grip. The front bushing, however, appears to be one piece, probably molded in place inside the front pivot. I used the following steps to remove it:
-
Trim off the lip on the front side of the bushing.
- This end will be pushed through the hole.
- Clamp the arm in a vise, forward edge up.
-
Drill 6-8 small holes (1/8" - 1/4" in diameter) through the
rubber, parallel to the metal bushing.
- This relieves the pressure holding the bushing in place.
- Insert a bolt and tighten a nut on it.
- Hammer the bolt head to push the bushing out a half inch or so.
-
Twist the bolt head (the nut needs to be really tight) and the bushing
will eventually pop out.
- Once again liberal shots of WD-40 will help this process.
The new urethane bushings are a joy to install. Just grease them up with that sticky clear bushing lube and pop them into place. The front bushings are split, so installation is easy. Its a rather tight fit getting the new bushings into the front recess, I pressed them in place with the vise jaws. Once in there the motion is much smoother than before. Be sure to grease the front bolt (18mm) and torque it to specifications (53 ft.lb.).
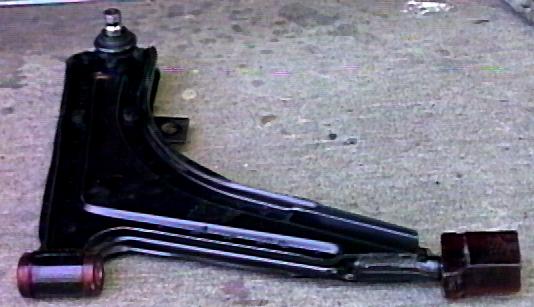 Here's
the new bushings installed on the lower arm (lower left and right
corners). Also note the replacement ball-joint and sway-bar attachments
both bolted on. Now is a good time to clean and paint the metal. The
leading edge gets pitted from road debris and can develop rust.
Here's
the new bushings installed on the lower arm (lower left and right
corners). Also note the replacement ball-joint and sway-bar attachments
both bolted on. Now is a good time to clean and paint the metal. The
leading edge gets pitted from road debris and can develop rust.
I also took this opportunity to upgrade the steering rack bushings to urethane as well.
- This involves removing the two U-brackets that hold the rack to the firewall, slipping off the old mounts and installing the new ones.
-
If your steering has some play in it, this is a good time to tighten
the pinion pre-load that is conveniently located on the back side
of the rack.
- I had previously adjusted mine; had to go back a few times to get it just right.
- Mine was a little tight on the ends of travel, but over a month or two, that eased up and now the pinion is tight in the rack from lock to lock.
I'm impressed with the ride after this upgrade. My cornering speed is improved a great deal and the road feel is much better. The ride is more solid than before, but it is not harsh. However, I think I have found a few new rattles, than need to get tracked down. Except for that, it now feels like a new car (except for some new rattles).
Cost:
  1   Suspension bushings     $50
  1   Steering rack bushings  $20
  -------------------------------
                              $70
Rating:

[return to the top of this page]
Sway Bar End Link Bushings:
By all means, this is an ideal application for polyurethane bushings.
[return to the top of this page]Upper Stress Bar:
I run a Neuspeed upper stress bar:
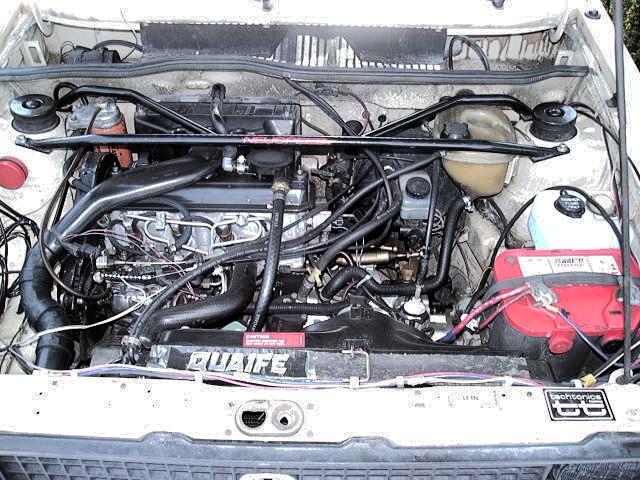
Only modification needed was to slightly lower the diesel fuel filter on the passenger side strut tower. To do so, I removed the bracket and made two new notches abpve the original ones, as high up and I could fit them to use to bolt the bracket back in place about 1" lower. This provided enough clearane to let the bar clear the filter and bolt down to the strut bearing studs.
[return to the top of this page]
Lower Stress Bar:
I used to run a single tube lower stress bar from JC Whitney, it worked well enough. I later happened upon a 16V 4-point lower stress bar. After cleaning it up and painting it, it was time to swap it out.
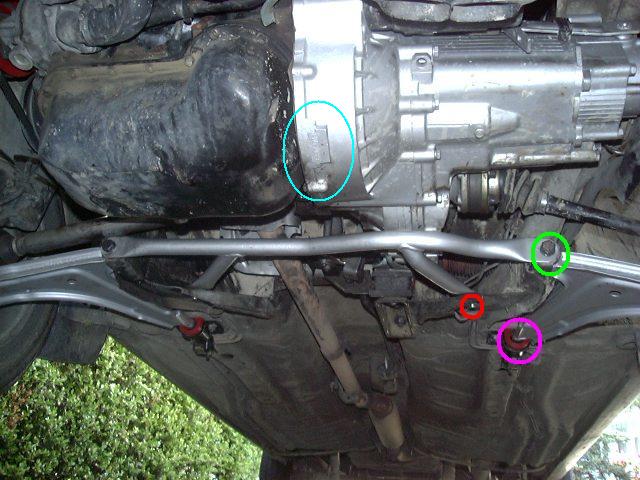
Installation is pretty straight forward. The bar attaches to 4 points, the 2 control arm bolts (circled in green), and 2 bolts on the sub frame. If your vehicle didn't have the bar from the factory, you'll need to drill these two holes (circled in red). The hardest part is lining up the hole in the bar (above the subframe) with the drill and bit that must come in from below. Measure twice, drill once. I used a 1/2" drill bit and 7/16"x1" long Grade5 bolts with washers top and bottom and a nylon lock nut to hold it all together. You could also use metric bolts, I would suspect an M10x25 bolt would work fine, but I had the 7/16" bolts in my parts drawer so that is what I used.
The lower stress bar stiffens up the lower sub frame, keeping the control arms parallel to each other especially under hard cornering. I found the 4-point bar was noticeably stiffer than the 2-point bar I had before. The change from stock to 2-point was about the same as from 2-point to 4-point.
You can also see the red poly control arm bushings (circled in magenta) above. Sway bar brackets are just behind that (I had the bar removed in this picture).
[return to the top of this page]
![]()
 ===>>
===>> 
[Last updated: 26.March.2021]
![]()