![]()
Blower Repairs
"Real Wheelers Are Built, Not Bought"![]()
Contents:
[Return to the Cheap Tricks page]![]()
Introduction:
The Toyota heater - A/C - blower system is fairly simple. There is a fuse, a switch, a relay, a resistor pack and the blower motor attached to the fan. All parts are inside the cab, on the passenger side of the dash. The switch of course is in the center of the dash. In the off position, everything is off. In the various numbered positions, it does two things, one is to turn on the relay that sends power to the fan and then it switches in various segments of the resistor pack to control the motor speed and air flow. The fuse and relay are under the dash, on the passenger side, mounted on the side of the center portion, sort of behind and to the left side of the glove box. You'll likely need to remove the glove box to gain access to the fuse and relay.
For testing, if you touch the relay, you should be able to feel it click on and off as you move the fan switch on and off. If it does, that likely means the relay is fine. Pull the fuse to inspect it. For other issues, the most common failure is the resistor pack, common issue is loss of all the lower speeds. Worn out motor brushes are also somewhat common, you may find the fan does not run or runs slower than normal or runs for a while then shuts off (due to overheating). The third most common problem is burned contacts on the fan switch itself. For this, you need to disassemble the dash enough to gain access to the fan switch. The burning is usually visually evident, replacement is the likely fix. ANd this would be the order in which you should probably approach blower problems. Checking the fuse and relay is easy. Resistor pack is also pretty easy to check, the fan motor is kind of tricky to access as one of the 3 screws holding it in place is hard to reach. And finally, the fan switch replacement is the most involved task, so try the easy things first.
[back to the top]
![]()
Blower Resistor Replacement:
"My blower only works on high speed..."
Where have I heard that one before? Looking in the Haynes book, I see that there are some resistors connected to the blower motor. High speed runs 12V right to the motor and each slower speed runs through more and more resistance to make the blower motor run slower. I'm a EE, so I like schematics. However, they are just that, a schematic, and not a physical wiring locator. So for the life of me, I could not find the silly resistor assembly. All the other vehicles I have worked on have had the blower located behind/underneath the heater controls in the center of the dash. That's where I was looking and I couldn't find it.
Finally, I convinced myself that the motor by the passenger's right foot was the blower motor. Then, it was really easy to follow the wire bundle from the motor to the firewall, about 3" away (directly towards the front of the truck from the blower motor) approx. 10" above the floor. Right there, screwed into the firewall was the resistor assembly and connector. Yank it out, see the burned out wire coil, get a new one ($16 at the dealer) and plug it in. Done!
- Pictured Below:
-
A: The location of the resistor pack on my '85 4Runner.
Taken with blower removed (housing just visible on the right hand edge
of the photo. Camera on the floor, back against the passenger seat
shooting forward and to the right.
B: is a good resistor pack, if yours is burned out, it will be obvious, one or more of the wire loops will be burned through. If the wire loops are all intact and you can measure continuity among all the connections (the actual resistance values are all under 1 ohm), then you likely have a problem in the switch or with the motor itself. There also may be a relay and fuse in the center dash area that supply power to the fan.
A: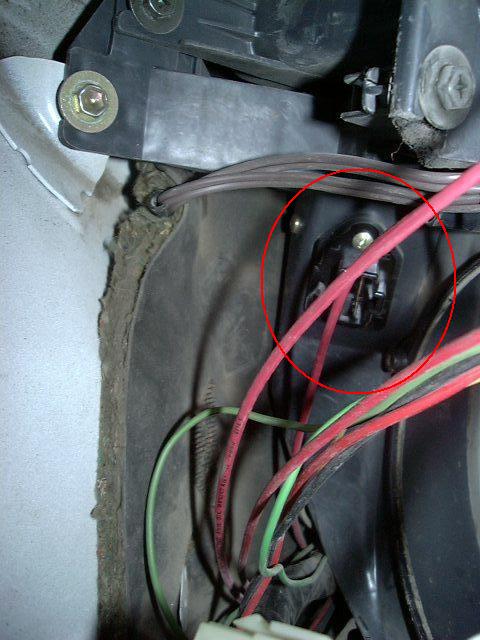 B:
B: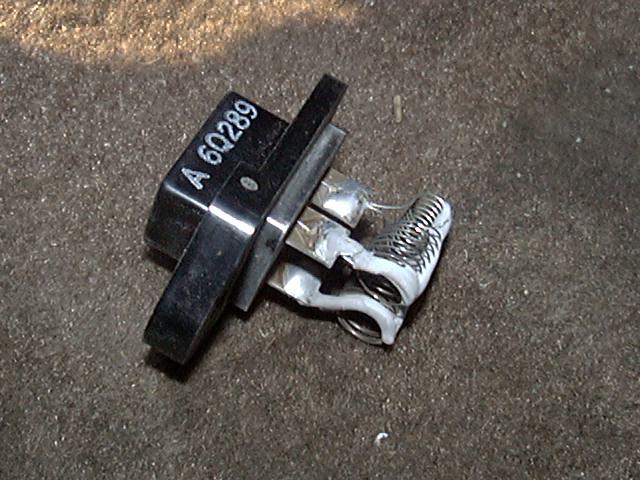
The new resistor I got has three resistors (and 4 pins on the connector) while my old one had only two. It seems that the newer vehicles have a 4-speed fan. Mine only has 3, although the wiring harness seems to have all 4 wires. Next project may be to find a 4-speed fan switch and see if I can make this upgrade. The lowest fan speed (that I now have) is very low. I think one in between low and medium would be great.
- FYI: The way the fan switch and resistor work to control the fan's speed is as follows:
-
The resistor is in series with the fan motor, limiting the current that
flows through the circuit and thus the speed of the fan.
- The resistor has taps along the wire-wound form and the switch supplies power through various sections of the resistor between the taps.
- The lowest speed has the full resistance in the circuit.
- The next speed has the first section bypassed and so on until high speed has the entire resistor bypassed.
- So one way to trouble shoot the system is to figure out which speeds work and fail and work back from there.
- The resistor has taps along the wire-wound form and the switch supplies power through various sections of the resistor between the taps.
Below is an ASCII-schematic of the circuit, when the switch is off, no power goes to the resistor, position 1, power is applied at the first tap and to the fan relay. In each successive position, the previous resistor segment is bypassed or shorted out, reducing the overall resistance and thus increasing the voltage at the motor. For example, speeds 1 and 2 work, but 3 is similar to 1, this might mean that the switch contact at the 3 position is not good (burned or dirty) or that you have a resistor pack designed for 3 speed operation and the #3 tap doesn't exist.
                   /\/\/\/\/\/\/\/\-+----FAN-MOTOR---->ground
                   o    o    o    o
          off      /1   /2   /3   /4
+12V----o / o------o----o----o----o
One thing to watch for is if you want to test the fan out before installing the resistor back into the air duct and that is the resistor will get hot, as in VERY HOT in use. Without the air flow inside the duct to cool it, it will get hot enough to burn your skin, so beware!
Cost:
'85 4Runner Blower Resistor p/n 87138-89103

Here's a p/n for an '86 4Runner: 88635-89103 (4-speed fan)
Here's a p/n for an '89 Pickup:  87138-89105

Here's a p/n for 1st gen Pickup w/ A/C   :  87138-87004
Here's a p/n for a 1st gen Pickup w/o A/C:  87138-87003

Rating:

[back to the top]
Blower Motor Repair:
So after replacing the resistor pack on my 4Runner, I enjoyed several years of trouble-free operation. However, after a while I started noticing my blower cutting out on my after longer periods of operation. If I turned it off for a while, it would come back on. I checked the resistors, they were fine, I pulled the switch out, it appeared fine as was the fuse and relay, which I checked by pulling the cover and observing the contacts closing.
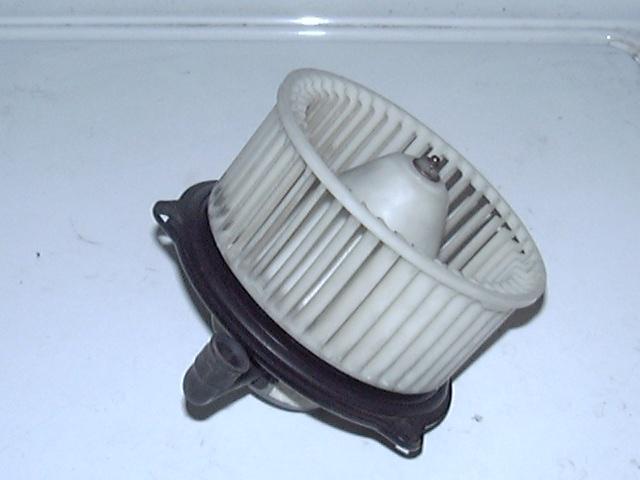
So, that left one last source for the problem, the fan motor itself, which is located just above the ECU in the passenger foot well. I removed the kick panel, ECU and disconnected the fan wiring and removed the 3 screws that hold the fan into the housing. I found a small socket on a universal with a short extension worked best for removing the rear most screws. I pulled the fan and motor out, it was filthy, had a few leaves and other junk inside:
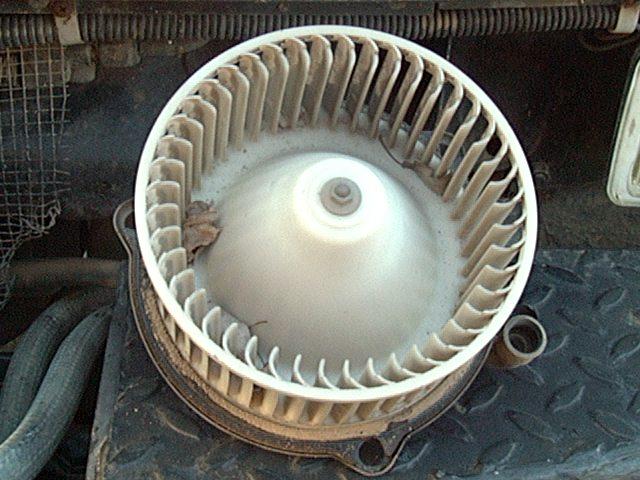
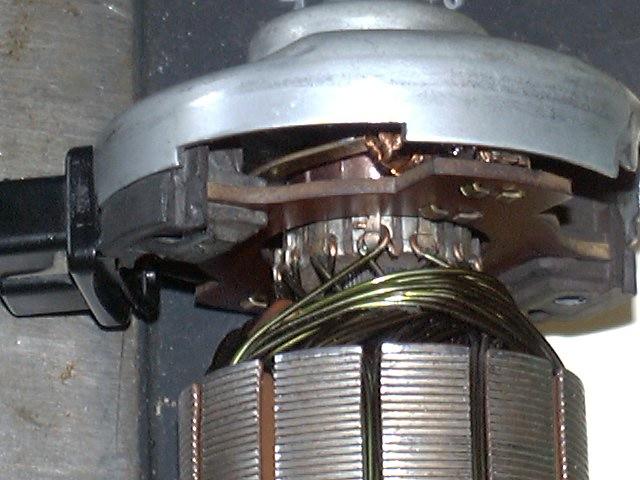
So I removed the fan, threw it in the dishwasher, then pulled the 2 screws off the end of the motor and found out the brushes had worn out and the commutator was chewed up pretty good by the arcing brushes. I cleaned up the commutator on my lathe, but a file or some sandpaper or even an ink eraser would work as well: You could even chuck one end of the motor shaft in a hand held drill and then spin it while holding sand paper to the commutator.

You can also use a pick or a fine blade screwdriver to clean out the small gaps between the copper segments in the commutator if they appear filled with carbon and copper dust. These segments need to be electrically insulated from each other, so cleaning the gap out can help restore this condition.
While you have the motor opened up, it's a good time to lubricate the bushings. I recall my motor had what was likely bronze bushings with a felt oil reservoir, one in the cap and one between the motor and blower wheel. Drip some light mineral oil in there to saturate the felt, allowing time for the oil to soak in fully. Air compressor oil works well for this or a light weight motor oil (30W or less). You don't want to over fill the bushings to the point oil is dripping out as that will attract dust and dirt over time and make a mess inside the motor housing. You want an oil that is not too thin, like WD-40, Liquid Wrench, etc., these oils are too thin and will dry up in a few days
Cleaning the blower assembly and lubricating the the motor bushings can go a long way to getting more air flow at a given speed setting. There is less drag on the motor and cleaner fins in the blower can move more air.
How to install the replacement carbon brushes:
Toyota considers the blower motor a non-serviceable part. They will only sell you a new blower assembly AFAIK. An example of this can be seen in the brush assembly. Notice how the factory brushes have the copper braids attached on the end and that's attached to the connector on the brush holder assemply. You would need to replace that entire assembly to replace just the brushes. Problem is Toyota doesn't list that as a separate part. In fact, even the motor isn't a separate part. In order to fit the new brushes, after curring the remnants of the old brushes off, you need to attach the original brush braids/shunt wires to the brass brush holders directly. Thus the new current path will be from the connector, through the braid, to the brush holder and then through the contact on the end of the new brush spring, down the braid and into the new brush.
With your new brushes in hand, you'll see that they have a spring attached, like the OEM brushes, but that also have a braided copper pigtail connected between the end of top of the brush and the end of the spring. The OEM brushes have the same spring, but the copper pigtail connects between the brush and the connector on the brush holder assembly. So, as a one-time modification, you just want to cut off the remnants of the old brushes from the copper pigtail (cut as close to the brush as you can manage to preserve as much lead length as possible) and then solder the ends of the old brush leads to the brass metal brush holders (lower left image - solder joints circled in red). For this step, you'll want to clean the area on the brass well with some steel wool or fine sand paper to leave shiny clean metal. Then with a hot soldering iron, "tin" the clean brass by holding the iron to the metal a few seconds to heat it up enough so that the solder melts when touched to the hot brass. Then tin the end of the copper braid from the old brush and finally touch that braid end to the tinned area on the brush holder and apply the soldering iron on top and hold until the solder melts and bonds the pigtail to the brush holder. Once it cools, give the pigtail a tug to make sure it is a good solid connection. The replacement brushes have springs and shunts soldered to them already, so just slip them into the brush holder (middle image) and slip the commutator into the brush assembly (lower right).
If you feel the spring is too long, you can shorten it. To do that, pull the spring off the round stud on the end of the brush. Then use a pair of small wire cutters to trim off a few coils off the end of the spring at a time. Be careful not to cut the braided shunt. If needed, you can snip a few of the trimmed coils to remove them from around the shunt braid. Test fit the brush in the holder and if needed, trim off a few more spring coils. You can use the original spring to get a rough idea of the overall length.
This modification needs to be done only this one time, as if in the future, these replacement brushes wear out (maybe another 200K miles or so), you can pull them out and simply pop in a new pair and be back on the road in no time.


In the above center image, on the left are my old worn out brushes and on the right are the new replacements.
Now slip the other end of the motor into the housing, oil the bushing at the other end, install the screws and fan (below):
And bolt the fan back into the housing. It should fire right up, be sure to check operation on all the speeds. The motor will be a bit noisy until the brushes and commutator break in. Since my original brushes lasted 15 years and 240,000 miles, I think the new ones will be a good investment. You may also notice the blower motor will run a little slower than it did with the old brushes. This is because carbon brushes have a certain resistance per unit length. A longer brush will have a higher resistance (and thus flow less current) than a shorter brush (note the length difference in the above-center photo). In fact on my blower, this is why the motor would overheat and shut down with continued use, it was essentially pulling too much current and overheating. We try to size the brush to be as long as can fit into the brush holder to ensure maximum service life. But the tradeoff is that the motor will run slower than it did with the old worn out brushes. It is the same idea as the way race cars will run tires where they shave down the rubber very thin. They can run faster without overheating, but have to change tires a couple of times in a 500 mile race, compared to your typical road tires where you can expect 40,000 miles or more of use.
Replacing worn out brushes can help the motor run more efficiently. Worn brushes can lead to sparking on the copper commutator which in turn increases wear on both the commutator and brushes. This can also increase motor current and that can cause overheating or pitting of the fan speed selector switch and/or burn out resistor segments.
Replacement Brushes available on-line:
Toyota considers the blower motor a sealed, non-repairable unit so don't offer a replacement brush kit. 4Crawler Offroad has sourced replacement brushes ready to install in your Toyota fan motor; size is a nominal 6mm x 7mm x 12.5mm long. Fits most common Toyota blower motors (Hilux/pickup, Hilux Surf/4Runner, Celica, Landcruiser and others (select Toyota application). Also available for Honda vehicles (Prelude, etc. - select Honda application)) as well, 6mm x 7mm x 19mm long. The brushes are easily to trimmed to fit, if needed. Sandpaper to reduce the width, a fine tooth saw or file to reduce the length. Note these brushes also fit the Hitachi 4.5" angle grinders.
We've sold out of the brushes, but here's an Amazon link where you can order them.
| SOLD OUT | SOLD OUT | SOLD OUT |
| ~~~~~ | ~~~~~ | ~~~~~ |
| SOLD OUT | SOLD OUT | SOLD OUT |
| ~~~~~ | ~~~~~ | ~~~~~ |
| SOLD OUT | SOLD OUT | SOLD OUT |
Note, the international shipping options offer no shipping insurance same with the US FIrst Class mail option. For international customers wishing insured shipping, select either the Priority or Express (EMS) shipping option.
Why not just go to the local junkyard and grab a spare fan motor? That would work as well. Often, the ratio of pick-n-pulls to people is pretty low and the prices are correspondingly high and selection poor. So, often it is better to repair instead of replace. Also, if you grab a 15-30 year old fan out of a junker, it may be in no better shape than the one you already have and you have to remove both the blower in your truck and the blower in the junkyard truck, so it is twice the work and time.
Note, if considering the brush replacement:
- You should first determine that the brushes are indeed worn out by removing the fan motor and inspecting it.
- This will also ensure that you can remove the fan motor and actually open up the motor as some units are not easily serviceable.
-
Some units may be more difficult to work on and if you have a fan motor
that is sealed up tight and resists opening, replacement may be the
only option.
-
An example is the 2007 and later Camry vehicles. So if ordering the
brushes, be sure to open up the blower motor and check that:
- #1 you actually need brushes.
- #2 that you can actually access and change said brushes.
- No sense spending the money for the brushes only to find that you can't install them.
-
An example is the 2007 and later Camry vehicles. So if ordering the
brushes, be sure to open up the blower motor and check that:
-
Brushes fit the Toyota mini-trucks (pickup, 4Runner, Hilux, Hilux Surf),
various Landcruiser models like the 40-series, 60-series, etc.
- Best advice is to open up the blower (see above) and check that you indeed have worn out brushes (and not some other problem) and that the brushes are approximately the same dimensions as listed above.
-
Brushes also fit some Honda passenger car blower motors (such as the
Prelude) as well as Hitachi 4-1/2" (and possibly other models)
angle grinders.
- Just open up the blower motor and check the approx. size of the brushes and if they are about 0.25" (6-7mm) square and less than 3/4" (19mm) long, these brushes should work.
-
If you have an electric motor and need brushes for it, contact us and
we'll see if we can find some that that will work for your application.
- We'll need to know the width and thickness of the brush (measure the remnant brush you have) and an estimate of the maximum length of brush that will fit into the brush holder and we can try and find something that will fit.
- Contact 4Crawler Offroad to discuss your carbon brush needs
 <--
Comments
<--
Comments[Last updated: 14.October.2025 ]
Visitor # since 07.NOV.2001