4Runner Rear Window Cheap Tricks
Rear Window Tips:
Here's a couple of tips I have used to improve the operation of the rear window wiper on my 1st generation 4Runner:
- Troubleshooting steps
- Rear Window Relay
- How to test the motor
- Theory of Operation
- Wiper Modification
Troubleshooting:
Seems like 4Runners are plagued with rear window problems. It won't go up, it won't go down, one switch works the other switch doesn't, etc. So how do you fix the window? Best bet is to keep it working, clean and lubricate the moving and rubber parts regularly. But if it does finally stop working, how do you fix it? Below are some troubleshooting tips from my 1985 Factory Repair Manual (aka FSM):
Rear power window does not work
- Battery discharged or alternator inoperative
- Fusible link blown, note that almost everything electrical in the vehicle runs through the fusible link, so if other circuits work, then skip to the next troubleshooting steps
- Circuit breaker tripped
- Engine (EFI) fuse blown
- Power window/wiper relay faulty
- Power window regulator switch faulty
- Back door control switch faulty
- Cover top switch faulty ('84-'89 only)
- Ensure all bolts are installed ('84-'89 only),especially the driver's side "A" bolt, there is an interlock switch under it
- Door lock detection switch faulty
- Power window motor faulty
- Rear wiper retraction detection switch faulty
- Wiring or ground faulty at the rear window or between the rear window and the relay module
NOTES:
-
While these troubleshooting steps are numbered from 1 to 13, you really
should start at step 13 and work backwards.
-
For example steps 1-4 (see schematic below) are responsible for
supplying power to the entire vehicle.
- If you can start and run the engine and have any sort of 12V power in the vehicle, rule out these first 4 items.
- If they are bad, the inoperative rear window is likely to be the least of your worries :-)
-
So start with the bottom of the list and work your way back to the top
of the list.
- Basically the bottom-most of the trouble shooting steps are the most likely to cause the specific problem and as you work your way back up the list, you are getting into more and more general causes.
- So unless you are experiencing a wide variety of problems, start with the most likely sources of the problem, then eliminate each one in order as you work your way up the list.
-
For example steps 1-4 (see schematic below) are responsible for
supplying power to the entire vehicle.
- Steps with hot links associated with them will take you to another page with more information on that components.
BACK DOOR warning light does not light (ignition switch ON)
- Engine fuse blown
- Light bulb burned out
- Door lock detection switch faulty (or back door open)
- Back door unlock warning switch faulty (or back door unlocked)
- Wiring or ground faulty at the rear window or between the rear window and the relay module
Below is a schematic diagrams of some 4Runner rear window systems. If you are having problems, follow the above troubleshooting steps to isolate the problem to as small a section as possible then find the cause of the problem. Click on the small image below for a larger version:
 |
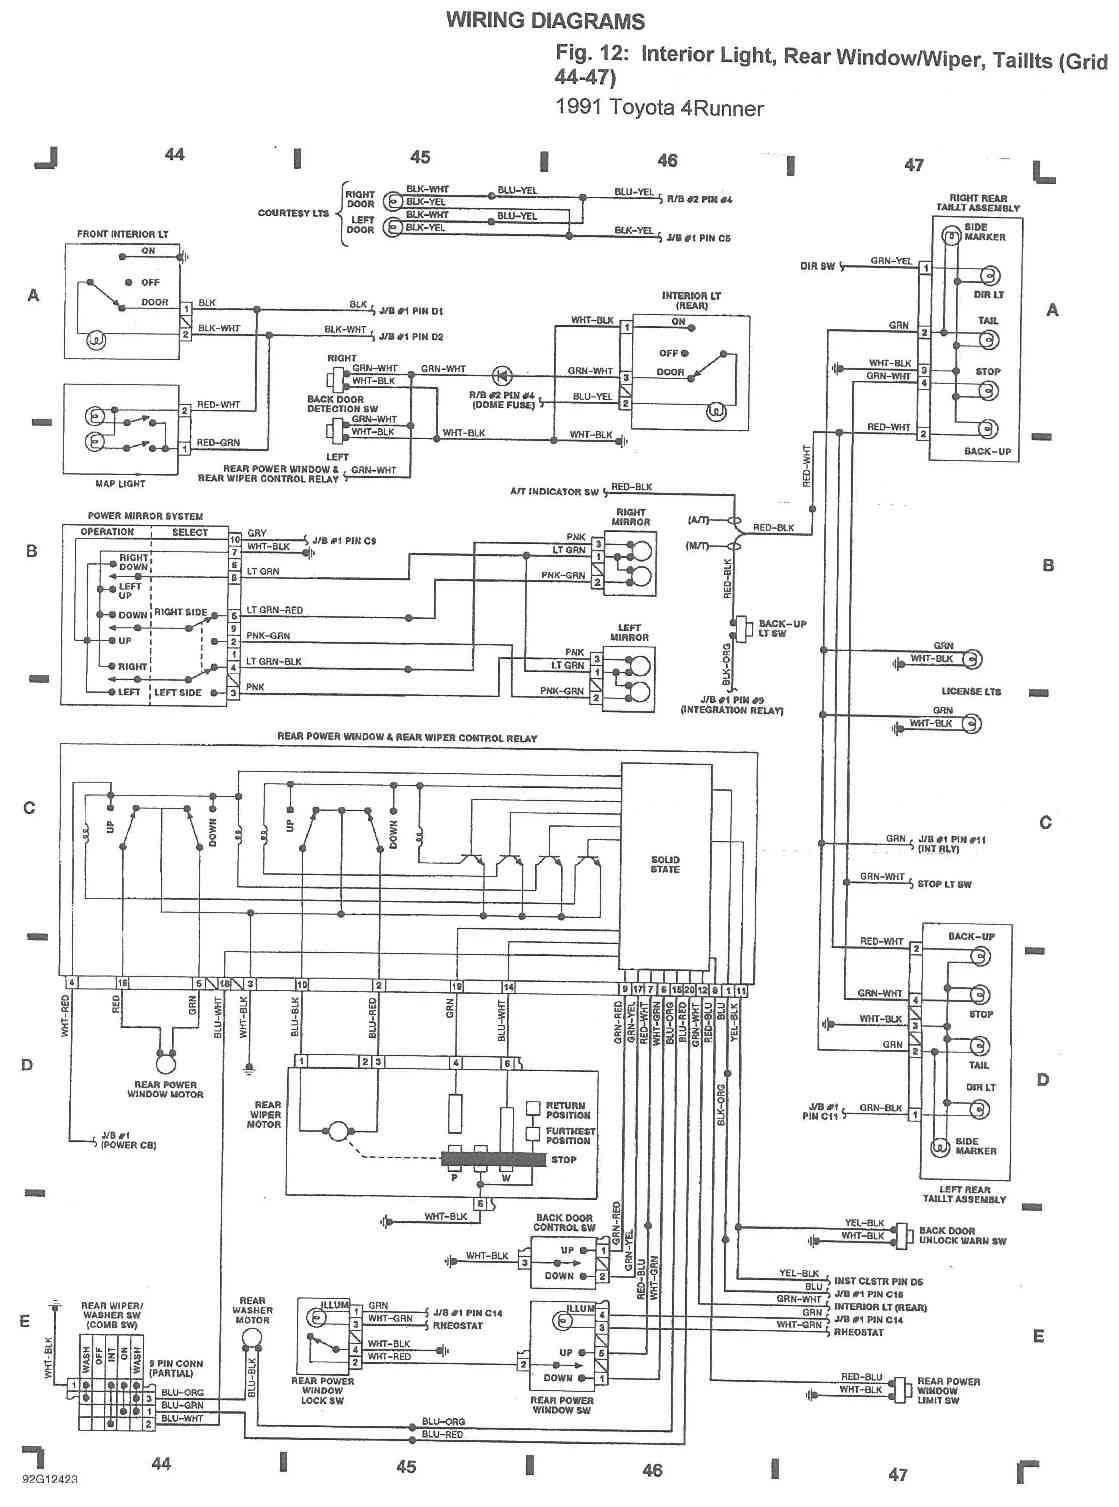 |
| A: 1st Gen. Wiring Diagram | B: 2nd Gen. Wiring Diagram |
 |
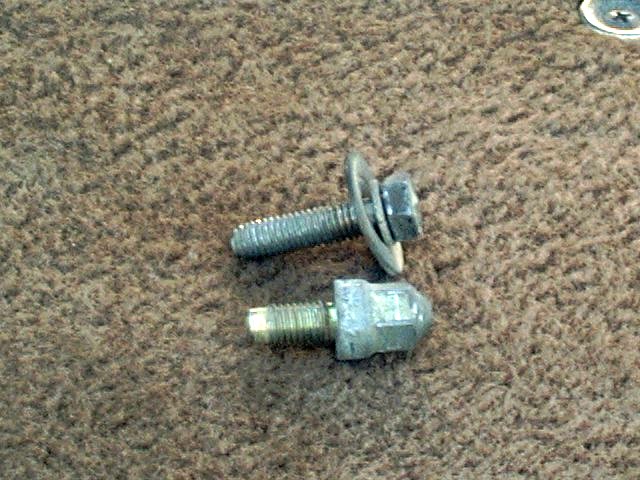 |
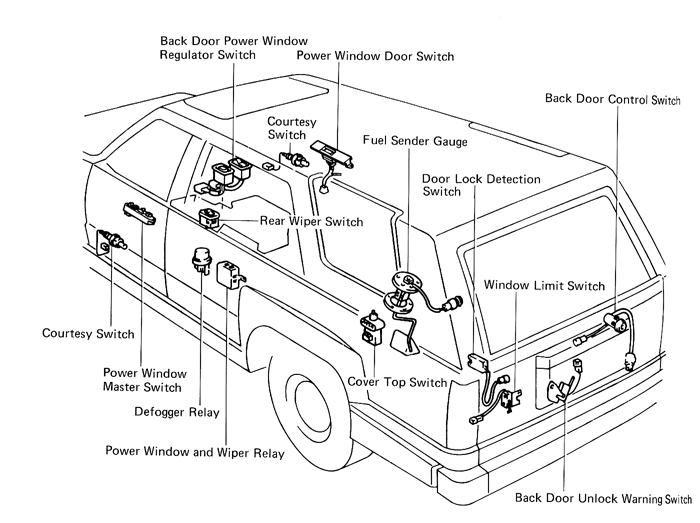
| C: 1st Gen Parts Locations | D: 1st Gen Cover Top Bolt ("A") |
So what are the most common problems that are encountered with the rear window?
- Check out this deep dive into the innter workings of the rear window relay.
- First most common issue is the rear wiper not fully retracting and closing its switch. If the window relay doesn't think the wiper is off the glass, it won't move the window, up or down. In the 1st gen 4Runner you can also have neglected to reconnect the window wiper connector inside the rear driver's side corner. Also, a second issue with the rear window wiper is if the wiper is not connected (inside the driver's side rear pillar) and the wiper switch is accidentally turned on. Since the wiper is not connected, it of course will not move, but since the switch is on, the rear window relay module "sees" this as the wiper being in motion and thus disables the rear window operation. Some folks just wire a jumper across this switch to bypass it.
- The next most common problem, at least in 1st gen 4Runners, is a missing shell interlock bolt (image D above - bolt A below). These are the two funny looking bolts near the back. If they are missing, the relay thinks the top is off and won't let the window move, up or down. If the bolt is installed and you still suspect a problem, pull off the trim/panel on the driver's side and look at the interlock switch. Sometimes, if too long a bolt was installed, the switch can become deformed and may no longer work properly. Some folks just wire a jumper across this switch to bypass it.
- In the 2nd gen 4Runners, one probable source of trouble is the child safety override door lock button being on.
- Another issue is "too much junk in the truck", so to speak. That is if you have a lot of cargo in the back of the truck and that cargo has shifted back against the tailgate to put pressure on it, that may be enough to force the door closed interlock switch open and that will disable rear window operation. So make sure any heavy items are not pressing against the tailgate. Also, try having someone push against the outside of the tailgate to force the it closed.
Beyond Simple Troubleshooting:
Beyond these common problems, troubleshooting involves understanding how the system works and then figuring out where its broken. Fundamentally, the window relay module (pictured above) has two main relays that provide the proper polarity power to the window motor to raise or lower the glass. Basically they swap +12V and Ground to the two motor terminals. If you can't measure the voltage at the motor, then something is wrong at the relay module. If you can apply power to the motor and it doesn't move, suspect the motor. At the relay module, all the interlock and control signals are combined to switch the two power relays. If you can't measure the proper interlock and control switch signals at the relay, something is wrong in the switches or the wiring. Otherwise, the problem is in the relay module itself. If a relay has power to its coil but you can't hear or feel it click on and off, then that relay is bad (coil burned out). And with a relay that does click, but nothing happens, that could mean the relay contacts are defective. A relay will always click when it is turned on and off, but you normally do not hear the click because the motor that the relay turns on makes enough noise to mask the click. But if the electrical contacts inside the relay are pitted or burned, they will not make electrical contact, even though the magnetic coil is pulling them together (the source of the click) and thus the load they control (i.e. the rear window motor) won't run (and thus makes no noise) and you now hear just the relay clicking. You can usually feel which relay is clicking with a finger touched to each relay in turn in the rear window module,
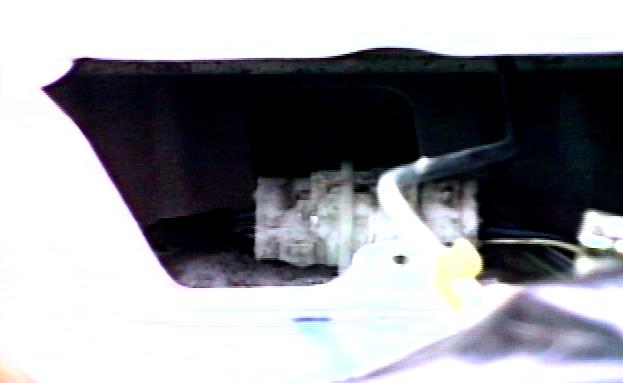
So where is the relay module located? On the 1st gen 4Runner, its behind the side panel next to the rear seat on the driver's side (photo A, below). Pull the tabs and shoulder belt trim to gain access to the panel and relay behind it. In the 2nd gen 4Runner, the relay is in the rear corner of the bed, behind the side panel (see photo B below).
 |
 |
| A: 1st Gen Relay | B: 2nd Gen Relay |
A few other troubleshooting tips involve using a volt/ohm meter (digital or analog, makes no difference) to isolate electrical problems in the system. First thing to note from the above wiring diagrams is that all the switches work by grounding inputs to the relay module. As such, what you are looking for is the given relay input going from a high voltage down to ground (or 0V) when the respective switch is closed. Any input that does not go to ground with switch closure would indicate a problem in the switch itself or in the wiring between the switch and relay module. If the voltage does go to 0V, then suspect a problem inside the relay module. A handy way to check for a good ground is to use a 12V test light (make one out of two wires and a 12V light bulb). Place one wire of the test light on a 12V power source. Then place the other wire on a connection that you want to check for ground on. If the light bulb lights, you have a complete circuit and a good ground connection. If not, there is no ground connection at that point. This is a more reliable way to find a ground connection, because a reading of 0 volts on a meter only says there is no voltage present, not that there is any capacity for that circuit to carry any real current. After all, lay your voltmeter probes on the table and you'll have a 0 volt reading, too.
Divide and Conquer:
Basic electrical troubleshooting follows this same logic.
- Tap into the middle of the circuit, measure for the desired input signal
-
If it is present the part of the circuit "upstream" is
eliminated as the source of the problem
- By "upstream", I mean the part of the circuit that is generating and transmitting the input signal to the test point
-
If the desired signal is not present, then you can likely
eliminate the circuit "downstream" from the test point and
instead focus on the "upstream" part of the circuit
- Note, there may be multiple problems, so you could have a problem in say the switch and the relay, but that it unlikely
-
Essentially, you divide the circuit into two pieces and by
testing, eliminate one of the two pieces
- Then you take the remaining piece and split in into two pieces and repeat the test
- Continue until you find the faulty component
-
I like to troubleshoot the circuit parts in order of ease of
access
- Test the easiest to reach parts first
- Then work towards the harder to get to or harder to test parts
- For example, it makes no sense tearing open the middle of a wiring harness to look for a specific wire when the problem may simply be an unplugged connector or a dirty contact inside a switch that is the cause of the problem
So, in general, assume you have a circuit that looks something like below:
- A - B - C - D - E
Where A might be the battery, B, C, D might be wiring, a relay or fuse, and E is the load or thing that is controlled by the circuit. So, assuming "E" is not working right and you have a good signal or voltage at "A", pick some point in the middle, like "C" and test for a signal/voltage/resistance there. If the test is good, that means the signal is getting through from A to B and to C, so the problem is likely in component "D" (and you have eliminated half the circuit by one test). But if the test at "C" fails, then the problem might be in component "B" and you can likely eliminate the rest of the circuit past component C as the cause of the problem. For a more complex circuit, just expand the above example, and that first test can still eliminate half the circuit based upon the results of the test. So for a 5 element circuit, with one test, you can eliminate 2-3 components with one test. With a 9 component circuit, you can probably eliminate 4-5 components with the first test, leaving a 4-5 component circuit to test, which one more test can get you down to 1 or 2 components that might be the cause of the problem.
So this illustrates the advantage of the Divide and Conquer strategy. If you were to test one component at a time, a 5 component circuit might take up to 5 tests to isolate the problem, a 9 component circuit could take up to 9 tests to find the problem. But with divide and concquer, 9 components might only take 3 tests to isolate the problem. So instead of a circuit that is twice as complex taking twice as long to test, it only takes one additional test. So take your choice, you can do the brute force method of testing every component in the circuit, or you can be smart and test a few key points and quickly zero in on the problem.
Garbage In / Garbage Out:
The other key thing to understand when troubleshooting components in a circuit is to know a little bit about the compoents and how they work. Most components in an automotive electrical system are "passive", that is they don't generate any currnet or voltage. Only the battery and alternator do that and everything else only passes current on to the next component or they consume the current (like a light bulb or motor). So by "garbage in / garbage out", I mean that if something like a relay has less than 12 volts coming into it, it will not put out 12 volts to the next component. All a relay or switch or wire can do is pass on at most the voltage they have at thir input side to their output side. So if you have a motor that is only getting 6 volts and you measure 6 volts out of the relay that feeds that motor and you also find that relay only has 6 volts at its input, the relay is likely not bad. It is getting a poor input voltage (garbasge in) and simply passing on that poor voltage to the motor (garbage out). And if you have something like a relay and that relay is not turning on. You might be tempted to say the relay is bad. But then you test the coil for the relay and you do not see any voltage at the coil wires. So it is likely the relay itself is fine, but rather it is that fact that the relay is not getting any power to its coil to energize it that is the reason it is not working.
So to take the above generic testing strategy and apply it to the rear window circuit. Assume you test and find that one of the rear key switch inputs is not reaching the relay module. If that is the case, the problem is likely in the switch or in the wiring and connectors between the relay and switch. So the next "logical" place to break the circuit apart is the connector inside the door where the key switch connects to the wiring harness. Remove the cover panel on the door, pull the connector apart and test the contacts with an ohm meter or test light. You are looking for the test light to come on or the ohm meter to read something near 0 ohms when the respective contact closes. Lets assume this time, you measure good contact closures at the switch. In this case, you can now eliminate the switch (and also the relay from above). So all that is left is the wiring and connectors. Try probing the connector to wire harness connections to see if they are intact. Then look for chafed or broken sections of wire. If all else fails, you could always run a new wire in parallel to the harness and see if that fixes the problem.
A final issue that is somewhat common is the situation where the motor operates but "runs out of steam" towards the top and fails to fully close the window without help. Assuming there is no mechanical binding and that all the moving parts are well lubed (including the rubber where the glass slides - use silicone spray), then a simple voltage check will help isolate the cause of the problem. Attach some wires to the motor terminals (it makes no difference how they are connected) and hook a volt meter to the wires. Then run the motor down and up. Note the voltage reading when the window is moving normally. Then note the voltage when the window (and motor) "stalls".
-
If the voltage is nearly the same in both cases, then you may have a
problem with a "tired" motor. Might have worn out brushes or
something else wrong internally.
- Probably best to replace it.
- HOT TIP: Same motor as used in the power windows.
-
However, if you note that the voltage falls off as the window slows and
stops, then it is likely that there is some resistance in the circuit
feeding the motor.
- As the load on the motor increases, so does the current flowing in the motor. Remember Ohm's Law, V=I*R, so as the current (I) increases, so does the voltage (drop - V) between the battery and the motor due to the high resistance (R).
- Likely cause is a relay who's contacts are getting pitted and dirty. The dirty contact causes a higher than normal voltage drop at high currents and this causes the motor to slow and lose torque and finally stall.
- If this is the case, then track back from the motor to the relay, checking the voltage sent to the motor. If the voltage reads about the same at the relay outputs (measured under load of course), then the problem lies in the relay most likely. Check the voltage at the input to the relay module to confirm.
Tired of having to dig out your keys just to open the @*$%-ing rear window?
You either need to use the rear key switch or worse, turn on the ignition to use the front switch. After studying the wiring schematics, the key to this seems to be the rear window relay module, which is located inside the body panel right above the driver's side seat belt retractor on the 1st gen. 4Runner (on the 2nd gen. 4Runner, its farther back behind the left rear storage compartment). In either vehicle, you'll need to remove the appropriate interior trim parts to access the module.
| Function | Wire | Pin # |
| Window Motor - 2 | L/B |
1 |
| Window Limit Switch | R/W |
2 |
| Window Motor - 1 | L/Y |
3 |
| Blank pin | n/c | n/c |
| Dash/Window Down | G/Y |
4 |
| Dash/Window Up | R/Y |
5 |
| Battery/+12VDC | L |
6 |
| To - Washer Switch | L |
7 |
| Engine/+12VDC | R |
8 |
| To - Wiper Relay | L/R |
9 |
| Ground | W/B |
10 |
| Back/Window Down | L/W |
11 |
| Back/Window Up | L/B |
12 |
| Wiper Retracted | G/Y |
13 |
So, with module and schematic in hand, you'll notice that there is an up/down input from the rear key switch (that operates with the ignition off) and an up/down input from the front switch that operates with the ignition on. Simple fix is to just jumper the two sets of inputs together. As luck would have it, the two up inputs (pins 5 and 12) are just across the connector from each other, as are the two downs (pins 4 and 11). Two 1/4" pieces of wire soldered between the respective solder pads will do the job nicely.
 |
| 1st Gen Relay Mod |
For the 2nd gen 4Runner models, the corresponding pins to jumper together are:
- 9 (green-red) to 7 (red-white)
- 17 (green yellow) to 6 (white-green)
I don't have access to a 2nd gen relay module, so not sure the relationship of these pins on the PCB. The idea of this modification is that you are simply connecting the rear key switch Up/Down contacts to the dash switch Up/Down contacts. In stock form, the rear key switch operates without the key in the ignition (i.e. unless you have 2 keys, you couldn't operate the rear window switch). The front switch requires a key in the igniton. With the jumpers installed, the front switch acts like the rear switch and works without a key in the ignition.
- If you have small children who like to play in your 4Runner, pushing buttons and flipping switches, this mod. may not be for you. Also, if concerned with vehicle security, realize anyone can roll the back window down from the cab, assuming they can get in one of the front doors.
-
One slight "problem" with this modification is that you are
bypassing the little switch in back that one of the shell retaining
bolts closes. This switch is there to prevent the window from operating
when the top is removed. The rear key switch is not interlocked, and
you just have to remember that the top is off, don't operate the
window.
- I consider this more a feature than a problem, though, since I'm always forgetting to lock the tailgate after opening it and not realizing it until I start the engine and see the "Rear Door Unlocked" light on the dash. It is now a simple matter of blipping the switch up and down to activate the automatic locking feature of the rear window.
-
Another option, would be to remove the Engine/+12V wire/connection at
pin 8 and connect pin 8 to the Battery/+12V at pin 6 (i.e. pins 6 and 8
are connected to Battery/+12V). If you have small children that like to
play with switches, I would consider this route.
- I had previously relocated the rear window switch from the center console onto the dash, in one of the unused cutouts. This way, I'm not accidentally hitting the switch and it is easier to find in the dark (the switch is lit - but you can't see it without taking your eyes off the road). If you leave it in the stock location, I'd recommend doing the 2nd modification, not the first.
-
Another minor issue is that if someone were to be pressing Up on the
front switch and Down on the rear key switch, you might have issues
with the window circuit breaker popping, as you may create a short
circuit. So just be careful when using the rear key switch that you
don't have someone up front using the switch there at the same time.
- In using my modified relay for over 25 years, I've had no issues with this. I almost exclusively use the front switch now as it's so easy to access and no need to fumble around for the keys for the rear switch.
- If you want to add additional window switches this relay is an excellent place to wire them to. Just tap into either the dash or rear key switch connections for the switch.
- One tip when re-installing the relay, be sure to use some adhesive/sealant on the mounting tabs. When I took mine out, I noticed it was loose and probably is the source of the rattle I was hearing in back. Better yet, Replace those sheet metal screws with RivNuts.
Relay Repair:
If you suspect you have a faulty relay or two in the circuit module (there are 4), there is a simple, low-cost replacement part available. Radio Shack carries a mini DC relay that is a pin-for-pin match for the stock part. According to MarkH of Williamsburg, VA:
"I was having troubles with my rear window relay on my 89 4runner (should be the same for all 1st gen 4Runners, 1984-1989). It would go down just fine, but it would be intermittent in cold weather on the way up, using both the rear switch and the cab switch. I figured this had to be a relay problem, b/c the motor obviously worked (for going down) and the problem was the same from both switches. I turned out to be right after I replaced the correct relay. Usually if the relay is at fault, one removes it and replaces it. However, this relay unit (which is actually made up of four individual relays and some electronics) is very expensive from Toyota. So I cracked it open and measured voltages while opening and closing the window to figure out which relays were responsible for what. Then I went to Radio shack and tried to find a 12V relay hoping to jerry rig it and wire it in place of the bad relay. I found that the Radio Shack 9VDC MINI relay was a drop in replacement! Just un-solder the old relay (use solder wick or a "solder sucker" to remove the old solder), drop in the new one and re-solder the connections. $2.99 and I have a working relay system. The only problem is that it is about 1/16 of an inch too tall for the board to fit back into the relay box. I just shaved some plastic off and jammed it in there.
Here's a chart of what relay is responsible for what: (This is
looking at the PC board from the top, component side)
1 2 3
4
1) up relay
2) down relay
3) always on (I can't figure this one out)
4) on whenever window is closed (a safety relay for the wiper).
So you can eliminate possible bad relays by looking at your symptoms and you can replace the relay that you're having trouble with.
Hope this information is of use to all you suffering from intermittent bad relays. And remember that it might not be a relay problem, might be a bad connection or switch. And much thanks to all you out there who helped me."
Notes:
SInce Radio Shack is no longer a viable option for small parts like this, here's an Amazon link for similar relays.
Likely other sources available, you're just looking for a 12V PCB mount relay with 5 pins, the same size as the existing relay.You can also replace the entire relay module. New price from Toyota is $300-$400!. If you can find a used one at a junkyard for not a lot of $$$, it might be worth grabbing for a spare. All the 1st gen relays should be similar as should the 2nd gen relays, although it would be wise to test this out before paying for the relay.
Sean Boltman of Seattle (1990 4Runner should be the same up through 1992) submitted the following writeup on his relay repair:
Problem: Rear window fails to roll down sometimes. Doesn't matter if you are using rear lid car key to activate the window, or the center console toggle. Wiggling the rear window wiper seemed to sometimes trigger the window to work, but I suspect this was coincidence, and finally decided to go after the main circuit board (described on this page) to attempt to replace the relay switches. I had decided this was not a failed motor, because when it worked, well, it worked fine.
Solution: Replace the relay switches! Main circuit is located right next to left-hand storage box near rear of cargo area.
NOTE: all orientations are based on you standing at the tailgate looking into the cargo area.
To get this you have to:
- Remove carpet hold-down kick strip at back near fold down lid.
- Unscrew little seatbelt holder clip on side of car near top of rear left-hand seat.
- Unbolt left-hand side seatbelt holder bracket where it attaches near top of roof.
- Now you can remove the whole side panel. It's held on with about 10 pop clips.
- Pull out the left-hand side storage box. It's held in place with two pop clips on top (may not be salvageable based on their design).
- Now you should see the main circuit board box (black, with aluminum bracket). Unbolt the two bolts to pull out for easy access.
- Unplug the wiring harness from the main circuit board.
- Two black tabs on the black box lift to open one side of the black box, allowing you to slide out the circuit board. Mine was a gen-2 design board, and I included a picture of it.
- The four black boxes on this circuit board are the relay switches. I ended up replacing them all.
- Go to Radio Shack and get: A de-soldering iron (the one-hand operation unit that has air suction bulb on it) or some solder wick, a soldering iron (30 watt), and 4 of these relays: # 275-005 They are blue, slightly bigger than the Toyota ones, and are exact match pin pattern!
- Use de-soldering iron to remove solder from the 4 relays. Tricks: Hold board upside down (relays pointing up) so solder when molten runs down away from the circuit board. Once solder removed, take a watch screwdriver and push the pins left and right to break the little solder that remains, then pop out. Take your time, it will require a little fussing.
- Put new relays in, solder them. As always, be careful. This solder job is relatively easy even for novices.
- Reassemble black box, plug it in, make sure things work.
- Put your car pieces back together.
New relay switches were the answer to my problem. $20 in parts. Toyota charges $400 for new board plus labor!
Sean
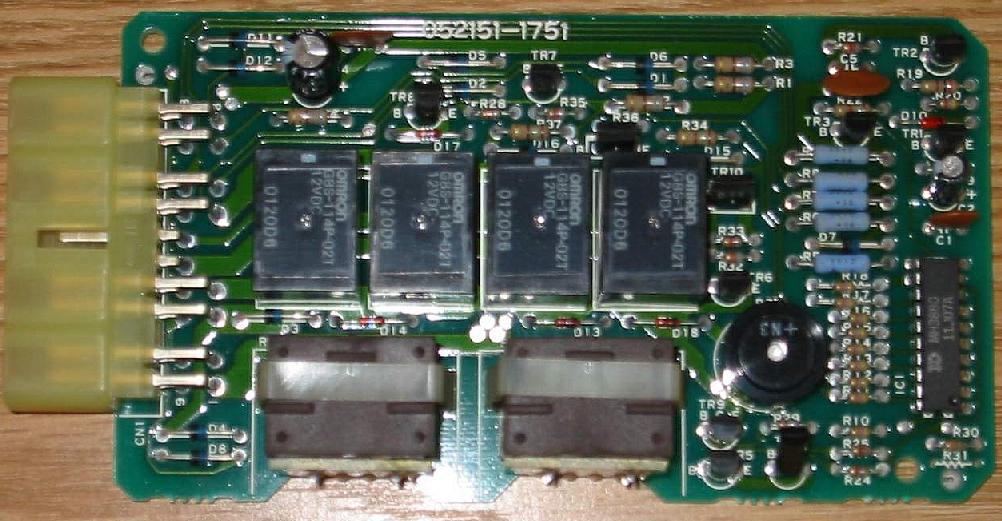
Relays from left to right are (if you find out the functions of the missing relays, let me know):
- ?
- ??
- Down Relay
- ???
Another option for replacement relays, instead of the Radio Shack parts, is to get an exact replacement from Omron, p/n G5LE-1DC12, it is an upgraded 10A relay that replaces the original 6A relay (Newark part number 35K4530)
Relay Replacement:
 |
| Example of manual window control wiring |
If repairing the relay is too daunting a task, or you have tried and it did not work, another option is to eliminate the relay altogether. You will need to disconnect the factory relay module altogether if doing this. Why? Because the two relays for the rear window motor are set up to leave both sides of the motor connected to ground when off. So, if you try to apply 12V to one side of the motor, with the module connected, it'll be a dead short to ground!
To do this, simply wire the motor to a switch, you can pick up wires 1 and 3 off the rear window module connector. You'll need to use a momentary DPDT (Double Pole Double Throw) switch (SW1). This type of switch has a center off position and two momentary on positions to either side (On-Off-On). Wire the two common terminals to the rear window motor and then connect one side to power-ground and the other side to ground-power. This way in one position the motor terminals have power-ground and the motor runs one direction. In the other switch position, the motor polarity will be reversed (ground-power) and will run the other direction. Note, in doing this, you are bypassing all the safety interlocks, so YOU will have to be operate the window safely.
Or, as shown in the above wiring diagram, if you want to re retain use of the rear window relay as well as have manual control over the rear window motor, then you need to add an additional DPDT toggle switch (SW2). The purpose of this switch is to disconnect the rear window relay module from the rear window motor. As wired from the favctory, the rear window relay connects both sides of the rear window motor to ground when it's not in use. So, you need to cit the wires from pins 1 and 3 from the relay (usually blue-black and blue-yellow) and add some mating connectors to the cut wires. THen insert SW2 in-line, with the center terminals connected to the motor and one set of side terminals to the relay module. Then connect the other side terminals to the DPDT rocker switch as shown. This way, with SW2 in the relay position, the rear window operates as normal. In the other position, the rocker switch operates the window. Scroll down to photo #76 for more information.
Also, note that I have omitted details such as fuses or circuit breakers in the diagram above in order to keep the drawing simple. If you pull power from the source that feeds the existing relay module, then it is fed through a circuit breaker, so is already protected. And make sure you use a good source of power that can supply the current the motor needs under load.
Another option is to pick up the simplified replacement relay module from The 12 Volt Guy.
[Return to the top of this page]How to test the motor:
The motor itself is fairly easy to test. Open up the access panel on the rear door and unplug the connector that goes to the motor. Now with some wires off the battery or even a portable jump start battery pack, connect +12 volts to one terminal and ground to the other terminal. If the motor is good, it'll turn in one direction. To reverse the direction, swap the power and ground wires.
Apparently the rear window motor is the same unit as used for the power windows in the doors. So if the motor is indeed bad, you can replace it with a power window motor.
[Return to the top of this page]How do the rear wiper and window operate?
On the 1st generation 4Runners, the rear wiper, window and shell are all interlocked to prevent damage.
-
The wiper has a limit switch that closes when the wiper is lifted free
from the window glass.
- This allows the window to be operated.
-
The window has a limit switch that closes when the glass is fully up.
- This allows the wiper to operate.
- If the wiper does not fully retract, no window operation is allowed and if the window is not fully closed, no wiper operation is allowed.
-
The rear shell has a bolt in the left rear corner that closes a switch,
that allows the window to operate.
- When out, this prevents the window from operating if the shell is removed.
So how can the wiper be made to work better?
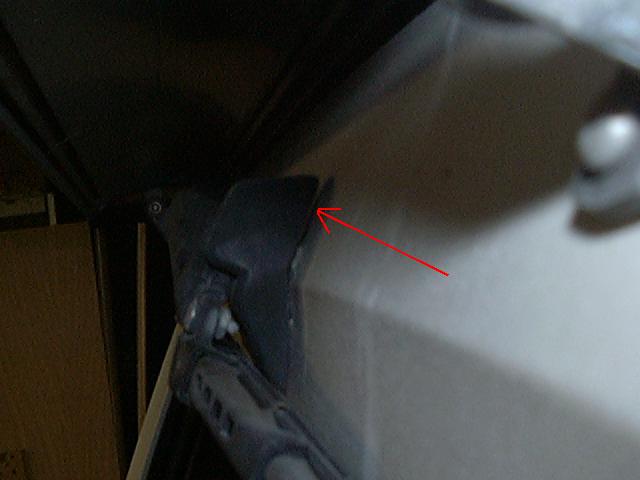
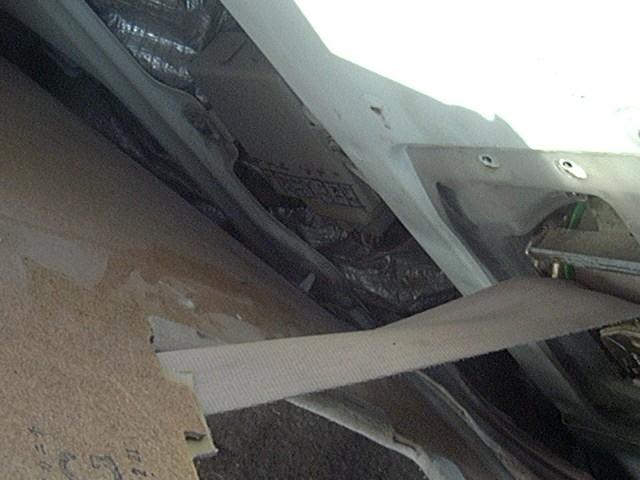
- My wiper didn't fully lift off the glass (or park) when it was turned off. That meant any time I used the wiper (on purpose or by accident), I had to walk around back and manually lift it before lowering the rear window (can you say PITA?). There is an angled piece of plastic screwed to the rear of the shell that catches a plastic piece on the wiper arm that is supposed to lift the wiper off the glass. I found that it didn't lift the blade high enough to clear the lip of the fiberglass shell. So, I took a thin nut and beveled it on a grinder and placed it between the angled plastic and the shell. This gives perhaps 1/8" (3mm) extra lift and (red arrow in the above image is pointing at the gap the nut creates between the back of the shell and the plastic piece), more importantly, steepens the angle of the ramped piece. I put a little silicone grease on the plastic pieces and now the wiper reliably lifts off the glass. This is really nice feature to have working in snow country as it keeps the wiper from freezing to the glass.
- My second wiper tip involves the plastic box that covers the wiper mechanism inside the shell. It appears that those cheesy little push-in plastic pins were used to originally hold the cover in place. Mine had one or two of these (worn out) and a few pieces of wire wrapped trough the other holes to keep the cover in place (cheap fix by the previous owner). I found that some #10-24 aluminum threaded inserts would fit nicely in the sheet metal holes. Now I can screw the cover in place and it has not fallen off since.
-
Another major PITA is that I'm always accidentally hitting the
&$@*% rear wiper switch on the center console. Now that the wiper
parks itself properly, this is not as bad a problem as before.
- To remedy this, I extended the wires from the console so that the switch can be installed above the radio in the spare switch opening on the dash. It is now safely out of the way and looks like a factory installation.
-
Finally, if your rear window doesn't want to go up and down using the
rear key switch, chances are the connector inside the door was pulled
apart. There is a plastic tab that holds it in place, but the connector
is very close to the window. In mine, the window caught the connector
and pulled it loose, separating it. I ended up gluing and tie-wrapping
it to the door frame giving it extra clearance.
- One major clue that this is the problem is that your rear license plate light no longer does (light that is).
- And, if you run into the classic paradox when the rear window is not fully up AND the wiper is not fully retracted (they are both preventing the other from operating), a simple work-around, at least on the 1st gen 4Runner, is to disconnect the rear wiper connector in the rear corner. This will disconnect the wiper control logic from the rear window relay module and let the window work by itself. Once the window is up, then you can get the wiper sorted out and retracted.
Cost:
  1  Thin brass nut               $0
  4 #10-25 threaded inserts        2
  4 #10 machine screws+washers     1
  ----------------------------------
  Total                           $3
Rating:

[Return to the top of this page]
![]()
 ===>>
===>> 
Visitor # since 28.AUG.2001
[Last updated: 19.March.2026 ]