Inexpensive Nippon Denso Starter Repair
Ever turn the key and all you hear is CLICK?
Contents:
- Introduction
- The Fix
- Cost
- Contact Dimensions
- Project Rating
- What if its not the solenoid?
- References
![]()
Introduction:
The following information applies to the typical Nippon-Denso (ND) starter motors. Lots of automobile manufactures use the ND starters, including Toyota, Honda, Subaru, Mitsubishi, Isuzu, Chrysler, etc.
Have you noticed your starter turning slower and slower, or worse yet, you turn the key and all you get it a loud click and a slight (or no) dimming of the lights? If you answered yes to any of the above questions, your starter may be due for some R&R. My 22R-E equipped 1985 4Runner, had over 210,000 miles on it, and I'll bet the starter is bone stock. The starter is actually composed of two main parts, the series-wound starter motor itself and a solenoid which serves dual functions of pushing the drive gear into the flywheel as well as making a high-current contact to supply battery power directly to the motor. Starters can pull many hundreds of amps of current under load and the solenoid acts like a giant relay taking the low current signal from the ignition switch to control the high current for the motor.
The solenoid consists of a steel plunger that is pulled into an electro-magnetic coil, that is energized by the ignition switch. There is a rod extending from the plunger that actuates the starter gear and a spring on it to retract the gear after the engine starts. Also, at the other end of the plunger is a copper ring that makes contact with two copper contacts, one from the battery and the other that goes to the starter motor itself. When the plunger is pulled into the coil, the copper ring completes the circuit between the two contacts, current flows and the starter motor spins, driving the small gear which in turn spins the flywheel, making the engine turn over. Over time, the two contacts are eroded by the inductive arcing that occurs when the starter motor is started and stopped. In every case I have heard of, only the contact on the battery side of the solenoid wears out.
Before removing the starter and tearing it apart, you should first remove, clean and re-install every power, ground and control wire between the starter and battery. Especially check the small control wire that energizes the starter solenoid, it can either be loose or the wire itself can easily break where it is soldered to the connector. If this is your problem, you might want to skip to the web page section here...
What to do if you are stuck on the road and need to get the engine started
There are a couple of things you can try to get your starter to crank the engine over of this problem happens out on the road and leaves you stranded. The first thing to try is to see if the small wire on the solenoid is tightly in place. If it is loose, see if you can reinstall it tighter or try slightly crimping the spade lug to make it fit tighter. If this does not help, try tapping on the starter solenoid with a hammer or screwdriver handle while someone in the vehicle turns the key to the Start position. The tapping can help the solenoid make contact and send current to the starter motor. If that does not work, you can fashion a short jumper wire and use that to power the solenoid coil off of the big power post on the starter. Again, have someone turn the key to Start and disconnect the small solenoid wire and use the jumper to bridge between the big cable from the battery (may need to peel back the rubber insulator over that post) and touch the other end to the solenoid terminal. Be careful not to touch the bare end of the wire with your fingers (it is likely to spark when you make and break contact with the solenoid terminal) or let it contact anything metal (it is hot and can short to any grounded metal). As soon as the engine fires, pull the jumper wire off the solenoid. If you happen to be alone, you can do the same sort of jumper leaving the key in the On position, transmission in neutral or park, e-brake on and then try connecting the jumper wire to the solenoid. Again, once the engine fires, disconnect the jumper and put the regular wire back on the solenoid.
Also, this jumper wire to the solenoid is a good diagnostic test as well. If this makes the starter work normally, that is telling you something. What? That the starter and solenoid are in good shape and rather it is a poor electrical connection between the battery, ignition switch, starter relay (if present) and the starter solenoid that is limiting current flow to the solenoid. As noted in the section below, the solenoid pulls something in the range of 12-20 amps when energized, so even a tiny amount of resistance can cause a huge voltage (and current) drop. Recall your Ohm's Law from school, V = I x R, so if I (current) = 20 amps and R (resistance) = 0.1 ohms (a very low resistance), V = 2 volts. What that means is that instead of the starter solenoid seeing 12 volts from the battery, it only seems 10 volts (12 - 2 = 10) and that will result in a big drop in in how hard the solenoid plunger pulls inward to make contact for the motor current. Generally you need at least 9 volts to even make the plunger move at all, so the closer to 12 volts you can get, the better. With insufficient current, the solenoid will not pull in hard enough to make the electrical contact to power the starter motor to crank over the engine.
Easy Test To Isolate the Nature of the Problem:
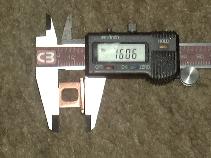
If the problem is repeatable, one thing you can do to troubleshoot the cause is to use a voltmeter to check the voltage at the starter solenoid when it acts up. You want to check the small wire that plugs into the solenoid coil, not the heavy gauge wire direct from the battery that supplies power to the starter motor itself. Shown below is a simple test jig you can use to make this test properly, that is under load. You.ll need one male crimp-on spade lug and two female connectors and two short lengths of wire, ~16 ga. Strip the two lengths of wire and insert both wires into one of the female connectors and crimp it. Then crimp a male lug onto the other end of one wire and the female onto the other wire end. Now plug the single female end onto the stater solenoid terminal and the wire that used to connect to the solenoid to the male spade lug. Now, you can connect the positive lead from your volt meter to the center female terminal on your test wire, negative lead to a chassis ground and you can now measure the voltage at the starter while trying to start the engine:
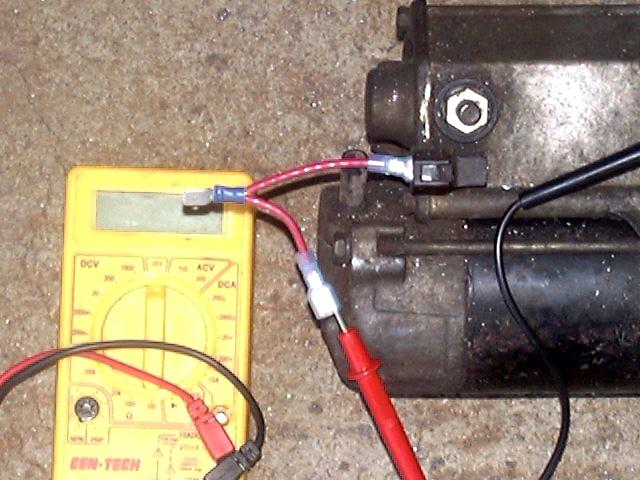
NOTE:
While the above photo shows the starter removed from the vehicle this is only for photographic purposes. You can and should test the starter in place, in the engine bay, bolted to the engine, hooked up to the vehicle's wiring system, etc. After all, you want to test your starter in your vehicle with your's vehicle's wiring supplying power to the starter. This is needed in order to find why your starter is not working in your vehicle when powered by your vehicle's wiring. If you pull the starter and take it to a shop to test in their test fixture, you are only testing the starter and not the rest of the things that supply it with power to run.
What sort of voltage should you see?
-
If it is much lower than the battery voltage (which you can measure off
the heavy cable), then there is likely something causing the voltage to
drop:
- Factory specifications are that the solenoid voltage be within 0.5V of the battery voltage.
- If the voltage at the solenoid terminal is low, suspect the control wire, the ignition switch.
- If you have it, the neutral safety start switch (for A/T equipped vehicles) or a clutch cancel start switch (M/T equipped vehicles). With an A/T, try shifting the transmission to different gears then back to park/neutral and try the starter.
-
If you have a clutch cancel switch, try starting with the switch
engaged and see if the starter works.
- If so suspect either of the two switches, either adjust them or replace them if defective.
- You may also want to check this section of this page for some additional repair ideas...
-
If the control voltage is good (when the starter doesn't crank) then
suspect the solenoid.
-
But first check the voltage at the big power cable on the solenoid,
make sure it has a good voltage, say 10 volts or so.
- If that voltage is low, suspect a bad cable or connection between the starter and battery.
- A quick check for this is to use a battery jumper cable between the battery and starter, if that works, then the cable is bad.
- If you can tap on the solenoid and get it to turn over, the solenoid may simply be sticking.
- Likely it is the copper contacts inside the starter solenoid that are worn and causing the problem, see below for the repair...
-
But first check the voltage at the big power cable on the solenoid,
make sure it has a good voltage, say 10 volts or so.
And, remember there are two parts of this circuit.
- First, there is the current flowing from the battery "+" terminal to to the starter solenoid
- And there is the hidden ground circuit from the starter case to the engine block that eventually takes the current through various ground wires/connections back to the battery "-" terminal.
Yes, technically current (i.e. electrons) actually flow from the negative terminal to the positive terminal, but current is current whether it flows "+" -> "-" or "-" -> "+". So, you can have a problem with the "+" terminal -> solenoid circuit OR you can have trouble with the starter case -> "-" terminal circuit. To help isolate which part of that entire circuit to look at is to take various voltage measurements by placing your meter probes on various points. So you could measure the "+" terminal to solenoid wire voltage, or rather voltage drop between those two points. In this mode, a reading of 0 volts would be perfect (meaning you have 0 volts dropped between those two points). That would of course require super-conducting wiring in your vehicle (and the rather cumbersome need to submerge your vehicle in liquid nitrogen :). In actuality, you would see something like 0.5 volts dropped between the battery and starter. More than that may indicate a problem, less than that is good. And you can do the same test, but put one meter probe on the starter case (maybe one of the mounting bolt heads) and the other probe on the battery "-" terminal (and if your probes are not long enough, hook up a length of wire between the probe and the battery). Then measure the voltage drop (on the ground side) while trying to start the engine. Again, "less is best", low voltage drop = good, high voltage drop = bad. On the ground side, you should see very little voltage drop since you should have heavy ground cables and not a whole lot of "circuitry" between the blocks and the battery. So in an ideal world, you would see 12 volts across the battery, 0 volts (drop) between the battery "+" and the starter, 12 volts (drop) across the starter solenoid and then 0 volts (drop) between the starter case and the battery "-" terminal. That way the solenoid gets the full current produced by 12 volts across it. But if you have an issue like 2 volts drop between the battery and starter and maybe 1 volt drop on the ground side, you only end up with 9 volts across the solenoid. It now only gets 75% of the original current (9/12) and thus it may not have enough "oomph" to make good contact to send current to the starter motor or to push the drive gear into the flywheel to turn the engine over.
And one tip when checking for bad grounds. You can't just look at the connection and say it is good. You might try tugging on the wire and see if the connection is loose or not. If not, that is not an automatic OK either. You really need to open up the ground connection (remove the bolt for example) and check the contacting points. You may have oxidation in there or you may have an insulator, like PAINT or something similar, that prevents current from flowing. And even a good clean contact may not be an OK sign, either. Ground cables are notorious to corroding up under the insulator at one end or the other. Up under the insulation, the wire conductors may be all oxidized, preventing current from flowing. Often, when this happens, the cable is very stiff at the site of the corrosion.So you can bend the cable along it's length and feel if there is any sudden change in it's stiffness, if so, you might peel back the insulation for a look. Once you have verified you have good wires making good contact on bare metal with tight connections can you say the grounds are OK. If you just look and say the grounds are good, you are really kidding yourself.
And whatever you do, DO NOT get a rebuilt starter, fix the one you have!!!
Why do we say that? We have heard countless stores from folks who have been down the road of the "rebuilt" starter with the enticing "lifetime warranty" who have had nothing but trouble with the rebuilt starter. Sure, you can get it replaced for free where you bought it from when it stops working (be sure to save your receipt) but what about the hassle of having the starter quit working when you need it then your time to remove it and take it to the store and get a replacement and then reinstall it. Then have it go out again in a year or so? So the "lifetime warranty" may be more like you'll spend the rest of your lifetime replacing that "rebuilt" starter every so often.
Why is this so often the case? We suspect that most starters that are brought in as cores have an intermittent issue like you are probably experiencing now if you happen to be reading this web page. So you pull that starter out, take it to the parts store, hand it over for a "rebuilt" starter and call it good. That old starter is probably shipped to a factory where they clean them up and test them. If they pass that initial test, they are probably given a coat of fresh paint and put back in a box and sent back to the part store. Why do we say this? We have had customers with freshly "rebuilt" starters contact us to purchase replacement contacts as the ones in their freshly "rebuilt" starters are worn out.
Sure you might get lucky and get a properly rebuilt starter. Especially if you take it to a local starter repair shop and have them replace all the wear parts and clean and inspect everything while you wait. And sure, if your starter is worn to the point that the drive gear is worn out or the bearings are shot or the brushes inside the motor are done, etc. then by all means get it rebuilt. And you may get lucky and get a rebuilt starter that has truly been rebuilt and will be a reliable unit. But short of tearing it apart on the parts store counter to carefully inspect it, you'll never know what the quality of the rebuild was. But that said, I have the original Denso starter in my 1985 4Runner, it has had the contacts replaced at around 200K miles and now has close to 300K miles on it and it still cranks over at the first turn of the key and it cranks strong. In fact I will often use the starter to start the truck in gear on steep hills while off-road. So our take is that if your starter was working fine until the copper contacts wore out, then replacing those worn out contacts should result in a properly working starter in the end.
[Back to the top of the page]The Fix:
Before condemning the starter and going to the trouble of removing it, you should first remove, clean, and check all the wiring connections at the starter, including the heavy power cables, the control wires and the ground straps between the engine and frame. Recall all wires have at least two ends, so be sure to follow the wire or cable to its other end and check that end as well. Also, clean and re-install the connections at the battery. If the problem goes away, great. If it gets better for a while then returns, time to do some more digging.
If you have a clutch cancel switch or a neutral start switch, make sure it is adjusted and functioning properly. If the starter can be made to act up reliably, check the voltage at the solenoid control wire. If it is weak, suspect the wiring between it and the ignition switch (and the switch itself). If the voltage is strong, then suspect the solenoid, the repair of which is below.
Whether you contemplate doing this repair now or in the future, by all means get the parts (see part numbers below) and carry them as spares. When you go in to get the parts, you'll either be told you need a new starter or that they have never heard of this part. In any event, don't be swayed, give them the part number (below), special order them and when they arrive in a few days, you'll be ready to tackle the repair. Since there are two contacts, get two kits, they don't cost that much and if it turns out you only need to replace one, you'll have a spare.
Where is the Starter Located?
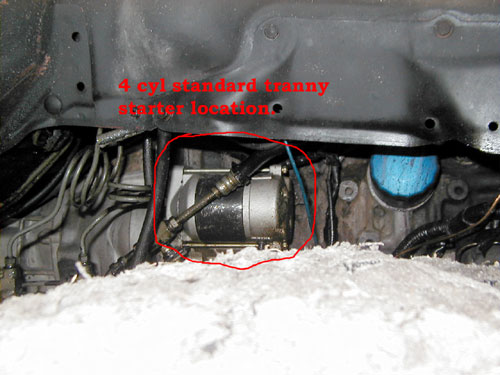
So, parts in hand, first step is to take off the starter (assuming you can find it). The starter is *always* located where the transmission bell housing attaches to the back of the engine block. Why? Because the starter engages the teeth on the outside of the flywheel and the flywheel is attached to the back of the engine and drives the transmission. So. if you have a body lift, you are halfway there. If not, better start limbering up your arms.
So, first thing is to disconnect the battery (+) lead, then squeeze and pull off the small solenoid wire connector and big high current wire from the starter (usually a 12 or 14 mm nut). Now, get a 14mm wrench or socket and an assortment of extensions and take off the bolt at the base of the starter and the nut at the top. Both screw out to the front of the engine. It will help if you either take off the passenger front tire or jack that corner up. Also, pull back the wheel well liner for better visibility and if present, remove the 4 - 10mm bolts that hold the access panel in place at the side of the wheel well sheet metal. On IFS Toyota trucks ('86-'95), it can also help to remove the front skid plate and possibly the steering stabilizer to get a straight line shot at the nut and boot holding the starter in place.
Once the starter is loose, slide it forward then drop it down and clean it up before tearing into it. I sprayed mine down with brake cleaner to remove the accumulation of clutch dust and engine grease. Now, on a clean bench, remove the 3 Phillips head screws or bolts that hold the plate on the end of the solenoid next to where the battery lead connects. Do not remove the two long screws that hold the starter motor itself together. You only want to open the solenoid up.
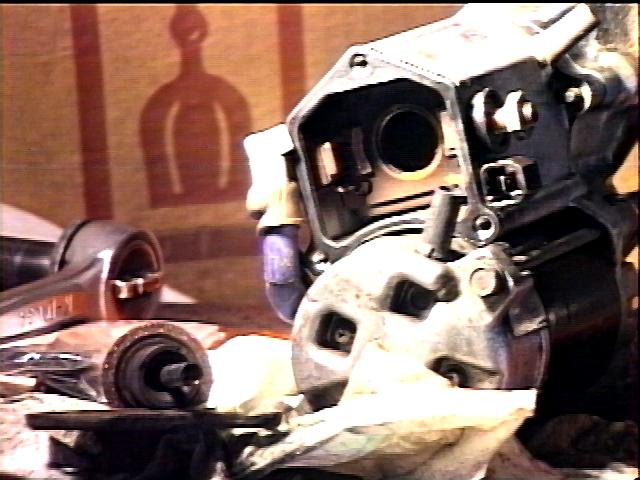 |
| Solenoid end cap |
Carefully pry off the cover and the plunger and its spring should pop out. Examine the copper ring on the plunger and the two contacts. On mine, notice how the contacts are worn. it looks as if a step has been machined into the copper. In fact, aside from being dirty, they looked normal, like this step was supposed to be there. Compare this with the new contacts, that are flush all the way across their face. I think what happens is that as the copper is worn away, the plunger bottoms out and doesn't make full contact, resulting in the poor starting performance. The contact on the battery side was worn almost all the way through and the motor side (visible in the picture) was about halfway gone. Spray down the inside with a good electrical cleaner. I decided to replace both, keeping the better of the two as a trail spare in my toolbox. Using a 14mm open end wrench, carefully back off the nut holding the copper stud in place. There is only a bit of the nut exposed, so be careful not to round off the corners. Notice too, the pitted copper ring on the plunger, visible in the lower left corner of the picture.
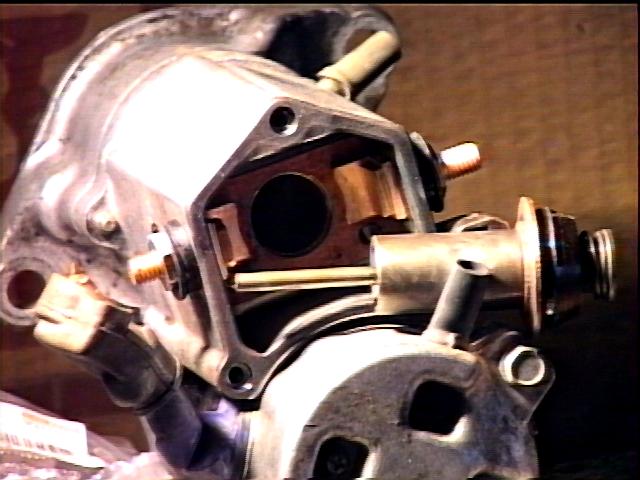 |
| Solenoid Plunger |
Do one side at a time, so you can use the other as a guide to put it back together. My starter kit came with all the parts of the assembly, however, I found the stud on the motor side was not knurled at the base like the one in the kit (I had unknowingly ordered two battery-side kits, instead of one of each), so I re-used the original stud after replacing the other parts (apparently if you buy the motor-side contact kit, it will have the non-knurled stud - however, the studs don't wear out, so no need to replace them). This is the reason 4Crawler Offroad chose to supply the contacts only as the remaining parts are not wear items and they tend to vary from starter to starter, unlike the 4 basic contact shapes. Notice the appearance of the new contacts. It is important that the tops of the contacts are on the same level to ensure good contact with the ring of the plunger. The easiest way to do this is to push each contact down flush to the flat area of the solenoid housing before tightening up the nut on the stud. You can double-check this by pushing the plunger down into the solenoid and making sure it hits both contacts at the same time without tipping to one side or the other.
Plunger Cleanup:
After rebuilding the contacts, take a wire brush, steel wool or fine sand paper to the copper ring on the plunger and put it all back together. If your plunger contact ring is worn more, you might try chucking the end of the plunger up in an electric drill and spin it while holding some sand paper to the contact ring to clean it up. You are just looking to take off any oxidation and flatten any high spots. It is not the goal to end up with a perfectly flat, mirror surface, some minor pitting is fine. If you try to sand the ring down perfectly smooth, you'll be removing too much material, thinning the ring and making it wear out faster. If you look at the physics of the contact between the ring and the two stationary contacts, a high spot on the ring would mean only a few percent of the surface area between the ring and contact are touching (= BIG ARC) vs. if you had a basically flat ring with some pitting, you would have all but a few percent of the surface area touching (= no arcing); bottom line - high spots = bad, pitting = OK. Since the plunger is free to turn (and does so) when making contact, it puts a different part of the ring in touch with the copper contacts each time. It is likely one plunger could outlast many pair or copper contacts in normal use.
New plungers are typically available by special order. They cost approx. US$35.00 plus shipping and we'll need to know the dimensions of the plunger you have for the special order. This includes the outer diameter of the copper ring (typically 33mm - 37mm), the overall length of the plunger (typically 97mm - 127mm) and the distance from the bottom of the copper ring to the big end of the plunger (typically 18mm - 33mm). But that said, since a plunger is likely to outlast several sets of contacts, which in turn will last ~150K-200K miles, it is likely that you'll be needing new brushes or bearings or other parts of the starter replaced by the time the plunger is gone. By that time (assuming the vehicle is still going strong), that would be a good time to take the starter in to a local rebuild shop for a thorough rebuild.
I put a little bit of disk brake grease around the starter drive gear. One item take note of is that that there is a ball bearing that drops into a hole in the end of the clutch assembly. The spring that rides on the plunger in the solenoid rides on that ball bearing. Whenever you take the starter solenoid apart to replace the contacts, make sure that the ball bearing remains in the hole in the end of the clutch assembly. It can come out and yet remain inside the starter and cause a grinding noise and lock the starter if it falls into the right spot.
Installation is the reverse of the removal process. I found it easier if I bent the bracket that holds the hose for the clutch slave cylinder off to the side, then hang the starter from the upper stud and get that nut started first. Then move the bracket back over and get the bottom bolt going through it and the starter into the bell housing. Finally, hit the connector on the wire from the battery with a wire brush and hook up all the wires and finally the battery. Now its ready for a test. If your contacts were worn, it should feel like a brand new starter after this repair. Mine must spin at least twice as fast now as before the fix (when it actually would spin).
I saved the half-worn starter-side contact for use as a spare. It seems that the starting problems are related to the unequal wear on both sides, since the plunger can only accommodate a small amount of height difference before it starts losing contact. So, my thought is that in another 200k miles, my battery-side contact will be worn out and the starter-side will be half gone. I'll now have a half-worn spare to put in for another 100k miles of use. Then at 500k, I imagine I'll need a new starter :-)
Update-I:
 |
 |
| Before - worn contact | After - TIG welded |
Update-II:
Subject: Starter rebuild details on a '94 V6 4RunnerFrom: Eric Maher; Thanks for the great site. I replaced the contacts on my '94 4Runner about a month ago, and no trouble since then. Here's the part numbers, courtesy of Bob at Kent Brown Toyota (great parts department, by the way!) - 28226-72010
- 28226-70040 Now for the details: The battery side contact replacement looks to have been redesigned. There's some additional material (approx. 3 mm tabs) on either side of the contact where the solenoid strikes. Perhaps Toyota is looking to solve this problem once and for all. Accessing the starter on a V6 is aided by a access hatch cut into the passenger side wheel well, behind a rubber splash guard. The splash guard was easy to remove, but I succeeded in breaking all the plastic clips that hold the guard on. A trip to Lowe's fasteners section yielded parts that worked. The fasteners in question are in the "automotive body" fasteners section, and are labeled "Nissan Clips" or something along that line. I tried some of the "Help!" brand fasteners, but they were a hair too small and fell out in short order. I had do to do some tucking and shoving to get the starter out, but it was a fairly straight forward task getting it in and out. There were some 1/4" long rubber breather tubes that were lost when I removed the starter, but I'm not certain that this will be a problem. There is an error in the Toyota service manual in regards to the placement of the bolts that hold the starter to the bell housing. The manual shows two bolts pointing towards the back of the vehicle. This is incorrect. The top bolt is pointing to the rear, the lower bolt is facing the front of the vehicle. If you look from underneath, up through the front suspension "wishbones" you can see the bolt, and get a wrench on it from this angle. Thanks to Newark Toyota in DE (their service department works weekends!) for tipping me off as to where the second bolt was located. Again, thanks for the great site. Feel free to post this email on your site so others may benefit.
Further tips to aid starter removal on the V6 are to remove the heat shield off the exhaust manifold to create more room to physically maneuver the starter out of the engine compartment and you can unbolt and move the clutch slave cylinder to the side (manual transmission of course). Another option is that the starter solenoid housing can be opened and repaired with the starter still in the engine bay, but oriented to give access to the parts.
Update-III - Chrysler/Mitsubishi Starter Repair:
From Bob Shuman:
Also, FYI, here is some additional information that I was provided regarding Chrysler applications that also happen to use the Nippon-Denso starter. While I can't guarantee it is 100% correct, I believe the information is accurate since it came from a person whom I know to be knowledgeable and very detail oriented. You may want to add this info to your already great web site. BTW, the A, B, and C refer to the photo you had posted on the site that had each type labeled
"Daniel J. Stern" wrote:
From my rotating-electrics builder:
- "A" (my P/N 66-82756) is used on all the 2.2/2.5 Chryslers, 2.6 Mitsus, as well as the '87-'91 long-starter-motor 3.0 Mitsu V6 and '89-'91 long-starter-motor RWD applications. Two contacts used per starter.
- One "A" and one "B" (my P/Ns 66-82756 and 66-82759) are used on transverse 3.3 and 3.8L V6s.
- One "A" and one "C" (my P/Ns 66-82756 and 66-82761) are used on all other Chryslers - 2.4, 3.0, 3.2 and aluminum DOHC 3.5, 3.9/5.2/5.9 RWD, V10, you name it.
Links to other starter solenoid repair articles:
- A write-up for the 3VZE (3.0L V6) repair
- Another write-up on 3VZE (3.0L V6) starter solenoid repair (Uses two A contacts)
- A write-up on replacing the contacts in a Toyota Previa (Typically uses contacts A and D, but some may use A and C)
- Starter Removal and Reinstallation on the Toyota 3.4 V6 Engine (4Runner)
- Starter Removal and Repair on the Toyota 2.7L 4-cyl engine (Tacoma) (Uses contacts A and B)
- Starter Repair on Toyota Camry 4-cylinder engine (Uses contacts A and C)
- Toyota Tacoma 2.7L starter repair (Uses A and B contacts)
- Subaru Outback uses the A and B type contacts
- Geo Prizm (1996 model) uses the A and C type contacts.
Cost:
   ~$16-25 - qty. 1, Starter Kit, Toyota P/N 28226-72080 or -70040 (battery side)
   ~$16-25 - qty. 1, Starter Kit, Toyota P/N 28226-72010 (motor side - if needed)

   See: Write-up here for 3VZE/3.0L/V6 repair, uses the same part numbers
~ Dealer parts cost were based upon 11/2002 data from a reader of this page ~
Or, save time and money and have the contacts shipped to your mail box with convenient on-line ordering:
On-line ordering:
We have a limited supply of these contacts, but here is an Amazon link for Denso starter solenoid repair parts
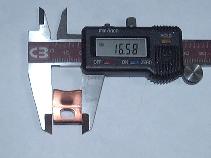
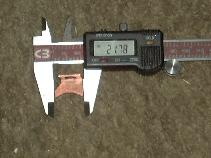
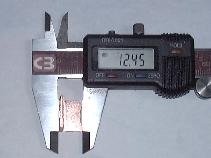
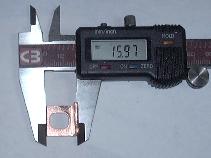
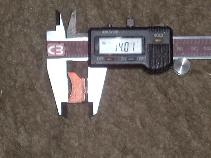
| Picture: Note: Digital caliper shown for size comparison only; It is not included w/ the contacts :-) |
 |
 |
| Contact Style | A: Smaller Contact,US$4.95/ea. | B: Larger Contact, US$4.95/ea. |
| Toyota p/n (equiv.) |
28226-72010 28226-72080 28226-74040 |
28226-72040 28226-22050 28226-54340 |
| Order / US Delivery | ||
| ~~~~~ | ~~~~~ | ~~~~~ |
| Picture: |  |
 |
| Contact Style | C: Larger Contact, US$4.95/ea. | D: Larger Contact, US$4.95/ea. |
| Toyota p/n (equiv.) |
? | 28226-70040 |
| Order / US Delivery |
-
The smaller contact (A) is the same as used in the motor side of most,
if not all Toyota (ND) starters (28226-72010)
- It also is the same as the small battery side contact used in 28226-72080 such as in the 22R,RE,RET engines
-
The larger contact (B) is used on the battery side of the newer Toyota
engines
- It is the same as used in p/n 28226-72040
- The larger contact (C) is used on the battery side of the newer Toyota engines, but extends to the opposite side as B and is about 2mm longer
- The larger contact (D) is used on the battery side of the newer Toyota engines, but extends to the both sides, not quite as far as the B or C styles
- Contacts are sold separately, if you need two of one size, order two
-
Note that Toyota may list different part numbers for the same contacts.
- This is mainly because the Toyota contact kit will come with all sorts of other parts that you usually do not need but that vary, even though the same actual contact is supplied.
-
Note, no shipping insurance is included by default with the
above ordering buttons.
- In order to keep our prices and shipping costs reasonable, we can't send out replacement contacts if yours are lost in the mail and shipping insurance was not purchased.
- We can offer to provide replacement contacts at a reduced price for uninsured losses, contact us for details.
Not sure which contacts you need?
-
Best bet is to pop open the solenoid and see if you really need new
contacts and if so, which type:
- You may not have worn contacts which may point to some other electrical issue.
- This way you'll know for sure if the contacts are worn and if so how many and which type you'll need.
- You'll also find out if you can access and remove the starter for the repair.
-
Or order one of each (A, B, C & D) for US$19.50, standard US postage
included ->

- For orders outside the US, select an international shipping option.
-
Use the ones you need, return
any unused contacts for a US$3.50/ea.
- Refunds within 60 days will be to the original source of funds used for the purchase, after 60 days, via Paypal "Send Money" transfer.
-
Refund sent upon return of the contacts to the following address:
- 4Crawler Offroad
- PO Box 61092
- Sunnyvale, CA 94088-1092
- If you have a tracking number, feel free to send it to us so we can keep an eye out for your returned contacts to arrive, or at least let us know when you ship the package and via what method so we can know it is on the way.
-
Be sure to package the contacts securely, they won't
make it in a plain paper envelope when it passes through the US Postal
Service sorting machinery.
- Use a padded envelope at a minimum.
- If you want to order a different combination of 4 contacts, use the above button and specify the contact mix you want in the Note field of the Paypal order form
- Or order 1 or 2 A style contacts, they should fit every starter, since they are smallest
-
Or order an A and a D, the D can be trimmed to fit in place of a B or C
style contact if needed
-
The Type-A contact should fit in almost all starter solenoids
- It can also replace a Type-B or Type-C contact, only difference is a bit smaller contact surface area, same thing with the trimmed D-style contact. It'll have somewhat more contact area than the A-style contact, but somewhat less than the real B- or C-style contact.
-
The B- or C-style contact will fit the battery side on the newer Toyota
engines/starters:
- Again not a 100% exact match, but it'll fit and get you hack on the road.
-
You may even be able to upgrade a smaller contact with a larger one if
it physically fits
- The larger contacts have about 50% more copper in contact with the solenoid plunger, so should last longer
- If in doubt, get one of each and you can return the unused contacts for credit (US$4.00/ea. to your PayPal account)
-
The Type-A contact should fit in almost all starter solenoids
-
Here are some typical contact usage guides:
- Most Toyota 4-cyl starters (22R, 22RE) up through the '80s used 2 A-style contacts
- Most Toyota 4-cyl starters (22RE) in the early '90s use an A-style motor side and a C-style battery side contact
- Most of the Toyota V6 starters (3.0L, 3.4L) use an A-style motor side and a B-style battery side contact
- Most Toyota Previa starters use an A-style motor side and a D-style battery side contact, although some models may use the C-style contact
- A '98 Toyota Corolla uses the B- and D-style contacts
Shipping Options:
-
US/domestic First Class postage is added automatically by the on-line
ordering system
- Items are shipped from the SF Bay Area of CA., so should be 1-3 days delivery in-state, up to a week in the rest of the US.
- Items are sent with no shipping insurance or signature required
- US shipments include a delivery confirmation number with some tracking capability
-
International
shipments include the customs label number with limited tracking
capability
- Most common source of delays on international shipments are due to your country's customs department
- If you desire a faster, more secure and fully trackable delivery method, select one below:
| Priority Mail Shipping (US only) - US$5.00 additional, 2-3 days typical shipping time (not guaranteed) w/ tracking: - Specify insured or signature required |
|
| Express Mail Shipping (US only) - US$25.00 additional, 1-2 days guaranteed delivery - Insured w/ full tracking information |
|
| . | . |
| International Airmail Shipping US$14.00 additional, 10-14 days typical delivery, minimal tracking) |
|
| International Priority Shipping US$34.00 additional, 6-10 days typical delivery, minimal tracking) |
|
| International Express Mail Shipping - US$65.00 additional, 3-5 days typical delivery time, w/ tracking - Insured w/ full tracking information |
View Shopping Cart/Check Out: ![]()
-
The above on-line ordering is handled via PayPal.
-
Don't have a PayPal account?
- You can sign up for one in a few minutes
- If you would prefer other ordering options, please contact 4Crawler Offroad
-
Don't have a PayPal account?
-
Additional shipping costs will show up as one cent ($0.01) items
in the shopping cart
- The remainder of the cost will be applied to the shipping item when you check out.
- For shipments to US military bases (APO) you can choose the Priority Mail option, however, there may be no tracking information for Military Mail shipments, depending on destination.
- Also, be sure to double check your shipping address to make sure it is where you want the contacts shipped to and that it is a valid address for postal shipments
-
Tracking:
- Shipments to US addresses will include delivery tracking numbers which will be e-mailed to the e-mail addressed used in the PayPal transaction
- Express Mail offers full tracking. Priority and First Class mail offer delivery (or signature) confirmation only.
-
Insurance:
- Default (First Class Mail) includes no shipping insurance, if the shipment is lost in transit, the buyer is responsible for replacement.
- For insured First Class, Priority or Express mail shipments, US Post Office shipping insurance is added. Int he event of a lost shipment, an insurance claim will be filed on the buyer's behalf by 4Crawler Offroad and upon payment of that claim, the order will be re-shipped at no cost to the buyer. If a faster replacement is required, the buyer may purchase a replacement set of contacts and upon settlement of the post office insurance claim, the parts cost of the initial order will be refunded.
-
Only contacts are included, you'll re-use your old studs,
insulators, and other hardware
- If the studs or insulators on your starter solenoid are damaged, consider ordering the Toyota repair kit
- These contacts should fit most Nippon-Denso starter solenoids that are used on a wide variety of makes and models of vehicles
-
See below for dimensional information below:
- The copper is 2.25mm thick and the hole for the stud is approx. 8mm x 10mm.
- If these dimensions match the contacts in your starter solenoid, these should fit.
- The only difference in the A, B and C contacts is the length of the base.
- In fact if you cut the extra tab off the side of the B or C contact you would have an A-contact.
Need more than a few contacts?
Contact Dimensions:
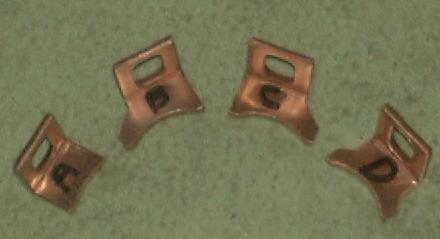 |
| Starter Solenoid Contact Styles: A - B - C - D |
 |
 |
|
| A-Contact width = 12.5mm | A-Contact height = 16mm | A-Contact length = 16.5mm |
 |
 |
|
| B-Contact width = 14mm | B-Contact height = 16mm | B-Contact length = 22mm |
| Same as B... | Same as A and B... | |
| C-Contact width = 14mm | C-Contact height = 16mm | C-Contact length = 24mm |
| Same as B... | Same as A, B, & C... | |
| D-Contact width = 14mm | D-Contact height = 16mm | D-Contact length = 22mm |
[Back to the top of the page]
Project Rating:
What if its not the solenoid?
If you've gone through all the items above and the starter is still acting up, its time for a little bit of re-design. From the factory on certain years, the starter solenoid is operated directly off the ignition switch. Over time the switch contacts can wear, the wiring and connectors can age and increase in resistance, etc. A solution is to use a relay to power the solenoid. Use a standard 30A headlight relay, wire the relay coil to the ignition switch and then use the relay contact to power the solenoid. So now the ignition switch only had to supply a milli-amp current to operate the relay and the relay supplies the higher current required by the solenoid (which in turn supplies the 100s of amps needed by the starter motor itself).
I recently installed a Painless Wiring Hot Shot starter relay kit in my 4Runner to cure an intermittent starting problem. While my starter solenoid contacts were in good shape, I would still get an intermittent "click" when I tried to start the engine. Since my '85 has no starter relay of any sort, the ignition switch provides power to the starter solenoid directly. After 19+ years of use, I figured it was getting tired. So, by adding the relay, I took the heavy current load off the ignition switch and let the relay handle it. Installation was a snap, clip the wire running to the solenoid and run it to the relay coil, then the output wire of the relay to the solenoid and finally run the heavy relay power wire (via the supplied circuit breaker) down the the 12V post on the starter. The relay kit includes an engine "bump" switch which allows for bumping and starting the engine from under the hood. I may also run a second switch in parallel back to the dash to use as a starter button for on the trail. Take the wear and tear off the old ignition switch and make it last as long as possible. Since installing the Painless relay kit, I've experienced no more starting problems, it cranks as soon as you turn the key every time. The wiring of the Painless relay kit is very much like shown below, I just followed the included directions (see link to PDF file).
I chose to not make any permanent wiring changes to my vehicle for two reasons:
- I wanted to be able to revert to stock or bypass that relay in the event it failed on me in the middle of nowhere.
- I did not have access to a mating connector for the existing Toyota factory starter solenoid connector and the one that came with the Painless kit did not match, so I left the stock connector where it was.
So, to install it all I did was to cut the small wire running to the starter solenoid and then I added a male and female spade lug connector on the two cut ends. So to test that I did no permanent changes, I can simply plug those two connectors back together and the wire is just like before electrically. Then I simply used these two connectors to splice in the relay. I used mating connectors to tie in the relay. The incoming signal (that originally came from the ignition switch) is run to the relay coil (the small purple wire as I recall), the output from the relay contact (the large purple wire) is tied into the remaining wire at the solenoid. Only other relay kit connections are a chassis ground (black wire) and constant power (red wire) from either the battery or the starter power terminal. The kit includes a circuit breaker to protect the relay and wiring from over-current.
But if your vehicle already has a starter relay (check your Factory Service Manual wiring diagrams) you may want to just troubleshoot the existing system and make it work properly. Troubleshooting the starting system is not really complicated, just pick some point in the circuit that you can access, say the control wire on the solenoid, and see if the voltage and current at that point are good or not. If not, its something between the stater solenoid and the ignition switch. If you have relay, check out out, you can put your hand on the relay and feel if it clicks when the key is turned. Check the coil resistance and see if the contacts have continuity when the relay is energized. Check wires and connectors for corrosion or damage. Make sure any neutral-start or clutch-cancel circuits are working and adjusted properly. Spend the time to find the CAUSE of the problem and don't just treat the SYMPTOMS. And if you have an automatic transmission (A/T as designated in the diagram below), the Neutral Start switch may often take the place of the starter relay. It is a mechanical contact actuated by the A/T shift linkage to indicate the transmission is in NEutral (or Park) for safe starting.
Below is one interesting fix from user "Big Ern" on the Pirate BBS. He noted that on later model vehicles with manual transmissions, the factory starter relay is energized by the ignition key as expected. However, the power source that the feeds the starter solenoid also comes from the ignition switch. He reasoned that if you cut the wire at the relay that connected to pin 3 (the relay coil) and pin 4 (the relay contact) and ran a separate wire (fused of course - a 30 amp fuse or circuit breaker should be sufficient - the solenoid pulls about 20 amps when energized) to the battery to pin 4, then the relay would be able to pass the full battery voltage to the starter, instead of the somewhat reduced voltage present at the ignition switch. This would also take most of the current load off the ignition switch making it last longer. You might want to make this wire modification easy to access, since if the relay were to ever stick in the ON mode, the starter would continue to run even though the key were turned off. See below for the wiring diagram and modification:
| Socket | Female |
| 1 | 2 |
| 3 | 4 |
And where is the stater relay? It is usually located on the passenger side fender. It is a metal capped relay with the words "Starter Relay" on it. And if it is not in that location, simply follow the small wire off the starter solenoid and see where it runs to. The starter relay (if present) should be located fairly close the the load it controls (i.e. the starter).
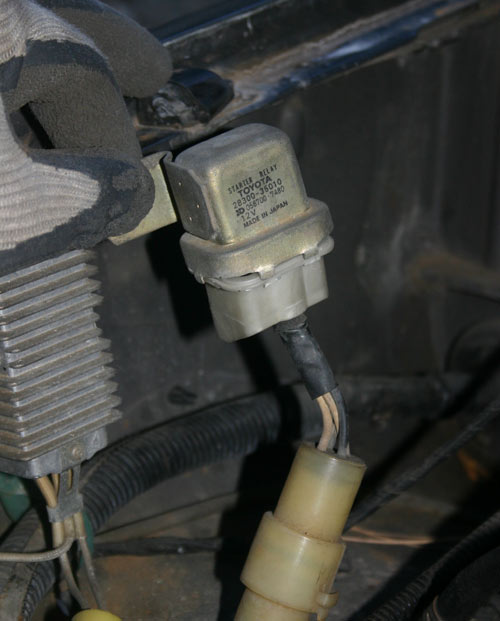
Note that starter relays only started being used about the 1986 model year on the Toyota pickups and 4Runners. One way to find the relay if it is not easily seen, is to follow the small wire from the starter solenoid back to the relay, if there is one.
References:
- The Toyota Factory Service Manual has a good section covering the starter
- A write-up for the 3VZE (3.0L V6) repair
- Another write-up on 3VZE (3.0L V6) starter solenoid repair
- A write-up on replacing the contacts in a Toyota Previa
- Starter Removal and Reinstallation on the Toyota 3.4 V6 Engine
[Back to the top of the page] Back to the Cheap Tricks main page.

Visitor # since 28.AUG.2001
[Last updated: 11.June.2025 ]