
Custom Leaf Spring Shims, Blocks and Spacers
 Designed and manufactured in
the USA by Visual Diagnostics LLC
Designed and manufactured in
the USA by Visual Diagnostics LLC
At this time, 4Crawler Offroad will no longer be making custom shims, relocation plates or lift blocks. We still have a limited stock of leaf spring center pins in stock. Check these links for other options:
- Pinion angle shims on Amazon.
- Axle lift blocks on Amazon.
- Axle relocation plates on Amazon.
-
There are many other sources available with a quick web search, examples:
- Summit Racing
- Tom Woods
- Offroad Design
- 4 Wheel Parts
-
Or look for a local or on-line machine shop or fabricator and see if they can help you out
- For example, ProtoLabs.com, eMachineShop.com, Xometry.com, Hubs.com, ProtoTek.com
- To facilitate that, we've made a free, 3D CAD model available
Contents:
- Introduction
- Custom Shims
-
Ordering
-
Shims:
- Standard 2" (50mm) Width Shims - SOLD-OUT
- Custom Width Shims - SOLD-OUT
- Lift Blocks:
-
Axle Relocation Plates:
- Standard 2" (50mm) Width Axle Relocation Plates - SOLD-OUT
- Custom Width Axle Relocation Plates - SOLD-OUT
- Spring Perch Spacers (pickup and 4Runner front axle and FJ-40 rear axle/lean) - SOLD-OUT
- Longer Center Bolts (a.k.a. center pins)
- Toyota Emergency Brake Extensions
- Ordering Notes
-
Shims:
- Frequently Asked Questions
- References
- Installation Notes
- Contact Info.
Introduction
Custom:(adjective) "Made or done to order for a particular customer" We make these parts to order since every pair of shims if likely a unique combination of length, width, angle, and mounting style.
If you've found this web page it's likely because some change has been made to your vehicle's suspension and now you're experiencing some issues with drive shaft vibration and/or steering. As such, realize you no longer have a stock vehicle, as a stock vehicle is usually set up properly from the factory. We don't know what has been done to modify your vehicle. As such, we don't go by "X model, Y year" vehicle, instead our parts are made to the dimensions you provide us as to the angle, length, width, etc. shims or blocks that you feel would fit on your vehicle. Also, realize that this isn't a simple matter of looking up a number in a table. For example, we once ran into an on-line shop that listed a 3" lift needed a 3° shim and a 6" lift neded a 6° shim. That seemed simple enough, the 3° shim was installed with a 3" lift and vibrations ensued. It turns out, removing that shim was the fix, so no shims were needed for that lift. And you'll also run across "experts" who'll tell you to "point the pinion at the transfer case" or similar "rule"without so much as looking at your vehicle. If it were that easy, this web site wouldn't exist, nor would it be so long and detailed. Our goal is for you to understand what the cause of your particular problem is and then understand how to go about fixing it.
On leaf-sprung vehicles, shims (or wedges) are often used to modify the angle between the spring perch on the axle and the leaf spring itself. The correction may be needed because of longer spring shackles tilting the pinion out of alignment, or to change from a single-cardan to a double-cardan drive shaft (for increased drive line angle capability), or to correct steering geometry (so your trucks handles better). An alternative to shims is to cut off the spring perches and re-weld new ones on at the corrected angle, but this is a lot of work and requires careful measurement to get things lined up properly.
Anyway, for whatever reason you need a shim, you do need one. And if you need one you probably need an exact angled one, not just the angle or two the shop has. When I needed shims, I found one shop that had 3° and 6°, and another that had 4° and 8°. All of these shims were aluminum, and not the nice strong billet aluminum, no they were cheap cast aluminum. Cast aluminum can be brittle, and it tends to fatigue or deform over time, and ultimately break. On the rear axle, this can be a pain if it happens on the trail, if it happens on the front axle, this can be downright dangerous.
Since I had only been able to find low quality cast alloy shims available and only in limited angles, I decided to make my own shims from a solid piece of mild steel, cut to the desired angle. Then a flat seat for the center bolt head is cut into the base to eliminate stress at that critical point. These shims are much more resistant to breakage than cast alloy shims. After locating a material source, developing the mfg. process, and forming a company to produce them, 4Crawler Offroad can now make these made-to-order shims available to others. If you want to "roll your own", click here for a VRML model of my shim design (5°). These shims are used to correct drive line and steering angles on leaf-sprung vehicles. Feel free to read my article on measuring drive line angles here before ordering. Finally, for permanent mounting, steel shims can easily be welded to the spring perch. No worries about shims breaking, twisting or falling out on the trail.
Lift blocks are similar to shims, except they are designed to add lift (to a spring over axle) or drop (to a spring under axle) and optionally may have a bevel cut in the top for pinion angle correction. Common aftermarket blocks use extruded aluminum sections. The thin wall material is prone to fatigue and cracking. 4Crawler Offroad can also make solid billet aluminum lift blocks with built-in angles. With the solid material, the blocks will hold up to the heaviest vehicles and loads.
[Return to the top of this page]Custom Shims:
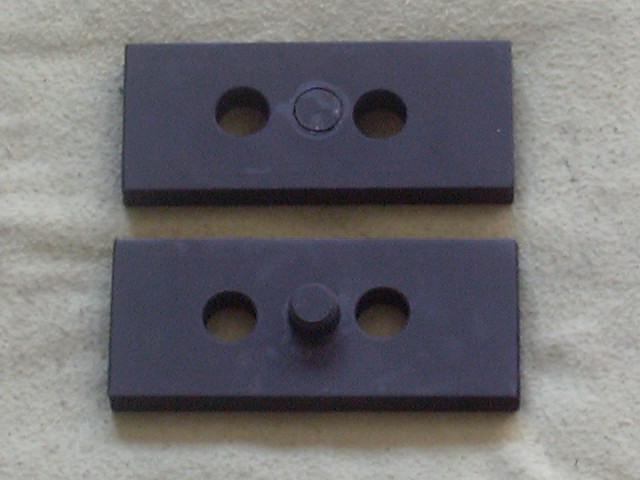
Below, you can see a few versions that 4Crawler Offroad has produced over the years:
- Photo A: Is a bolt-on shim, it is drilled for the center bolt to go through, there is a bolt head relief flat ground or milled to allow the bolt head of the center bolt to rest flat, then the shim is bolted to the rest of the spring pack. With aluminum shims, this is your only option. This shim has also been precision machined in the "high accuracy shim" option.
- Photo B: In the center is a picture of an 8° weld-on shim. Since the shim is steel and the spring perch is steel, one way to ensure the shim stays put is to weld it to the spring perch. Then, the head of the center bolt goes into the hole in the shim, so you don't need to remove or replace your old center bolt.
-
Photo C: On the lower right is a custom width 2° bolt-on shim,
3" (76,,) wide, 5-3/8" (136mm) long cut from 3/8" (10mm)
stock for minimum thickness
- Longer center bolts and for Toyota rear axles emergency brake extensions are available if needed.
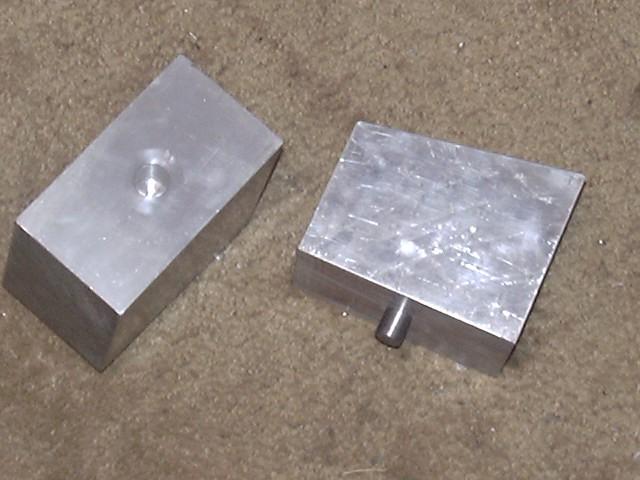
- Photo D: A pair of tapered lift blocks in billet aluminum with pressed in locating pins
- Photo E: A pair of shims with offset center holes for use with relocated axles via offset spring perch holes
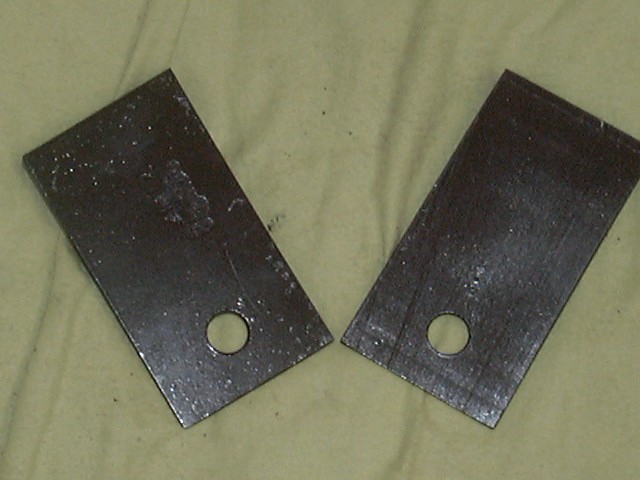
- Photo F: A pair of axle relocation plates, locating pin locks the plate into the perch, new holes allow spring to be moved forward or back as desired.
-
The maximum length of the steel shims will depend upon the angle and
the material used:
- At 14°, 3-1/5" (89 mm) is about the limit on shim length using the thickest 1" (25mm) stock
- At 12°, 4-1/8" (104 mm) is about the limit on shim length using the thickest 1" (25mm) stock
- At 11°, 4-1/2" (114 mm) is about as long as can be cut
- At 10°, 4-3/4" (120 mm) is about as long as can be cut
- At 9°, 5-1/4" (133 mm) is about as long as can be cut
- At 8° and less. 6" (152 mm) long shims are possible
-
Note that the above length limits are not "standard shim
lengths", they simply represent the longest shim that can be cut
at a given angle from our thickest standard material.
-
Shims can be extended the above lengths about 1" (25 mm) with a
welded on extension piece or laminated/welded up in thickness.
- Shims above 12° can also be fabricated with this technique
- Shims can also be cut from billet aluminum in arbitrary dimensions
- Contact 4Crawler Offroad for details
-
Shims can be extended the above lengths about 1" (25 mm) with a
welded on extension piece or laminated/welded up in thickness.
Below are some examples of various shim styles, tapered blocks, relocation plates:
 |
 |
 |
 |
| A: 3° Bolt-On Shim High accuracy shim pictured |
B: 8° Weld-On Shim | C: 2° Bolt On 3" (76 mm) Wide |
D: 10° tapered AL block w/ flat side pin |
 |
 |
 |
 |
| E: Offset Center Holes | F: Spring Relocation Plates | G: Extra long (2.5" x 8") shims | H: Twin hole shim for - Ford F150/Raptor model |
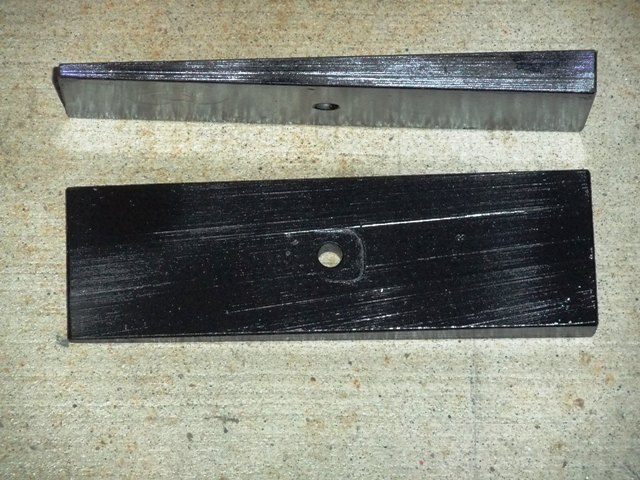
Below is a closeup of some of the design details 4Crawler Offroad incorporates in the shims. First is the above mentioned center bolt head relief pocket. By creating a flat pocket for the head of the center bolt (on bolt-on shims) you prevent stress on the center bolt which could otherwise cause the head of the bolt to bend, as pictured in this photo. Also, each shim is stamped in 1 or 2 places with the angle it was cut to. This will come in handy down the road when you need to change angles for whatever reason. On several occasions, customers have run into trucks with existing shims (of unknown angle) where it is needed to add or subtract a few degrees. Without pulling the shim out, its very difficult to get an accurate angle off it. With the angle stamped into the end and the face, it should be visible in most situations.
 |
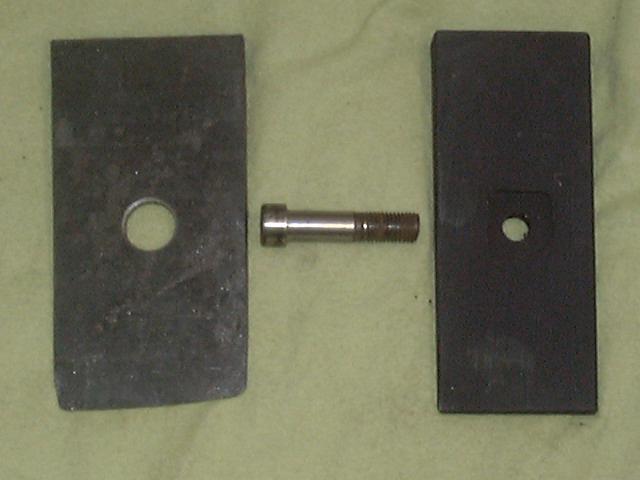 |
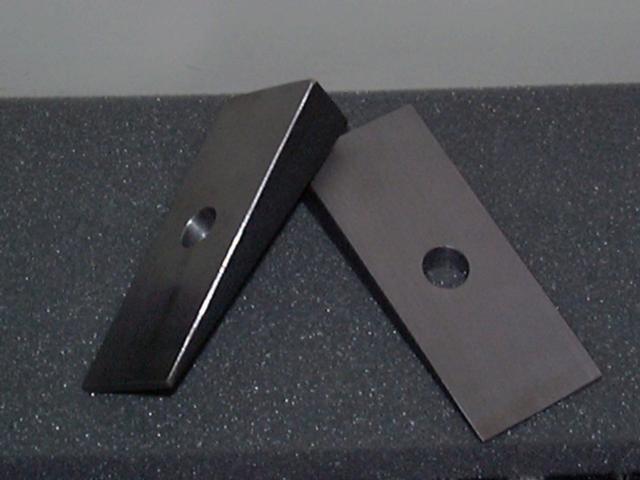
| Closeup of shim details | Weld-on vs. Bolt-on shim |
In the image above-right, is pictured a weld-on and bolt-on shim with a spring center bolt in the middle. The weld-on shim has a center bolt hole large enough for the head of the center bolt to fit. The shim itself is designed to be welded to the spring perch, in effect becoming a permanent part of the perch. The bolt-on shim has a center bolt hole only large enough for the shaft of the center bolt to fix. The head of the center bolt then fits into the machined pocket in the shim and then engages the hole in the spring perch as normal. In this case, the shim becomes part of the spring pack.
Note the difference between the thin shims and the thick tapered blocks. In the shims, there is only a hole in the middle. In the blocks, there is a hole on one side and a pin on the other side. So, can shims be made with a hole/pin combination? Unless the center of the shim is thicker than 3/4" (19 mm) - 1" (25 mm), there is simply not enough room for a hole deep enough for the head of the center bolt (they can be up to 1/2" (12,5 mm) tall) and the pressed in pin, which needs to be 3/8" (10 mm) or so deep. Since all the "shims" are made under 1/2" (12.5 mm) thick, they can only be had in the through-hole design. If the hole/pin design is desired, then a tapered block will be required.
[Return to the top of this page]Ordering:
At this time, 4Crawler Offroad will no longer be making custom shims, relocation plates or lift blocks. We still have a limited stock of leaf spring center pins in stock. Check these links for other options:
- Pinion angle shims on Amazon.
- Axle lift blocks on Amazon.
- Axle relocation plates on Amazon.
-
There are many other sources available with a quick web search, examples:
- Summit Racing
- Tom Woods
- Offroad Design
- 4 Wheel Parts
-
Or look for a local or on-line machine shop or fabricator and see if they can help you out
- For example, ProtoLabs.com, eMachineShop.com, Xometry.com, Hubs.com, ProtoTek.com
- To facilitate that, we've made a free, 3D CAD model available
4Crawler Offroad can machine solid steel axle shims, custom angles, 1°-12°, made to your specifications:
-
Note: Due to material limitation, there are certain angle vs. length
limits for the steel shims as noted below:
- 15° = 3-3/8" ( 85mm) long maximum
- 14° = 3-5/8" ( 90 mm) long maximum
- 13° = 3-7/8" ( 98mm) long maximum
- 12° = 4-1/8" (104 mm) long maximum
- 11° = 4-1/2" (121 mm) long maximum
- 10° = 4-3/4" (120 mm) long maximum
- 9° = 5-5/8" (144 mm) long maximum
-
8° or less can be cut up to 6" (152 mm) in length
-
For longer (up to 1"/25mm longer than the above limits) high angle
shims, extensions can be welded on; order the "high angle
shim" option for the shim width you desire:
- For example, with welded-on extensions, 12° angle can be cut up to 5-1/8" (130 mm) long and and 10° up to 5-3/4" (146 mm) long
-
For shims more than 1" longer than the above limits or over
6"/150 mm long or more than 12°), we can make extra long high
angle shims by laminating steel into larger blocks:
- Laminated/welded steel shims allow for shims up to 6" (152 mm) long and/or angles above 12° to be made
- Steeper angles can be cut as well, using the billet aluminum material which is available in greater thicknesses
-
For longer (up to 1"/25mm longer than the above limits) high angle
shims, extensions can be welded on; order the "high angle
shim" option for the shim width you desire:
- For custom width shims wider than 3" (76 mm), order the "high angle" custom width shim.
-
To find out what size shim you need, measure
the length and width of the spring perch on the axle before ordering.
- Ordering a shim longer than required is not "better", it will only make the shim thicker than needed and the extra shim length will likely just be bent over the end of the spring perch.
- Shims exceeding the above sizes/angles will incur additional cost, inquire for an estimate before ordering.
-
1" (25 mm) thick is the maximum steel material thickness,
resulting in a shim with a ~1/2" (12.5 mm) center thickness.
- If thicker lift shims are needed in steel, 1/2" (12.5 mm) and 1" (25 mm) thick spacers can be welded to the bottom of the shim at an additional cost or $8.00/pair
- Order both the shim and the desired thickness spacer and the shim will be supplied welded to the spacer.
- These shims will be made from laminated/welded steel to increase the thickness/length as needed. As such, the finish will not be as clean as the shim cut from a single piece of steel. If this is an issue for you, you might consider ordering shims from another supplier.
-
Shipping:
- Ships via USPS Priority Flat Rate Envelope or Small Flat Rate Box
- Expedited shipping add-on available...
- Please, PLEASE be sure to include a valid shipping address capable of receiving US mail deliveries.
- The tapered lift blocks are custom-ordered and shipping will depend on weight and destination.
- Alternate shipping arrangements are possible, please contact 4Crawler Offroad before ordering.
-
Most items below are priced per pair (pair).
-
So when you see "Qty. 1" in the order form, that is "1
pair" or 2 shims.
- Unfortunately, it is not possible to alter the order form to reflect the per pair quantity.
-
If you want 2 shims of the same dimensions, order 1 pair (Qty. 1).
- Usually 1 pair of shims is sufficient for one axle.
- Put a shim between each spring perch and the spring and the u-bolts will roll around the axle tube to adjust to the angle change.
-
If you want 2 (or more) pair of shims, order quantity 2 or more as
needed.
- Some axles may require 2 shims per side.
- This is the case if you have a square u-bolt or for axles with a u-bolt eliminator kit.
- In this case, you'll need one shim between the spring and herch and another spring between the perch and u-bolt or spring plate.
-
So when you see "Qty. 1" in the order form, that is "1
pair" or 2 shims.
- For multiple item orders, see this section of the web page.
- Please refer to the ordering notes for other options...
- And please refer to the accuracy specifications of the standard shims and if you feel your requirements are more stringent than that, be sure to add the high accuracy option to your order.
Standard 2" (50 mm) wide steel shims:
If you want a shim wider (or narrower) than 2" (50 mm), order the CUSTOM WIDTH shim.
We have 3 options available for the standard 2" / 50mm wide shims:
- Any length up to 6" (152 mm) and 2" (50 mm) wide (only) and length/angle within these limits.
-
For shims longer than permitted to be cut from a single piece of stock,
order the custom length shim
for up to 1" (25 mm) longer
- These shims will be made from laminated/welded steel to increase the thickness/length as needed. As such, the finish will not be as clean as the shim cut from a single piece of steel.
-
For extra long or high angle shims
more than 1" (25 mm) longer than length/angle
limits listed above or for lengths greater than 6" or for
angles steeper than 12° or for shim thickness exceeding 1"
- These shims will be made from laminated/welded steel to increase the thickness/length as needed. As such, the finish will not be as clean as the shim cut from a single piece of steel.
Standard 2" shims:
At this time, 4Crawler Offroad will no longer be making custom shims, relocation plates or lift blocks. We still have a limited stock of leaf spring center pins in stock. Check these links for other options:
- Pinion angle shims on Amazon.
- Axle lift blocks on Amazon.
- Axle relocation plates on Amazon.
-
There are many other sources available with a quick web search, examples:
- Summit Racing
- Tom Woods
- Offroad Design
- 4 Wheel Parts
-
Or look for a local or on-line machine shop or fabricator and see if they can help you out
- For example, ProtoLabs.com, eMachineShop.com, Xometry.com, Hubs.com, ProtoTek.com
- To facilitate that, we've made a free, 3D CAD model available
-
Any length up to 6" (152 mm) and 2" (50 mm) wide (only)
-
Note for extra long or high angle shims
(greater than 8°) or shims longer than 6" (152 mm):
- If this is an issue for you, you might consider ordering shims from another supplier.
- Or order 2 shims and the material will be laminated/welded to increase the thickness for a single shim.
-
Note for extra long or high angle shims
(greater than 8°) or shims longer than 6" (152 mm):
- The shim design minimizes the length of the center bolt, but if your's is near the end of its length, you may need to use a longer center bolt. It needs to be long enough to pass through all the leaves of your spring pack, the shim and any blocks you may have as well leaving sufficient threads exposed for the retaining nut. The shim thickness will vary with the angle, a 3° shim adds about 3/16" to the bolt length, 5° about 1/4", 8° about 3/8", etc.
- Need more than a single hole in the shims? Here's how to add more holes to your shim order here.
- Cost: US$30.00/pair (i.e. 2 shims) plus shipping and applicable sales tax:
| US delivery | Canada delivery | International delivery |
Use the buttons below to order high angle shims up to 1" (25 mm) longer than the length/angle limits listed above or for angles steeper than 12°:
- Cost: US$45.00/pair (i.e. 2 shims) plus shipping and applicable sales tax:
| US delivery | Canada delivery | International delivery |
Use the buttons below to order extra long or high angle shims more than 1" (25 mm) longer than length/angle limits listed above or for lengths greater than 6" or for angles steeper than 12° or for shim thickness exceeding 1":
-
These shims will be made from laminated/welded steel to increase the
thickness/length as needed. As such, the finish will not be as clean as
the shim cut from a single piece of steel.
- If this is an issue for you, you might consider ordering shims from another supplier.
- Cost: US$60.00/pair (i.e. 2 shims) plus shipping and applicable sales tax:
| US delivery | Canada delivery | International delivery |
Custom width steel shims:
Any width other than 2" (50 mm) wide, up to 3" (76 mm) wide and 6" (152 mm) long
At this time, 4Crawler Offroad will no longer be making custom shims, relocation plates or lift blocks. We still have a limited stock of leaf spring center pins in stock. Check these links for other options:
- Pinion angle shims on Amazon.
- Axle lift blocks on Amazon.
- Axle relocation plates on Amazon.
-
There are many other sources available with a quick web search, examples:
- Summit Racing
- Tom Woods
- Offroad Design
- 4 Wheel Parts
-
Or look for a local or on-line machine shop or fabricator and see if they can help you out
- For example, ProtoLabs.com, eMachineShop.com, Xometry.com, Hubs.com, ProtoTek.com
- To facilitate that, we've made a free, 3D CAD model available
-
Note for high angle shims (more than 8°)
or shims longer than 6" (152 mm) or wider than 3" (76 mm):
- If you want a shim of longer length that permitted to be cut from a single piece of stock, with order the custom length shim (see order buttons below):
- Or order 2 shims and the material will be laminated/welded to increase the thickness for a single shim.
- Shims cut from 1/2" (12.5 mm) or 1" (25 mm) thick stock, ideal for higher angle shims
- Need more than a single hole in the shims, add more holes to your order here.
- Cost: US$45.00/pair (i.e. 2 shims) plus shipping and applicable sales tax:
| US delivery | Canada delivery | International delivery |
Use the buttons below to order a high angle shim up to 1" (25 mm) longer than length/angle limits listed above or for wider than 3" (76 mm up to 4" - 100 mm wide) or for angles steeper than 12°:
- Note, this shim option applies to only a single specification exceeding the above limits, if you need a high angle and an extra wide shim, or your shim is more than 1" longer than the length/angle limits, order the shim option below.
- Cost: US$60.00/pair (i.e. 2 shims) plus shipping and applicable sales tax:
| US delivery | Canada delivery | International delivery |
Use the buttons below to order extra long and/or high angle shims more than 1" (25 mm) longer than length/angle limits listed above and/or for lengths greater than 6" (152 mm) and/or widths greater than 3" (76 mm) and/or for angles steeper than 12° or for shim thickness exceeding 1" (25 mm):
-
These shims will be made from laminated/welded steel to increase the
thickness/length as needed. As such, the finish will not be as clean as
the shim cut from a single piece of steel.
- If this is an issue for you, you might consider ordering shims from another supplier.
- Cost: US$75.00/pair (i.e. 2 shims) plus shipping and applicable sales tax:
| US delivery | Canada delivery | International delivery |
Steel lift blocks (1/2", 3/4" and 1" tall, standard 2" width) in bolt-on or weld-on lift blocks.
At this time, 4Crawler Offroad will no longer be making custom shims, relocation plates or lift blocks. We still have a limited stock of leaf spring center pins in stock. Check these links for other options:
- Pinion angle shims on Amazon.
- Axle lift blocks on Amazon.
- Axle relocation plates on Amazon.
-
There are many other sources available with a quick web search, examples:
- Summit Racing
- Tom Woods
- Offroad Design
- 4 Wheel Parts
-
Or look for a local or on-line machine shop or fabricator and see if they can help you out
- For example, ProtoLabs.com, eMachineShop.com, Xometry.com, Hubs.com, ProtoTek.com
- To facilitate that, we've made a free, 3D CAD model available
- Note, spacer is flat, no taper, also known as a "zero rate leaf"
- 2" width, length up to 6" long, and heights of 1/2", 3/4" or 1" tall
-
Choice of mounting options:
- Bolt-on spacer has a hole for the center bolt (3/8") or as specified
- The weld-on spacer has a hole for the center bolt head (5/8") or as specified
- Cost: $30.00/pair (i.e. 2 blocks) plus shipping and applicable sales tax.
- Specify bolt-on or weld-on, length and height:
| US delivery | Canada Delivery | International delivery |
-
Want a taller block?
- Order as many 1" blocks as needed to make the height you want and they will be welded together into a single piece.
- So, for a 2" solid steel block, order qty. 2 of the 1" tall blocks above or below:
Bolt-on w/ pressed in locating pin (US$40.00/pair (i.e. 2 blocks)):
At this time, 4Crawler Offroad will no longer be making custom shims, relocation plates or lift blocks. We still have a limited stock of leaf spring center pins in stock. Check these links for other options:
- Pinion angle shims on Amazon.
- Axle lift blocks on Amazon.
- Axle relocation plates on Amazon.
-
There are many other sources available with a quick web search, examples:
- Summit Racing
- Tom Woods
- Offroad Design
- 4 Wheel Parts
-
Or look for a local or on-line machine shop or fabricator and see if they can help you out
- For example, ProtoLabs.com, eMachineShop.com, Xometry.com, Hubs.com, ProtoTek.com
- To facilitate that, we've made a free, 3D CAD model available
- This option only for 3/4" and 1" tall blocks.
- Also can do offset center holes for axle relocation, specify offset in special instructions field of order form or send us an e-mail with the order number and details.
| US delivery | Canada delivery | International delivery |
Steel lift blocks (1/2" and 1" tall, custom width) in bolt-on or weld-on lift blocks.
At this time, 4Crawler Offroad will no longer be making custom shims, relocation plates or lift blocks. We still have a limited stock of leaf spring center pins in stock. Check these links for other options:
- Pinion angle shims on Amazon.
- Axle lift blocks on Amazon.
- Axle relocation plates on Amazon.
-
There are many other sources available with a quick web search, examples:
- Summit Racing
- Tom Woods
- Offroad Design
- 4 Wheel Parts
-
Or look for a local or on-line machine shop or fabricator and see if they can help you out
- For example, ProtoLabs.com, eMachineShop.com, Xometry.com, Hubs.com, ProtoTek.com
- To facilitate that, we've made a free, 3D CAD model available
- Note, spacer is flat, no taper, also known as a "zero rate leaf"
- Width up to 3", length up to 6" long, 1/2" or 1" tall
-
Choice of mounting options:
- Bolt-on spacer has a hole for the center bolt (3/8") or as specified
- The weld-on spacer has a hole for the center bolt head (5/8") or as specified
-
Cost: US$45.00/pair (i.e. 2 blocks) plus shipping and applicable
sales tax.
- Some international shipments may cost more due to weight.
- Specify bolt-on or weld-on, length and width:
| US delivery | Canada delivery | International delivery |
-
Want a taller block?
- Order as many 1" blocks as needed to make the height you want and they will be welded together into a single piece.
- So, for a 2" solid steel block, order qty. 2 of the 1" tall blocks above or below:
Bolt-on w/ pressed in locating pin ($55.00/pair (i.e. 2 blocks)):
At this time, 4Crawler Offroad will no longer be making custom shims, relocation plates or lift blocks. We still have a limited stock of leaf spring center pins in stock. Check these links for other options:
- Pinion angle shims on Amazon.
- Axle lift blocks on Amazon.
- Axle relocation plates on Amazon.
-
There are many other sources available with a quick web search, examples:
- Summit Racing
- Tom Woods
- Offroad Design
- 4 Wheel Parts
-
Or look for a local or on-line machine shop or fabricator and see if they can help you out
- For example, ProtoLabs.com, eMachineShop.com, Xometry.com, Hubs.com, ProtoTek.com
- To facilitate that, we've made a free, 3D CAD model available
- This option available only for 1" tall blocks.
- Also can do offset center holes for axle relocation, specify offset in special instructions field of order form or send us an e-mail with the order number and details.
| US delivery | Canada delivery | International delivery |
2" Wide Axle Relocation Plates (specify length in the Note field):
At this time, 4Crawler Offroad will no longer be making custom shims, relocation plates or lift blocks. We still have a limited stock of leaf spring center pins in stock. Check these links for other options:
- Pinion angle shims on Amazon.
- Axle lift blocks on Amazon.
- Axle relocation plates on Amazon.
-
There are many other sources available with a quick web search, examples:
- Summit Racing
- Tom Woods
- Offroad Design
- 4 Wheel Parts
-
Or look for a local or on-line machine shop or fabricator and see if they can help you out
- For example, ProtoLabs.com, eMachineShop.com, Xometry.com, Hubs.com, ProtoTek.com
- To facilitate that, we've made a free, 3D CAD model available
- 2" wide, 3/8" thick
-
5/8" locating pin and 5/8" holes offset 3/4" and 1"
from center standard
- Custom offsets (3/4" or more) and pin sizes available, specify in the order Note field
-
Default length is 4-3/4" long, available thicknesses: 3/8" or 1/2".
- Custom lengths available, up to 6" long
- Cost: $35.00/pair (i.e. 2 plates) plus shipping and applicable sales tax.
| US delivery | Canada delivery | International delivery |
At this time, 4Crawler Offroad will no longer be making custom shims, relocation plates or lift blocks. We still have a limited stock of leaf spring center pins in stock. Check these links for other options:
- Pinion angle shims on Amazon.
- Axle lift blocks on Amazon.
- Axle relocation plates on Amazon.
-
There are many other sources available with a quick web search, examples:
- Summit Racing
- Tom Woods
- Offroad Design
- 4 Wheel Parts
-
Or look for a local or on-line machine shop or fabricator and see if they can help you out
- For example, ProtoLabs.com, eMachineShop.com, Xometry.com, Hubs.com, ProtoTek.com
- To facilitate that, we've made a free, 3D CAD model available
And now available, low offset relocation places for those needing to relocate the axle less than 3/4". These plates will be 3/4" thick and allow center hole/pin offsets of 0" - 3/4". This is due to needing to have plate depth to drill a 5/8" center bolt hole 3/8" deep in one side of the plate (to accommodate the head of the existing center pin) and to seat the 5/8" center pin ~3/8" deep in the other side of the plate. Specify the offset of the single offset hole in the "Note to Seller" field of the order form or via e-mail.
Cost: $35.00/pair (i.e. 2 plates) plus shipping and applicable sales tax.
| US delivery | Canada delivery | International delivery |
Custom Width Axle Relocation Plates:
At this time, 4Crawler Offroad will no longer be making custom shims, relocation plates or lift blocks. We still have a limited stock of leaf spring center pins in stock. Check these links for other options:
- Pinion angle shims on Amazon.
- Axle lift blocks on Amazon.
- Axle relocation plates on Amazon.
-
There are many other sources available with a quick web search, examples:
- Summit Racing
- Tom Woods
- Offroad Design
- 4 Wheel Parts
-
Or look for a local or on-line machine shop or fabricator and see if they can help you out
- For example, ProtoLabs.com, eMachineShop.com, Xometry.com, Hubs.com, ProtoTek.com
- To facilitate that, we've made a free, 3D CAD model available
- Over 2" wide, 1/2" thick
-
5/8" locating pin and 5/8" holes offset 3/4" and 1"
from center standard
- Custom offsets and pin sizes available, specify in the order Note to Seller or via separate e-mail.
-
Default length is 4-3/4" long
- Custom lengths available, up to 6" long, specify in the order Note to Seller field
- Cost: $45.00/pair (i.e. 2 plates) plus shipping and applicable sales tax.
- For the Mazda B2200 / Belltech relocation blocks, see below.
| US delivery | Canada delivery | International delivery |
Belltech Relocation Plates:
At this time, 4Crawler Offroad will no longer be making custom shims, relocation plates or lift blocks. We still have a limited stock of leaf spring center pins in stock. Check these links for other options:
- Pinion angle shims on Amazon.
- Axle lift blocks on Amazon.
- Axle relocation plates on Amazon.
-
There are many other sources available with a quick web search, examples:
- Summit Racing
- Tom Woods
- Offroad Design
- 4 Wheel Parts
-
Or look for a local or on-line machine shop or fabricator and see if they can help you out
- For example, ProtoLabs.com, eMachineShop.com, Xometry.com, Hubs.com, ProtoTek.com
- To facilitate that, we've made a free, 3D CAD model available
For the Mazda B2200 pickups with Belltech lowering springs, we now offer a combination 1" lowering block combined with an axle relocation feature. The blocks will have a 9/16" pin on one side and then a hole on the other side 1" offset from center to allow for moving the axle forward or back by that distance. Simple installation, drop the desired hole on top of the spring center pin head and then insert the pin into the center hole of the spring perch, no need to remove or replace the existing center pin. You'll need at least 1" of exposed u-bolt threads to install these blocks. If not, be sure to pick up a new set of longer u-bolts prior to installation. Cost: US$85.00 / pair.
| US delivery | Canada delivery | International delivery |
Spring Perch Spacers:
At this time, 4Crawler Offroad will no longer be making custom shims, relocation plates or lift blocks. We still have a limited stock of leaf spring center pins in stock. Check these links for other options:
- Pinion angle shims on Amazon.
- Axle lift blocks on Amazon.
- Axle relocation plates on Amazon.
-
There are many other sources available with a quick web search, examples:
- Summit Racing
- Tom Woods
- Offroad Design
- 4 Wheel Parts
-
Or look for a local or on-line machine shop or fabricator and see if they can help you out
- For example, ProtoLabs.com, eMachineShop.com, Xometry.com, Hubs.com, ProtoTek.com
- To facilitate that, we've made a free, 3D CAD model available
-
For vehicles with Toyota front axles who want to run equally arched
springs. If you run equally arched springs without this spacer, you can
see 3/4" or more tilt in your vehicle.
- Note: Use of this spacer with stock push-pull steering is not recommended due to drag link/u-bolt clearance issues
- Also useful for FJ-40 Landcruisers or other vehicles with a lean to one side.
-
Bolt-on or weld-on spacers for the lower spring perch, raises it to the
level of the other perch (3/8')
- The spacer is the proper thickness to make both perches the same height
- The bolt-on spacer has a hole for the center bolt (3/8" or 10mm typical)
- The weld-on spacer has a hole for the center bolt head (5/8")
- Can also incorporate this offset into shims, blocks, etc.
- A 2" wide spacer (5-1/4" perch length typical) costs US$15.00 plus shipping and applicable sales tax.
| US delivery | Canada delivery | International delivery |
- A custom width spacer (2-3/8" spring or 2-1/2" perch width, 5-1/4" perch length typical) costs US$25.00 plus shipping and applicable sales tax.
| US delivery | Canada delivery | International delivery |
Longer center bolts:
- May be needed with bolt on axle shims.
- Bolts are threaded approx. 4" long, so can be cut to length as needed.
-
3/8" center bolts with nuts (will also replace 10mm import center
bolts)
- 3/8" seems to be the most common size, but 5/16" (~8 mm) and 7/16" (~11 mm) are other sizes available
-
Cost is US$9.00/pair plus shipping and applicable sales tax.
- If you need 2 pair, such as for the Ford F150 pickups, set Quantity = 2 in the 2nd order screen:
Typical center pin dimensions, may vary:
| Shank Dia | Metric | Bolt Length | Unthreaded | Thread Length | Head Dia. |
| 5/16" | 8mm | 2.25" | 1.0" | 1.25" | 0.46" |
| 5/16" | 8mm | 3.0" | 1.6" | 1.4" | 0.46" |
| 3/8" | 10mm | 3.0" | 1.6" | 1.4" | 0.55" |
| 3/8" | 10mm | 3.5" | 1.8" | 1.7" | 0.55" |
| 3/8" | 10mm | 5.0" | 1.0" | 4.0" | 0.56" |
| 7/16" | 11mm | 4.0" | 2.5" | 1.5" | 0.65" |
| 1/2" | 12.5mm | 4.0" | 2.1" | 1.9" | 0.74" |
The unthreaded shank length will be the difference of the bolt length and the thread length.
- For example on the 5/16 x 2-1/4 bolt, 1" long.
Center Pin Ordering: sold in pairs (i.e. 2 bolts/nuts)
| Add a pair to a an existing order i.e. no added postage |
Order for US delivery, i.e. adds first class mail postaage |
Order for International delivery, i.e. adds international postage |
Toyota e-brake lever extensions:
- Click here for installed image
- Click here for installation instructions
- Lengthens the e-brake arms to clear taller spring packs, or when running blocks and/or thick shims
-
Can be drilled to raise the e-brake lever attachment point between
1" and 2"
- With the spring over axle configuration, it is possible that adding a thick shim or spacer between the axle and springs can lift the top of the spring pack high enough that the e-brake cable rubs on the springs.
- This can reduce e-brake effectiveness and can cause damage to the cable.
- The extensions include a hardware to attach them to the e-brake arm and are shipped without a top hole drilled.
- This allows you to raise the e-brake cable just enough for your needs.
- NEW: Also available with pre-drilled top holes for ease of installation.
-
Also suitable for use in a horizontal orientation to lengthen the
e-brake cables for use on a wider rear axle
- For example when upgrading from an '85 or earlier to an '86 or later rear axle that is 3" wider, the existing e-brake cables will be 1.5" short on each side.
-
P/n: E-BrakeExts, Cost: US$19.95/pair (i.e. 2 extensions) for the blank extensions or
US$24.95 for extensions with pre-drilled holes 1", 1.5" or 2"
offset from the bottom hole plus shipping and applicable sales tax:
- Ships via USPS First Class Parcel
E-Brake Extension Ordering: sold in pairs
| Add to existing order i.e. no added postage |
US delivery | Canada delivery | International delivery |
Made to order custom tapered or flat lift blocks: - SOLD-OUT
At this time, 4Crawler Offroad will no longer be making custom shims, relocation plates or lift blocks. We still have a limited stock of leaf spring center pins in stock. Check these links for other options:
- Pinion angle shims on Amazon.
- Axle lift blocks on Amazon.
- Axle relocation plates on Amazon.
-
There are many other sources available with a quick web search, examples:
- Summit Racing
- Tom Woods
- Offroad Design
- 4 Wheel Parts
-
Or look for a local or on-line machine shop or fabricator and see if they can help you out
- For example, ProtoLabs.com, eMachineShop.com, Xometry.com, Hubs.com, ProtoTek.com
- To facilitate that, we've made a free, 3D CAD model available
- Machined out of billet T6061 aluminum (solid block, no cast or extruded material used).
- In billet aluminum, blocks are available in 2", 2-1/2" and 3" widths.
-
Price varies with height/width/length but generally ranges from
US$100.00/pair on up depending on size (width, length and height), plus
shipping and applicable sales tax.
- Ships via USPS Priority Medium Flat Rate Box
-
Standard mounting with center bolt through hole, optionally a pressed
in locating pin is available for US$10.00 additional.
-
Specify if you want the pin on the flat or angled side.
- Flat side lets the block project straight up from the spring perch.
- Angled side lets the block project straight down from the springs.
- Pin and hole can be offset, if needed, for axle relocation.
- Also, we can add multiple holes on blocks of 1" thick and taller to allow for adjustment like our relocation plates.
-
Specify if you want the pin on the flat or angled side.
- Contact 4Crawler Offroad with your specifications.
Ordering Notes:
-
Unless otherwise specified, center bolt holes will be drilled
for 3/8" hardware (bolt -on shims) and 5/8" bolt head (for
weld on shims) and the hole will be centered in the shim.
- For center bolt holes larger than 5/8" (up to 1" maximum dia.), add US$5.00 for the extra machining time involved.
-
Note 5/16", 10mm and 7/16" center bolts are also used,
likewise, head sizes can range from 1/2" up to 3/4"
- Jeeps often use 5/16
- Toyota commonly uses 3/8" or 10mm
- Ford uses 1/2"
- If you are unsure of what size hole to specify, you can order shims w/o center holes or 5/16" and drill to match your vehicle.
- This applies to blocks with pressed in centering pins, the default pin size is just under 5/8", and the opposite hole is 5/8" diameter by default
- You can also specify off-center (e.g. 3/8" hole offset 1" toward the thick or thin edge of the shim) or multiple holes.
-
"Buy Now" buttons above:
-
These buttons will take you the PayPal secure web server.
If you already have a PayPal account, you may directly access it via
these buttons. If you do not have an account set up, or have an
unverified account, you may want to consult the following PayPal
HELP information before proceeding. And if you don't want
to set up a Paypal account, you may choose to simply enter your credit
card and address information to place the order w/o setting up a Paypal
account. Some advantages of having a Paypal account are:
- Only need to enter your information once
- You'll be able to check the status of your order on-line, including a direct link to package tracking information
- And with verified address and account information, your orders and shipments will be more secure
-
These buttons will take you the PayPal secure web server.
If you already have a PayPal account, you may directly access it via
these buttons. If you do not have an account set up, or have an
unverified account, you may want to consult the following PayPal
HELP information before proceeding. And if you don't want
to set up a Paypal account, you may choose to simply enter your credit
card and address information to place the order w/o setting up a Paypal
account. Some advantages of having a Paypal account are:
-
For oversize shim orders shipped outside the US, additional shipping
charges may apply:
- Regular international shipping covers shipments up to 4 lbs., this is sufficient to cover most shim/block orders
-
However, for extra thick/large shims, weighing over 4 lbs., additional
shipping charges may apply:
- You will be notified once the items are ready to ship if this applies to your order.
- For an estimate on whether this applies to your order, a shim/block volume larger than 12 cu.in. will tend to exceed the 4 lb. limit;
- e.g. a 2.5" wide, 5" long, 8 degree shim would probably exceed 4 lbs. and incur additional shipping charge.
- Note: For shims wider than 2", most shims of 5 degrees and higher will be cut from 1" thick stock, so volume will be width * length * 1" cu. in.
- For shipments to California, add applicable state sales tax (automatically added by PayPal).
- Local pickup (for orders from the SF Bay Area) is possible. Contact us with order details.
- For multiple item orders, see this section of the web page.
- And please refer to the accuracy specifications of the standard shims and if you feel your requirements are more stringent than that, be sure to add the high accuracy option to your order.
Frequently Asked Questions:
Below are some commonly asked questions along with answers. Please take a minute to browse this list and see if it answers your questions. If not, feel free to contact us.
- How do I know what angle to make my shims or if I even need shims?
- How do I figure out how long to make my shims?
- How do I figure out what width to make my shims?
- What's the difference between bolt-on and weld-on shims?
- How accurate are the shims?
- Which way do the shims go?
- How long will it take to get my shims after I order and how will they be shipped?
- What if I measure wrong, am I stuck with the shims?
- Is there any "volume" discount on shims?
- How do I order the shims and specify options?
- I only need a single shim, can I order just one?
- Are there any drawbacks to lift blocks?
- Do you make shims for other applications?
- What if I want a tapered or flat lift blocks made out of steel instead of aluminum?
- Will I need longer center pins/bolts with the bolt-on shims?
- What are the center bolt hole location and options?
- I need extra holes in my shims, e.g. Ford F-150/Raptor pickups use 2 center pins, can I get extra holes in my shims?
- What options are available for the 2WD B-series Mazda pickups?
- I have extra long spring perches (7" - 8" long), do you make shims for that?
- 1. How do I know what angle to make my shims or if I even need shims?
-
The best answer is that you would have measured all your drive line
angles before and after modifying the suspension. That way you would
have some baseline measurements to use to restore smooth operation
after the modifications. Unfortunately, nobody seems to remember to
measure before slapping on the new suspension, so you'll need to resort
to one or more of the techniques below...
- - You might contact the lift supplier and ask them what angle shim they recommend for your type of vehicle with their lift installed.
- Spring manufacturers should be able to supply this information to you.
- You may find someone else (on a web forum, Facebook group or mailing list) who has done a similar modification to their vehicle (that is similar to yours) and find out what angle shim they used for their application.
- Luckily, the Internet offers a great resource in finding this sort of information. For example if you have an early Ford Bronco, here is a great link. That link was found with a simple web search.
- Short of finding out from someone else what angle shim is needed, the only real way to know is to measure the angles. Since you are even considering adding shims means you have somehow modified your vehicle. Either you have added lift, changed springs, installed longer shackles, moved spring hangers, etc. You need to get some simple measurements to determine if shims are needed and if so, what angle shim is required. For rear axles, you only have the worry about the angle of the pinion in relation to the driveshaft.
- How to measure the driveshaft pinion angles:
- Depending on the type of driveshaft you are running, the information on how to measure may be found here.
- Not able to measure the angle shim you need? No problem. If you can set up your axle at the proper angle and measure the height difference front-rear on the spring perch as well as the length of the spring perch, we can work out that angle from those measurements. For example, if there is a 1.5" difference over a 6" long perch, that works out to a 14° angle.
- Axle Wrap considerations:
- Allow for 1° - 2° rotation at the pinion end of the shaft to account for this. Rear axle will tilt up and front axle will tilt down under load. This can be influenced by the stiffness of the springs, the weight and aero drag of the vehicle, height of any suspension lift blocks (taller = more wrap) and the size of the tires and even axle gearing. Anything that puts more torque through the axle and causes it to "wrap" or twist under the springs will increase the angle change under load. It's all fine to have your pinion angle dialed in to a fraction of a degree in the driveway, but what matters is where it sits when you're driving down the highway at speed.
- Single-cardan or u-joint drive shaft considerations:
- Ideally, you would point the two u-joints would be at equal and opposite angles of each other. Real world, you have axle wrap. That is, the leaf springs are going to deform under the torque of accelerating or driving down the road at speed, see above. Another consideration is that the vibration cancellation in u-joints diminishes the higher the operating angle is. In our experience, once you get much over 10° operating angle, your shaft may vibrate, depending in it's length, tubing dimensions and RPM. It may be worth looking into getting a double-cardan or CV style shaft made.
- Front axle pinion and caster angle considerations:
- For a leaf-sprung front axle, you can use the above measurements, but they only consider the pinion/driveshaft angles. You want to first address steering angles up front (unless you have a trail-only rig) first then worry about pinion angles. After all, if you have to choose between having proper steering geometry or a proper pinion angle (so that you can use 4WD at speed), I would choose proper steering angle any day? Why? Well if you can't drive the truck in a straight line on the road, having 4WD available at high speed becomes a moot point. I have had bad caster angle on my truck and I can tell you that the term "death wobble" is aptly named! When that front end starts hopping all over the road and seems to get progressively worse as you drive is not fun. Give me good solid steering anyway and I can live with a little front driveshaft vibration if I need to use 4WD at higher speeds every once in a while.
- So how do you measure the steering caster angle? Best is to go to an alignment shop and have them put your truck on the alignment machine and give you a printout of the angles. You'll get a list of toe-in, camber and caster as-measured and they may tell you what the angles should be. If not, consult your owners manual or a good repair manual for your vehicle. As far as what angle to use, its a direct relationship between the number of degrees your caster angle is off and the angle of the shim. For example if your vehicle specs +2° of caster and you are at +5° or -1°, you'll need a 3° shim (that is 5° - 3° = 2° or -1° + 3° = 2°), and just install it in the proper orientation to correct the angle.
- If running taller than stock tires, you may want to reduce the caster angle a bit. The reason being that the effect of caster angle is to give a horizontal separation between center of the tire's contact patch and the point where the ball joint or king pin axis would intersect the ground. The taller the tire, the less angle is needed to create that same separation.
- Here is a link to Toyota solid front axle steering alignment specifications. On the Toyota front axle, an angle of approx. 6° up (front of perch higher than the back) on the spring perch provides a decent caster angle (Note: this measurement is related to but not the actual caster angle). At this caster angle, the stock front pinion angle will be tipped up ~5° from horizontal (or 85° from vertical). So every degree you tip the pinion up/down will result in the same caster angle change. Too little caster will give poor return to center and wandering at speed. Too much caster will give a heavier feel to the steering. Best to shoot for a caster angle in the middle of the range. Realize that the caster angle will change as you change the rear ride height, either due to changing the suspension or adding load. This can be in the range of 2/3° - 1° per inch of ride height change.
- It is not uncommon for the caster angle to be off different amounts on each side of the axle. If so, this means that the front axle housing itself is not quite aligned side to side or that it is slightly bent. Best bet is to get a shim to correct the average of the two angle errors. Short of cutting off one steering knuckle and turning it to align with the opposite side, its unlikely that you'll be able to "twist" the front axle housing by using two different angle shims. If you think about it, you have a rigid steel housing attached to two flexible leaf springs with some shims in between.
- And if you want to correct BOTH the caster and pinion angles at the same time, the only way to do that properly is to cut and rotate the steering knuckles on the axle to set the proper caster angle and if needed cut and relocate the spring perches (or add shims) to set the proper pinion angle. Here is a write-up on doing this modification on a Toyota solid front axle. On some axles, like the Dana 44, you may find that one of the spring perches is cast into the side of the differential housing and is therefore difficult to modify. In that case, you can either use two shims to change the pinion angle, or cut/relocate the separate perch and then add a single shim to the cast perch to set the pinion angle.
- If you are unable to modify the front axle housing, another option is to have a custom front drive shaft made. Replace the lower u-joint with a CV joint and this will eliminate any issues with the pinion angle being out of alignment with the shaft angle.
- Realize that the front axle and pinion will tip down under load (when driving forward), so it's the opposite of the rear shaft. If you have a front CV shaft, you'll want the pinion angle to be 1° - 2° above the angle of the driveshaft to allow for this down tilt. However, if you have a front drive shaft that spins all the time, like with the "shift on the fly" type 4WD systems (like Toyota's Automatic Differential DIsconnect or ADD system), then you'll likely want the front u-joint angle in-line with the shaft angle. Why? Because you'll mainly be concerned with the shaft running smooth, while spinning freely, rather than under load which you may only do off-road in 4WD. Also, don't worry about a 0° u-joint angle "burning up" the u-joint. Why? Because it's running at no load, so no chance of "brinelling" which is where the needle bearings pound dents in the races over time. And also, unless you are driving on a glass smooth road for hundered of hours on end, any bumps int he road will cycle the suspenion enough to move the u-joint. Rough rule of thumb is an inch of ride height change is about 1° of u-jount angle change.
- Finally, with regards to shimming the front axle. If you have a steering setup with the tie rod and/or drag link above the springs, you need to be sure there is enough clearance over the springs for the steering linkage to pass when adding a shim. Since the shim will add thickness and raise the spring pack off the axle/perch, you'll need to ensure adequate clearance for the thickness of the shim.
- CV or double cardan drive shafts:
- Ideally, you would point the pinion directly at the CV joint, that is the pinion u-joint wou,ld be at a 0° operating angle. Real world, you have axle wrap. The leaf springs are going to deform under the torque of accelerating or driving down the road at speed. Allow for 1° - 2° rotation at the pinion end of the shaft to account for this. Rear axle will tilt up and front axle will tilt down under load.
- Shaft angle changes with pinion angle change:
- One complication arises when changing the pinion angle on a driveshaft. As you change the pinion angle, the driveshaft angle is also changing. Tipping the pinion up reduces the angle of the shaft. Tipping the pinion down, increases the angle of the shaft.
- It's relatively easy to determine the relationship of the relative change in the two angles. The angles change by the ratio of the respective lengths of the driveshaft and the pinion extension from the axle center line. Lets say that you measure the distance from the center of the axle to the pinion flange / u-joint yoke and find it is 12" (as measured on a Toyota 8" axle). And lets say the driveshaft measures 60" long from the transfer-case output flange to the pinion flange. This results in a 1 in 5 ratio, meaning that for every 5° of pinion angle change, the driveshaft angle will change 1/5 of that or 1°. This is easy to see if you sketch out the driveshaft and pinions to scale. Since the shim is tilting the axle at it's center line and the pinion sticks out away from that center line, it moves up and down as the angle changes. This means the bottom end of the driveshaft moves up and down by the same amount. But since it is much longer than the pinion length, the angle change is reduced by the ratio of the two lengths.
- Another way to look at it it that the pinion will tip up (or down) by exactly the angle of shim you insert between the spring perch and spring. That angle change will raise (or lower) the u-joint attached to the pinion. Since the bottom end of the drive shaft is attached to that same u-joint, it will rise (or fall) by the same amount. But since the shaft is typically longer than the axle-pinion joint length, it will move fewer degrees than the pinion was rotated. It will move at the inverse ratio of the shaft to pinion length.
- For a practical example, assume a 20° driveshaft angle and a 10° pinion angle, with a pinion length of 12" and a driveshaft length of 60". Tthis gives a 1:5 ratio (12 / 60) of angle changes. So, starting with the 10° difference, we want to end up with the pinion angle 1° - 2° below the driveshaft angle. Installing a 7° shim, we would find that the pinion angle would increase from 10° to 17°. But at the same time, the driveshaft angle would decrease by 7° x 1/5 or 1.4°, so it would end up at 18.6° (20° - 1.4°). This leaves an angle difference of 1.6°, which is within the 1° - 2° below target we were shooting for.
- For another example, assume a short wheelbase Jeep with 20° driveshaft angle and a 5° pinion angle, with a pinion length of 12" and a driveshaft length of 18". This gives a 2:3 ratio (12 / 18) of angle changes. So, starting with the 15° (20 - 5 = 15) difference, we want to end up with the pinion angle 1° - 2° below the driveshaft angle. Installing an 8° shim, we would find that the pinion angle would increase from 5° to 13° (5 + 8 = 13). But at the same time, the driveshaft angle would decrease by 8° x 2/3 or 5.3°, so it would end up at 14.7° (20° - 5.3°). This leaves an angle difference of 1.7°, which is within the 1° - 2° below target we were shooting for.
- Your measurements will likely be different than the above examples, use your measurements to work out your ratios and then follow the same steps. Also, don't get too hung up on the exact numbers and carrying out the ratios to a high degree of accuracy. If your shaft measures 17.5" instead of 18" in the above example, using 18 instead of 17.5 results in about a 2% ratio difference which would in turn work out to about 1/4° angle difference. You are just trying to get within a degree or two of the ideal alignment, +/- 1/4° is in the noise. And realize, this happens for both u-joint/single-cardan and CV/double-cardan shafts. Although on a u-joint shaft, both the upper and lower u-joint operating angles will change by the same amount. On a CV shaft, the same is true, but, while the CV joint could care less about the angle, the bottom u-joint will no longer be near 0° and may start to vibrate. This same issue will also affect 2-piece shafts, see below for more information on that setup...
- 2-piece drive shafts (i.e. center support bearing):
- For applications with 2-piece drive shafts (i.e ones with a Center Support Bearing or CSB), there is often confusion about what to do about the CSB. Some folks think it is necessary to shim the CSB to correct the driveshaft angle. This is not something you want to do in all cases. Why? We have an in-depth discussion of how to set up 2-piece drive shafts here, but in short it comes down to understanding how the 2-piece shaft was designed to operate by the vehicle mfg.
- One option is to set the upper u-joint and shaft to 0° and then look at the bottom half of the shaft only, it is either a single-cardan (u-joint) or double-cardan (CV joint) shaft and you just measure and correct the angles on that part of the shaft. So just treat the bottom half of the 2-piece shaft like any other driveshaft and forget the upper half. In other words, treat the two halves of the driveshaft as independent parts, separated by that CSB. So, if you made no changes that affected the transmission/transfer case to CSB (which is attached to the frame) part of the shaft, you should also not make any changes to that part of the drive shaft. If instead, you made changes that affected the CSB to axle portion of the shaft, then that is the part you need to correct.
- Another option on a 2-piece drive shaft that has 3 u-joints is to treat the upper shaft section as sort of an extended CV joint. That is the two u-joints on that section of shaft should be equal to each other and they should also align (i.e. they are in phase). Then the bottom u-joint, at the axle, is set to 0° operating angle relative to the drive shaft (i.e. the pinion u-joint "points at" the carrier bearing u-joint). But if you have a 2-piece drive shaft with 3 u-joints, one of those u-joints should be at 0° and the remaining two should be at equal and opposite angles. So pick the u-joint that is closest to 0° and then set the other two u-joints to equal and opposite angles. It all depends on how the drive shaft was designed and set up at the manufacturer and how you have modified the vehicle (if applicable). But in any event, if you have 3 u-joints on the shaft, eliminate one of them by running it at 0° and then just worry about the remaining 2 u-joints.
- Traction Bar considerations:
- If running a traction bar, of some sort, that limits axle wrap, then the only real consideration to make is that you would want to set the lower u-joint angle to the ideal angle for your type of drive shaft. That is you don't leave the pinion 1° - 2 ° below the ideal angle. So for a single cardan shaft, you would have both u-joint angles the same and for a double cardan shaft, you would have the lower u-joint angle at 0°.
- - You might contact the lift supplier and ask them what angle shim they recommend for your type of vehicle with their lift installed.
- 2. How do I figure out how long to make my shims?
-
4Crawler Offroad does not have a master database of all possible
vehicle and axle combinations (we tried to do this but it became such a
mess trying to keep track of every possible combination, that the data
was not reliable). And by the very fact that you need to add a shim,
you have a modified vehicle, the axle may or may not be stock, the
perches may or may not be original, and the axle itself may be a hybrid
of several different axle components.
- You'll want the shims to be about the same length as the spring perch on your vehicle's axle, which is very easy to do. One way to measure that is to get the distance between the u-bolts (length and width). If the axle is separated from the springs, just measure the spring perch directly. And no need to get the length measurement to the nearest 0.001", usually to the nearest 1/4" is fine (6 mm). On some vehicles, spring perches can be difference lengths (especially on front axles). If this is the case, you would want to use the longest perch length measurement, and let the other shim hang over the ends of the perch. Shims can be made different lengths if requested, at an additional cost of $10.00, if desired.
- So why does the length of the shim matter? It should match the length of the spring perch. If it is too short, the spring may not make contact with the shim along it's full length, since it may hit the end of the perch sticking out past the end of the shim. If the shim is much longer than the perch, the thin end of the shim will likely just bend down around the end of the spring perch and be ineffective. Likewise, for any given angle, the longer the shim, the thicker the material it must be cut from is. Since most applications desire as thin a shim as possible (especially in a spring-under-axle situation), specifying a 6" long shims, for example, where a 4" shim would be sufficient may in fact double the thickness of the shim.
- For example on the Toyota mini-truck axles, the rear spring perch is approx. 4-3/4" long, so the shims would be cut 4-3/4" long for the rear axle. Jeep Wranglers have 4-1/2" long perches and the early Jeep CJ models might be closer to 4" - 4-1/8" long. However, some folks replace the stock spring perch with a u-bolt eliminator kit, such as the one All-Pro Offroad makes. That kit uses a 6" long spring perch, so that is how long the shims should be.. A polpular trend on Jeeps with spring over axle conversions is to use 7" or 8" long spring perches. The front Toyota mini-truck axle spring perches are approx. 5-1/4" long, so that would be the proper length for the front mini-truck axle. Other vehicles probably have varying length spring perches, so don't use the above numbers, grab a tape measure and find out for yourself.
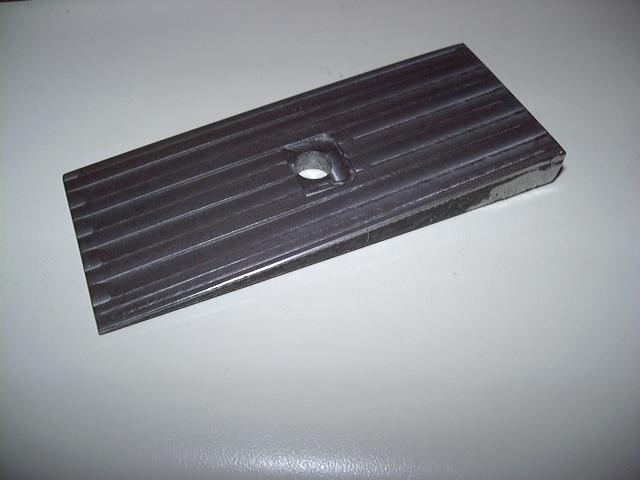
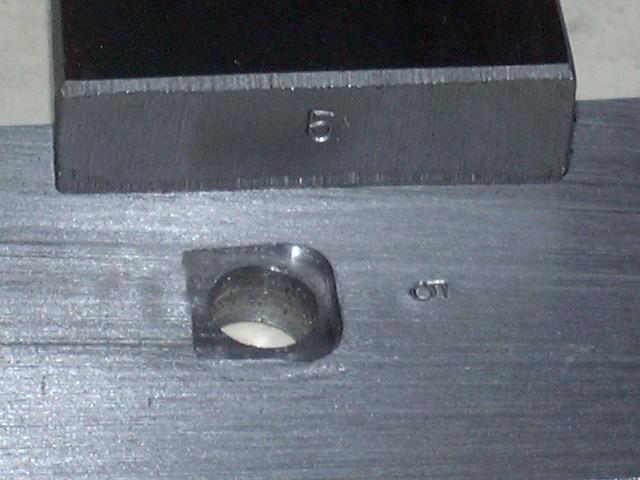
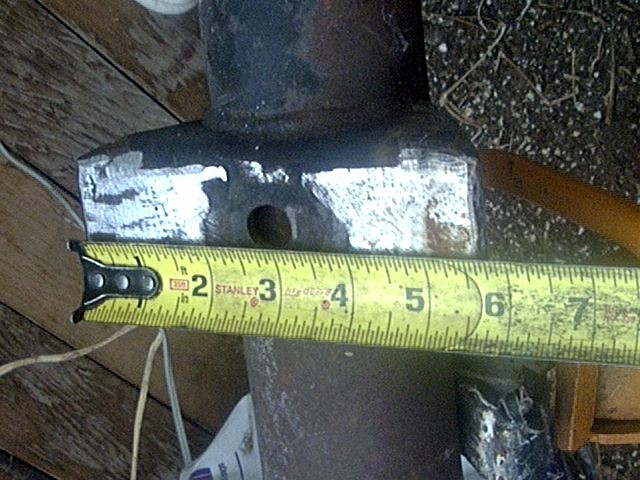
- There is no "standard length" for a spring shim or rather there are many standard lengths! 4Crawler Offroad has shims have been made in lengths from 3-1/2" to well over 6" long. So bottom line, how long is the spring perch (front-back) on your vehicle's axle (rear or front) to the nearest 1/4" or so. See below for the measurement in question (note this is a modified Toyota rear axle spring perch, stock length is 4-3/4", this one has had 3/8" extensions welded to each end to make it longer). In this case the shim length would be about 5-1/2" long:

Spring perch length - You'll want the shims to be about the same length as the spring perch on your vehicle's axle, which is very easy to do. One way to measure that is to get the distance between the u-bolts (length and width). If the axle is separated from the springs, just measure the spring perch directly. And no need to get the length measurement to the nearest 0.001", usually to the nearest 1/4" is fine (6 mm). On some vehicles, spring perches can be difference lengths (especially on front axles). If this is the case, you would want to use the longest perch length measurement, and let the other shim hang over the ends of the perch. Shims can be made different lengths if requested, at an additional cost of $10.00, if desired.
- 3. My springs are more (or less) than 2" wide, what width shim do I need?
-
You really have 2 options, one is to run the standard 2" wide
shim, the springs really won't "know" the difference. If you
look at the spring perch itself, it probably has rounded edges
resulting in a flat area that is only about 2" wide. However,
4Crawler Offroad can make shims to the match the width of the springs
and/or perch if desired. There is an additional cost for shims over
2" wide due to the additional material and labor required to
manufacture them.
- For example, my Toyota 4Runner has springs that are 2-3/8" wide. I run 2" wide shims and they work just fine. A full width shim might resist twisting a bit better since it would be trapped in between the u-bolts, or I can even fit a 2-1/2" wide shim in between the u-bolts as the perch itself is 2-1/2" wide.
- On a vehicle like the Toyota Landcruiser that uses 2-3/4" springs or a full size rig with 3" wide springs, a full width shim probably makes sense. Jeep Wrangler springs are 2-1/2", early Jeep CJ springs may be 1-3/4" wide. So what is the "correct" width to use? That's why this is an option, you order what you want. To put it another way, if its worth the additional cost (to you), get the custom width shim, if not, get the standard width.
- Also, some vehicles have spring perches much wider than the spring. For example, some early 1990s model Toyota pickups use a rubber lined metal clamp around the springs (the purpose of which is not known) and thus have a perch that is perhaps 1" wider than the actual springs. To add shims to this vehicle, you generally need to remove the clamp and then use a regular width shim. It would not really make sense to use a 3-1/2" wide shim on a 2-3/8" wide spring. Same story with some of the u-bolt eliminator kits, they have a perch that is much wider than the spring to allow room for the clamping bolt nuts to ride below the perch.
- On a related note, why do the custom width shims cost more than the standard width shims? There is more material (and waste) involved in the production of the custom width shims and also more labor. The standard width shims are cut from lengths of 2" wide flat bar to the exact length needed. On the custom width shims, they are cut to width out of 6" wide flat bar then cut to length. Any excess is scrap. The extra time and labor to make a 6" x 1" cut in steel is significant as well. Finally, with the standard width shims, 4Crawler Offroad often will make several copies of the shim if the length and angle are common. With the custom widths, the extra variable means its unlikely that exact combination will come up again, so each pair of shims is made to order.
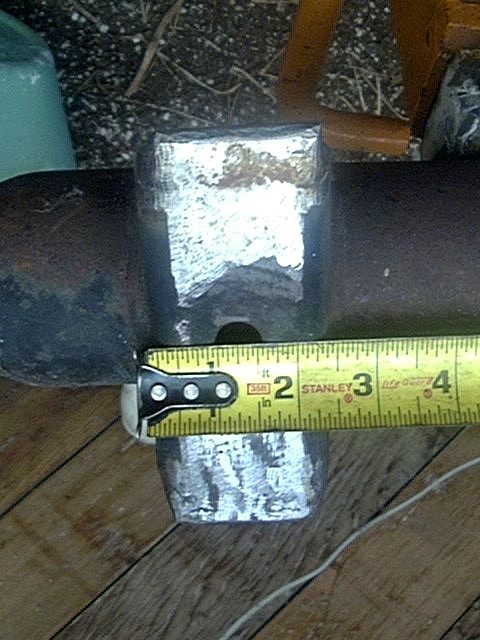
- See pictures below for examples of measuring the width of the spring perch and the width of the spring. In this case the spring perch measures about 2-1/4" wide, the spring is about 2-3/8" wide, so you could use a 2", 2-1/4" or 2-3/8" wide shim for this application, your choice:
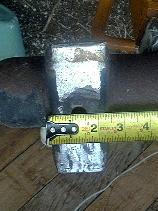

Spring Perch Width Spring Width - For example, my Toyota 4Runner has springs that are 2-3/8" wide. I run 2" wide shims and they work just fine. A full width shim might resist twisting a bit better since it would be trapped in between the u-bolts, or I can even fit a 2-1/2" wide shim in between the u-bolts as the perch itself is 2-1/2" wide.

- 4. What's the difference between bolt-on and weld-on shims?
-
In short, for the shim to do it's job, it must sit between the leaf
spring pack and the axle/spring perch. However, the shim will not sit
there all by itself, so you either need to attach it to the spring pack
or to the spring perch. With the bolt-on shim, you use the center
pin/bolt in the middle of the spring pack to also hold the shim in
place. Essentially the shim becomes just like another leaf on the
spring pack. In a spring-over-axle setup, the shims go on the bottom of
the spring pack, in a spring-under-axle setup, the shims go on top of
the spring pack. With the weld-on shim, you weld the shim to the spring
perch on the axle, thus the shim becomes part of the axle. With
spring-over-axle, the shim is welded o the top of the spring perch,
with spring-under-axle, the shim is welded to the bottom of the spring
perch. WIth both bolt-on and weld-on shims, the shims still end up
located between the spring pack and the spring perch.
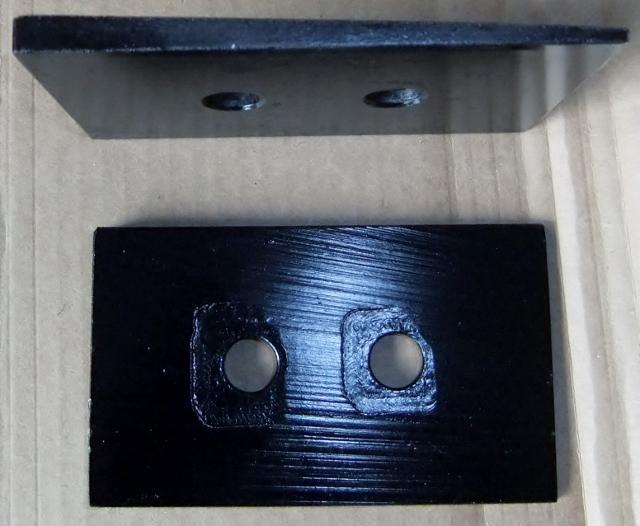
- Both types of shims are made of mild steel. Below are some of the main differences:
- 1. Bolt-on shim has a small center bolt hole (typically 3/8" or 10mm) for the shaft of the center bolt, the weld-on shim has a larger hole (typically 5/8"or 17mm) for the head of the center bolt.
- 2. Bolt-on shim will have a pocket machined into the angled side to eliminate the angle for the center bolt head, allowing it to sit flat. This eliminates the stress riser in the center bolt that would otherwise be caused by the head of the center bolt being tightened against the angle of the shim. The weld-on does not have this.
- 3. Bolt-on shim is typically shipped painted to prevent rust, the weld-on shim is shipped unpainted to allow welding it to the spring perch.
- 4. A bolt-on shim may require a longer center bolt to hold it to the spring pack. If the extra length of your center bolt is less than the thickness of the shim, this would be the case. Longer center bolts are available above. To determine the length, measure the height or thickness of the spring pack that the center bolt passes through. Allow extra length for the nut and the new shim (usually arounf 1/2") and that'll be the length of center pin you need. We ha e various lengths available, be sure the untreaded length is less than the thickness of spring pack. A weld-on shim of course will not require any changes to the center bolt (or even removing it from the spring pack for installation), since the head of the center bolt simply fits into the hole in the shim to locate the axle and springs properly.
A bolt-on shim can always be converted to weld-on at a later time:- Simply drill out the center bolt hole to accommodate the head of the center bolt and weld it to the perch.
- Which type of shim would be best for your application? Well, that is all up to you. Both types will work equally well. Some considerations:
- 1. If you do not have access to a welder, then the bolt-on shim is the best style for you.
- 2. If are unsure of the exact angle shim you need or have plans to change your suspension at some time in the future, a bolt-on shim is easier to change out down the road.
- 3. If you are sure of the angle shim you need and plan no future changes and want a more permanent installation, a weld-on shim, once welded to the spring perch, essentially becomes part of the axle.
- Here is a picture showing the differences, weld-on to the left, bolt-on to the right and a typical center pin in between the shims. Note how the hole in the weld-on shim is slightly larger than the head of the center pin, while the hole in the bolt-on shim is the size of the shaft of the center pin.
- Both types of shims are made of mild steel. Below are some of the main differences:
- 5. How accurate are the shims?
-
4Crawler Offroad can typically machine the shims to +/` 0.5°
tolerance. Shims are checked after machining with a digital angle gauge
to ensure they are within this tolerance. Both shims are typically cut
from one block of material so the angles are identical between the
pair. This is typically more important than the exact angle. On
thickness, 4Crawler Offroad tries to get the two shims within
1/16" of each other, and within 1/16" variation in thickness
across the face of the shim
- 4Crawler Offroad can also make shims for Toyota front axles where the 10mm offset in spring perch heights can be built into the shim, making the driver's side shim 10mm thicker than the passenger side shim. We can do other thickness differences as well, within the material dimensions.
- If concerned about the slight difference in thickness, measure the ride height of both sides of the vehicle and place the slightly thicker shim on the low side for a spring-over-axle or on the high side for a spring-under-axle application.
- While this tolerance is typically fine for 99% of the customers, some folks need higher accuracy. If your application depends a high accuracy shim, you can order the item below along with your shims to get shims custom machined to be typically within 0.010"-0.020" in thickness of each other, and the angle within +/- 0.2 degrees (whole angles only and shims of 6" length or less - see note below).
- If you are the type of person looking for shims with a mirror finish and tolerances of +/-0.001", you might want to look elsewhere for shims, as you'll likely not be satisfied with these. We make these shims to fit a practical application and once installed, they are nearly invisible, so surface finish is not a design factor. And since there is generally a bit of leeway in angle/length/width of the actual shim installed. raising the machining cost by performing extreme high precision operations does not really make sense. We try to offer a custom made and serviceable part for a reasonable price.
- Cost is $15.00 to cover the additional machining and setup time (note this option is only applies to one set of shims (per option) and you must specify it at the same time the shim order is placed):
- If you already have a set of shims and want them machined to a tighter tolerance, you may return the shims (US orders only) for re-work as noted below (cost $15.00/shim + return shipping), or you may have a pair of shims machined down to a thinner angle (for example from 4° to 3°): This option applies to angle changes of a few degrees. For angle changes of more than a few degrees, the better option is to order a new pair of shims as there may not be enough metal in the shims for the new angle:
Shim re-work, US shipping Shim re-work, International shipping - Note: The high accuracy option does not apply to any of the high angle or extra long shims with the laminated construction. This is because the laminated joints don't machine well with the milling cutter. We can do this operation on the billet aluminum shims and blocks because they are constructed of a single piece of material.
- 4Crawler Offroad can also make shims for Toyota front axles where the 10mm offset in spring perch heights can be built into the shim, making the driver's side shim 10mm thicker than the passenger side shim. We can do other thickness differences as well, within the material dimensions.
- 6. Which way do the shims go on the axle?
-
It all depends on which way you want the axle to rotate and how your
axle sits on the springs. Its easiest to think of the springs as being
rigid and fixed. Then visualize the axle being separate from the
springs and one solid part, that pivots about the springs. Then,
depending on which way you need to rotate the pinion to correct the
drive line angle, think of grabbing the axle and turning it (and the
pinion) to the correct the pinion angle. You should now be able to
"see" a gap between the spring perch and axle on one end or
the other, that's the side that the thick end of the shim goes in (i.e.
the shim fills this "gap). One other trick I've found to help
visualize this is to exaggerate the angles involved. Its hard to
"see" 3° but if you imagine 30° its a lot easier.
- Spring-under-axle:
- Placing the thick end of the shim on the pinion side of the axle will tip the pinion up. Likewise, thick end away from the pinion will tip the pinion angle down.
- Spring-over-axle:
- This reverses. If the thick end of the shim is on the pinion side of the axle, the pinion will tip down. If the thick end of the shim is away from the pinion, the pinion angle will tip up.
- Spring-under-axle:
- 7. How long will it take to get my shims after I order and how will they be shipped?
-
These shims are custom made to order to *your* specifications. As such,
they are generally not "in stock", since there would need to
be thousands of different combinations of angle, length, width, bolt
hole size and mounting style shims stocked to meet each and every
possible order.
- Shims can usually be custom machined and shipped in 1-2 weeks depending on backlog, see backlog note below. Normal shipping is via Priority Mail shipping from zip code 94088 which has 2-3 day delivery time in most of the US and Priority Mail International (to many countries, check the USPS.COM web site for service info.) which takes 6-10 days internationally. In the US, shims and blocks up to 1" thick are shipped in a Priority Mail envelope and insured via USPS insurance. In the event of loss or damage to the items, 4Crawler Offroad is happy to file an insurance claim on your behalf for the item. When the claim is paid by USPS, the shims or blocks will be re-made and replacements sent out. If you wish to have replacement parts sooner, you can order a replacement set and when the insurance claim is paid, those funds will be refunded to you for the original purchase. If you wish to have the items sent with signature guarantee in place of insurance, please indicate in the special instructions on the order form. If you wish more accurate tracking of the items, use the expedited Express Mail option below. If you wish to use a different carrier or shipping method, inquire below.
- Express handling and delivery (in the US, 1-2 day typical shipping time) is also available starting at US$25.00 additional for the shims and other parts, except for the larger custom tapered blocks. Please inquire on exact shipping costs for the larger items like that.
- Also, note that the standard shipping method (Priority Mail) only offers a delivery confirmation number, while Express Mail offers full package tracking information. So if you want detailed tracking information, select this shipping option.
- Order this item to upgrade the shipping on an previously ordered set of shims or center bolts.
- Shims can usually be custom machined and shipped in 1-2 weeks depending on backlog, see backlog note below. Normal shipping is via Priority Mail shipping from zip code 94088 which has 2-3 day delivery time in most of the US and Priority Mail International (to many countries, check the USPS.COM web site for service info.) which takes 6-10 days internationally. In the US, shims and blocks up to 1" thick are shipped in a Priority Mail envelope and insured via USPS insurance. In the event of loss or damage to the items, 4Crawler Offroad is happy to file an insurance claim on your behalf for the item. When the claim is paid by USPS, the shims or blocks will be re-made and replacements sent out. If you wish to have replacement parts sooner, you can order a replacement set and when the insurance claim is paid, those funds will be refunded to you for the original purchase. If you wish to have the items sent with signature guarantee in place of insurance, please indicate in the special instructions on the order form. If you wish more accurate tracking of the items, use the expedited Express Mail option below. If you wish to use a different carrier or shipping method, inquire below.
- 8. What if I measure wrong, am I stuck with the shims?
-
No problem, you can return the shims for credit against a new set. For
custom and standard width shims (excluding the high angle and extra
long variety) the credit against a new set of shims is $10.00. For the
new set, pay the cost of the new shims, less the $10.00 credit and add
return shipping and send back
the old shims to 4Crawler Offroad. For shims/blocks with
non-centered holes, or weld-on shims that have been welded on or other
modifications such as high angle or extra long, contact 4Crawler
Offroad for return/credit information. Generally for those types of
shims, can only offer to re-machine the shims if
possible.
- For the custom aluminum tapered and lift blocks and the fabricated steel blocks and shims, they are generally not refundable. We cut these blocks from a large block of billet aluminum or weld up separate pieces of steel to fabricate these parts to your specifications. Since these parts are so specialized, the chances of us being able to resell them in a timely manner is almost non-existent. We have an ever growing stack of shims that we have accumulated over the years in doing single shim orders or for exchanges and it is a very rare occasion where we can pull something out of that stack to fill a new order. And since we do at least 100 pair of shims to each pair of lift/tapered blocks, the odds of getting a match are at least 100 times less. We'll be more than happy to modify a block that you have ordered to a shorter lift height or different angle, etc., but if you tell us you want X, Y, and Z and we make you X, Y, and Z, then we have done our job. If you decide you no longer want the part, you might see if you can put it up on eBay or Craigslist or some venue like that. If you can find someone else who is looking for that very part, they are likely to offer you more for it than we can.
- 9. Is there any "volume" discount on shims?
- For 2 (or more) pair of shims made to the same specification, there is a US$5.00 discount on the 2nd (and subsequent) pairs of shims, since there is a savings on setup time for the machining. This discount will be refunded upon shipment for on-line orders upon request, simply set the order quantity to 2 (or more) pair of the desired shims, specify the length, width and angle for the combined order. On multiple pairs of shims (of differing specifications) shipped to the same address, there is often a savings on shipping, over shipping them separately. You can also use the multiple item order link at the top level web page.
- 10. How do I order the shims and specify options?
-
You can click on the "Buy Now" buttons above to order on-line
using the PayPal service. If you have an account already set up on
PayPal, you can just use it as-is, if you don't have an account set-up,
you can do so on-line while ordering. You can use credit cards,
electronic funds transfers and other sources for the funds as desired.
- You can specify any details on the parts order in the NOTE TO SELLER or Special Instructions link of the order form BEFORE hitting the submit order button, or include that information in an e-mail. PLEASE BE SURE to give a working e-mail address to reply to. All too often 4Crawler Offroad is sent questions with invalid reply-to addresses, if we can't reply, you won't get an answer.
- 11. I only need a single shim, can I order just one?
-
Sure, 4Crawler Offroad can make single shims, cost depends on width, a
2" wide standard width single shim costs $18.00, a custom width
single shim costs $30.00. Common use is on Dana 44 front axles with
relocated long side spring perch, short side perch is cast into the
axle/differential housing. Contact
4Crawler Offroad for details.
- --
- Order a single standard width (2" wide) shim:
Single 2" wide shim; US delivery Single 2" wide shim; International delivery - --
- Order a single custom width shim:
Single custom width shim; US delivery Single custom width shim; International delivery - --
- 12. Are there any drawbacks to lift blocks?
- In a spring-over-axle configuration, adding lift blocks does move the center of the axle farther away from the leaf springs. Since one of the leaf springs jobs is to resist the torque reaction of the axle to the tires in contact with the ground, moving the axle farther from the springs will increase the leverage of the axle on the springs. This can increase the likelihood of axle wrap, which is a condition where the axle causes the springs to twist into an "S" shape, arching up in front and down in back, due to the axle torque. Whether this is a problem or not depends on the weight and engine power of the vehicle, the stiffness of the springs and the presence or absence of some sort of torque-countering device like a traction bar, kicker shocks or anti-wrap leaves. The taller the block the more likely wrap will occur.
- 13. Does 4Crawler Offroad make shims for other applications?
- Sure, if you need a tapered shim for another application, feel free to contact 4Crawler Offroad for a quote. For example, tapered blocks/shims have been designed and machined for bumper and radiator mounting applications. Cost will depend on complexity and size of the part needed.
- 14. What if I want tapered or flat lift blocks made out of steel instead of aluminum?
-
Sure, no problem. Simply order the combination of a shim and lift
blocks as needed to make up the height of block you want. The shim will
typically be 1/2" center thickness, so account for that in the
overall block thickness. For example if you wanted a 1" tall,
6° tapered block, order a 6°
shim and a 1/2" tall
block. Or if you wanted a 2" tall block with an 8°
taper, order an 8° shim and a 1/2" tall block and a 1" tall block. Steel
blocks are available in any width, lengths to 6" long and height
increments of 1/2".
- Or if you want an axle relocation plate combined with a shim or a block, order the relocation plate and the shim or the block that you want and we'll combine them into one, or you can keep the relocation plate separate from the shim or block for ease of future changes. Just let us know which way you would like them to be set up when you order.
- The shim and block(s) will be machined and then welded together, for an additional cost of $15.00 per welded lamination, and shipped to you ready to install. If you want the block with a locating center pin, be sure to order one pair of lift blocks with the center pin installed. Note that a thickness of at least 1" (25mm) is required for a center pin to be installed. This is because there needs to be a 1/2" deep hole in one side for the head of your spring center pin to fit into and then we need about 1/2" of material to secure the new center pin into.
- Use the order button below to add the welding option to you block and/or shim order:
- Note that there are some considerations you might want to make before opting for a welded block + shim. Keeping them separate gives you flexibility in the future if you need to make further adjustments to the drive line angles. Or if you make a change to the leaf springs and need to eliminate or change the height of the lift block. Having the block and shim separate lets you change either separately. While you may think this is absolutely the only time you are going to change the suspension on your truck, it may only be the first of many changes you'll do over the years.
- Or if you want an axle relocation plate combined with a shim or a block, order the relocation plate and the shim or the block that you want and we'll combine them into one, or you can keep the relocation plate separate from the shim or block for ease of future changes. Just let us know which way you would like them to be set up when you order.
- 15. Will I need longer center pins/bolts with the bolt-on shims?
- The classic answer is that it depends. It depends on how much extra length your current center bolts have extending beyond the nut. And it depends on how thick the shims you plan to install will be. How thick the shims will be is a function of the angle of the shim and the length of the shim. Shims up to about 4 degrees will typically be 1/4" thick in the center, so if your center bolts have at least 1/4" of exposed thread then you should be able to re-use them. Shims over that angle can run up to 1/2" thick in the center. High angle shims can be thicker than 1/2" in the center, so factor in the thickness of the spring pack plus the thickness of the shim into determining the length of the center pin/bolt.
- 16. What are the center bolt/pin hole location and options?
-
As the name implies, the center bolt holes is typically drilled in the
center of the shim to allow either the shaft of the center bolt/pin (for a bolt-on shim) or the head of the center
bolt/pin (for a weld-on shim) to fit. However,
some applications require a hole that is not located in the center. If
this is the case, specify the center bolt hole location along with the
other shim specifications in the "Special
Instructions to Merchant" field of the order form. A
non-center hole is often required where the spring perches on an axle
have been redrilled to relocate the axle forward or backwards. And in
some cases, you may have an axle where the spring perches have multiple
holes in them to allow for several different axle locations. Often this
is done with something like a relocation
plate. If this is the case, the shims can be ordered with
additional center holes, as noted below:
- And of course, you are more than welcome to order shims with no holes at all and then you can drill hole(s) wherever you want.
- IMPORTANT:
- When specifying an off-center hole(s), be sure to be clear about referencing the hole location.
- Examples of some imprecise descriptions are:
- Hole offset 1" forward of the center (we don't know which end of the shim you will be placing in front)
- Hole 1" from center (which direction off of center?)
- Hole 1" from the back (or front) of the shim (again, we don't know which end of the shim will be in front)
- So specify the hole is offset from or toward the thin or thick end some examples would be center hole offset 1" towards the thin end or hole 1" from the thick end
- Also, hole locations are always given to the center of the hole, not the edge
- And of course, you are more than welcome to order shims with no holes at all and then you can drill hole(s) wherever you want.
- 17: I need additional holes in my shims, e.g. Ford F-150/Raptor pickups use 2 center pins, can I get extra holes in my shims?
-
Sure, we can do that.
- For example, some Ford pickup models use a non-standard leaf spring/spring perch with two 1/2" center pins spaced 40 mm apart. So instead of a single hole in the center of the perch, there are two 1/2" holes 20 mm forward and 20mm back from the center of the spring perch. These spring perches are typically 3" wide x 5" long. Note that some other F-150 customers (one with a 2007) have reported needing 3/4" with a +/- 3/4" (19mm) offset from center. This may be a case where the customer was wanting to slide the heads of the center pins through the shim instead of removing those bolts and sliding the shank of the center pins through the shims, as discussed in the bolt-on vs. weld-on FAQ. Another customer with a 2018 F-150 reported a pair of 1/2" holes, one centered and the other 40mm offset to the thin end.
- Also, if you get the hole spacing wrong and need an additional hole drilled in a new location, this will be the same cost as drilling he initial offset hole. You can return the shims to us with the new bolt hole location marked with return postage and $10 for redrilling/repainting and we'll modify it for you.
- So be sure and confirm which size and spacing of holes that your truck requires prior to ordering.
- We can add the additional shim hole to your custom width shim order with the order button below. The cost is $10.00 for the first extra hole and then $5.00 for each additional hole. So if you need 3 holes, order qty. 2 additional holes. Then leave information on the hole size/spacing in the special instructions link in the last page of the order screen or in a separate e-mail:
- For example, some Ford pickup models use a non-standard leaf spring/spring perch with two 1/2" center pins spaced 40 mm apart. So instead of a single hole in the center of the perch, there are two 1/2" holes 20 mm forward and 20mm back from the center of the spring perch. These spring perches are typically 3" wide x 5" long. Note that some other F-150 customers (one with a 2007) have reported needing 3/4" with a +/- 3/4" (19mm) offset from center. This may be a case where the customer was wanting to slide the heads of the center pins through the shim instead of removing those bolts and sliding the shank of the center pins through the shims, as discussed in the bolt-on vs. weld-on FAQ. Another customer with a 2018 F-150 reported a pair of 1/2" holes, one centered and the other 40mm offset to the thin end.
- 18. What options are available for the 2WD B-series Mazda pickups?
-
We have 2 shackle options for the B-series pickups running the Belltech lowering springs.
Both are 1" longer than stock, similar to the T-100 shackles, but feature the proper offset
sides to match the Mazda spring hanger width.
One set uses full sized 18mm dia. bolts, cost US$95.00.
The other set uses 18mm dia. sleeves, cost US$125.00.
The shackles with sleeves are easier to install as you fit the short sleeves inside the bushings then slide the
shackle bolts through the sleeves. They also allow you to torque down the bolts onto the sleeves.
- These longer spring shackles are needed to handle the longer than stock Belltech springs and prevent the shackles from hitting the frame. One downside is tha added length will result in added lift height. To counter that and also to re-center the rear wheels in the wheel well arch and restore the original driveshaft length, we have a combined 1" lowering / relocation block. This block is US$85.00, add $9.00 for a pair of longer center bolts. This block is designed to bolt to the Belltech spring pack using the center bolts. We also have a custom lowering / relocation block that has recesses in the block for the head of that bolt at either 3/4" or 1" offset The block then has a 9/16" center pin that fits into the spring perch on your axle.
- Contact us for more information.
- I have extra long spring perches (7" - 8" long), do you make shims for that?
- Yes, we do, see the extra long shim options in the ordering section at the top of this page. However, realize that you have a custom built axle in order to have such long spring perches. Ideally you would have had that custom axle built with the spring perches set to the correct angle in the first place. You might consider having the spring perch angle corrected as adding an extra long shim means that shim is going to be extra thick due to the length and the angle.
If this is all too confusing to figure out, 4Crawler Offroad will be more than happy to consult with you on your specific application.
[Return to the top of this page]
References:
Here's a good YouTube video on driveshaft angles.
U-bolts need to be properly torqued. You should consult your vehicle manufacturers recommendations, if that is not possible, then the following can be used as a general guideline.
U-bolt Torque (from Rancho) U-bolt Dia. Torque (ft.lbs.) 5/16" 15-18 3/8" (10 mm) 28-32 7/16" 30-35 1/2" (12 mm) 65-80 9/16" (14 mm) 75-90 5/8" 85-110 
U-Bolt Dimensions In the above image, you can see how u-bolts are specified.
-
A is the inner diameter of the u-bolt itself (not measured at the
center of the bolt ends).
- It corresponds to the maximum size axle tube it can fit over.
-
D is the diameter of the threaded bolt end.
- Note that since most u-bolts use rolled threads, the un-threaded portion is likely to be a bit smaller in diameter than the threaded portion, due to the thread forming process pushing metal out to form the threads.
-
L is the length of the u-bolt, measured from the inside of the
"U" to the end of the bolts.
- It usually needs to be longer than the total of the axle tube diameter, the height of the spring perch, the thickness of the spring pack and spring plate and still leave enough length for the washer and nut to fit on top. U-bolts usually have an extra long threaded portion (which is often specified) that allows them to fit a wide variety of heights and then be cut to length.
- If you find the nuts bottoming out on the u-bolt threads, you can stack a few hardened Grade 8 washers under the nut to gain some height.
- Finally, the shape of the end of the u-bolt can be specified, the two common types are round and square.
If longer u-bolts are required, you can usually find those at a local suspension or 4WD shop. They can usually bend up a set to your specification for less money than you can purchase a pre-made set for.
Installation Notes:
Block the wheels and jack up the frame and put jack stands under it. Remember safety first. This will take the weight of the truck off the axles. You have to unbolt both sides before adding the shims. Unbolt the u-bolts carefully. If you did not take enough weight off the axle, the springs will ride down the u-bolts as you turn them. If that is occurring, jack the frame up a bit higher. Once the nuts are off the bolts, pull the bolts and plate. Now your springs are connected to the frame at the rear perch and the front shackle. The springs are disconnected from the axle.
For a spring-under axle setup, if you lower the frame, the axle will stay put because it is resting on the jack stands. The springs will pull away from the axle a few inches. For spring-over axle, you can raise the frame a bit for added clearance.
See this FAQ section for details on how to orient the shim.
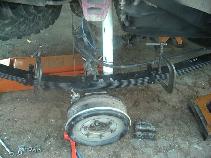
Clamping Leaf Springs - For a bolt-on shims:
- Use C-clamps on your springs ahead and behind the spring perch (see image above), clamping all the leaves securely. This will keep the spring pack from fanning out when you take the center pin out. Next, remove the nut on the bottom or top of the center pin. If the center pins are damaged, you might have to replace yours, or if there is insufficient excess length to accommodate the new shim. Put the shim in between the springs and perch (make sure the head of the center bolt is in the machined pocket in the shim) then install the old (or new) new center pin in and put the nut on. Pull it tight, but make sure your shim and spacer stay lined up. If you notice a slight height difference in the 2 shims, you can check the ground to wheel well arch heights on both sides of the vehicle and note which side is higher. For a spring-over-axle setup, place the thinner shim on the higher side and the thicker shim on the lower side of the axle. For spring-under-axle, it's the opposite arrangement. This will help to level out that end of the vehicle as leaf sprung vehicles are rarely perfectly level.
- For single shims:
- If installing a single shims, for example on a Dana 44 front axle w/ rotated knuckles, you should try to align the hole in the shim with the hole in the other spring perch (that has been relocated on the axle housing) to ensure the center holes remain lined up. If you just align the center hole on the cast perch with the center hole on the shim, the angle of the shim will "push" the hole forward or back, depending on the shim orientation.
- For a weld-on shims:
-
Place the shim on top of the perch, align the center bolt holes with a
spare center bolt head or something of similar diameter. Then place
weld beads on the thick end and sides as needed.
- One option with weld-on shims is that you can make small adjustments to the angle prior to welding them on using thin pieces of sheet metal under one end or the other. On a 5" - 6" long shim, adding 0.010" thick stock (roughly 32 ga. or 0.25mm) with alter the angle by about 0.1 degree (up or down depending on where the metal is inserted. So if you are trying to dial in an exact angle, just tack weld the shim in place, measure or test drive it and if you need to make an adjustment, grind out enough of the tack welds to slip in some shim stock, thin end will reduce the angle, thick end will increase the angle. Then tack the shim in place and retest. Repeat until you get it dialed in then weld it out, trapping the shim sheet metal in place.
- For tapered blocks:
- Slip the block in between the springs and perch, ensuring the pressed in pin engages the hole in the spring perch and the head of the center pin engages the hole in the block.
- For axle relocation plates:
- You may also need to drill new holes in your spring/u-bolt plate to allow room for the end of the center bolt/nut to protrude from the spring pack in the new location. The relocation plate will provide the new hole in the spring perch for the head of the center pin, but if the u-bolt plate also has a hole for the end of the center pin, it'll need a new hole in it as well. You'll need to drill approx. a 5/8" (16 mm) dia. hole for the center pin nut to fit in. A stepped drill bit (1/2" - 1" w/ 1/16" steps) works well for this is you need to buy a bit larger than 1/2" for the job. That way you can just keep enlarging the new hole until it is big enough to clear the end of the center bolt. And, to be honest, you may be able accomplish the same relocation by also drilling a new hole in the spring perch without needing to purchase the relocation plates. One issue you may run into with re-drilled perches is that there may be one or more existing holes in one or both perches that may be close to where you want to drill. Short of welding those holes closed, you'll have to adjust your relocation holes to match any existing holes, if possible. The relocation plates offer the advantage if being able to move the center pin holes forward or backward wherever you want them. The relocation plates are held in place by their pressed in center pins fitting into the spring perch center hole and then the spring pack center pin head fits into the hole in the relocation plate and finally the u-bolts hold the spring to the plates to the perches. You can weld the plates to the spring perch if desired, but that is not required.
Lower the frame back down (or up) until the center pin pops into the hole in the perch. You may have to push and pull on the tires/axle a bit to line the center pin up correctly with the hole in the spring perch. Then, put the spring plate back on with the u-bolts back in. You should inspect your u-bolts and if the threads are damaged or the bolt appear stretched or fatigued, consider replacing them. You may also need to replace them with longer bolts depending on the thickness of the shim/block. New u-bolts are relatively inexpensive and reusing them is often recommended against. After re-installing the u-bolts, torque to the factory specifications (or use the table above). Check to make sure everything is lined up. Push and pull on the axle to make sure it is secure. Lower your frame back off the jack stands. Take it for a test drive. Go slow and listen for odd noises and then re-check the u-bolt torque after approx. 100 miles.
Toyota e-brake extension installation.
[Return to the top of this page]
(Contact 4Crawler Offroad if interested in more information on any of these items)
[Return to the main 4Crawler Offroad page... ] Questions? -->
  <-- Comments?
email: sales@4Crawler.com
<-- Comments?
email: sales@4Crawler.com
[Last updated: 07.June.2024 ]
Visitor # 280033 since 13.AUG.2001
- These longer spring shackles are needed to handle the longer than stock Belltech springs and prevent the shackles from hitting the frame. One downside is tha added length will result in added lift height. To counter that and also to re-center the rear wheels in the wheel well arch and restore the original driveshaft length, we have a combined 1" lowering / relocation block. This block is US$85.00, add $9.00 for a pair of longer center bolts. This block is designed to bolt to the Belltech spring pack using the center bolts. We also have a custom lowering / relocation block that has recesses in the block for the head of that bolt at either 3/4" or 1" offset The block then has a 9/16" center pin that fits into the spring perch on your axle.

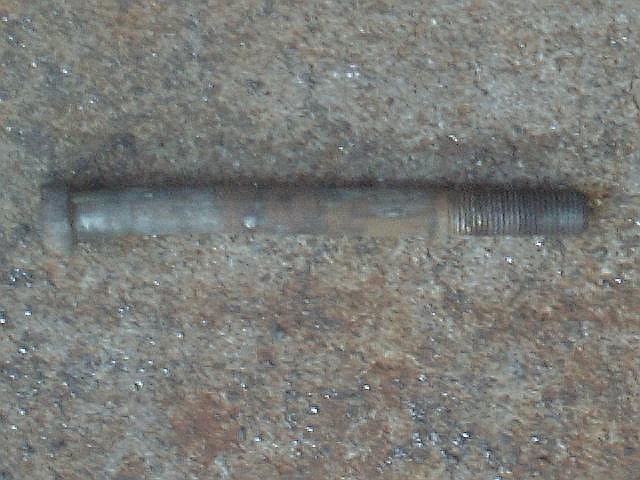
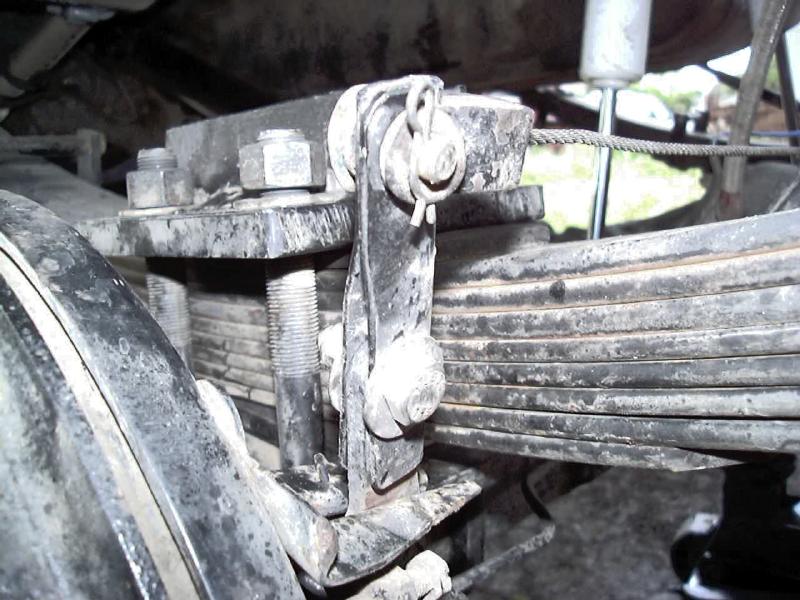