Short Throw Transfer Case Shifter
NOTE: Due to high order volume and supply chain issues, it may take some time for deliveries, production and shipments to catch up. Order backlog could be up to 8 weeks.
Contents:
- Introduction
- On-line ordering
- Installation
- And now 2 solutions for shortening the transmission shifter throw
Introduction:
One common problem on 4WD Toyota trucks is the transfer case shift lever binding when shifting into the various 2H-4H-N-4L positions. The lever has to move quite far, especially to select 4L and often it can bind with the shifter boot or the sheet metal surrounding the shifter hole in the floor of the vehicle. This problem is exacerbated by a body lift, where you are raising the body up and away from the transfer case. With a 2" body lift, you need about twice the clearance around the shifter as you did at stock height, due to the increased length of the shifter from the shifter base (while the actual angle that the shifter moves through is unchanged with the body lift, the distance the lever moves is increased the farther up the lever you move).
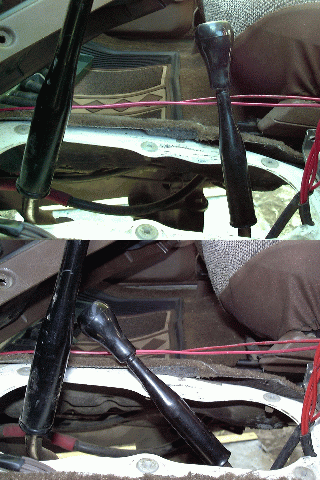
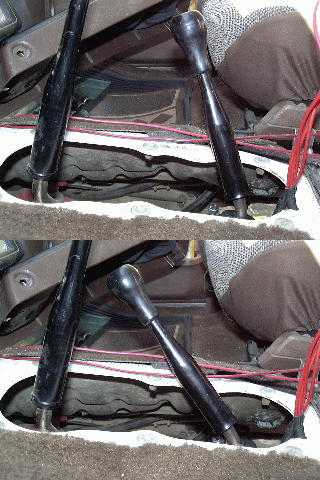
So one option is to shorten the throw, or angle, that the shift lever moves in to affect the gear selections. One way to do this is to raise the shifter pivot base about 1" and add a 1" extension to the end of the shifter itself. This does two things, one is it raises the lever up 1", thereby negating 1" of body lift all together. The second thing it does is to halve the angle the lever needs to move, since the stock pivot is 1" above the end of the shift lever, doubling that to 2" makes the pivot twice as long and therefore you need 1/2 the angle to make it move the same distance. You can see below how far the stock shifter moves (lower left) and how much less it move with the short throw shift kit installed (lower right):
(Hit your browser's "STOP" button to halt the animation)
What is it good for?
- Its hard to see it in the upper-left picture (above), but with a 3" body lift, I can just barely operate the transfer case shift lever. In fact, if you look closely you'll notice that the sheet metal just ahead of the lever is actually bent due to the level hitting it in the process of the body lift. In the upper-right picture, you can see not only the reduction in shifter travel but that it is both higher and has more clearance. This allows the shift to work without interference on body lifts from 1" to 3".
- Note that this kit is only for the transfer case (i.e. the 2H-4H-4L shift lever, not the transmission - 1-2-3-4-5-R shift lever).
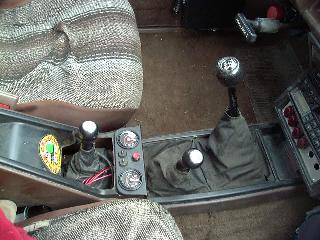
- Also, for 4Runners with the factory rear heater/center console (pictured above) that are considering istallation of a dual transfer case, the rearmost transfer case shift lever must be set up for short throw operation if you intend to keep the center console. Same story if you have a pickup with bench seats. The rear-most shift lever has to be short throw it clear the seat.
What is it not good for?
- It may not be possible to install this kit on a non-lifted body, depending on how much clearance you have above the transfer case shift lever, you need at least 1" of clearance between the top of the transfer case and the body to install the riser plate.
- This kit is NOT for the transmission (i.e. 1-2-3-4-5-R) shift lever.
I've only seen one other solution to this problem on the market, and I had one installed on my rear transfer case (careful observers will note I installed my kit on the middle case. I liked it so much, I wanted another one for my front case, but wanted something simpler than the cut-n-weld approach used on the solution offered by Marlin Crawler. So, I re-designed the system to be full bolt on installation. Not only is it lower cost but it is removable and transferrable to another vehicle. No special skills or tools are required for installation.
[return to the top of this page]On-line Ordering:
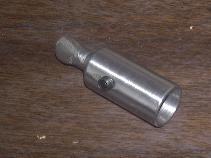
If you simply want to lengthen the shifter, we do have these screw-on extensions available here....
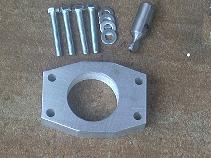
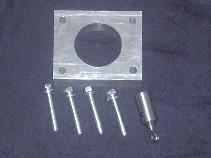
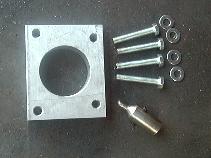
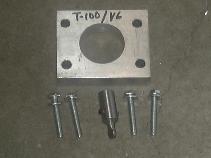
There are multiple versions of the short throw transfer case shift kit are available.
-
If you have a 4-cylinder engine, manual transmission or have converted
your chain-drive case to a gear-driven one, you'll need either kit A or
B. Which you need depends on where the shift lever is physically
located.
- If it comes up and out of the transfer case, then its a top-shift lever and you need kit A.
- If the shifter comes up out of the transmission, its a forward-shift lever and you need kit B.
-
If you have a pickup or 4Runner w/ V6 engine or an automatic
transmission, you have a chain-driven transfer case and need kit type
C.
- Front-back spacing is ~62mm and side-side spacing is ~70mm and 80mm
-
For the T-100 V6 drive trains, you can use kit type D.
- The bolt pattern is approx. 90mm / 87mm x 55mm front-back, so be sure to check whish size bolt pattern s on your truck..
-
Finally, for applications not listed above, or if you want to make your
own spacer, the bolt-on shifter extension is available separately.
- From what we have seen, almost all Toyota transfer cases use the same type of shifter end, the only variation is in the shifter base plate.
-
And if you are not sure which kit/baseplate to order, just take a few
quick measurements of your transfer case shifter, with the
center-center hole spacing of the bolt holes. So basically the distance
between the two forward holes, the distance between the two rear holes
(if different than the front) and the distance between the front and
rear holes. And if the shifter pivot point is not centered inside those
holes (it typically is), let
us know.
- We can take these dimensions and see which base plate/spacer is right for your applcation and if they don't match any of our current designs, we'll also need the overall width and length of the shifter base plate and we can design a spacer to fit your vehicle. This is exactly how all the spacers below were designed, off of measurements of existing shifter bases.
- This kit will only work with the OEM type t-case shifters that use the 2H-4H-N-4L shift pattern. It won't work with aftermarket twin stick shifters that split the shift pattern into separate 2-4 and H-L shift patterns, there's not enough clearance between those shifter ends for the extension to fit onto.
The forward shift t-case kit is for shifters that have a separate shifter base from the transmission. Some tranny/t-case combos such as the W56C/D and RF1A-FwdShift boxes have a shared shifter base between the t-case and tranny shifters. As such, it is not possible to raise the t-case shifter w/o touching the tranny shifter. Easy to tell which you have by pulling the shifter boots up and looking. If you see a t-case shifter with 4 bolts holding it down and a tranny shifter base that is separate with 4 or 6 bolts holding it down, you can use this kit. If you see one long shifter base held down by 6 bolts total, then this kit will not work, unless you convert that t-case to a top-shift unit. Note that the gear driven t-cases are most commonly used for upgrading with either lower range gearing (4.0 : 1 or 4.7 : 1) or for use in dual transfer case setups.
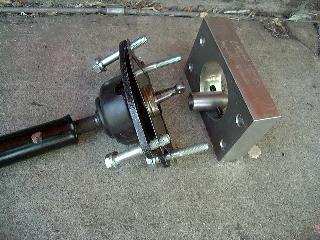
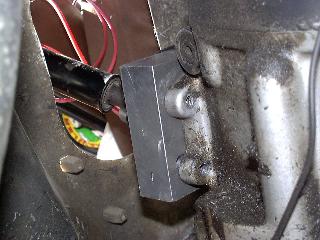
Cost of the kit, as pictured, is US$129.00 (riser plate, lever extension, mounting hardware: p/n: ST_Transfer) plus shipping via USPS Flat Rate envelope. Be sure to provide a valid mailing address for the order, and double check the address before submitting the order. Incorrect shipping addresses will result in delayed shipments and any reshipping cost will be at the customer's expense. Specify the type of transfer case shifter you need: top-shift, forward-shift or the V6/chain-driven style:
| US delivery | Canada delivery | International delivery |
NOTE: Due to high order volume and supply chain issues, it may take some time for deliveries, production and shipments to catch up. Order backlog could be up to 8 weeks.
Dual T-case kits:
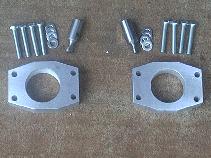 |
| Dual Case Short Throw Kit Top-shift version pictured |
And for owners of dual transfer case trucks or 4Runners, get a pair of short throw shift kits (one for each transfer case, p/n: ST_DualCase) for $199.00 + shipping via USPS Flat Rate envelope, specify top/top or fwd/top shifter styles:
| US delivery | Canada delivery | International delivery |
For international orders, please provide a local telephone number for customs paperwork.
NOTE: Due to high order volume and supply chain issues, it may take some time for deliveries, production and shipments to catch up. Order backlog could be up to 8 weeks.
DIY Kit:
If you want to make your own custom short throw kit, a shifter extension is available as a separate item at a cost of US$60.00 + shipping. This extension should fit most Toyota gear- and chain-driven transfer case shifter ends. Designed for a 1" rise on the shifter base. To make the spacer plate, just trace the existing shifter base for the bolt hole locations and mark the center for the shifter hole. Cut a piece of stock to size, mark and drill the holes. A hole saw works well for the center shifter hole.
| US delivery | Canada delivery | International delivery |
- Notes:
-
Kits are built to order, allow approx. 2-3 weeks (depending on backlog)
for fabrication and shipping. We've been experiencing unprecedented
order volume the last year along with supply chain issues obtaining raw
materials for these parts.
- If at some point in the future you find you no longer need the short throw kit (body lift removed, drivetrain lift installed, etc.) 4Crawler Offroad may buy it back if it is still in good condition. Contact 4Crawler Offroad for details.
NOTE: Due to high order volume and supply chain issues, it may take some time for deliveries, production and shipments to catch up. Order backlog could be up to 8 weeks.
The above ordering buttons work via PayPal, or you can use your credit card or checking account
[return to the top of this page]Installation instructions:
- Apply the emergency brake and block the wheels so the vehicle doesn't roll while you work on it.
-
Shift the transfer case into 4H and make note of the approximate
orientation of the shift lever.
- In 4H, both shift rails will be aligned and towards the front.
- Remove the shift knob(s), console, shifter boots, and/or carpeting at the base of the levers.
- Remove the 4 bolts holding the shift lever to the transfer case and carefully remove it (there may be a sealer holding it to the case).
-
Slip the extension end over the end of the shift lever and tighten the
two allen head retaining screws evenly, making sure that the
flats of the extension are lined up with the flats on the end of the
end of the shifter.
- Application of a red Locktite thread locker is a good idea, for added security, although the mounting screws may already have a thread locking compound applied.
- You might also consider making a small depression in the face of the shifter end to give the retaining screws something to "bite" into. I did this on my lever by just starting a 1/4" drill bit hole to make a small dimple on each side.
- On the V6 transfer case shifter, there is a spring clip at the base of the shifter, this needs to be removed before installing the spacer. It serves no real purpose and the shifter will work fine without it installed.
- The 4-cylinder/gear driven t-cases use the exact same shifter without the spring.
- Clean the base of the shift lever and the top of the transfer case and apply a bead of black or gray silicone sealant to the lip of the transfer case and the top of the riser block.
-
Install the riser block, then any oil baffle plate that was present (be
sure that this goes on top of the riser/spacer block, not below) and
finally the shift lever (with extension installed) into the transfer
case, being sure to properly align the lever and stab the shifter end
into the two aligned slots in the transfer case shift rails.
- You want to make sure and fit the end of the shifter w/ extension attached into the space between the two aligned shift rails.
- It is possible to flip the lever 180° and it is easy to miss getting the end of the lever into the shift rails.
-
Install the 4 longer bolts, tighten a bit and check for proper transfer
case operation.
-
If it is not shifting properly, remove it and re-examine where the end
of the shifter is installed.
- If the shift rails are no longer aligned towards the front of the hole in the gear box, you can use a long screwdriver to push them both forward so that the two gates on the rails line up as pictured here.
- Then torque the bolts snugly and re-install the carpeting, console, and shift boots as necessary.
-
If it is not shifting properly, remove it and re-examine where the end
of the shifter is installed.
- Check for interference with any other shift levers by trying all possible gear combinations. Since the lever is still traveling in its stock arc and the throw has been reduced, there should be little chance of interference. In fact if there is interference, you may have accidentally re-installed the shift lever backwards. If so, remove it, turn it around and re-install it.
-
If you find the shifter extension is too tight in the shift rail slots,
you can file or grind the end of the extension for added clearance.
Just take a bit off the leading and trailing edges of the end until you
get nice smooth shifts. Likewise, if you find the extension sticks down
too far, it's possible to file or grind a bit off the bottom for added
clearance.
- You can check to see where the interference is happening by applying some grease paint or felt marker to the end of the extension before installing it loosely, then try to shift back and forth a few times. Then remove the extension and look for where it's been rubbing.
Since you have halved the range of motion of the shift lever, it will unfortunately be twice as hard to move. I find it is not as easy to force the transfer case when it is bound up in a turn, for example. However, I don't think it is a good idea to be forcing gears to engage and disengage when they are jammed, so if this happens, try straightening out the wheels or reversing for a bit to unload the drive train before shifting. Once you get used to the smooth crisp feel of the short throw shifter, you'll never want to go back (but you can if you want, as my kit is fully removable).
[return to the top of this page][Last updated: 17.January.2024 ]
Visitor # 93992 since 28.AUG.2001
 ===>>
===>> 