Drive Shaft Spacers for Toyota, Ford, Dodge & Chevy Vehicles

Fits many Pickup, 4Runner, Tacoma, Tundra, Landcruiser models
also may fit Mitsubishi Montero, Pajero, MityMax and Dodge D50 pickups.
And now available for the Ford 8.8/9/9.75/ (9") and other flanges and the Dodge/Chevy flanges
 A product of Visual Diagnostics
LLC
A product of Visual Diagnostics
LLC
![]()
Contents:
[Return to the 4Crawler Offroad main page... ]Introduction:
If you are here looking for a driveshaft spacer, that means your vehicle has been altered in some manner. Perhaps the transmission and/or transfer case was swapped or the suspension has been lifted, or who knows what. No matter how you've arrived here, you no longer have a stock vehicle. You may have purchased this vehicle and have no idea what was done to it previously. As such, you're not going to find a handy table with "You need this part number for this model vehicle". Instead, you'll need to check some dimensions of the driveshaft you're dealing with as well as determine if you need a spacer and if so, how thick a spacer. This is what this page is designed to help you to do. Sorry if this is somewhat confusing, but there's no "one size fits all" spacer because there is no single driveshaft flange design nor single type of modification that everyone does to their vehicle.
On the Toyota 4WD Pickup, 4Runner and Land Cruiser model, the front and rear drive shaft bolt to "companion" flanges on the transfer case with a mating flange on the drive shaft (Propeller Shaft in "Toyota-speak"). On the 2WD pickups, the drive shaft typically slides into a slip yoke output on the transmission and bolts to the rear differential with a flange. Up until now, the only way to make a drive shaft longer was to remove it and have a drive line shop cut the existing tubing off the drive shaft and weld on a new length of tubing. If you needed a significant change in length, this was not so bad to do. But often, you only needed to lengthen the shaft a small amount, from 3/4" to 1-1/2" for example. Since you had pay for a whole new length of drive shaft tubing (plus the labor to install it) and not just the additional inch or so of additional tubing, it could cost hundreds of dollars to have a shaft lengthened, even a short amount. On the other hand, shortening a shaft is typically less expensive, since you can simply separate one end from the shaft tubing, cut the remaining shaft down and re-weld the end back on.
What are some indications that your drive shaft is too short?
- One obvious indication is that the slip yoke on the drive shaft pulls apart as the suspension drops away from the vehicle. This is typical of front drive shafts, especially with a leaf sprung front axle with rear-mounted spring shackles, as is common on solid axle Toyota min-trucks (both factory and solid axle swaps).
- Another less obvious indication is that the slip yoke is not engaged far enough and thus it causes some vibration. An easy way to check for this condition is to grasp the center section of the drive shaft near the slip yoke and give it a good tug side-side. If you feel any play in that slip yoke, you may have too little spline engagement inside (or the slip yoke may be out of grease or even worn out).
- A general rule of thumb is that you shouldn't be able to see any of the male splines outside of the slip yoke. Just measure the length of splines that are showing and select the nearest thickness spacer to that measurement.
- You may be doing a transmission or transfer case swap, such as from an automatic to a manual transmission. That new transmission/transfer case stack length is shorter than it was before. This can cause one of the two drive shafts to be too short.
Ideally, you only want just a little more slip yoke compression travel than needed by the change in drive shaft length as the suspension fully compresses. How much is that? It is hard to give an exact answer, as every vehicle is different. Generally a rear drive shaft needs less slip yoke travel than a front drive shaft. A longer drive shaft generally needs less slip yoke travel than a shorter one. A drive shaft that is at a flatter angle will generally need less travel than one at a steeper angle.
[Return to the top of this page]How much spacer do I need?
So how do you determine how much slip yoke travel you need on your vehicle?
-
Ideally, you would have measured your drive shaft angles and lengths
prior to modifying your truck so you would know how it was set up from
the factory.
- Lacking those measurements, find a similar model vehicle in stock form and see if you can get a measurement of the drive shaft length.
- Or, try posting on a vehicle-specific web forum and see if anyone there has either a similar vehicle and modification that has used a driveshaft spacer or has lengthened their shaft and find out what dimension they used. Or lacking that, see if someone with a closer to stock vehicle can measure the shaft length for you.
-
If you installed a transmission or transfer case that's shorter than what was there
before:
-
You'll need a spacer thickness equal to the difference in length of the
old vs. new gear box.
-
You might be able to see the wear marks on your driveshaft where it
used to run before you modified the truck, assuming the slip yokes are
exposed.
- When using wear marks, you may see multiple different sections on the exposed slip yoke splines (if visible), so try to identify where the maximum compression of the original shaft was (should be a marked transition from dirty to somewhat clean splines), then where it normally ran (possibly a shinier/smoother section of splines), then the current maximum compression mark and of course the normal running position will be inside the slip yoke. So be sure to measure between similar marks, i.e. original vs. new max. compression and not new normal position to original max. compression.
- On a 2WD with the slip yoke inside the transmission, you probably won't be able to use this technique.
-
You might try driving some place where you can go over some bumps to
get the rear (or front) end to compress fully. Then hop out and examine
the cleared portion of the drive shaft slip yoke and mark or measure
the amount of compression observed.
- Often, you can see where the slip yoke is cleaner than the remainder due to the shaft compressing to that point and clearing the old grease and dirt away.
-
You could take some measurements of the shaft length and height on each
end then use that to draw out a triangle, with the shaft on the
hypotenuse of the triangle. Then measure how far your suspension can
compress from the static ride height and use that to create a new
triangle with the shorter height due to the suspension compression.
Then solve for the length change of the drive shaft.
- Here's a really handy app for calculating triangle side lengths, or feel free to dust off your old high school geometry book and the Pythagorean formula:)
- Here's an example worked out with this tool
-
Alternately, if you had measurements of the ride height before the lift
or know the exact lift height and current ride height, you can figure
out the shaft length change. For example with the above application,
using the "2 sides and included angle" solver, here are some
example dimensions to illustrate how to use that information to
determine a length change.
-
Assume you have 48" horizontal separation between the ends of the
drive shaft. Then assume a vertical separation of 12" (simply
measure the height of both ends off the ground and subtract the two
heights). Then plug 48 into side b, 12
into "side a" and 90 into angle
C (note 90 degrees is a right angle). Then note that side
c is equal to ~49.5. Then lets assume the truck
has a simple 3" lift block between the spring and axle, so before
that 3" tall block was there, you instead had a 9" vertical
separation. So in the triangle solver, plug in 9 in
place of 12 and note that side c is now ~48.8",
or about 0.7" less, meaning the shaft has pulled out about
0.7" due to the 3" lift block. In this case, a 3/4"
spacer would be about the right size to restore the stock shaft length.
- Note that your truck's dimensions will likely be different than this, so be sure and use the dimensions measured off YOUR truck and not the numbers in this made up example. We just included some sample numbers to show you what to measure and where to plug the numbers into the solver and how to extract and analyze the results.
-
Assume you have 48" horizontal separation between the ends of the
drive shaft. Then assume a vertical separation of 12" (simply
measure the height of both ends off the ground and subtract the two
heights). Then plug 48 into side b, 12
into "side a" and 90 into angle
C (note 90 degrees is a right angle). Then note that side
c is equal to ~49.5. Then lets assume the truck
has a simple 3" lift block between the spring and axle, so before
that 3" tall block was there, you instead had a 9" vertical
separation. So in the triangle solver, plug in 9 in
place of 12 and note that side c is now ~48.8",
or about 0.7" less, meaning the shaft has pulled out about
0.7" due to the 3" lift block. In this case, a 3/4"
spacer would be about the right size to restore the stock shaft length.
- You can also measure the travel on the slip yoke and shoot for about half way on that range of travel.
- Aside from the above, you should probably have 1" to 1-1/2" of rear shaft slip yoke compression length. Up front, you'll probably need 2" or more of slip yoke compression travel, depending on your suspension travel, where the spring shackles are located, etc.
-
Note that the only thing that affects drive shaft length is a true
suspension lift. This is the only type of lift that changes the
distance between the frame and the axle(s) and the drive shaft, of
course, runs between the frame and the axle(s).
- A body lift will have no affect on the shaft length as a body lift only riases the body up off the frame
- Taller wheels/tires will have no affect on the shaft length as they lift the entire vehicle higher off the ground
-
A front end lift like a dropped spindle, coil spring or torsion bar
lift also won't change the front shaft length unless you install some
sort of drop kit to lower the front differential.
- One thing to note on an IFS front drive shaft is that it's length is nearly fixed in use, so it needs very little slip yoke travel.
- A front shaft on a live front axle on the other hand needs a lot of slip yoke travel, because the shaft is typically shorter and the front axle can move to the front and back quite a bit with leaf springs, not so much on a control arm type suspension.
Generally having too much slip yoke compression travel is better than not enough. Whatever you do, you do not want the drive shaft to "bottom out", as that can cause severe damage to the transfer case, as it will take the brunt of the impact should the slip yoke compress fully. But if you have so much slip yoke pull apart that it separates or vibrates is no good either.
There is one situation where a drive shaft spacer may not be an option and that is where a short drive shaft is already running at an extreme angle and/or the joints are near their maximum operating angle. Since installing a spacer effectively shortens the distance between the ends of the shaft (that is how the spacer makes a too short shaft fit), it also will make the angles increase. Normally this is not a big issue on a longer shaft, but on a short shaft where you are already running at the maximum joint angles, the angle change of the spacer may be too much to accommodate. In this case physically lengthening the shaft is the better, albeit more expensive, option.
Until now there has only been one solution, that is to have the shaft physically lengthened at considerable expense. But now available for the Toyota 2WD and 4WD pickup, 4Runner, Tacoma and FJ-series Landcruiser models are some simple bolt-on spacers that fit many of the common drive shaft bolt patterns and typical applications listed below. The bolt pattern dimensions are illustrated in this sketch. The three dimensions you'll need to determine the bolt pattern are labeled "X", "Y", and "Z". X and Y represent the center-center spacing of the pattern on each side while Z is the size of the bolt that goes through the flange, typically 8mm, 10mm or 11mm. Note that the actual holes in the flange are typically slightly oversized, so if you measure 10.2mm hole diameter, that implies a 10mm bolt.
[Return to the top of this page]Drive Shaft Flange Dimensions:
The pilot dimension is that of the ring in the middle of the flange that keeps the drive shaft properly centered.
Toyota Companion Flange Dimensions:
All have a 46mm diameter pilot ring. See note below if your driveshaft flange uses studs instead of through bolts...
| Bolt Pattern/Metric | Bolt Size | Bolt Pattern/SAE (approx.) |
Typical Application |
| 60mm x 60mm | 8mm | 2-23/64" x 2-23/64 | 1979-1983 U-Joint* |
| 56mm x 64mm | 8mm | 2-13/64" x 2-33/64" | 1979 - 1983 U-Joint** |
| 56mm x 64mm | 10mm | 2-13/64" x 2-33/64" | : FJ-40 Landcruiser**** |
| 60mm x 60mm | 10mm | 2-23/64" x 2-23/64" | 1984-1995
U-Joint also FJ-80/LX-450 front |
| 60mm x 68.5mm | 10mm | 2-23/64" x 2-23/64" | 1984-1995 CV Joint/4cyl |
| 61.5mm x 70mm | 10mm | 2-27/64" x 2-45/64" | 1988-1995 CV
Joint/V6 also: FJ-60 |
| 65mm x 65mm | 10mm | 2-9/16" x 2-9/16" | 1995.5-200x Tacoma CV 1996-200x 4Runner CV 2005+ Tacoma 2WD pinion flange Tundra 2WD pinion flange*** |
| 66mm x 66mm | 11mm | 2-19/32" x 2-19/32" | FJ60 differential flange ***** Tacoma/Tundra 4th gen 4Runner/FJ Cruiser |
| 77mm x 77mm | 11mm | 3-1/32" x 3-1/32" | Tundra ***** |
| 88mm x 88mm | 11-12mm | 3-15/32" x 3-15/32" | Tundra ***** |
Ford Pinion Flange Dimensions:
| Bolt Pattern | Bolt Dia. | Pilot Dia. | Typical Application |
| 2.5" x 2.5" ~3.5" BCD |
12mm | 2.0" | Passenger Cars |
| 3.0" x 3.0" ~4.25" BCD |
12mm | 2.0" | F-150 and up pickups Explorer Mustang |
| 3.375" x 3.375 4.75" BCD" |
12mm | > 2.0" | F-350/1 ton pickups |
Dodge/Chevy Flange Dimensions:
| Bolt Pattern | Bolt Dia. | Pilot Dia. | Typical Application |
| 3.0" x 3.0" ~4.25" BCD |
7/16" | ~3.1" | Dodge Ram pickup, etc. |
| 3.0" x 3.0" ~4.25" BCD |
7/16" | ~3.1" | Chevy pickup, SUV, etc. |
| 3.0" x 3.0" ~4.25" BCD |
7/16" | ~2.18" | Dodge 2WD pickup, etc. |
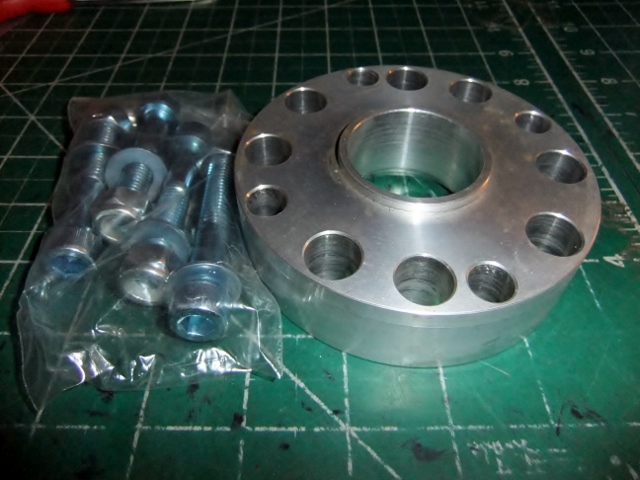
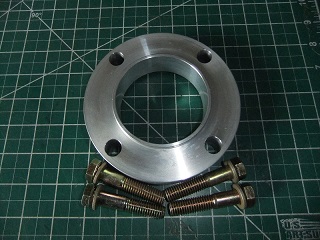
The spacers are machined from billet T-6061 aluminum and are 107mm or 127mm in diameter (does not need to match the outer diameter of the transfer case or pinion flange exactly) and include 4 - 8mm, 10 mm, 11mm or 12mm metric grade 12.9 mounting bolts and class 10 lock nuts (where needed) to replace the stock mounting bolts. These spacers feature a male locating ring on one side (~3mm high) and a corresponding female recess (4.5mm deep) on the back side to fit the corresponding ring and recess on the stock drive shaft and companion flanges. To check what drive shaft flange bolt hole spacing will work on your truck, measure the center-center bolt hole spacing and compare to the above dimensions and see if you match up with one of the above bolt hole patterns,
When measuring the bolt hole patterns, it might help to imagine a square (or rectangle) formed by the 4 bolt holes in the flange. The corners of the square (or rectangle) will fall upon the center of the bolt holes and it is the width (and length) of that square (or rectangle) that define the bolt hole pattern. For example, if you drew a 60mm x 60mm square then drilled a hole at each corner of that square, you would end up with a 60mm x 60mm bolt hole pattern. This is contrasted to a Bolt Circle Diameter (BCD) measurement which is commonly used on measuring wheel stud locations. For example, a Toyota 6-lug wheel BCD is 6 on 5.5", meaning 6 holes equally spaced around a 5.5" diameter circle. The problem with BCD is that it assumes the bolt holes are equally spaced and while it would work with the square bolt patterns, it does not work for the rectangular patterns as you can't specify where the bolt holes are located along the bolt circle.
-
The information regarding years vs. bolt hole patterns is typical, but
be advised that a previous owner of your vehicle may have swapped in
drive line parts from another year vehicle. Also note that this table
is by no means to be taken verbatim, that is when we list a given
vehicle as using a given pattern, that only means that we have received
feedback that a given spacer fit a given vehicle or that we have
measured a given bolt pattern on a given vehicle. But if someone
purchases a certain spacer and we never hear back, we have no idea what
vehicle the spacer was installed on. So about all that can be said is
that your vehicle will likely have one (or likely more) of the above
bolt patterns:
- So it is always advisable to measure what you have to be sure and get a spacer that will fit your vehicle.
- Also, front and rear drive shaft bolt patterns may be different, so measure the one you intend to install the spacer on.
- Each end of each drive shaft may have a different bolt hole pattern, so be sure to measure the end of the drive shaft that you intend to put the spacer on.
-
Realize that the information in the above table does not mean that the
listed bolt pattern is THE ONLY bolt pattern used on a given vehicle.
- Rather, it lists where that given bolt pattern was introduced and is typically used, but there may be other bolt pattern(s) present on a given vehicle.
- So for example, on the newer Tacoma and 4Runner models, they MIGHT have one or more 65mm x 65mm pattern flanges, but they also might have one of the earlier u-joint or CV joint patterns as well and in fact they might not have any flanges in the 65mm x 65mm pattern.
- You might be tempted to use information posted on-line about what someone else used on their truck. But in the end, what matters is what bolt hole pattern you have on your truck and not what bolt pattern someone else has.
-
-
Bolt hole spacing is measured from adjacent bolt hole center to bolt
hole center.
- On square patterns, both sides will of course measure the same.
- On the rectangular patterns, there will be a long and short side.
-
Note, these are not diagonal or bolt hole circle dimensions (like you
find on wheels):
- Basically think of the length and width of the square/rectangle formed by the bolt hole centers.
-
And if it is easier, you can measure from leading edge to leading edge
of the holes instead of the centers.
- Just don't make the mistake of measuring from the leading edge of one hole to the trailing edge of the other, since that will give inaccurate readings.
- For example on the 60mm x 60mm pattern, if you measured from the leading edge of one hole to the trailing edge of the adjacent hole, you would have 60mm + 10mm (the size of the bolt hole) or 70mm total.
- The standard 5X-drilled spacers directly fit the bolt patterns listed in RED in the table above.
-
(*)
For the '79-'83 pickup rear drive shafts (that use a
60mm x 60mm x 8mm bolt pattern) there are several options available:
-
The first option is to re-drill the transfer
case and drive shaft flange holes to 10mm to accommodate the larger,
late-model 10mm bolts.
- Simply order the regular spacer in the thickness desired.
-
The first option is to re-drill the transfer
case and drive shaft flange holes to 10mm to accommodate the larger,
late-model 10mm bolts.
-
(**) For the '79-'83 pickup rear drive
shafts (that use a 56mm x 64mm x 8mm or 9mm bolt pattern) there are
several options available:
-
The first option is to order an un-drilled
spacer and then drill the spacer to match the flange on the drive
shaft.
- If this option is chosen, you'll be getting the 10mm hardware, so plan on drilling out the flanges to fit the 10mm bolts.
-
For the 8mm bolts, another option is to
order sleeves to step down the spacer hole size from 10mm to 8mm. They
cost $15.00 for a set of 4.
- In addition, 8mm bolts and nuts are available for a cost of $15.00 for the set of 4 alone, or $10.00 additional in place of the standard 10mm hardware.
- So, for a spacer with 10mm holes, a set of 4 - 10mm/8mm sleeves and 8mm hardware (in place of the 10mm hardware), add $25.00 to the cost of the desired spacer. See below for 8mm hardware add-on ordering options. Allow approx. 1 week extra time for the sleeves and hardware as they are special order items.
- '79-'83 front shafts typically use a CV joint, usually with one of the 5X-drilled bolt hole patterns, but possibly with an 8mm bolt, vs. the 10mm bolt. So the above options apply to front shaft spacers; that is drill a blank spacer, drill out your flanges for 10mm bolts or order smaller bolts and 8mm/10mm sleeves.
- Note: The 10mm flange bolts typically have a 14mm head (i.e. size of wrench needed to fit the bolt), while the smaller bolts will have a smaller bolt head, on the order of 12mm..
-
The first option is to order an un-drilled
spacer and then drill the spacer to match the flange on the drive
shaft.
-
(***) Some Tacoma pickups use a 65mm square
bolt pattern on the CV joint.
- Please be sure to measure the bolt hole spacing of the flange you intend to put the spacer on as the front and rear flanges may be different.
- Also note that on rear 2-piece drive shafts, the flange off the carrier bearing will likely be a different pattern than the transfer case flange, usually something like 60mm x 60mm, so be sure to check the bolt pattern on the flange you wish to install the spacer before ordering!
- This same bolt pattern may also be used on some 3rd generation 4Runner on the pinion flange and again the pattern on the pinion/axle end of the drive shaft is likely a different pattern than on the transfer case end. So be sure to know which pattern you have on the end of the shaft that you intend to put the spacer on prior to ordering.
- And since many of these vehicles also use a 60mm x 60mm bolt hole pattern on some flanges, we've updated this spacer with slotted holes that fits both the 60mm and 65mm bolt patterns for a wider range of fitment.
-
Some Tundra and Tacoma pickups
also use this same bolt pattern including some 2WD pickups
- On the 2WD pickups (Tundra and Tacoma), this bolt pattern is present on the pinion flange, which is where the spacer is installed since the upper end of the shaft slips into the tail housing of the transmission.
- Some Tundra pickups use an oversized flange that is about 5" (125mm) in diameter with larger bolts pattern and 11mm bolts. These spacers will not fit that oversized flange, so best to measure the size of the flange that is on your truck prior to ordering!
-
(****) For the older FJ/HJ/BJ Landcruisers, the
56mm x 64mm x 10mm bolt pattern is likely but one of many bolt
patterns.
- We place this bolt pattern on a double-drilled spacer that also includes the above slotted hole pattern.
- This is but one pattern we are aware of.
- The FJ-40s may also use the 61.5mm x 70mm x 10mm bolt pattern that is included in the 5X-drilled spacers.
- So again, please measure what bolt pattern your truck uses prior to ordering. Because Toyota does not go by our table on what drive shaft pattern goes on what vehicle. We only know what patterns are used based upon what our customers have told us that they have found on their vehicles. So the bolt pattern that your truck has is what it has.
-
The FJ-80 and LX-450 models with the high pinion 8" front
differential often use the basic 60mm x 60mm bolt pattern.
- Of course the same applies to solid front axle applications that use the FJ-80 high pinion front differential.
-
(*****) New spacers for some of the 11mm bolt flanges.
- Includes the larger 66mm x 66mm x 11mm bolt pattern.
- Take care in measuring as the 65mm x 65mm x 10mm pattern is very close in size to the 66mm x 66mm x 11mm pattern. The big difference will be the bolt diameters. The 10mm and 11mm bolts often have "11" stamped on the head (a grade marking) and the wrenching size is the same 14mm head/nut on the 10mm and 11mm factory hardware. Also, these flanges are often in the 4-3/8" - 5" outer diameter size. Aside from careful measuring of the bolt pattern spacing, you can usually get a pair of calipers on the exposed end of the bolt sticking out past the nut. The end of the bolt is slightly tapered, but the 11mm bolt will measure about 10.6mm in dia. while the 10mm bolt will measure something like 9.6mm in dia. If you actually remove a bolt and check, the unthreaded shank will measure out quite close to the 10mm or 11mm measurement. Some models may also use a 12mm dia. bolt, this will work with these spacers.
- If you are sure you have 11mm bolts, order the larger 66mm x 66mm x 11mm spacer.
- If you are not sure of your measurements, (it can be difficult to get accurate measurements in the confined space of the installed drive shaft), you can use the 65mm x 65mm x 10mm spacer with the 66mm x 66mm x 11mm flange. How can this be? Well, the holes in the spacer are drilled about 0.5mm oversized as are the holes in the factory flanges. The difference between the 65mm and 66mm bolt patterns are 0.5mm wider on each half, so with the bolt hole sizes, there is enough overlap to fit a 10mm bolt through all the holes. The reverse is not true, however. That is if you actually have a flange with 10mm bolts, the 11mm bolts will not fit in the 10mm hole.
-
Note that there are some Tundra models that
use an even larger bolt pattern of 88mm x 88mm with about a
6"/150mm dia. flange.
- Yet another variation in the 11mm saga is that some vehicles use 11mm studs threaded into the pinion or t-case flange for attachment. The flange end of the stud is M11x1.0 thread for which we've been unable to find a matching bolt for use with the spacers. In this case, we do have M12x1.50 or M12x1.75 high strength bolts available (ARP or Darling flange head alloy). To use these, remove the threaded studs, drill out the hole to 7/16" (removing the 11mm threads) then re-tap the hole with the 12mm thread tap. No need for any precise measurements or special tooling. The dril bit and tap are available as most hardware and tool stores if you don't have them. Contact us prior to ordering if you need this option: mailto:sales@4Crawler.com
- Some models may even use a 12mm diameter bolt. This spacer will work with that larger size bolt, however will ship with 11mm mounting bolts. If you feel the need to use the larger diameter bolt, you can pick those up at a local hardware store.
-
Some Toyota models make use of studs instead
of nuts and bolts to attach the drive shaft (or companion) flanges
together.
-
There seem to be two versions of studs used by Toyota, so it's
important to find out what type your vehicle has:
-
Pressed in studs in a thinner flange will have a sort of rounded head
on the back side of the flange.
- If this is the case, you'll need to be able to remove the existing studs (they'll be too short with the spacer) and then replace the studs with bolts.
- You'll need to ensure there's enough room to install either the supplied bolt or nut behind the flange the studs were attached to (approx 1/2" for the nut).
- You may also need to drill out the holes the studs were in, if they're undersized for the studs, in order to fit the bolts.
-
Threaded in studs in a thicker flange:
- These studs will often have a small hex head on the end that allows them to be unscrewed.
-
On the 11mm hardware vehicles, Toyota often uses an odd M11x1.0 thread
that we've never been able to find a source for longer than stock studs.
- In this case, an option is to re-tread the existing holes to M12x1.75 using a 10mm or 13/32" drill bit to open up the hole and then a set of M12x1.75 taps like this.
- With this done, we can supply the same high strength 12mm hardware we use on the Ford 9" spacers
- Contact us prior to ordering so we can get the details such as the approx. thickness/depth of the flange is so we can size the bolts accordingly.
-
Pressed in studs in a thinner flange will have a sort of rounded head
on the back side of the flange.
- If you are unable to do this, you'll either need to locate longer studs to install the spacer or you'll need to counter sink holes in the spacer to make use of the existing studs and then drill and tap a second set of holes in the spacer to fit threaded studs into to attach the drive shaft flange to.
- Or if that is not an option for you, you'll need to have your drive shaft lengthened at a drive line shop.
-
There seem to be two versions of studs used by Toyota, so it's
important to find out what type your vehicle has:
-
What if you need to make up additional
drive shaft length? Of course, the "best" option is to have
the shaft lengthened, but that is also fairly expensive.
-
You have 2 options with our spacers:
- One is to stack spacers if you only have one flange on the shaft, simply order 2 spacers that add up to the desired length and then add a "Note To Seller" or drop us an e-mail letting us know you wish to stack the spacers and we'll send longer hardware to accommodate the added thickness.
- We'll need to special order the extra long hardware and there are limits in terms of how long the bolts we can source in each of the various sizes. So be sure to check with us first to make sure we can supply hardware for your application.
-
The other option is to put one spacer on each end of the drive shaft if
has flanges on each end.
- Note that the bolt patterns of the two flanges may be different, so be sure to check both flanges and order the correct spacers.
- After all, the shaft has 2 ends and unless you have a 2WD with the upper slip yoke connection, you'll have a flange at both ends of the shaft.
-
With the available bolt patterns, you should be able to find a spacer
to fit on each end.
- On most 2WD models, you have to put the spacer at the pinion flange at the rear differential, since the transmission end of the drive shaft is typically a slip yoke.
-
You have 2 options with our spacers:
-
Note, bolt sizes are in reference to the shank or size hole the bolt
fits into. Typical "wrenching" sizes below:
- 8mm shank = 12mm wrench
- 10mm shank = 14mm wrench
- 11mm shank = 14 mm wrench.
- If you have other questions about the spacers, click here...
What makes the 4Crawler Offroad spacers different?
So, what makes these spacers different? First off, our spacers are designed and manufactured 100% in the United States.
We were one of the first companies offering a Toyota-specific drive shaft spacer and have now expanded into the Ford, Chevy and Dodge vehicles. In designing our spacers, we studied the market and picked the most popular set of drive shaft flange bolt patterns to support. As such, we offer the widest variety of patterns and spacer sizes available on the market. We also offer blank, un-drilled spacers for those cases where you may have a unique pattern or application. And over the years, we have increased our product offering by adding the newer 65mm x 65mm pattern as well as the older 56mm x 64mm pattern plus the new 11mm bolt patterns on the newer Toyota trucks.
Also, we only use metric bolts where applicable, unlike some of the other spacers out there, which use undersized SAE hardware. Also, we use grade 12.9 hardware, meeting or exceeding the specs. of the factory grade 11 hardware. And also, we list the exact bolt patterns of each of the spacers, so you can check which one meets your needs before you order. Since there is such a wide range of bolt patterns that have been used over the years on a wide variety of vehicles, it is hard to list a spacer that fits any given year/model vehicle. Also, with the popularity and ease of swapping parts from one vehicle to another, you may have a 'XX 4Runner with a transfer case from a 'YY pickup and a drive shaft from a 'ZZ Tacoma, and deciding what "year" your vehicle is for purposes of selecting a spacer for is pointless.
Note: Flange hole vs. bolt size:
Drive shaft flanges are held together typically with 4 bolts that fit through the holes in the two flanges and the spacer, if present. This bolted joint transfers the torque through the mechanism of clamping friction. That is, it's the normal force supplied by the clamping bolts, that are under tension, coupled with the coefficient of friction of the flanges and spacer that allow torque to be transferred across the bolted connection. Contrary to popular belief, torque is not transferred via the flanges loading the bolts in shear. The only way this can happen is if the bolts are too loose and allow the flanges to rotate against each other until it's only the bolt shanks that are under load. If the flanges were meant to be loaded it in this fashion, the bolts would need to be pressed into interference fit holes to ensure all 4 bolts were equally loaded in shear. But, you'll observe that the factory bolt holes are drilled out somewhat larger than the bolts to allow for easy assembly.
Why is this the case? One word, REVERSE. If the bolts are tight against the holes with forward torque, what happens when you throw the transmission in reverse? The shaft would have to slip backwards until the bolts were against the other side of the bolt holes. That shock loading would gradually weaken the bolts over time and shear them off at one of the flanges.
Here's a good discussion of this topic on the Eng-Tips forum. So this is the reason the holes in the spacers are drilled somewhat oversize, both to allow for easier installation and to allow for varying bolt patterns and bolt diameters to be used.
[Return to the top of this page]On-Line Ordering:
Order a drive shaft spacer below:
-
Toyota Spacers:
-
For 10mm hardware:
-
5x drilled spacers, 10mm hardware
- May also fit Mitsubishi Montero/Pajero/MityMax and Dodge Raider/D50 models
-
5x drilled spacers, 10mm hardware
- For 11mm hardware:
-
For 10mm hardware:
- Ford 8.8/9/9.75" spacers, 7/16" or 12mm hardware
- Dodge/Chevy spacers, 7/16" hardware
- Expedited shipping
- Separate hardware:
- Returns and exchanges
- Cancellation Policy
Want the spacers shipped faster?
Use the order buttons below to upgrade the normal Priority Mail postage to Express Mail. For Australia orders, this is required as Priority Mail is currently not being accepted until furhter notice. If you would like to use UPS or FedEx shipping, contact 4Crawler Offroad for details before placing and order.
| Express Delivery upgrade; US$18.50 for US shipments | Express Delivery upgrade; US$32.00 for Int'l shipments |
8mm hardware options:
For customers needing 8mm hardware, the first option is we can supply 8mm hardware along with the default 10mm hardware. This gives you the choice of running 8mm hardware w/o re-drilling your flanges and then later you could drill the flanges and have the larger 10mm hardware on-hand. The second option is we can supply 8mm hardware instead of 10mm hardware, just let us know at the time of ordering..
| Add 8mm nuts/bolts to spacer order |
Hardware-only options:
NOTE: Our spacers come with 4 longer than stock bolts. However, we do have the spacer hardware available separately in case you need different size hardware, you lost the hardware, or are installing a spacer on a different vehicle or maybe you received a spacer from someplace else and need hardware for it. A kit of 4 bolts (washers, nuts) as applicable is US$25.00 plus postage:
| Add spare h/w to spacer order | Order replacement h/w - US shipping | Order replacement h/w - Canada shipping | Order replacement h/w - Int'l shipping |
[Return to the top of this page]
5X-drilled spacers:
Our new 5X -drilled spacers provide 5 popular flange bolt hole patterns in a single spacer. This is an advantage in that many vehicles that use any of thesebolt hole patterns often use one or more of the other patterns as well. Normally with 5 sets of 4 holes, there would be a total of 20 holes in the spacer. However, by re-using some holes for multiple patterns, we're able to fit 5 (or 6) patterns into the same 12 holes as our original triple-drilled spacer had. This has allowed us to make a "one size fits all" spacer for the 10mm hardware.
We have had customers who intended to install a spacer on one drive shaft flange but for one reason or another, had to move the spacer to another flange with a different pattern. By having multiple patterns in one spacer, you can usually make that swap without having to exchange one pattern spacer for another. And to be clear, this spacer will fit any one of the 5 patterns listed below with 8mm or 10mm bolts. The 10mm bolts are socket head (needs 8mm allen key) to ensure a smaller head size to fit the cramped u-joint and cv-joint flanges:
- 60mm x 60mm
- 60mm x 68.5mm
- 61mm x 70.5mm
- 56mm x 64mm
-
65mm x 65mm
- Note: Diameter refers to the measurement across the face of the flange through the center.
- Spacers are 4-1/4" (105mm) diameter, a close match to the 4-3/8" flange on the common FJ Cruiser t-case swap
- There's overlap in the ~11.5mm holes in the flanges and the ~10.5mm holes in the spacer. The 10mm bolt may fit as-is or the holes might need a little work with a round file or drill bit to clean them out to fit the bolts in. This is typically due to rough edges in the holes in the flanges. Insert the spacer and get a bolt or two to fit, then file or drill out the remaining holes as needed. A 10mm or 25/64" drill bit should do the trick. You'll likely need to rotate the drive shaft to gain access the different holes.
- See photos 5, 6, 17 and 18 in this photo album
Inventory:
Size--------Part Number-----Cost(US$)---Status
0.50"/12mm - DSpcr5X_0.50 - $65.00 - In-stock
0.75"/19mm - DSpcr5X_0.75 - $68.00 - In-stock
1.00"/25mm - DSpcr5X_1.00 - $71.00 - In-stock
1.25"/32mm - DSpcr5X_1.25 - $74.00 - In-stock
1.50"/38mm - DSpcr5X_1.50 - $77.00 - In-stock
1.75"/44mm - DSpcr5X_1.75 - $84.00 - In-stock
2.00"/51mm - DSpcr5X_2.00 - $91.00 - In-stock - will include 1.25" + 0.75" spacers
Spacer includes grade 12.9 10mm bolts/washers/lock nuts
We HIGHLY recommend that you measure the bolt hole spacing on the flange you intend to install the spacer prior to ordering.
To order, select the desired spacer height and quantity, then click the Buy Now button to proceed.
 |
|
|
| US Shipping | Canada Shipping | Int'l Shipping |
- Shipping cost/time via USPS Priority small flat rate box
- Please be sure to double check your shipping address, both that it is correct and that it is able to receive US Mail deliveries.
[Return to the top of this page]
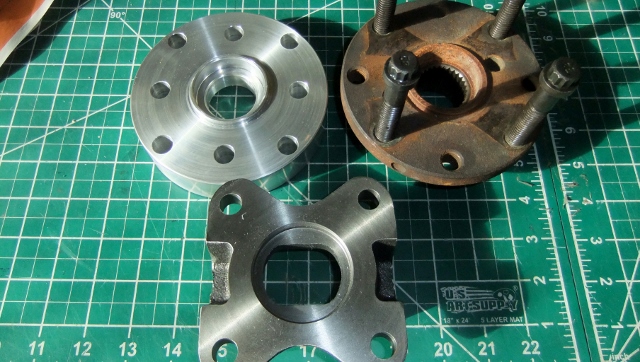
11mm bolt - 66mm x 66mm spacers:
These are 5X spacers that have been modifed to fit the 66mm x 66mm x 11mm bolt pattern by slotting out 4 of the holes to fit the wider bolt pattern. This spacer can be used on the popular 4th gen. 4Runner modification of installing a transfer case out of an FJ Cruiser. For this swap, the rear drive shaft needs to be lengthened between 3/4" and 1-1/2". To determine the spacer thickness needed, measure the rear drive shaft length prior to installing the new transfer case, then re-measure after. Alternately, measure the length of the original transfer case as well as that of the new transfer case. Here's a photo with more information (click on the image for details). The length differencce would equal the thickness of the drive shaft spacer. If you have added a suspension lift, you can add a bit to account for that. Round down to the nearest spacer thickness.
We HIGHLY recommend that you measure the bolt shank diameter and hole spacing on the flange you intend to install the spacer prior to ordering.
These spacers will not work with the larger 88mm x 88mm bolt pattern.
 |
| 11mm bolt spacer and hardware |
Inventory:
Size-------Part Number---Cost(US$)--Status - Limited stock, made to order
0.50"/12mm - DSpcr66x66x11_0.50 - $ 85.00
0.75"/19mm - DSpcr66x66x11_0.75 - $ 88.00
1.00"/25mm - DSpcr66x66x11_1.00 - $ 91.00
1.25"/32mm - DSpcr66x66x11_1.25 - $ 94.00
1.50"/38mm - DSpcr66x66x11_1.50 - $ 97.00
1.75"/38mm - DSpcr66x66x11_1.75 - $100.00
2.00"/51mm - DSpcr66x66x11_2.00 - $103.00 - will include 1.25" + 0.75" spacers
- Spacer includes grade 8 bolts/lock nuts:
- Spacers are 4-1/4" (105mm) diameter, a close match to the 4-3/8" flange on the common FJ Cruiser t-case swap
To order, select the desired spacer height and quantity, then click the Buy Now button to proceed.
| US Delivery | Canada Delivery | Int'l Delivery |
Notes:
- Shipping cost/time via USPS Priority small or medium flat rate box
- Please be sure to double check your shipping address, both that it is correct and that it is able to receive US Mail deliveries.
[Return to the top of this page]
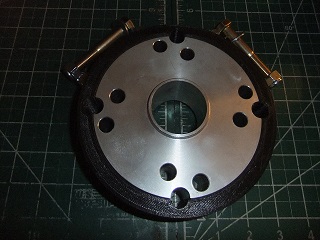
11mm bolt - 66mm x 66mm, 77mm x 77mm and 88mm x 88mm spacers:
For the larger 88mm x 88mm bolt pattern, this spacers uses partial holes around the circumference. The 11mm bolts will end up near the outer edge of the spacer in this configuration. The aluminum part of the spacer is ~5" or 125mm in diameter. The kit includes a trim ring made of tough ABS plastic that extends the spacer to ~6" or 150mm diameter. This ring covers the bolts around the outside, if desired. These spacers will also fit the 66mm x 66mm and 77mm x 77mm bolt patterns without the trim ring.
- Inventory:
- Size-------Part Number----Cost(US$)--Status SOLD OUT
- Spacer includes grade 8 bolts/washers/lock nuts:
- They are approx. 5" or 125mm in diameter
|
| US Delivery | Canada Delivery | Int'l Delivery |
Notes:
- Shipping cost/time via USPS Priority small flat rate box
- Please be sure to double check your shipping address, both that it is correct and that it is able to receive US Mail deliveries.
[Return to the top of this page]
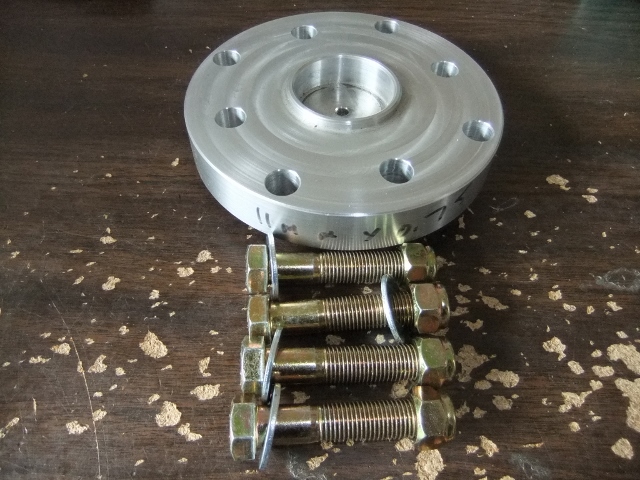
Ford 8.8/9/9.75" Spacers:
Now available for the Ford 8.8/9/9.75" and other pinion flanges with the 2" diameter pilot bore and the following bolt hole patterns:
- 2.5" x 2.5" or ~3.5" BCD, ~4.25" dia.
- 3.0" x 3.0" or ~4.25" BCD, ~5" dia.
- To be clear, the spacers have BOTH bolt patterns or a total of 8 bolt holes. You simply use the 4 holes that match your flange and don't use the other 4 holes.
Note that while the spacers may refer to Ford 8.8", as long as the flange you are attaching them to has one of the above bolt patterns and a 2" pilot ring diameter, the spacer will fit that flange. Makes no difference to the spacer if that flange is on an 8.8", or 9.75" differential.
Some Ford flanges will be tapped for 7/16", either fine (NF or 20tpi) or coarse (NC or 14tpi) thread. If you need to use that size hardware, be sure to select that option in the order form instead of the default M12 option. We HIGHLY recommend that you measure the bolt hole spacing on the flange you intend to install the spacer prior to ordering.
Along those lines, many of these flanges may have 2 sets of 4 holes. Why? There seem to be a few reasons. First is that there may be 2 different bolt patterns, so that either one can be used. Second, there may be 2 different thread pitches, so that 2 different size bolts can be used. And third, since the threads are in the flange, if one or more of those threaded holes gets messed up, that 4 bolt pattern can't be used. Thus, having another 4 bolt pattern available allows the flange to still be used with that other bolt pattern. And no, you don't need to use all 8 holes, after all your driveshaft flange likely only has 4 holes.
These spacers may also work with Atlas transfer case flanges that often have a 2" pilot ring and 3" x 3" bolt pattern. Those flanges often have 1/2" bolts, so be sure to select the no bolts option when ordering. The holes in the spacers will just fit a 1/2" bolt but you may need to slightly enlarge the holes if needed.
For the larger 3.375" square bolt pattern, the flanges typically have a pilot bore diameter greater than 2" and these spacers will not fit. If you have the different bolt pattern and the 2" pilot bore, we can provide a modified spacer that will fit the larger bolt pattern. Contact 4Crawler Offroad for details.
 |
 |
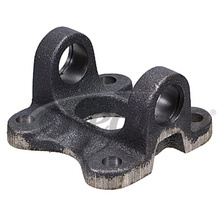 |
| Ford 8.8" Spacer, Flange and u-joint yoke | Ford 8.8" spacer installed | Ford U-joint flange example |
The spacer will fit in between the u-joint flange and pinion flange on vehicles equipped with a bolted flange. Some models don't have a bolted flange and rather have a u-joint yoke install on the pinion. If you wish to install a spacer on that type of setup, you'll need to change to a flange setup. On the lower end of the drive shaft, you'll install a u-joint flange, as shown in the above right image. Then on the pinion, remove the u-joint yoke and install a flange. You'll need to order the two flanges to match your u-joint and pinion, check out the ordering details on the Drive Train America web site. If doing this conversion, be sure to install the new flanges prior to measuring for the thickness of spacer you need. The flange setup will likely affect the shaft length and you'll want to account for that before selecting a spacer. Note that Drive Train America doesn't carry the spacers, they will supply the various flanges needed to convert your non-flange drive shaft to be able to use the 4Crawler Offroad spacers.
- Ford spacer questions.
-
Size-------Part Number-----Cost(US$)--Status
- 0.50"/13mm - DSpcr-F8.8_0.50 - $71.00 - In-stock
- 0.75"/19mm - DSpcr-F8.8_0.75 - $76.00 - In-stock
- 1.00"/25mm - DSpcr-F8.8_1.00 - $81.00 - In-stock - Will be 2 x 0.50
- 1.25"/32mm - DSpcr-F8.8_1.25 - $86.00 - In-stock
- 1.50"/38mm - DSpcr-F8.8_1.50 - $91.00 - In-stock - Will be 2 x 0.75
- 1.75"/44mm - DSpcr-F8.8_1.75 - $101.00 - In-stock
- 2.00"/50mm - DSpcr-F8.8_2.00 - $111.00 - In-stock - Will be 1.25 + 0.75
- 2.25"/57mm - DSpcr-F8.8_2.25 - $121.00 - In-stock - Will be 1.75 + 0.50
- 0.50"/13mm - DSpcr-F8.8_0.50 - $71.00 - In-stock
Each spacer comes with 4 - M12x1.75 12-point flanged ARP or Darling (or 7/16") bolts long enough to accommodate the thickness of the spacer. Note, the 2.00" spacer will consist of a 1.50" and a 0.50" spacer. Likewise, the 2.25" spacer will consist of a 1.75" and a 0.50" spacer, additional International shipping added due to exceeding the 4 lb. USPS weight limit.
Order with US delivery below:
| 0.50" Ford 8.8" Spacer | 0.75" Ford 8.8" Spacer | 1.00" Ford 8.8" Spacer | 1.25" Ford 8.8" Spacer |
| ~~~ | ~~~ | ~~~ | ~~~ |
| 1.50" Ford 8.8" Spacer | 1.75" Ford 8.8" Spacer | 2.00" Ford 8.8" Spacer | 2.25" Ford 8.8" Spacer |
| US Delivery | US Delivery | US Delivery | US Delivery |
| ~~~ | ~~~ | ~~~ | ~~~ |
Order with international delivery below:
| 0.50" Ford 8.8" Spacer | 0.75" Ford 8.8" Spacer | 1.00" Ford 8.8" Spacer | 1.25" Ford 8.8" Spacer |
| ~~~ | ~~~ | ~~~ | ~~~ |
| 1.50" Ford 8.8" Spacer | 1.75" Ford 8.8" Spacer | 2.00" Ford 8.8" Spacer | 2.25" Ford 8.8" Spacer |
Notes:
- Shipping cost/time via USPS Priority small flat rate box
- Please be sure to double check your shipping address, both that it is correct and that it is able to receive US Mail deliveries.
We can also combine the billet aluminum spacers for taller heights as well. The billet aluminum spacers have the mating pilot ring/hole so will stack more precisely than the 0.25" spacers that only have a pilot hole. Another option for a 2.25" spacer would be 1.75" + 0.50" for example. This stack would include bolts sized for 1.75" as well as 2.25" at no extra charge.
The combined spacer stack will come with 12mm 12-point bolts of the appropriate length for the combined spacer stack. Heights over 2.25" may require extra time as we don't stock the hardware in those sizes. Contact us for more information. Likewise, if you have a very tight installation area and need shorter bolts, let us know. By default, the spacers come with bolts that are ~35mm longer than the spacer height, e'g' 1"/60mm, 1.5"/70mm. We can supply bolts 10mm shorter than normal if you are tight on space.
[Return to the top of this page]Dodge/Chevy 9.25" (and other) Spacers:
We've sold out of our stock of these spacers. They are available from from Amazon as well as other web sites. We've also made available 3D CAD files for these including the small pilot ring adapter.
For the Dodge/Chevy 9.25" and other pinion flanges with the ~3.1" diameter pilot ring with the bore about 3.125" and the following bolt hole pattern:
-
3.0" x 3.0" or ~4.25" BCD, ~5" dia.
- 3-1/8" pilot ring, or
- 2-3/16" pilot ring
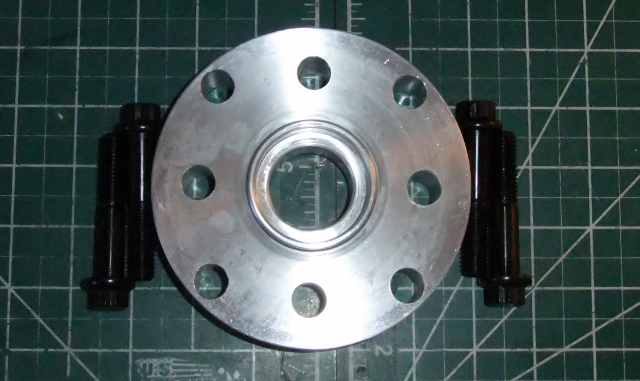
 |
| Dodge/Chevy 3" x 3" bolt pattern |
The spacer will fit in between the u-joint flange and pinion flange on vehicles equipped with a bolted flange. Some models don't have a bolted flange and rather have a u-joint yoke install on the pinion. If you wish to install a spacer on that type of setup, you'll need to change to a flange setup. On the lower end of the drive shaft, you'll install a u-joint flange, as shown in the above right image. Then on the pinion, remove the u-joint yoke and install a flange. You'll need to order the two flanges to match your u-joint and pinion, check out the ordering details on the Drive Train America web site. If doing this conversion, be sure to install the new flanges prior to measuring for the thickness of spacer you need. The flange setup will likely affect the shaft length and you'll want to account for that before selecting a spacer.
There is a second variation of the Dodge/Chevy pinion flange. It uses the same outer diameter and bolt pattern, but it features a smaller pilot circle, that being approx. 2-3/16" We can make a spacer for this application by machining off the ~3" dia. pilot ring and then providing a 3D printed insert for the larger bore spacer. The insert only serves as a locator for centering the spacer on the pinion and drive shaft flanges and it serves no structural purpose. Order the "-S" version of the spacer to get the pre-machined spacer and adapter. If unsure which version flange you have and you don't want to check prior to ordering, you can order the -S version and let us know you don't want us to machine off the existing pilot ring. This way, if you find you have the larger bore flange, you can use the spacer as-is. If you find you have the smaller bore, then you can use the insert, but you'll need to machine, grind or file off the existing ring before the spacer will sit flush on the flange.
- Inventory:
-
Size-------Part Number------Cost(US$)--Status
- 1.00"/25mm - DSpcr-D9.25_1.00-L - SOLD OUT
- 1.00"/25mm - DSpcr-D9.25_1.00-S - SOLD OUT
- 1.00"/25mm - DSpcr-D9.25_1.00-L - SOLD OUT
Spacer includes grade 8 7/16"-NC bolts/lock washers. Spacer in 1.0" thickness at this time, made of billet T-6061 aluminum.
- With the small ring spacers, we can machine the raised pilot ring off or we can leave it in place.
-
If you're unsure of the exact dimensions on your flange, leaving the
ring intact lets you fit either sizer pilot with this spacer
- Also, if you're fitting a small ring drive shaft to a large ring pinion flange, you can do that with the pilot ring left in place
 |
. |
| DSpcr-D9.25_1.00-L | DSpcr-D9.25_1.00-S |
| US delivery | US delivery |
| ~~~~~ | ~~~~~ |
| Canada Delivery | Canada Delivery |
| ~~~~~ | ~~~~~ |
| Int'l Delivery | Int'l Delivery |
Notes:
- Ships via USPS Priority small flat rate box
- Please be sure to double check your shipping address, both that it is correct and that it is able to receive USPS deliveries.
[Return to the top of this page]
-
Exchanges:
-
If an exchange is desired, please include a note as to what exchange
part you want and include return postage for that part to be sent back
to you.
- Return postage will be be as noted above, typically what the original item shipping was.
- If you are in a rush to get the exchanged part, place an order for the new part and we'll ship that to you right away. Then return the old part, and upon receipt, we'll issue a refund against the new order.
-
If an exchange is desired, please include a note as to what exchange
part you want and include return postage for that part to be sent back
to you.
-
Parts may be returned for a refund within 60 days of original purchase.
- No need to obtain an RMA number or anything like that.
-
A 10% restocking fee will be deducted from original purchase price less
outgoing shipping.
-
Parts must be in new and unused condition for the refund.
- Used or blemished parts can yield partial refunds at the discretion of 4Crawler Offroad.
- Parts that have been modified by the customer or that have been built to unique customer specifications are generally not refundable.
- Returned items with missing components will have the refund adjusted for the cost of the missing items (e.g. missing nuts or bolts, etc.)
- The customer is responsible for return shipping charges.
- Returned parts must include a copy of the original invoice or packing slip for proper credit.
-
It is highly recommended that a package tracking number be obtained
from the shipper and that that number be transmitted to 4Crawler
Offroad so that we are aware that you have sent an item back and that
we can track it, know when it arrives and can pick it up at our PO box.
- If you use the USPS.COM on-line shipping label system, you can get the delivery/tracking number at no additional cost and you can simply enter our e-mail address (sales@4crawler.com) in the recipient field and we'll automatically be sent that information.
- If you don't have a tracking number, at least send us an e-mail noting when and how you shipped the package so we can keep an eye out for it to arrive.
-
Parts must be in new and unused condition for the refund.
-
One exception to this policy is in the case that the parts do not fit
properly, per the installation instructions.
- The returned part(s) must be accompanied by photos or a detailed description of the fitment issue.
- In such a case 4Crawler Offroad will refund the full purchase price less shipping. And as noted, please furnish a detailed description of the fitment issue reported, including dimensions, so that this fitment issue may be corrected for future orders.
-
Items returned 60 days or more past the purchase date will be refunded
less any applicable transaction fees, typically 4% - 5%.
- This time is from the date of purchase until we get our hands on the returned item(s) so we can inspect them for missing parts or damage, so be sure to allow enough time if planning to return an item for a refund.
- Items that are custom built to fit customer specifications may only be returned for partial credit at the discretion of 4Crawler Offroad.
-
Return to:
- 4Crawler Offroad Products
- attn: Roger Brown
- PO Box 61092
- Sunnyvale, CA. 94088-1092
- USA
- Physical shipping address can be provided for UPS/Fedex return shipments if requested.
Installation Instructions:
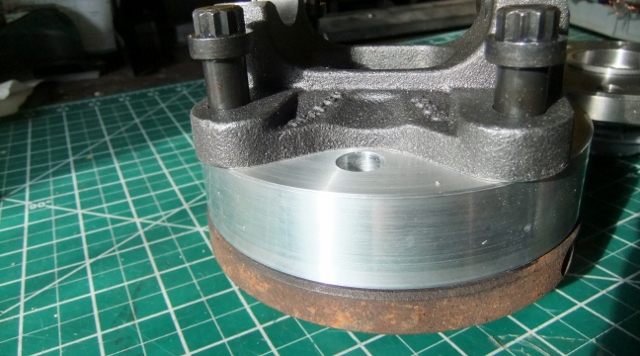
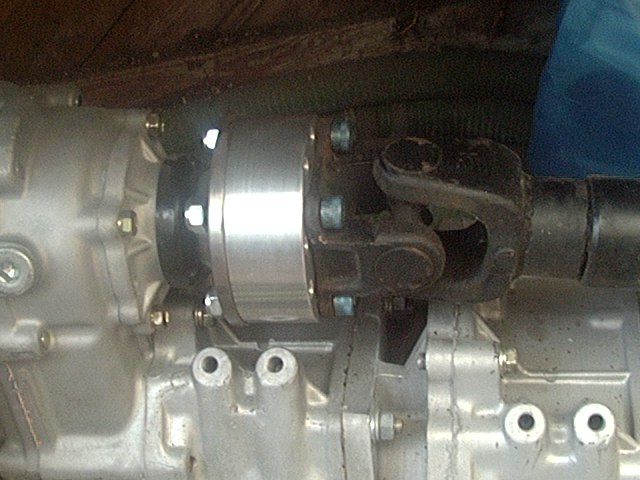 |
| Installed spacer on transfer case output flange |
Allow approximately 30 minutes for the installation, assuming you don't run into any rusted or damaged fasteners. To install, you'll need:
- Toyota 10mm: A pair of 9/16" or 14mm wrenches for the stock hardware and an 8mm long arm allen key and a 17mm wrench to install the new hardware
- Toyota 11mm: A pair of 9/16" or 14mm wrenches for the stock hardware and a pair of 5/8" or 16mm wrenches to install the new hardware
- Ford/Toyota 12mm: You'll need a 12-point socket or closed end wrench, typically 12mm or 14mm.
- Dodge 7/16": A pair of 5/8" or 16mm wrenches to remove the old and install the new hardware
While you should not have to separate the drive shaft to install the spacer, it is a good idea to put an alignment mark across both sides of the slip yoke. Some white paint works well and will help you re-align the slip yoke if you accidentally pull it apart.
Typically, the stock Toyota drive shaft (a.k.a. propeller shaft) flange bolts use a 14mm head, so you'll need a pair of 14mm combination wrenches to remove those. For the rear drive shaft, block the vehicle's tires or place the rear axle on jack stands for easier removal. You can place the transmission in neutral and release the parking brake if needed.
The spacers can be installed on either the upper or lower end of the drive shaft, depending on application and bolt hole patterns. On 4WD trucks, they are typically installed at the transfer case companion flange. 2WD trucks will only be able to install them at the pinion flange on the axle, but no reason 4WD trucks can't do the same. And it would not be out of the question to install two spacers on one drive shaft if you need to extend it more than 1.5", putting one spacer on each end of the shaft.
Break the stock flange bolts loose at the transfer case and then remove them. Support the drive shaft before removing the last bolt to keep it from falling. Then compress the slip yoke enough to allow insertion of the spacer.
- Note:
- Some companion (transfer case or differential/pinion) flanges have pressed in studs instead of separate bolts. In this case, you'll need to hammer or press the studs out. You can spin a nut on the end of the stud before hammering it out to protect the threads. The supplied bolts will replace the studs.
Then slip the spacer in between the transfer case output flange and the drive shaft flange and turn it to make sure you have the proper set of 4 bolt holes in alignment. Slip in one of the supplied metric socket head cab screws, a lock nut and washer (if needed). Repeat for the other 3 bolt holes, just to make sure all 4 bolts are installed before tightening them. If you find the bolts hard to install, use a small round file or drill bit to clean out the insides of the holes in the flanges to make installation easier.
For the 5X drilled Toyota spacers, you'll note holes af varying sizes. Just find 4 that line up with your flange bolt pattern. The varying size holes are there to allow for re-use of holes for multiple bolt patterns. If we didn't do this, there would be 20 holes in each spacer, instead of the 12 that are there.
There are varying thickness flanges and we try to supply a bolt that's long enough to fit the thickest flanges + spacer height. If you find the supplied bolts a little too long, you can add a few washers under the head of the bolt to take up the excess length. Or you can cut the excess length off the end of the bolt after it's installed. Or, we can supply the next size shorter bolts in most cases.
For un-drilled spacers, you'll want to use the existing flange to mark the spacer for the location of the new bolt holes. The spacer can be clamped to either the drive shaft or transfer case flange, probably easiest to remove the flange from the transfer case output (30mm staked nut holds it in place) and use that, clamping it to the spacer so it does not move. Select a drill bit that just fits inside the bolt hole or use a transfer punch to mark the hole locations. If you are unsure of your drilling skills, you may elect to mark and drill one hole at a time and then use that freshly drilled hole and a bolt to secure the spacer to the flange for marking and drilling the next hole. Once the hole location is marked, remove the flange and drill out that hole (a drill press works best to ensure a straight hole). Use a bit that is as big as or slightly larger than the hole in the flange. Once all 4 holes are drilled, make sure all 4 bolts fit into the flange, spacer and drive shaft before proceeding. If you find a slight misalignment, you can run your drill bit through the holes to open them up a little bit if needed. For the standard 10mm bolts, you generally want to drill the holes with a 10.5mm bit or a 13/32" or 27/64" drill bit.
Once all 4 bolts are in place, alternately snug them down in a crisscross pattern. Once all 4 nuts are snugged down, torque the nuts to the factory specifications listed in the Factory Service Manual. Lacking that information, you can use approx. 40-45 ft.lbs. (10mm) or 50-60 ft.lbs. (11mm hardware). Be sure to re-check the torque after 50-100 miles of driving. While nylon lock nuts are used with the spacers, you might get a flake of paint or dirt between the shaft and spacer during installation and the bolts will feel tight at that point. But after a while driving, that flake will get crushed and fall apart leaving a tiny gap that can lead to looseness.
The Ford, Dodge and Chevy driveshaft flanges have internally threaded holes into which the bolts fasten. For those, you can apply some thread locking compound if desired. Photos of replacement, stock length bolts often show a red thread locking compound pre-applied.
Some bolt torque specifications:
Toyota 10mm:      54 ft-lb (74 N-m)
Toyota 11mm:      58 ft-lb (79 N-m)
Ford 12mm:        70 ft-lb (95 N-m)
Dodge/Ford 7/16": 58 ft-lb (79 N-m)
A note on the bolt finish:
With high strength bolts, you commonly see either black oxide or the blue coating instead of the more common zinc plating. These costings have minimal affect on the dimensional tolerance of the fastener compared to zinc plating. One downside of these finishes is that they don't have the rust prevention characteristics of zinc plating. Black oxide fasteners use an oil or wax film applied periodically to protect the finish from rust. Another option is to apply paint to the exposed parts of the fasteners. This is best done after the bolts are installed since the wrench or socket will likely damage any paint applied to the head of the bolt prior to installation.
[Return to the top of this page]
 <-- Comments?
email: sales@4Crawler.com
<-- Comments?
email: sales@4Crawler.com
[Last updated: 27.April.2026 ]
Visitor # since 05.MAR.2008