VW Pickup/Caddy Rear Suspension
![]()
Contents:
![]()
Introduction:
The Caddy has a rather unique (to VWs anyway) suspension. MacPherson struts up front and a leaf spring over axle rear suspension. The main leaf is approx. 52" long, with a long second leaf and a shorter overload type leaf on the bottom of the pack. A conventional spring shackle is in back to accommodate the flexing of the spring. Two shock absorbers mount between tabs on the tube axle and brackets on the bed sub frame.
[Return to the top]
![]()
Springs
After getting tired of the rear end bottoming out over bumps, I first picked up a 1500lb.-rated helper spring to attach to the rear leaf spring. This helper attaches to half the spring, clamping to it near the spring perch and then it lifts under the stock leaves.
After running the helper spring for a number of years, I decided a full length spring leaf might work better. So, armed with an ample supply of left-over leaves from my Toyota, I found an ideal add-a-leaf for the pickup was the 3rd or 4th leaf from the front spring pack, of an 1985 or earlier Toyota truck. To install it, I jacked up the rear end, removed the lower shock mount, pulled the nuts off the u-bolts and removed the spring center bolt. I slid the Toyota leaf in between the 2nd and 3rd VW leaves (I applied a good helping of axle grease to the leaves while they were apart), spring clamp forward (spread open to fit the slightly wider VW springs) and installed a new, longer spring center bolt. One thing to watch for is the VW tube axle perch has a hole drilled into the axle for the center bolt head. If not supported the bolt can (and will) drop down inside the axle. Reassemble the u-bolts and shock and you'll not enjoy a much firmer, yet not harsh ride. By lifting the main leaves off of the overload leaf, your ride will be smoother than stock. I found the 3rd Toyota leaf restored equal front ad rear ride heights.
These add-a-leaf springs work on the VW pickup/Caddy as well as on Toyota pickup/Hilux and 4Runner/Surf models with leaf springs.
To install the add-a-leaf springs:
#1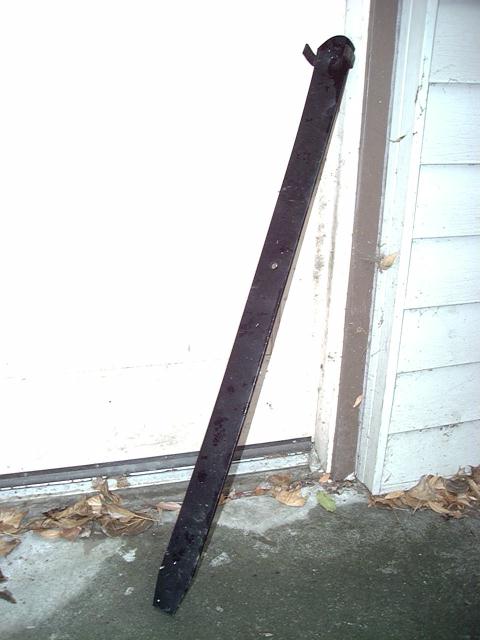 #2
#2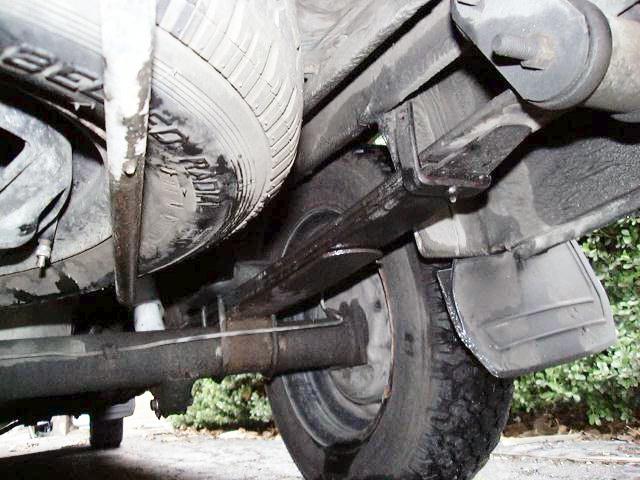 #3
#3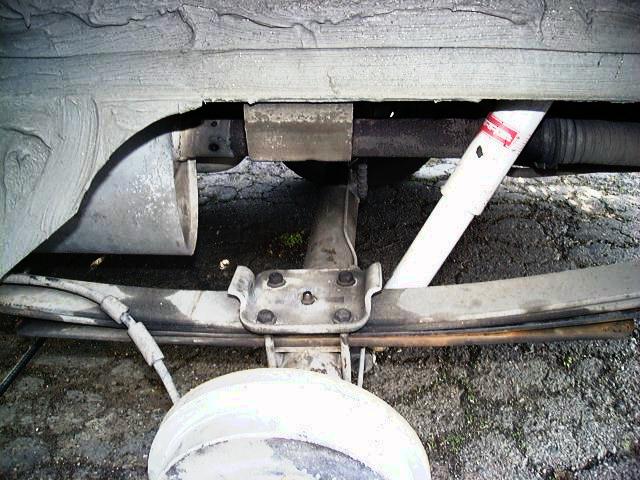
-
Spray the shock and spring u-bolt nuts with a shot of penetrating oil a
few days before starting the swap
- If interested, measure the distance to the rear wheel wells to get a "before" measurement
- Jack up the rear end and support the bumper on jack stands
- Remove the wheels to gain access to the springs
- Remove the lower shock retaining bolts
-
Loosen the u-bolt nuts on both sides
- Use a jack to support the axle if desired, its not really that heavy though
- If you have less that 3/8" or 10mm of thread protruding from the u-bolts, you may need longer ones (see picture #3 above)
- Remove the nuts from the u-bolts on one side and take off the plate and u-bolts
-
Use a vice-grip to hold the bottom of the center pin bolt and remove
the nut on top
- Some penetrating oil applied to the center bolt may be a good idea
-
If you have less than 3/8" or 10mm of thread protruding from the
center bolt, you will need a longer one
- We've found that a 3/8-NF allen head screw/bolts works great for this, the new spring pack is just over 1" thick, so a 1-1/4 to 1-1/2" long bolt is fine.
- Alternately, a hex head bolt will work, just knock off the corners of the head to fit the hole in the spring perch
- Otherwise, we can supply you a longer center bolt with the leaf springs if desired
-
Same story on the u-bolts, we've heard you can order new u-bolts at any
NAPA auto parts store, just give them the diameter of the bolt, the
diameter of the axle and the desired length of the "U" to get
new ones; on my truck they measure:
- Approx. 3/8 x 2-3/4 x 5", so another 1/2" or so added to the 5" length would be just the ticket
- WORD TO THE WISE - don't take the vice grips off until you can pull the center bolt free, the hole in the spring perch is open below and the center bolt can (and will:) fall down inside the axle tube and you'll have a rattle that will last the life of the vehicle, trust me!
-
Separate the spring pack and insert the add-a-leaf above the bottom
(overload) leaf
-
The overload leaf is that big, thick and flat piece of steel on the
bottom of the spring pack
- One option is to replace the flat overload leaf with the add-a-leaf.
- Use this option for a little less lift and/or if you find the center bolt or u-bolts are too short to fit the thicker spring pack.
-
Some of the add-a-leaves will have spring clamps attached and be of
different lengths:
- The longer Toyota leaf (#1 - above) is installed with the spring clamp forward
- The shorter Toyota leaf (#2 - above) is installed with the spring clamp to the rear
- Or if your leaves have no clamps are are equal length on both ends, put them in any direction you want
- Use a C-clamp on each end of the main two leaves help to hold them together in alignment, to make reassembly easier
- The VW springs don't seem to be under tension in the pack when its relaxed, they shouldn't pop out on you, but exercise caution.
-
The overload leaf is that big, thick and flat piece of steel on the
bottom of the spring pack
-
Line up the center holes and insert the bolt back in, tighten it down
snug
- Depending on the free arch of the existing spring leaves and the add-a-leaf spring, you may need to use a C-clamp or two to pull the springs together in the center to get the center pin installed.
- A bit of anti-seize on the threads is a good idea if you plan to ever take them apart again
-
Drop the center bolt into the perch, slip the u-bolts under the axle
and tighten down the nuts to specification
- I recall VW specs 35-40 ft.lb. but check your Bentley shop manual for sure
-
Reinstall the lower shock bolt and wheel, do the other side and you are
done
- Its a good idea to re-check the fasteners in 100-500 miles
- If interested, measure the distance to the rear wheel wells to get a "after" measurement
- We've seen anywhere from 1-2" of lift, depending on the conditions of your old springs and the load in the vehicle
These add-a-leaves are good for everyday driving and occasional heavy loads. Folks have reported anywhere from 1-2" of lift, depending on how bad your current springs have sagged and how much load you carry. In only one case has it been necessary to replace the stock u-bolts, however, longer center bolts are almost always required, unless you swap the add-a-leaf for the existing overload leaf in which case all the stock parts should fit fine.
- Here's a source for the add-a-leaf springs on Amazon.
- You only need the rear leaves, skip any of the kits with the Tacoma front suspension components. The Torch brand springs are decent quality and come with new center bolts that can be cut down in length as needed.
I used to run a set of 1500 lb. overload springs. The ones I used are similar to these. These are a easier to install than the full length springs.
To install the helper springs:
- Jack up the rear end and support the bumper on jack stands
- Remove the wheels to gain access to the springs
- Place the helper spring u-bolt over the spring pack, just in front of the spring plate
-
Place the helper spring underneath the spring pack, line up the holes
with the u-bolt, lifting end pointing to the front
- A shot of grease on the contact point can help the spring slide back and forth easier
- Tighten the nuts on the helper u-bolt to about 50 ft.lbs to bring the helper into contact with the overload leaf
- Repeat on the opposite side
-
Replace the wheels and lower the vehicle to the ground
- I recall getting about 1-1/2" of lift out of the 1000# helpers I ran
- Only problem I ever had was with the little clamp that came with the helpers used to hold the front end to the main spring
- It would loosen up and rattle so I ended up removing them and throwing them away, never had any trouble with the helper moving to the side in the 75,000+ miles I used them
Update:
When I purchased my '82 Caddy, it had a set of Rancho add-a-leaf springs that were installed by the previous owner (see image #1 below). He apparently hauled a lot of hay and horse tack as part of his business. Anyway, I found those springs way too stiff for the Caddy, even with a shell on the back. Also, he had installed some KYB shocks that were about 2" longer than the proper ones and without the stiff AAL, the shocks you'd bottom out fairly easily. I decided to play around a bit with the rear springs and shocks to improve both the load capacity and ride.
1: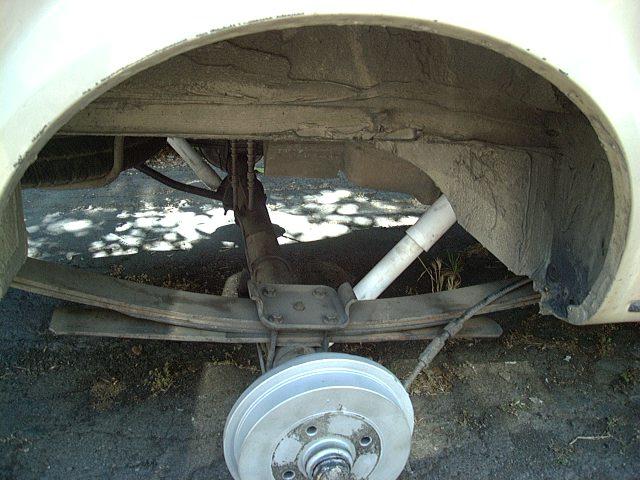 2:
2: 3:
3: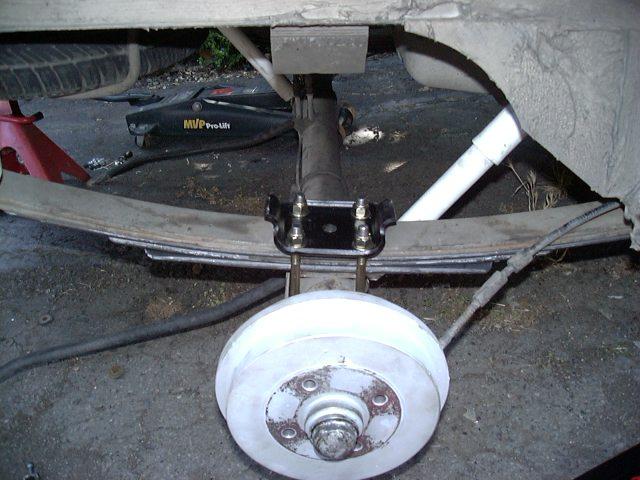
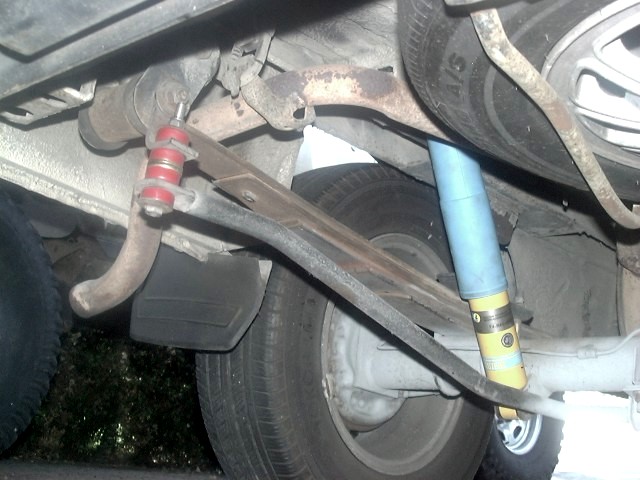
First thing I did was to get some longer u-bolts, I used a 1/2" Rancho u-bolt, and redrilled the spring plate for the larger bolts. I then fabricated some new leaves to replace the lower overload leaf (see image #2 above). I staggered the length of the leaves for a nice progressive rate and bolted them up into a 5-leaf pack (see image #3 above). For the shocks, I fabricated a bracket to move the top end of the shock farther away from the axle (see image #4 below). This places the shock at a shallower angle which both allows the longer shock to fit without bottoming and it also reduces the damping rate a bit, which is nice since I find the KYBs are a bit stiff.
4: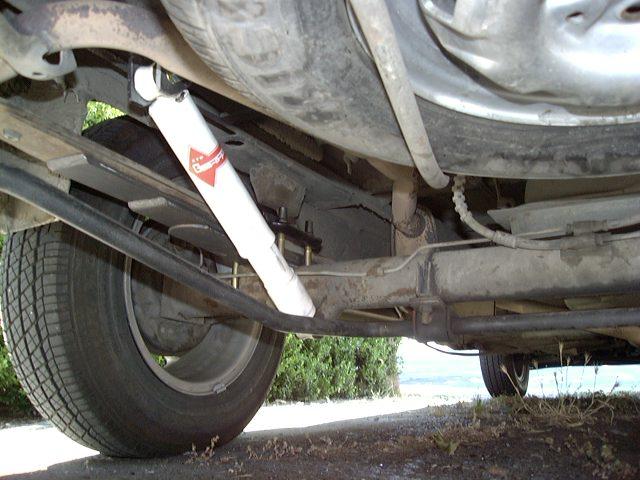 5:
5:
So, how does the new setup work? Great, my first test was to drop a 1200 lb. milling machine in the bed (see image #5 above). No problems at all as I hauled the mill about 15 miles to my garage. I found the rear end settled about 1.5" under the load (approx 400#/in per spring) and I still had about 2" of clearance at the bump stop. Surprisingly the ride was quite nice with that weight, no wallowing, it was smooth and solid. I get about 1" of lift over my front end (which itself may be 1/2" - 1" higher than stock). Ride is very nice unloaded, it greatly reduced the "pitching" I used to get on uneven pavement, where the rear end would pitch the front end down as it went over bumps.
Sway Bars:
Also, you can see the rear sway bar I had previously installed in image #4, above. It was bought used, unknown mfg. Along with the front Neuspeed bar, I get very little body roll, even with my tall "Caddy Shack" in place. Handling is quite nice, despite the skinny 13" all season tires I run.
Two vendors make rear sway bars for the Caddy that I know of:
- Addco
- H&H Specialties
![]()
Shocks
I had the stock rear shocks on my 1981 pickup replaced with KYB Gas-A-Just shocks in 1992 (model KG5449). They held up very well and seem to be as firm as when new when the pickup was totaled in early 2000. The shocks have 10mm (3/8") diameter mounting bolts top and bottom and measure 10-7/8" collapsed and 17" fully extended from center to center at the mounting holes. I find that the 17" length is slightly short and the spring wants to drop a fraction of an inch at full droop. With my helper spring, I find the shock is compressed 2" (of its 6" travel) at rest and there is about 4" of axle travel to the bump stop. So, it appears this is a decent length shock for this application.
My 1982 pickup had a set of KYB KG4012 shocks installed when I bought it. They are about 13.5" compressed and approx. 21.5" extended. As such I found they tended to bottom out easily with any load in the bed. To correct this I moved the upper shock mounts out about 4" from their stock location to allow them to fit without bottoming. These shocks would be a good addition to a 2" to 3" lift block setup, since they have the extra length needed for that application.
There are some interesting Rancho shock applications that might be adapted to fit the Caddy. From my shock selection table, I see:
- Model RS9006 18.31"/ 11.66" with 5/8" diameter mounting loops
Several other RS9000 models are of similar length. The RS9000 shock is adjustable and can be fitted with an in-cab remote adjuster too. The RS5000 models come in similar lengths but are fixed rate and typically are very stiff, equivalent to the 9000 at a 4 or 5 setting.
Another interesting rear suspension option is to use Gabriel Air-adjustable Hyjacker shocks. While Gabriel lists no VW pickup application, evidently, the VW Beetle rear shocks are almost an exact fit. The air-over-oil shocks are supposed to add up to 1000lbs. of load carrying capacity to the axle, depending on air pressure. Couple that with an electric air compressor and you could have an in-the-cab ride height adjustment, way cool!
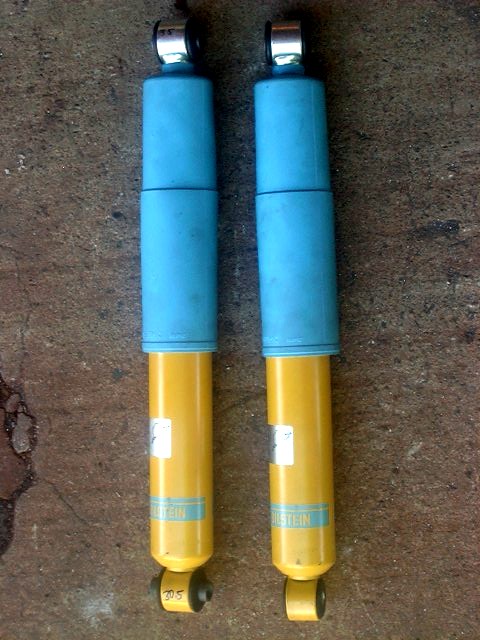
However, after years of enjoying the ride of the front Bilstein HD struts, I decided to set about fitting a set of rear Bilstein shocks. Unfortunately, Bilstein does not list a rear shock for the pickup/Caddy model, unlike the fronts, which are the same as the Rabbits use. But it turns out, the rear shocks for a Volvo 760 (p/n: FA-B46-0296-H2) are just about the right compressed and extended length and one would imagine the gross vehicle weights are comparable, so that is a good starting point.
 |
 |
| A: A pair of Volvo shocks | B: Changes to bottom mount |
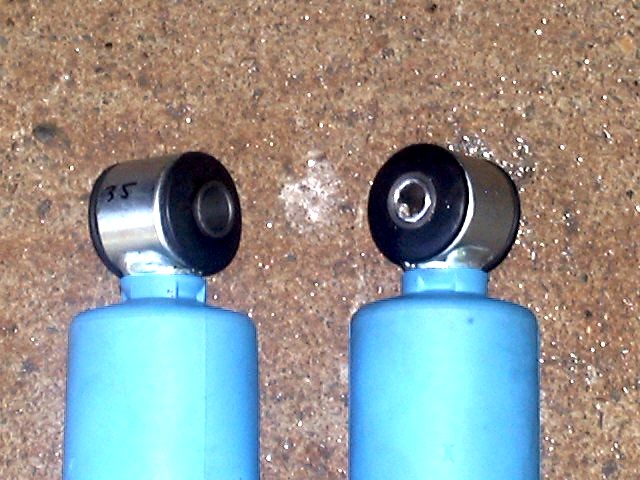 |
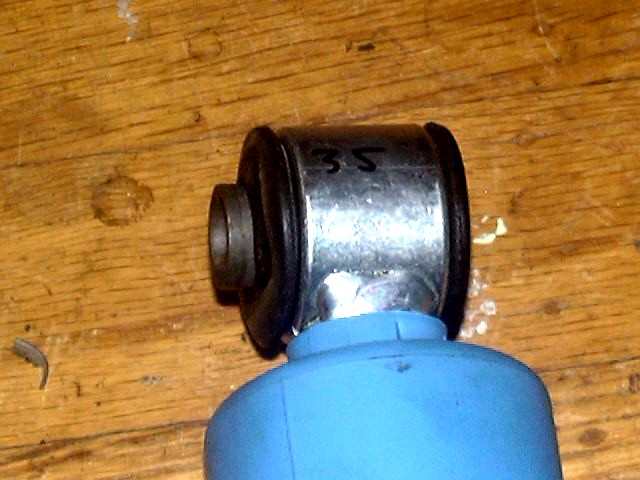 |
| C: Changes to upper mount | D: Closeup of upper mount |
So in picture A, above, are the shocks as received. The only issue is the mounting eyes on the shocks, the supplied sleeves are too wide to fit in the rear shock mounts on the pickup. Also the sleeves have too small a hole to accommodate the VW shock mounting bolts. At first I tried to trim the sleeves shorter and then drill them out, but that proved futile. So the easiest way to address this is to press out the Volvo sleeves and fabricate a new sleeves to replace them. I used some thin wall aluminum tubing sized to fit the ID of the rubber eye bushing and cut them to length to fit the VW shock mounting brackets and drilled the ID of the sleeve to fit the 10mm VW shock bolts. Once those were ready, I found I just needed to grind a small bit of rubber of the face of the upper bushing to allow it to fit into the tight slot under the bed.
- The sleeves are cut to match the 30mm thickness of the Bilstein shock bushings, but sometimes the shock mounts on the pickup may have been bent inward over the years, thus the need to file/grind down the width of the sleeve/bushing to make it fit.
- After all, it is always easier to remove a little material, if needed, than to put more back on.
- Check out our YouTube video on the conversion process.
Also, the shocks are a tiny bit too short to install with the axle hanging all the way down, so you need to raise the axle slightly to get the lower bolts in. Actually, this is a good thing, as the gas shocks will fully extend quite fast and are very hard to compress by hand, so if they were a little too long (instead of too short), installation would be a bear, as you would need to find a way to compress the shocks by hand and with the internal high pressure gas, that is very hard to do.
And the finished product:
 |
| E: Rear Bilstein shocks! |
- And how is the ride?
- One word: Wonderful!
Very nice, and very well controlled, loaded or unloaded, there is no change. And with the front and rear shocks matched, there is no longer the pitching felt on stretches of freeway with the uneven concrete sections. With the old KYBs, the pickup used to pitch up and down over those sections of road, almost getting into a resonance at the right speed. Now, it just follows the road. Note that the ride is firm, it is not a soft cushy Cadillac type ride. It is not harsh, though, just firm. I am very happy with the results.
Purchase Information:
We have a limited stock of items such as:
- Steering Extensions
- Driveshaft Spacers
- Upper Control Arm braces for 2WD Toyota pickups
- Weld-on Cab / Body Mount brackets
- Seat Lift kits
- Starter Solenoid Contacts
- Bilstein Shocks for VW pickups
- H4 switched power headlight relay harness
-
Some customers have reported issues with the Paypal order buttons while using the Safari web browser on an iPhone.
- If so, try a different browser and see if that works better.
| 4Crawler Offroad contact link | MissingLinkZ contact link |
Check out our growing collection of on-line design information so that you can make your own parts. Maybe you have a neighbor or acquanitance that can help or check out a local maker space or adult education machining class. Or engage a local or on-line machine shop to make them for you. Before you ask, no, we're not making any more of these items, rather we wanted to empower YOU to be able to make your OWN custom parts.
You'll find designs for body lift, suspension components and more, below:
- Thingiverse
- Printables
- Cults3D
- Maker World/BambuLab
-
GitHub
-
Includes RockSliderz and IFS Frame Brace designs
There's a wide selection of on-line 3D Printing and Machine Shop services available today. A few that we've heard of:
- Xometry.com, ProtoLabs.com, Mfg.com, eMachineShop.com, Hubs.com, RapidDirect.com, RenovoCNC.com, PartsBadger.com, ProtoTek.com, FicTiv.com, Jlc3DP.com, PCBWay.com, SendCutSend.com, etc.
-
Many of our model files use OpenSCAD and if you need to convert those to other CAD formats, use FreeCAD.
- Simply import the OpenSCAD file into FreeCAD then export it in the desired CAD format the on-line shop requires.
We have sold out of these sleeves, but we have made the CAD files available so you can make your own
| First Class shipping: (US only) |
We have one pair of these shocks remaining.
If you would like a set of Bilstein shocks, ready to
bolt in, we can supply that as well. Close out price: US$220.00 for the
pair. US shipping (only)
ships via large flat rate box:
| Priority Mail Shipping (US only): |
-
Notes:
- Limited stock available
- Parts are shipped from zip 94087 (CA)
- A tracking number will be provided
- Contact us for more information or for other options to order the modified Bilstein shocks
Bushing Sleeve Installation:
To install the sleeves, there are two options.
- Press the rubber bushings and sleeves out of the shock eyes. This can be done with a long bolt, nut and deep well socket. Press the Volvo sleeve out of the bushing and press or hammer the rubber bushing back into the shock eye and finally insert the VW sleeve into the bushing. You can apply some silicone spray, grease or dish soap to make it go in easier.
- A second option is to use a smaller deep well socket just large enough to fit over the Volvo sleeve. Then insert a long bolt or threaded rod through the socket, Volvo sleeve and the new VW sleeve. As you tighten the nut on the bolt, it'll pull the Volvo sleeve out while pulling the new VW sleeve in behind it.
- A third option, if you have a press, is to set the new sleeve on top of the Volvo sleeve and insert one of your shock bolts through the new sleeve into the existing sleeve. Then place the shock eye on top of a socket and press the bolt and new sleeve through the rubber bushing. This will force the Volvo sleeve out and replace it with the new VW sleeve.
To install the new shocks, jack up the rear of the pickup and support with jack stands. If you have gas shocks, it's best to remove at full droop so the shocks are fully extended. Now check the fit of the new shocks. You may need to clean up the old shock mounting locations if they are a bit deformed, especially the upper ones. If needed, you can file down the new shock sleeves a bit to fit the bushings in place. Depending on your springs, you may find the new shocks are a tiny bit short and thus you may need to lift the rear axle up just enough to fit the lower end of the shocks in place. Be sure to check all the shock mounting bolts after 100 miles of driving.
[Return to the top]
![]()
Summary
-
EM Sport (used to) makes front end lift kits for A1 VWs
- http://emsport.hypermart.net/
- Apparently, they are no longer in business, or at least the web site is down, if anyone has any info, let me know.
- The lift kit apparently was a 2" drop bracket for the A-arms and a 2" spacer for the top of the struts.
- Blake Macpherson did a write-up on his Caddy/Bunny lift
![]()
 ===>>
===>> 
[Last updated: 23.May.2025]
Visitor # since 19.SEP.2001