
Toyota IFS Ball Joint Spacers
Standard 1-1/2" (38mm) height, custom heights available
1986-1995 4WD Pickup/Hilux and 2WD/4WD 4Runner/Hilux Surf
1984-1995 2WD Pickup/Hilux
Also for T100 (1993+)2WD/4WD Pickup/Hilux and 1996+ Hilux 4WD (w/ front torsion bars)
Note: 1983 and earlier pickups have a different front control arm design and these spacers will not fit
 Designed and manufactured in
the USA by Visual Diagnostics LLC
Designed and manufactured in
the USA by Visual Diagnostics LLC
Contents:
- Description
- On-line ordering
-
Installation Notes
- Feel free to download or print a copy for use when you install the spacers, this should apply to any Toyota ball joint spacer
- Frequently Asked Questions
-
Related Products
- Front Differential and Sway Bar Drop Kits
- Pickups and 1st gen 4Runners
- 2nd gen 4Runners
- Custom length sway bar end-link quick disconnects
- Body Lift Kits
- Multiple Item Orders
Description:
 |
 |
 |
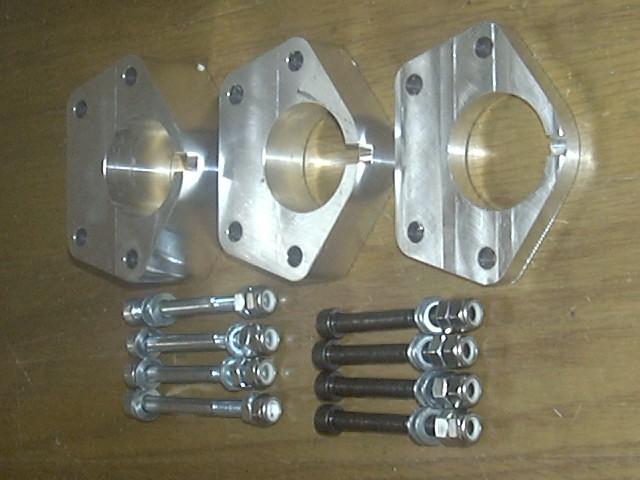
| Toyota 4WD Ball Joint Spacers | 1-1/2", 1",1/2" Spacers (L-R) | CNC Machining the spacers |
 |
 |
.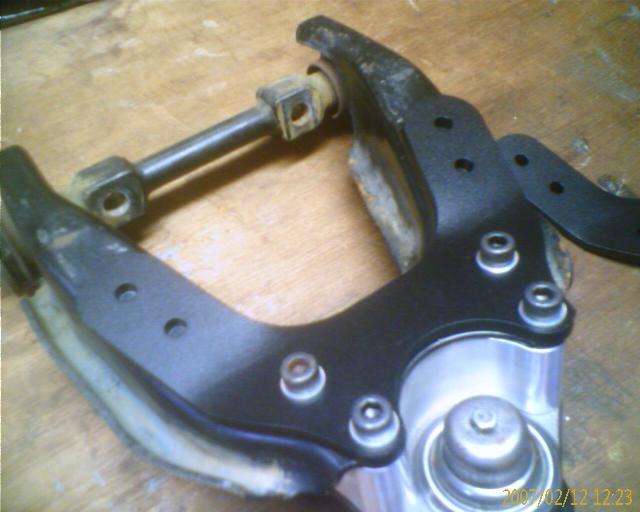 |
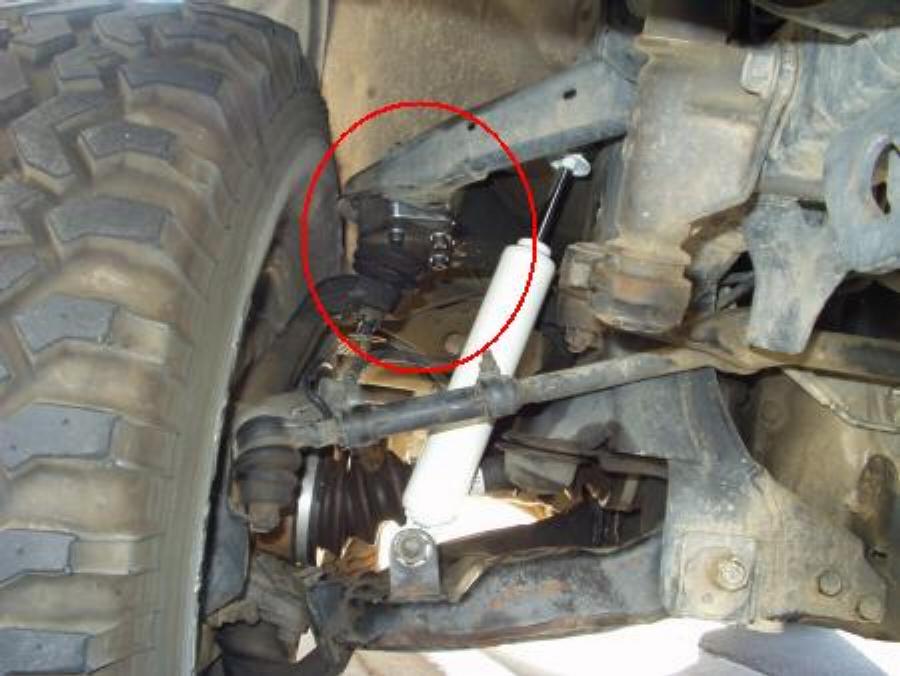
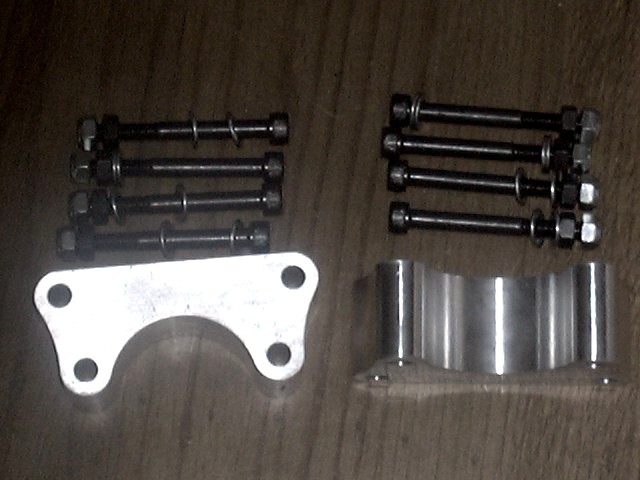
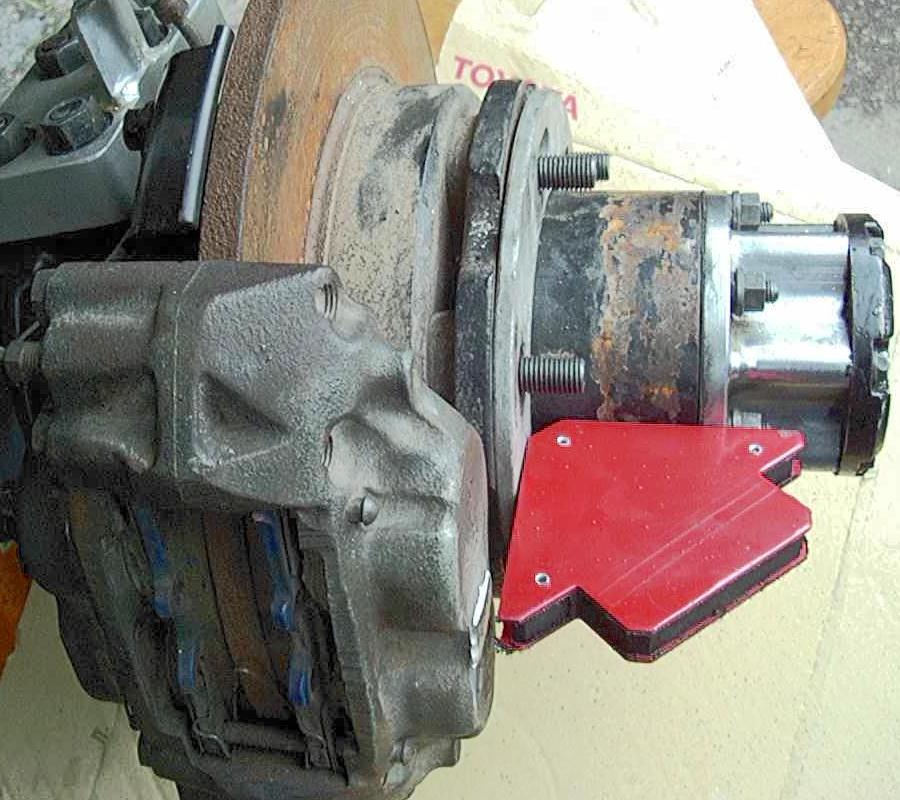
| 4WD Ball Joint Spacer Installed | 2WD Ball Joint Spacer Kit | .2WD Ball Joint Spacer and Brace Installed - Brace can also be installed w/o spacer |
These spacers are 1.5"/38mm tall and provide about that much front suspension lift over stock suspension settings as well as that much more overall front suspension travel. Actual front lift height will depend upon the vehicle's weight distribution and current torsion bar condition and adjustment which may be 1.5" more or less than the spacer height. Whether or not you prefer enhanced compression travel for high speed trips through desert washes or a balance between compression and extension travel more suited for rocky trails, these spacers will increase your functionality and ability to custom tailor your suspension characteristics while increasing clearance between the fenders and front wheels. If 1.5" is too tall for your needs, shorter spacers are available on special order. An installed 4WD spacer is shown on the far right hand image, above.
Also available for the 2WD Toyota pickups as shown in the lower right hand image above. In the 2WD suspension, the torsion bar is mounted to the lower control arm, not the upper control arm like in the 4WD suspension. So the 2WD spacers will typically require some torsion bar adjustment to attain a similar lift to the 4WD spacers. But the advantage that the spacers provide over just cranking up the torsion bars is that they provide the additional bump stop clearance so even with the torsion bars set higher, you still get full suspension travel.
When combined with a mild rear suspension lift, either a lift shackle or block or coil spring spacer, and possibly a mild body lift, it is easy and relatively inexpensive to fit 33" tires under an IFS truck. While a full 4" - 6" IFS spacer lift can be installed and will work fine for 33" tires, for less than 1/2 the price and less than half the time and effort, you can install a milder lift that will actually work better than the taller lift. In fitting with the 4Crawler Offroad motto of "lift as much as you need, but as little as possible", why use a 4" - 6" lift when 1.5"-2.5" will work just as well, if not better? With less lift, your center of gravity will be lower, drive line angles will be less, brake lines will usually not need to be extended, and overall there will be less stress on the components.
And if you want all the details, feel free to consult this web page for a detailed discussion of the Toyota IFS front suspension operation.
So apparently the saying "Imitation is the sincerest form of flattery" applies here as well! In fact we have noticed that some of the online auction sellers of Toyota Ball Joint Spacer kits are selling almost exact duplicates of our product and we even know now that they ordered one of our kits and copied it. We say "almost exact duplicates" because they missed one minor, but crucial aspect of the our design in their copy. We mention that difference in the installation instructions, but in order to not make it easy for the competition to find that aspect of the design, we'll not describe it here. But it sure makes it easy to offer low prices when your R&D budget is negligible - as in you steal all your new designs. Oh, and to top it off, they even our plagiarized our installation instructions, nearly verbatim, even down to the punctuation. If these guys were writing these instructions for a college paper, their professor would likely fail them for cheating. Not only that, but as we describe below, these vendors are advertising 2.5" or 3" "lift" spacers, and yet, when you measure their spacers, they are only 1.5" tall. As Clara Peller was so fond of saying, Where's the Beef?" And not only are the spacers not the full advertised height, but we have found that the cast aluminum spacers are also lighter than the billet aluminum used in our spacers. Our CNC machined billet aluminum spacers weigh in at 16 oz. (454 g.) each and a popular cast aluminum spacer off of eBay weighs about 14.1 oz. (400 g). So either those spacers are made of some super light alloy or they have voids in them. Since 6061 aluminum alloy is the most common and lowest cost aluminum alloy and to get lighter you need to add something like magnesium which is twice the cost of aluminum, it is unlikely that these low cost cast spacers are made of some high-tech super light alloy, so in all likelihood they are a porous casting, since air costs nothing and adds no weight. Judging by the rough surface finish of those cast spacers, it is not hard to believe they are full of voids, in the linked image, the cast spacer is on the left next to our CNC billet spacer on the right. Note that our spacers are now put through a tumbled finish to even out the appeareace of the non-machined mill finish top and bottom compared to the fully machined inner and outer faces. But if you look closely, you can still see the fine machining marks. Also, we have heard reports of purchasers of such spacers also finding issues with substandard grade hardware. In fact, we have supplied our replacement hardware for many customers who have experienced failure with these cast spacer kits.
2WD or 4WD Spacers?
 |
|
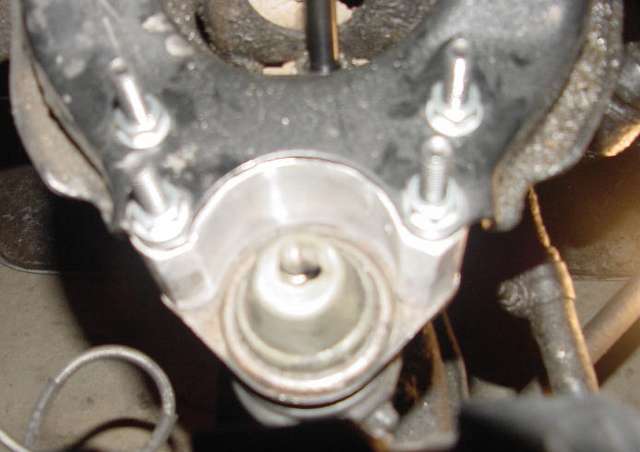
| 2WD Ball Joint | 4WD (pre-runner) Ball Joint |
In Other Words "Which Ball Joint Spacer do I need for my truck?"
In short, you'll want to look at the type of front suspension/ball joint is used on your vehicle (see the above two photos for the two types of front torsion bar suspensions that Toyota used). If you have a 4WD truck, the answer is simple, you need the 4WD ball joint spacers.
However, if you have a 2WD truck, then the answer is a little more involved. The 4WD spacers also work with 2WD trucks with "pre-runner" type suspensions. A pre-runner suspension is essentially the same as a 4WD suspension with the front drive train (differential and CV axles/half shafts) removed. This would include of the 2WD 4Runner and some T-100 models. Typically also fit the 1996 and later Toyota Hilux 4WD pickup models (non-US) that use the same torsion bar front suspension with matching ball joints (check dimensions below to verify proper bolt hole spacing).
The 2WD spacers are available for the earlier 2WD pickups and some 2WD T-100s (i.e. pre-Tacoma).
Which type to order? Compare the photos above with your truck's upper ball joint to find which type matches the shape of your vehicle's upper ball joint.
-
On the "2WD" ball joints, you'll note the inner pair of bolts
holding the upper ball joint in place are wider apart (~3-1/2" -
90mm) than the outer pair of bolts (~2-7/8" - 75mm).
- The spacers are 4-5/16" long (front-back dimension as installed) and 1=15/16" wide (left-right dimension as installed).
- On the 2WD ball joints, the ball joint itself essentially hangs off the end of the upper control arm (UCA).
-
On the "4WD" ball joints, the inner pair of bolts is closer
together (~2-3/8" - 60mm) than the outer pair of bolts
(~3-1/4" - 82mm).
- The spacers are 4-1/32" long (front-back dimension as installed) and 3-5/32" wide (left-right dimension as installed).
- The 4WD ball joint sits inside the end of the UCA.
And the ball joint spacers of of course not applicable if your vehicle has had a "solid axle swap" (or SAS) where the front IFS suspension has been removed and a leaf or coil sprung solid front axle has been added on.
DISCLAIMER:
- 4Crawler Offroad assumes the buyer to be the final manufacturer of his or her vehicle. Use this product at your own risk. 4Crawler Offroad assumes no responsibility for any damages of any conceivable sort to anything caused or not caused by this product.
- The user is responsible for ensuring shock fitment.
- Some cutting and/or grinding will be required to install these spacers, consult the installation notes for details.
-
Tires on rims with the stock backspacing
of 4.75" might have tire rubbing issues with 31" - 33" tires on the 4WD models.
- For 2WD, measure clearance to the wheels and tires and compare with the desired new wheel/tire combination.
- This is dependent on tire geometry, most clear but a few don't.
-
This can be often be remedied by filing/trimming the end of the a-arm
lip or using a wheel with less backspacing or a small wheel spacer.
- A 1/4" wheel spacer is an option for fitting stock wheels with clearance issues, available at many local auto parts stores or on-line via the earlier link.
- Here's a photo of that type of spacer installed. I've run that set of spacers on my '85 4Runner for over 25 years with no issues.
- You can also fit wider adapters that bolt onto the hub and then have 6 lug studs for mounting the wheel
-
Rims with 4.5" or less of backspacing clear all tires known so
far.
- What is backspacing and how do I know what backspacing I have? Click here to find out...
- 3.75" backspacing is a common dimension in aftermarket wheels.
- Ball joint spacers are CNC machined billet 6061-T6 aluminum.
-
Hardware consists of M8-1.25 class 12.9 socket head cap screws, class
10 flanged nylock nuts, and flat washers.
- Use of Loctite on hardware is not necessary when using a nylock jam nut but can be used if desired.
- Either stock extension bump-stops or shimmed bump-stops (low profile only) are required with this spacers in order control max droop angles. Failure to do so could result in damage to CV joints or other components.
-
A
front end alignment after
installation of this product
- The spacers, by their very nature, will push the wheels outward at the top, changing the camber angle.
- This camber change will affect the "toe in" adjustment.
- Both the camber angle and toe will need to be restored to factory specification with a proper alignment after installing the spacers.
- But once aligned, you should not need more frequent alignments with the ball joint spacers installed.
On-line Ordering:
We have a limited stock of items such as:
- Steering Extensions
- Driveshaft Spacers
- Upper Control Arm braces for 2WD Toyota pickups
- Weld-on Cab / Body Mount brackets
- Seat Lift kits
- Starter Solenoid Contacts
- Bilstein Shocks for VW pickups
- H4 switched power headlight relay harness
-
Some customers have reported issues with the Paypal order buttons while using the Safari web browser on an iPhone.
- If so, try a different browser and see if that works better.
| 4Crawler Offroad contact link | MissingLinkZ contact link |
Check out our growing collection of on-line design information so that you can make your own parts. Maybe you have a neighbor or acquanitance that can help or check out a local maker space or adult education machining class. Or engage a local or on-line machine shop to make them for you. Before you ask, no, we're not making any more of these items, rather we wanted to empower YOU to be able to make your OWN custom parts.
You'll find designs for body lift, suspension components and more, below:
- Thingiverse
- Printables
- Cults3D
- Maker World/BambuLab
-
GitHub
-
Includes RockSliderz and IFS Frame Brace designs
There's a wide selection of on-line 3D Printing and Machine Shop services available today. A few that we've heard of:
- Xometry.com, ProtoLabs.com, Mfg.com, eMachineShop.com, Hubs.com, RapidDirect.com, RenovoCNC.com, PartsBadger.com, ProtoTek.com, FicTiv.com, Jlc3DP.com, PCBWay.com, SendCutSend.com, etc.
-
Many of our model files use OpenSCAD and if you need to convert those to other CAD formats, use FreeCAD.
- Simply import the OpenSCAD file into FreeCAD then export it in the desired CAD format the on-line shop requires.
NOTE:
This has been a very popular product, but at this time we're not able to continue offering the 2WD and 4WD ball joint spacers for sale. We still have replacement hardware and the 2WD upper control arm braces in stock and ready to ship.
- If any individual, group or company would be interested in acquiring the rights to the 2WD and 4WD ball joint spacer design, please contact us.
- We can set you up with the CAD files and a high quaility US manufacturer of these parts.
-
CNC billet aluminum spacers and laser cut steel braces - Designed in the USA:
- 1.5" (38mm) 4WD ball joint spacers (#BJ4Spcr) US$79.00 per pair - SOLD OUT
-
1.5" (38mm) 2WD ball joint spacers
(#BJ2Spcr) US$79.00 per pair - SOLD OUT
-
Notes:
- We try to update these links from time to time, but sellers keep changing listings. So your best bet is to search on your favorite search engine for "toyota+pickup+ball+joint+spacer" or something similar.
- Often, the 2WD spacers will show up in 4WD spacer searches, so scroll down the listings and look at the photos and compare them to the 2WD spacer shotos on this page.
- They may be listed anywhere up to 3" lift, even though they're really 1.5" tall.
- Here's Amazon link for the 2WD spacers
- Here's another Amazon link for the 2WD spacers
- Here's another Amazon link for the 2WD spacers
- We've made the 3D CAD files available for personal use.
- Also available: 2WD Upper Control Arm Braces - IN-STOCK
-
Notes:
- One pair is enough for one vehicle.
- Make sure to order the right type of spacer, some 2WD vehicles use 4WD spacers!!!
- Search string for 4WD ball joint spacers: Toyota 4WD ball joint spacer
- Search string for 2WD ball joint spacers: Toyota pickup 2WD ball joint spacer
- Paste one of the above strings into your favorite search engine or the search box below (select Web option):
- Note that the search results or Amazon links may show spacers of lift heights claimed to up up to 3". These are most likely 1.5" tall spacers, although there also seems to be a 1" tall version available.
- They may also say for a specific model only. The IFS front suspension is the same for pickups, Hilux, 4Runner, Hilux Surf and T100 models.
- Finally, try variations on the search string, sellers may call these strut spacers or similar. We try and put representative search terms here, we have no control over what others may call these or what lift height they may state or what vehicle said spacers may fit.
- Click here to order replacement or spare hardware - IN-STOCK
Shipping:
- Ships in USPS Flat Rate envelope
- Shipping weight 3 lbs. per pair.
[Return to the top of this page...
4WD Ball Joint Spacers: - SOLD OUT
The Buy Now buttons below have been disabled, here's an alternate source for the 4WD spacers
| 1 Pair 4WD Ball Joint Spacers, - Priority/US only |
1 Pair 4WD Ball Joint Spacers, - Express/US only |
| ============================= | ============================= |
| 1 Pair 4WD Ball Joint Spacers, - Canada Delivery |
1 Pair 4WD Ball Joint Spacers, - Int'l Delivery |
- Notes:
-
Order with the above "Buy Now" buttons using major
credit/debit card, bank eCheck or Paypal account.
- eCheck orders are subject to a 3-4 day hold while the eCheck clears the bank
- Please be sure todouble check your shipping addressbefore submitting your order:
- Incorrect address may result in mis-delivery and re-shipment cost will be the responsibility of the customer.
- Be sure to to bookmark or download a copy of the installation instructions, printed instructions are not included with the spacers.
- eCheck orders are subject to a 3-4 day hold while the eCheck clears the bank
2WD Ball Joint Spacers and Upper Control Arm Braces:
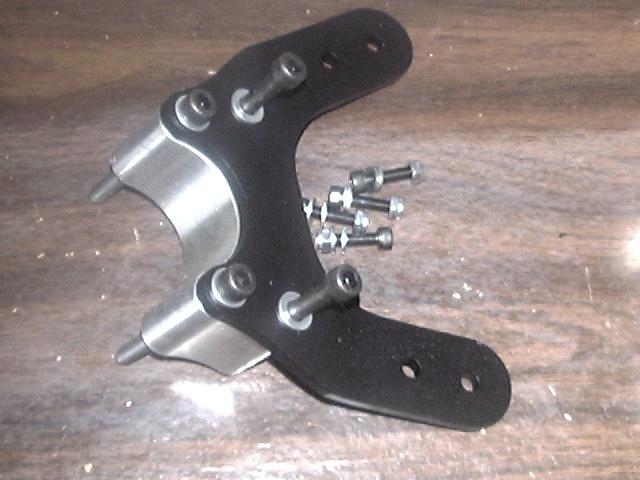
Now available for the 2WD applications are both the ball joint spacers as well as a heavy duty brace for the upper A-arm. Larger tires and off-road use puts stress on the upper control arms. This can cause the outer end of the control arms to fatigue. These braces strengthen that area eliminating the problem. They are made from 1/4" (6mm) thick steel, available in bare steel or a primer finish. These are recommended for any 2wd truck that sees off-road use or will be running wheels/tires significantly larger than stock. The A-arm brace can be used with the stock A-arms or with the addition of the ball joint spacers. For stock arms, check to see you have enough exposed thread on the ball joint studs to fit the brace on top. If your studs are not long enough, you can use 8mm bolts to replace the studs. If you can't get bolts, you can order stock length replacement hardware.
Online ordering:
-
2WD Ball Joint Spacers - SOLD OUT
- Search for TOYOTA PICKUP 2WD BALL JOINT SPACER for alternate source of these spacers, e.g. on eBay.
- 2WD Upper Control Arm Braces - IN STOCK
Cost:
- NEW: Lower price: The A-arm braces cost US$29.00 for a pair with mounting hardware, bare finish
- Add US$5.00/pr. for primer finish on the UCA braces
- UCA braces ship in USPS padded Flat Rate envelope
- Spacers with braces ship in padded flat rate envelope (US) or medium flat rate box outside the US
2WD Ball Joint Spacers: p/n: BJ2Spcr
|
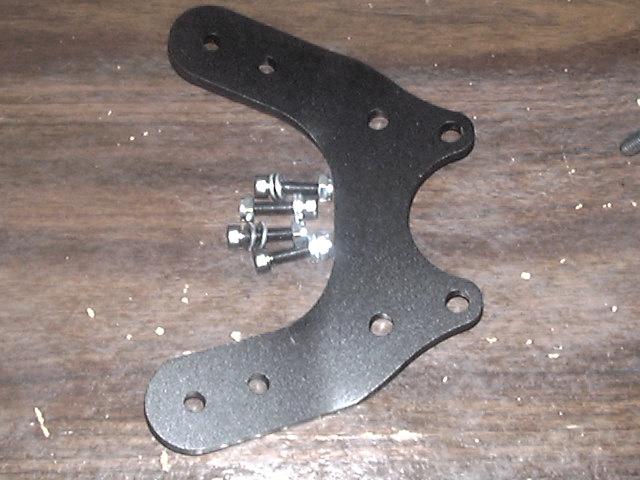 |
| A: 2WD Ball Joint Spacers | B: 2WD A-Arm Brace |
 |
|
| C: 2WD Brace + Ball Joint Spacer | D: Brace + Spacer Installed |
2WD Ball Joint Spacers - SOLD OUT
| 1 Pair 2WD Ball Joint Spacers, - SOLD OUT |
1 Pair 2WD Ball Joint Spacers, - SOLD OUT |
| ============================= | ============================= |
| 1 Pair 2WD Ball Joint Spacers, - SOLD OUT |
1 Pair 2WD Ball Joint Spacers, - SOLD OUT |
- Notes:
-
Order with the above "Buy Now" buttons using major
credit/debit card, bank eCheck or Paypal account.
- eCheck orders are subject to a 3-4 day hold while the eCheck clears the bank
- Please be sure todouble check your shipping addressbefore submitting your order:
- Incorrect address may result in mis-delivery and re-shipment cost will be the responsibility of the customer.
- Be sure to to bookmark or download a copy of the installation instructions, printed instructions are not included with the spacers.
- eCheck orders are subject to a 3-4 day hold while the eCheck clears the bank
2WD Upper Control Arm Braces: p/n: 2wdUCABrc - Limited stock
Note: The upper control arm braces add no lift, they are for reinforcing the upper control arm. They can be used with or without the 2WD ball joint spacers.
1 brace shown, kit includes 1 pair, i.e. 1 brace for each side.
| US Priority | US Express | Canada Priority | Int'l Priority |
- Notes:
-
Order with the above "Buy Now" buttons using major
credit/debit card, bank eCheck or Paypal account.
- eCheck orders are subject to a 3-4 day hold while the eCheck clears the bank
- Please be sure todouble check your shipping addressbefore submitting your order:
- Incorrect address may result in mis-delivery and re-shipment cost will be the responsibility of the customer.
- Be sure to to bookmark or download a copy of the installation instructions, printed instructions are not included with the spacers.
- eCheck orders are subject to a 3-4 day hold while the eCheck clears the bank
Custom Height Ball Joint Spacers:
In the 4WD spacers, heights of 3/4" or less may lessen or eliminate the amount of metal trimming of the upper control arm needed to install the spacers.
For the custom height spacers (i.e for heights less than 1.5"), cost is $99.00/pr. (4WD or 2WD) to cover the custom machining and hardware. Allow 1-2 weeks for custom machining. Spacers will include longer hardware (h/w) for the height of the spacer, i.e. the Normal h/w option (i.e. height of spacer equals length of hardware).
If requested, we can supply extra long hardware to accommodate stacking these new spacers on to of an existing ball joint spacer. So for example, if you already have 1.5" ball joint spacers and wish to add another 0.5" spacer on top of that, order that height spacer and select the Extra Long h/w + 1.50in. option when ordering. We can't guarantee these stacked spacers will work on any given vehicle, as noted here, but you are welcome to try. We have had some customers who have had good success with this. Note that this Extra Long hardware option is only available for 0.5" and 0.75" tall spacers.
The custom height spacer height will be within approx. 1/16" of the specified height.
Click here to request additional information...
Custom height Ball Joint Spacers (#BJSpcrCH)- SOLD OUT
| SOLD OUT | SOLD OUT | SOLD OUT | SOLD OUT |
- Notes:
-
Specify the style and height desired in the order form.
- Order with the above "Buy Now" buttons using major credit/debit card, bank eCheck or Paypal account.
- eCheck orders are subject to a 3-4 day hold while the eCheck clears the bank
- Please be sure todouble check your shipping addressbefore submitting your order:
- Incorrect address may result in mis-delivery and re-shipment cost will be the responsibility of the customer.
- Note that forinternational shipments, package tracking information is limited.
- Be sure to to bookmark or download a copy of theinstallation instructions, printed instructions are not included with the spacers.
- Order with the above "Buy Now" buttons using major credit/debit card, bank eCheck or Paypal account.
[Return to the top of this page...]
Frequently Asked Questions:
- Will longer shocks be required?
- Can I adjust torsion bars for more (or less) lift with these spacers?
- Can I use the ball joint spacers with larger than stock/aftermarket torsion bars?
- Can I use the ball joint spacers with a 4" - 6" IFS (drop bracket) lift kit?
- Can I use the ball joint spacers with a long travel IFS lift kit?
- How long does it take to install the ball joint spacers?
- How will the spacers be shipped and how long will it take me to get them?
- My country requires a Vehicle Alteration Document for this product, is that available?
- How do I level out the rear of my vehicle after installing the ball joint spacers?
- What is the difference between just cranking up the torsion bars or running the ball joint spacers up front?
- Are manual locking hubs required to use the ball joint spacers?
- Will these spacers fit my vehicle?
- Can I order replacement mounting hardware for my ball joint spacers?
- Do I need an upper control arm (UCA) brace for the 2WD spacers?
- Can I use these spacers on 1983 and earlier 2WD pickups?
- What's the maximum height I can lift the front of my truck with these spacers?
- A1: Will longer shocks be required?
-
Possibly, yes, possibly no. It all comes down to the shocks that are on
the vehicle now and how they fit with the existing suspension setup and
how much lift you are going for. If the current shocks are on the verge
of being too short to begin with, then likely any amount of lift will
push them beyond their capability. If, on the other hand, the shocks
are a little too long for the current setup, then they may have enough
extra length to handle a modest lift.
- The best option is to measure the compressed and extended shock lengths needed for the spacers once they are installed. Then order a shock that meets those needs.Here is a table of some common longer shocks that may be suitable. And here is a link to a good article on how to determine proper shock absorber lengths on a given vehicle. Typically, you would be looking for a front shock with a 10"-10.5" compressed length and a 15" extended length. Then use those dimensions to order shocks from a company that lists shocks by length, for example Rancho is one such company. Or, many shock companies list shocks by "lift", so you could order a shock for the approximate amount of lift you have, so perhaps a 0"-2" lift shock, for example.
- Now, on a vehicle that is primarily driven on the street (i.e. not used off-road that much), then a shock that is a little too short may not be a serious issue. Since you are not routinely lifting tires off the ground on pavement, it is unlikely that you'll be extending the suspension to full droop and therefore not maxing out the shock travel. Also, if the shock is close to fitting, you can see the installation instructions for tips on shimming the front shocks for a little extra extended length.
- You can also measure the shock length you currently have prior to ordering/installing the spacers. To do so, simply lift the front tires off the ground to let the front suspension drop down all the way (i.e. "full droop"). THen unbolt one shock on one side of the truck and see if it is limiting the current down travel at all (if so,, you already need longer shocks - even before installing any spacers). And if there is any extra shock down travel left, measure how much (i.e. how much farther does the shock extend when disconnected). If you have about 3/4" - 1" of additional travel that may be sufficient with the spacers, since the shocks attach approx. half way out on the suspension control arms and so will see about one half the added ride height.
- The best option is to measure the compressed and extended shock lengths needed for the spacers once they are installed. Then order a shock that meets those needs.Here is a table of some common longer shocks that may be suitable. And here is a link to a good article on how to determine proper shock absorber lengths on a given vehicle. Typically, you would be looking for a front shock with a 10"-10.5" compressed length and a 15" extended length. Then use those dimensions to order shocks from a company that lists shocks by length, for example Rancho is one such company. Or, many shock companies list shocks by "lift", so you could order a shock for the approximate amount of lift you have, so perhaps a 0"-2" lift shock, for example.
- A2: Can I adjust the torsion bars for more (or less) lift with these spacers?
-
Realize that the ball joint spacers (and any subsequent torsion bar
adjustment) will only affect the front end ride height (i.e. lift) and
not lift the entire vehicle.
- In answer to the above question, yes, no problem doing that within reason. Some folks install the spacers and then take all the pre-load tension off the the torsion bars, netting almost no lift but increase suspension travel. Others crank the tension on the bars up for additional lift.
- And on a related question as to how much lift will you see on your truck? It is hard to give an exact answer as each vehicle is different. Different engines, bumpers, winches, up front, torsion bars of differing degrees of wear and tear, different sized torsion bars, etc. So the lift you get is whatever you get when you install the spacers. One would assume that a 1.5" tall spacer should net about 1.5" of lift, but might be a little less since you are putting a little more load on the front end with the lift.
- Try before you buy:
- Want to get an idea how much lift you'll see from a particular height spacer? Easy enougn to do if you have some scrap wood available. Simply make a pair of wooden padsto drive your front tires up onto. You could use 1/2" or 3/4" plywood for the shorter custom height spacers or some 2x lumber on it's side for the 1-1/2" spacerrs. Just make sure to use enough wood to cover the contact patch of the tire. Lay that in front of the tires and drive up on it. Then bounce the front suspension a few times by pushing down on the front bumper to settle it in. Now meaure the height difference before and after driving up on the wood spacers. This should give you a fairly good approximation of the lift you can expect on your truck with the ball joint spacers.
- An interesting thing to note is that some vendors are advertising ball joint spacers as a 2" (or even 2.5" or 3") lift option. While that much lift is possible, realize that the spacer itself is likely to be only 1.5" tall. Any additional lift is accomplished via the torsion bars. 4Crawler Offroad has chosen to advertise the spacer by it's inherent height rather than some arbitrary height.
- So how much overall lift can one expect?
- Well, it all depends on you and how far you want to adjust your torsion bars and how you feel about the ride that results from that adjustment. Generally, with the IFS setup, the higher you crank the torsion bars, the harsher the ride gets. This is due to the increased angle of the control arms as well as the lesser amount of down travel in the suspension. So 3" total lift is probably the physical limit of the IFS components and you'll have 0 down travel as the a-arms will be jammed against the bump stops. 2.5" total lift (as some of the eBay spacer vendors advertise) is likely the highest useable height, but likely a pretty harsh ride to most folks. 2" total lift is likely somewhat decent and 1.5" and lower would give you stock ride and the most suspension travel. And realize that the higher you raise the front end, the more you'll be pushing the limits of the steering geometry adjustments (camber, caster and toe-in). So the higher you lift the front end, the more likely you are to run out of adjustment on the cams that set the front caster and camber angles. So if you find you can't get the front alignment right at a given lift height, lower the front height until it will align. This is especially true if there is some minor front end damage. For example, we had one customer report not being able to set his front end alignment after installing the ball joint spacers. Come to find out, he could not adjust it properly before the ball joint spacers were installed. Go figure!
- And on a side note, why are ball joint spacers taller than 1.5" not made??
- Because putting a spacer that tall would cause the angle on the front CV joints to be very steep at full suspension droop. Even at 1.5", you need to be sure and run stock height bump stops to limit the suspension's down travel to a safe level. It was found that most IFS front ends would start to bind with a 2" spacer installed, so the maximum height was backed off to a more reliable 1.5" height. Even so, owing to CV joint manufacturing variations, there are cases of CV joints that just show signs of binding at full droop with the 1.5" spacers. In this case, an easy fix is to install a front differential drop kit to lower the front diff. and lower the angle on the front CV joints. So what would be the point of making a 2" ball joint spacer that would likely cause almost every set of CV joints to bind up at full droop? Also, tie rod end angles get steeper as the spacer height is increased as well as hitting the limits of adjustment on the front suspension alignment cams (this applies to 2WD and 4WD applications). So, 1.5" is the tallest practical spacer height that works well for most vehicles. And if you do want 2" of lift, there is no issue with turning up the torsion bars that additional 0.5" if your front axles will tolerate it. And that small a torsion bar lift will likely have no noticeable affect on ride, at least when compared to doing the full 2" lift with torsion bars alone. And adjusting the torsion bars is really not that difficult, just takes a couple of wrenches and you can set your front ride height as you please.
- But if you just have to have a 2" spacer, we can set you up with an additional 0.5" spacer to add on top of the 1.5" spacer with some extra long bolts. Just order a 0.5" custom height spacer and the 1.5" spacer and we'll set that up for you. And we can supply you with the mounting hardware to revert to the 1.5" spacer so in case you find that the taller setup is too much for your front end, you can revert to the lower height. If you are worried about the two spacers slipping past each other, simply apply a coat of epoxy to the mating surfaces prior to installation and then once clamped down with the bolts, the epoxy will harden and the two spacers will become one. And interestingly, some other ball joint spacers vendors only supply stackable spacers in 1/2" thickness.
- In answer to the above question, yes, no problem doing that within reason. Some folks install the spacers and then take all the pre-load tension off the the torsion bars, netting almost no lift but increase suspension travel. Others crank the tension on the bars up for additional lift.
- A3: Can I use the ball joint spacers with larger than stock/aftermarket torsion bars?
- Yes, larger torsion bars work fine with the ball joint spacers. Some folks choose to run the spacers to allow the stiffer torsion bars to be backed off for a softer ride while retaining the same lift. Or you can adjust the bars to get increased lift.
- A4: Can I use the ball joint spacers with a 4" - 6" IFS (drop bracket) lift kit?
- Yes, the ball joint spacers work fine with the typical 4" - 6" IFS lift kits. Some folks choose to run the spacers to allow the torsion bars to be backed off for a softer ride while retaining the same lift. Or you can adjust the bars to get increased lift.
- A5: Can I use the ball joint spacers with a long travel IFS lift kit?
- Yes, some long travel IFS lifts work fine with the ball joint spacers, at least those kits that use ball joints that retain the stock mounting holes. There are long travel kits that replace the upper ball joint with a higher travel uniball joint and that does not use the stock ball joint mounting holes and those of course will not work with the ball joint spacers. Some folks choose to run the spacers to allow the torsion bars to be backed off for a softer ride while retaining the same lift. Or you can adjust the bars to get increased lift. One notable exception is the Blazeland LT kit in that it basically incorporates something like a ball joint spacer on the end of the upper control arm and trying to add another ball joint spacer under that is likely to push the front end parts beyond their limits.
- A6: How long does it take to install the ball joint spacers?
- Typical installation time is about 2 hours, plus the time to have a front end alignment done.
- A7: How will the spacers be shipped and how long will it take me to get them?
-
All shipping is via US Mail. Domestic
Express Mail is typically 1-2 days delivery time, domestic Priority
Mail is typically 2-3 days delivery time. For international shipments,
Domestic shipments include US Mail tracking and insurance. In case of
loss or damage, 4Crawler Offroad will be happy to file an insurance
claim with USPS on your behalf. Once the claim is paid, a replacement
set of spacers will be shipped at no cost. Or you can order a
replacement set and upon claim payment, the original purchase price
(less shipping) will be refunded.
- For international shipments, Priority Mail International is used where possible, it takes 6-10 days typically. A delivery confirmation (tracking) number will be e-mailed upon shipment, but this information is not guaranteed to be updated on international shipments. Also, no shipping insurance is offered with this service. If more detailed tracking information or insurance is required, international Express Mail shipping (~5 day delivery time) is available at an additional cost, contact 4Crawler Offroad for more information
- For international shipments, Priority Mail International is used where possible, it takes 6-10 days typically. A delivery confirmation (tracking) number will be e-mailed upon shipment, but this information is not guaranteed to be updated on international shipments. Also, no shipping insurance is offered with this service. If more detailed tracking information or insurance is required, international Express Mail shipping (~5 day delivery time) is available at an additional cost, contact 4Crawler Offroad for more information
- A8: My country requires a Vehicle Alteration Document for this product, is that available?
- Here is an Adobe PDF file with the product design features and safety aspects.
- A9: How do I level out the rear of my vehicle after installing the ball joint spacers?
-
For the rear leaf sprung pickups and 4Runners, one common lift option
for the rear end is a 2"- 3"
longer than stock spring shackle
- For the rear coil sprung 4Runners, a 2" coil spring spacer makes a good way to level the rear end. Using a slightly taller spacer in back helps make up for the common rear end sag in the 2nd generation 4Runners.
- A10: What is the difference between just cranking up the torsion bars or running the ball joint spacers up front?
-
While both techniques can provide the same amount of lift, the ball
joint spacers will afford a softer ride and more suspension flex
compared to the cranked torsion bars for a given ride height. Why? The
more the torsion bars are cranked, the tighter they get and the less
likely they are to allow for full travel. With the spacers, you get the
added ride height of the spacers without the need to tighten up the
torsion bars as much, so the suspension can flex more. As far as the
suspension and steering components go, there is no difference in stress
or wear and tear on them at a given ride height whether that be from
cranking up the torsion bars or running the spacers. So running the
spacers gives the advantage of increased suspension travel over simply
cranking up the torsion bars. A side effect of the spacers is that they
separate the upper and lower control arms by the height of the spacer.
This in turn means that the distance the upper and lower control arms
can move before hitting the bump stops is increased with the spacers.
So if you want to "crank up" the torsion bars on top of just
installing the spacers, you'll at least be gaining that potential
increase in control arm movement. For example, without spacers, the
upper limit of lift height is when you crank up the torsion bar until
the down travel bump stop contacts the upper control arm. At this
point, you have no more down travel and only have up travel in the
suspension, which can lead to a very harsh ride. If you were to install
a ball joint spacer at that point and lower the ride height back down
to the previous height, you would still have some down travel left in
the suspension.
- Of course the advantage of the cranked torsion bars is that it can be done at no additional cost.
- And here is an in-depth discussion of the differences of cranked torsion bars vs. ball joint spacers
- And on a related question, how about simply installing larger torsion bars for added lift? While a larger diameter torsion bar will provide lift in that a torsion bar (or any spring) will have an effective spring rate measured in so many pounds of force per inch of wheel travel. So assuming you start at the upper bump stops, a stiffer torsion bar will settle less distance for the same amount of weight as a softer torsion bar. But just like the cranked up torsion bar scenario above, you may find that a stiffer torsion bar will not allow for full compression of the suspension assuming a nearly stock weight vehicle. Sure, if you have installed a big heavy V8 engine or have a massive front bumper and winch or if you do a lot of high speed pre-running and need the added stiffness to prevent bottoming out, you might be able to get that stiffer bar to flex for you. And it is important to understand how torsion bar stiffness changes with diameter and how that relates to the vehicle weight. Torsion bar stiffness increases proportional to the 4th power of the diameter:
- - http://www.4x4wire.com/toyota/tech/torsion_bars/
- So while a 25mm bar does not sound all that much bigger than a stock 22mm bar, it is in fact 66% stiffer. And if you figure you have perhaps 2000 lbs. of vehicle on the front wheels, increasing the torsion bar stiffness 66% would imply adding something like 1300 lbs. of front weight to get the same sort of torsion bar flex. So that 100 lb. bumper and 80 lb. winch is small potatoes as far as a stiffer torsion bar goes. For sure, if your old torsion bars are maxed out on adjustment and you are still bottoming out, by all means consider replacing them, but don't go overboard. Something like stock diameter or maybe 1mm larger should get you back to the stock setup without making the ride too stiff.
- Of course the advantage of the cranked torsion bars is that it can be done at no additional cost.
- A11: Are manual locking hubs required to use the ball joint spacers?
-
No, manual hubs are not required to use ball joint spacers. You may
find that manual locking hubs will help to reduce wear and tear on the
CV joints and boots if you have the Automatic Differential Disconnect
(ADD) front axle. Why? With ADD, you have drive flanges on the front
axle half shafts meaning the axles, CV joints and CV boots are spinning
100% of the time. With ADD, when you engage 4WD, an actuator in the
front differential locks the the driver's side axle to the differential
to make the front axle operational. With manual hubs, you can unlock
the hubs when you only need 2WD operation and thus those CV joints and
boots will not be spinning.
- But with ADD, you do not have to give up the shift on the fly 4WD to have manual hubs? How is that? Simple, with manual hubs, if you lock them, you have exactly the same setup as the stock ADD drive flange, you can shift in and out of 4WD any time you wish. And no need for an expensive manual hub conversion kit like some vendors are offering. Just grab a set of manual locking hubs from an '86-'95 Toyota pickup or 4Runner and a few parts from the dealer and you are ready to swap.
- A12:Will these spacers fit my vehicle?
- Best to measure and see. There are two kinds of spacers that fit a wide variety of Toyota 4WD and 2WD pickup and 4Runner models. See this section for full details on what to measure on your vehicle to see if these spacers will fit...
- A13: Can I order replacement mounting hardware for my ball joint spacers?
-
Yes, we have a limited supply of new mounting hardware for the spacers. Perfect
solution if you have lost your original hardware or if you want to
upgrade the unknown grade hardware often supplied with the low cost
eBay ball joint spacers. This is the same Grade 12.9 metric socket head
cap screws and Class 10 flanged lock nuts that comes with the
spacers originally. Cost for a full set of 8 bolts, washers and
nuts is US$20.00. Individual pieces are also available in case you
misplaced a bolt or two, those run US$3.00 per bolt/washer/nut
combination. If running the 2WD spacers with the upper control arm braces,
specify the 2WD option for slightly longer bolts needed for the braces.
- ----------------------------
- Single bolts:
- ----------------------------
- Set of 8 bolts - US Shipping:
- ----------------------------
- Set of 8 bolts - International shipping:
- ----------------------------
- A14: Do I need an upper control arm (UCA) brace for the 2WD spacers?
- That is up to you and how you plan to use your truck. Since it has probably been driving fine since it was new and if you plan to continue driving it in the same manner, then you probably are fine just adding the spacers. The 2WD ball joint spacers will not radically change the forces and loading on the UCA. However, if you plan to drive the truck off-road more with the added lift and especially if you plan to do activities like "pre-running" or high speed off-road driving with jumps and bumps, then you will be pushing the stock suspension components pretty hard. In that sort of use, you can over stress the ball joint mounting points on the UCA and that metal can fatigue and ultimately crack under heavy use. That is where the UCA braces can help to reinforce that joint. By capturing the UCA between the thick steel of the brace and the ball joint (and/or spacer) underneath, you take a lot of the load off the UCA and keep it from fatiguing. The UCA braces can also be used with stock ball joints (i.e. without adding the spacers) for folks who drive their 2WD truck hard without a suspension lift. YOu can also add the UCA braces after the fact, so to speak, if you find your driving style has changed. For example if this year you install the spacers and some larger tires and then next year move to the desert and find you enjoy bombing down the desert roads at high speed, that would be a good time to add the UCA braces.
- A15: Can I use these spacers on 1983 and earlier 2WD pickups?
-
Directly, no. The earlier 2WD control arms and ball joints are a
different design and these spacers will not fit. However, it is
possible to swap in the front suspension from a 1984 or later 2WD
pickup onto an earlier truck. For details, see this thread: http://www.toyotaminis.com/forum/threads/spindle-differences.5309/
- If you can swap to the later style suspension, then it should be possible to install the 2WD ball joint spacers. It'll also be easier to get replacement parts like bushings, etc. for the later model suspension as well.
- A16: What's the maximum height I can lift the front of my truck with these spacers?
-
That's a difficult question to answer exactly. There are three main
factors in play. First is the physical geometry of the IFS front
suspension compnents. The second is the ability to align the front
wheels at a given lift height. The third is your "tolerance"
if decreased ride quality as you lift the front end higher.
- For the first factor, realize there's only a fixed amount of suspension travel from fully compressed to fully extended. Ideally your normal ride height is somewhere in the middle of that range of travel allowing for sufficient up and down travel so that the front suspension can do it's job. The spacers will create more travel range by separating the upper and lower control arms a bit. This delays the contact of the control arms on the bump stops. You also have to consider the range of motion on the ball joints and tie rod ends and also on 4WD trucks, the angle of the CV joints in the front axles. You'll ant to check all thes components and make sure they're not binding up.
- For the second factor, if you plan to drive the truck on pavement a lot and at highway speeds, you'll need to be able to align the front wheels. On the 4WD trucks, eccentric cam bolts are used to do this. On the 2WD trucks, shims are used to do this. There is only so much adjustment range in those components and once you lift higher than that adjustment range, you won't be able to fully align the front wheels. The height at which this limit occurs will vary with the condition o f the control arms, bushings and adjustment hardware as well as any previous damage to the IFS sub frame.
- For the third factor, realize that the higher you lift the frond end, the more the ride quality will degrade. You can read this article that goes into some details. A consequence of the first factor (above) is that as you raise the front end, you're trading off lift for down travel. At the limit, you can lift the front suspension to the point the control arms are in contact with the down-travel bump stops. In this state, your front wheels will not be able to drop into holes while driving and instead the whole front of the truck will drop with the wheels. How the ride quality will limit the ride height will be up to the vehicle owner. Some folks don't mind a rougher ride, it's a truck after all, not a Cadillac. Other folks are very particular and won't tolerate the ride above a certain lift height.
- In summary, if you are looking for the most lift you can get, be prepared to try a few setups. Luckily, it's fairly easy to adjust the torsion bars and try out various ride heights. Perhaps take notes on each ride height you try and what the results were and then work your way up until you find the limit for yourself and your truck.
- For the first factor, realize there's only a fixed amount of suspension travel from fully compressed to fully extended. Ideally your normal ride height is somewhere in the middle of that range of travel allowing for sufficient up and down travel so that the front suspension can do it's job. The spacers will create more travel range by separating the upper and lower control arms a bit. This delays the contact of the control arms on the bump stops. You also have to consider the range of motion on the ball joints and tie rod ends and also on 4WD trucks, the angle of the CV joints in the front axles. You'll ant to check all thes components and make sure they're not binding up.
[Last updated: 10.December.2025 ]
Visitor # since 12.APR.2009
E-mail Sales@4Crawler.com for more information... [Return to the main 4Crawler Offroad product page]