Custom Sway Bar Disconnects
![]()
Contents:
- Introduction
- Disconnects, V1.0
- Disconnects, v2.0
- Disconnects, v3.0
- Here's an option for the Ford F150/Raptor
- Returns and exchanges
- Cancellation Policy
Introduction:
Every time I do any serious off-road driving, I like to disconnect my sway bar to increase the articulation of the suspension. The solid front axle sway bar wasn't too difficult to disconnect; a wrench to hold the bolt and a socket to remove the nut. But you still need (the right sized) tools and while taking the end links off is straight forward, putting them back together is a bit time consuming, getting the right sequence of washers, bushings, etc. Also, I worried about the nylon lock nut wearing out after many off/on cycles, so I went looking for a better solution. I've seen wing nuts used to facilitate easy removal, but I didn't think this would hold well enough. There also seem to be a number of commercial units on the market, but I didn't see any for the solid axle trucks. And a final thing I noticed was that with the added suspension lift on the front of my 4Runner, the sway bar ends were no longer horizontal like they were when stock. Why is that important? See below for the answer...
Sway Bar Operation:
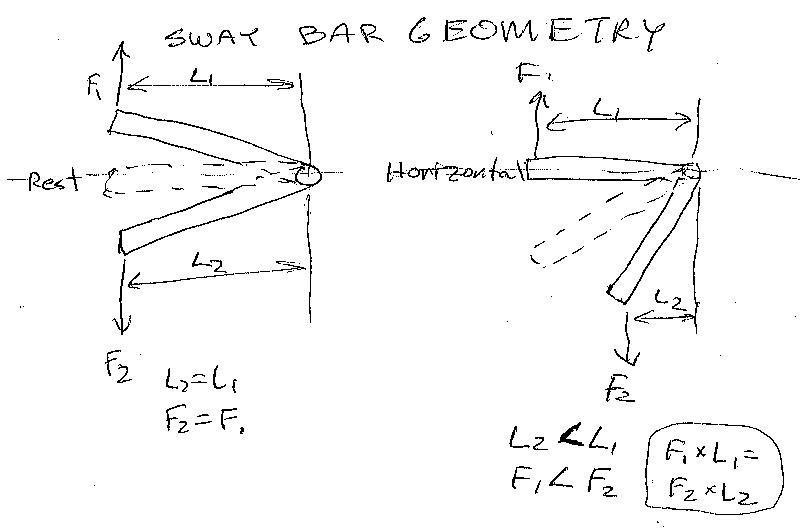
So, why is it important that the sway bar end link matches the suspension lift? Ideally, you want the arms on the end of the sway bar to be sitting horizontal to the ground and the end links sitting vertical at rest. This ensures that you get equal up and down force on each side of the bar when the body/frame tips to the side. This is because as the bar twists under load, the arms will bend up and down at equal angles from horizontal. If the arms were at an angle below horizontal (as would be the case if the suspension has been lifted) the two bar end angles would not be equal, resulting in a lessened anti-sway affect.
As you can see in the sketch below, on the left hand side is a sway bar set up with the ends parallel to the ground (the dotted bar outline in the center shows the rest position). Under cornering load, the bar is twisted up by the suspension loads, F1 is the force of the outside side being compressed upward, F2 is the force of the inside side pulling the sway bar downwards. If the bar starts out horizontal and then the two effective bar end lengths (L1 and L2) are equal, since one end is twisted upward to the same angle as the other end is twisted downward. On the right had side is an illustration of what happens if the sway bar does not start out horizontal. This would be the case if a suspension lift were installed (thus raising the frame and the sway bar attached to it) without extending the end links. In this example, you can see that as the one end of the bar twists upward, it's effective length, L1, gets longer and longer as the angle is decreased towards horizontal. And the effective length of the end of the bar twisting down, L2, gets shorter as it's angle increases. Since the torque in the bar must necessarily be balanced, F1*L1 must equal F2*L2. Since L2 is less than L1, F2 must be higher than F1 to maintain the equality of the torque in the bar. This means that there is less force supplied by the sway bar to the outside suspension component in the turn so the vehicle will lean farther than it would if the forces and lengths were equal, as they are on the left side of the sketch. Thus if the purpose of a sway (or anti-roll) bar is to resist body roll, then the most efficient setup is to have the ends of the sway bar as close to parallel to the ground at rest as possible.
Sway Bar and End Link Geometry
So, when measuring for new end-links or disconnects, be sure and place the sway bar ends in the proper orientation (usually horizontal) and measure the distance from the center of the bar to the center of the attachment point on the axle or suspension arm. The other option if you do not want to replace the end links, is to install drop spacers on the sway bar frame brackets to lower the bar down to restore the angle. Drop spacers for some applications are available here...
[Return to the top of this page]Disconnects, v1.0:
After a bit of research, I determined a standard turn-buckle could be adapted to this use. I located a stainless steel turn-buckle at a local hardware store that suited my needs. It had 3/8" eye bolts on each end, the same diameter as the stock sway bar end link bolt. Furthermore, the length of the center portion was just a bit shorter than the spacer sleeve on the end link. A turnbuckle is built with one right-hand and one left-hand thread, so I also purchased a pair of left- and right-hand 3/8" nuts.
Place the right-hand threaded eye-bolt on the sway bar end, using polyurethane bushings, cupped washers and a nylon lock nut. On the bottom (axle end) I used the left-hand eye-bolt, bushings and the left-hand threaded nut. Put some paint on both the LH eye-bolt and the LH end of the turn buckle to help orient the ends for assembly. I tightened the nuts until the bushings were slightly compressed and provided enough friction to allow the turn buckle to be tightened and loosened without the need of tools.
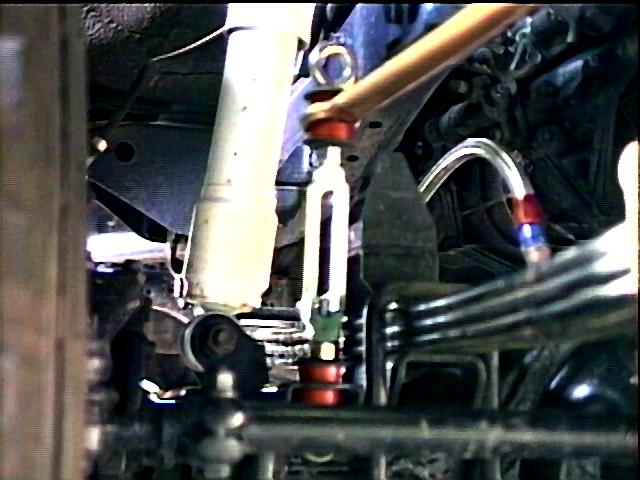
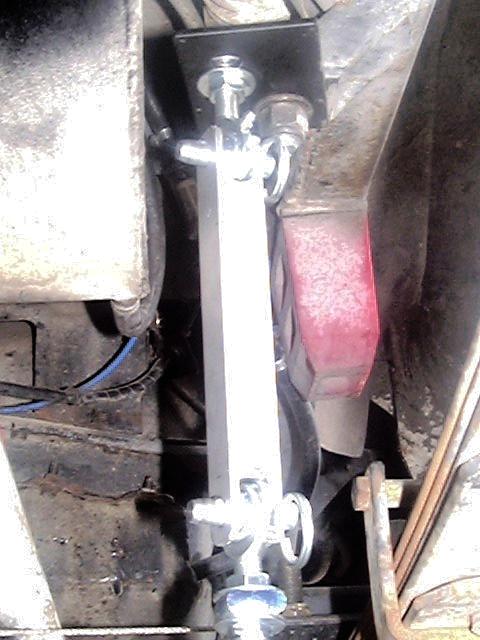
There is no fabrication involved in this design. All the parts are available off the shelf at most hardware stores. Here's what the installed disconnect link looks like in place:
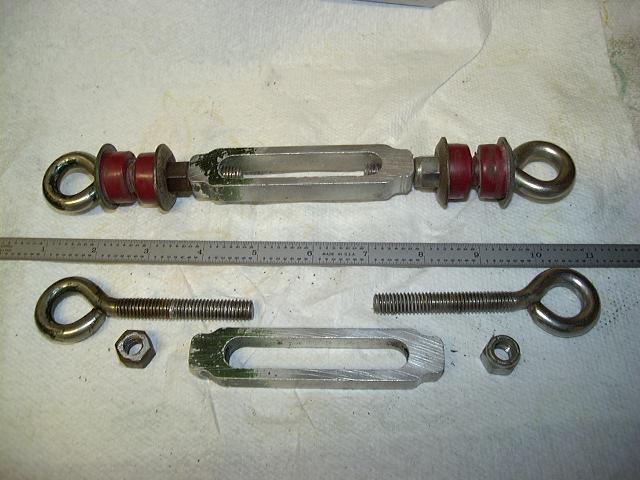
Parts:
  2  3/8" S/S turn buckles
  2  3/8" left hand nuts
  ------------------------

  A set of polyurethane sway bar bushings is a good idea
These parts should be available at a good hardware and/or auto parts store.
[Return to the top of this page]
Operation:
To disconnect the sway bar, unscrew each turn buckle by hand. I find that I can unscrew one side up until it is nearly off, then unscrew and remove the other side (releasing the tension on the sway bar), and finally finish removing the first side. Throw the turn buckle sections into the glove box and you are ready for action. Connection is just the reverse, I find it easiest to start the left-hand threaded end (bottom) a few turns then engage the right-hand threaded end (top) and hand tighten, first one side then the other. For either operation, no tools are required.
With the tension in the sway bar, the turn buckles seem to be quite snug. If one were to loosen (i.e. lengthen) it would quickly pick up spring tension from the sway bar and stop. So far, I've not had any trouble with them loosening and they go on and off in less than a minute.
I also took this time to swap the worn out rubber sway bar bushings for some nice red polyurethane (ProThane) sway bar end link bushings and pivot bushings. On road, the poly is much stiffer and provides more positive anti-sway action. Off-road, I find the poly bushing will hold the bar twisted up to the frame. It seems to stay in place without the need to tie it off. Perhaps as the poly bushings wear, the bar will loosen up and require restraint when disconnected. If that were to happen, I was planning on adding an eye-bolt through the fender well to accommodate a short bungee cord to tie the sway bar end up.
[Return to the top of this page]Epilog:
However, after being lazy and not re-connecting the sway bar a few times, I found that the handling is more predictable on-road with the front sway bar disconnected. So, I've completely removed the sway bar all together. With leaf springs front and rear (no rear sway bar), the bar in front causes the two axles to behave differently in turns. Under load, the spring shackles will pivot back, making the wheel on that side also move back, in effect turning the axle to the outside of the turn. With the sway bar attached, this is lessened (at least in front). What I found was happening was that the front end would stay level, while the back leaned, causing the rear axle to over steer. With the front bar out, the whole truck leans, making both axles skew a similar amount. Before I pulled the front bar, cross winds were wicked (the wind would in effect push the rear end out), now the truck is much more stable. If I ever get around to installing a rear sway bar, I'll re-install the front one, with the disconnects, so I'll get the best of both worlds.
And to wrap up this story, after installing crossover steering up front, I found it was not possible to re-install the stock front sway bar. While there are a few options with using other sway bars (like the Tacoma front bar) up front, with the steering and high pinion front differential, there just seemed to be a lot of stuff in the way that I didn't feel like working around to install something up there. But with the soft, long travel springs and lift, I found that the on-road handling, especially when loaded down with gear for a long trip, was getting worse as the years went by. So I picked up a rear sway bar and temporarily installed it and found it helped immensely on the road. So see the next section for how that bar was installed and made easily dis-connectable...
[Return to the top of this page]Disconnects, v2.0:
So, with no front sway bar, I picked up a Addco rear sway bar. I had it installed for a while and it seems to work great, however, it doesn't have quick disconnects and with the lift I have, it'll need extra long versions. So I've come up with a simple design for a quick disconnect end-link that can be adapted to almost any end link length as needed:
 |
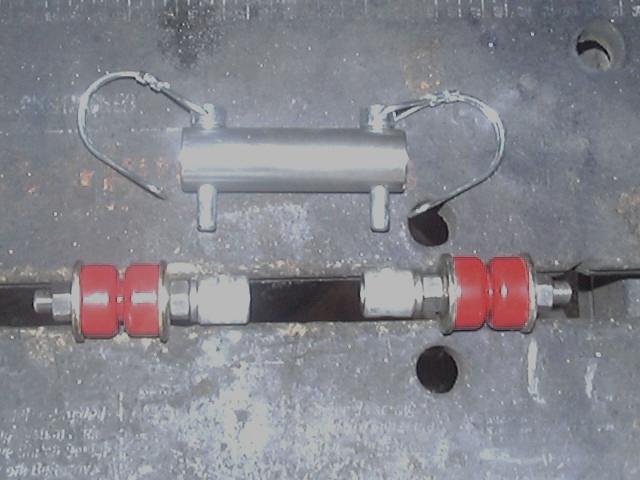 |
 |
| A: Assembled end-link | B: End-link disconnected | C: Right Angle Adapter |
We're no longer making the v2.0 style disconnects due to the overwhelming popularity of the v3.0 style.
Installation:
Removal and installation is as simple as sliding the center tube over the end link, sliding in the hitch pin and pop the retaining clip over the end of the pin. Often, it is only required that one side of a sway bar be disconnected for off-road use. As long as the free end of the sway bar will not make contact with any of the other suspension components, it'll be OK to allow it to move around. Since one end is disconnected, the sway bar is rendered inoperative, that is it will allow the two sides of the axle to move independently. You'll probably find the tubes line up best on one orientation, at least in initial use. If so, one option is to spray a bit of paint on the mating ends so that you can keep the tube on the ends that it matches best. As the parts wear in over time, they will loosen up a bit to allow for easier installation and removal.
Note that when you first install the new bushings on the end link ends, those bushings will take a while to seat into the sway bar and control arm ends. So you might find that they move around a bit and throw out the alignment of the end studs with each other. This can lead to difficulties connecting or disconnecting the tubes in between the studs. So it may take 2 or 3 adjustments of the bushings on the end links to get them to settle into the position you need them to be in. In time, the polyurethane bushings will deform to match the shape of the parts they are sitting on and will hold their position, but until that time, they can shift and move under the loading and unloading they see while connected. So by readjusting the bushings a few times in the first few weeks of use, you will coax them to move into the position you want them to be in. Ideally, you want the two end studs perfectly in line with each other and the holes in them to align with the holes in the tubes, when they are inserted. This will make insertion and removal of the locking pins as easy as possible. And it is the ease of this task that dictates how quick the disconnects will be to put in and take out. You can also adjust the tightness of the pre-load on the end link bushings. With polyurethane bushings, you only need to tighten the nut just to the point you have taken out any slack in the bushings and perhaps squish them just a little. But within that range, you can adjust the pre-load to either let the studs move easier or harder. Keeping them on the looser side will let things move around just a bit to let the holes line up easier. But if you find they move around too much in use, you can tighten things up a bit more to keep them from moving so much. Each vehicle is going to be different with regards to how the bushings should be set up, so there is no "right way" to do it. But rest assured, once you have then dialed in just right, they should hold that position for a long time. So take the time to get them lined up like you want them to be and they will stay that way.
[Return to the top of this page]Disconnects, v3.0:
We've sold out of the v3.0 sway bar disconnects. If you want to make your own, you'll need 1/2 in. male thread heim joints and some 1/2 in. quick release pins and some 1 in. square tubing, 1/8 in. wall steel or aluminum. Cut the tubing to length, about 2-3/4 inches shorter than the desired center-center length. Then drill 1/2 in. holes 1/2 in. from either end across the tube for the quick release pins. Then on the opposite side, drill 2 more holes 1 in. from either end and then cut out the excess metal to the end of the tube. This is to allow room for the tube section to fit over the heim joints.
After running the version 2.0 disconnects on my rear sway bar, I found a few things I wanted to change. One was that you needed to disconnect both end links in order to remove one side. This is because the disconnect ends fit up inside the disconnect tube. And with the resistance of the sway bar, you typically can't pull one end out without disconnecting the end link on the other side. And re-connection was just as tedious, in that you had to line up both ends before pushing both ends into the tubes before aligning and inserting the release pins. On my rear sway bar, this could be done by one person, but entailed laying on your back under the truck. On a front axle, you would typically need two people to accomplish this. Also the bushings on the end links are a wear item and also a source of a little play in the sway bar system, as they compress and expand in use.
So, in order to make an easier to use disconnect setup, I wanted a design that would allow only one side to be removed. Being able to disconnect or reconnect one side at a time makes the sway bar disconnects a one person operation. No need to round up another person to line up the other side for you. Also we wanted to make the disconnection and reconnection process as easy as possible, giving the ends lots of room to put them together and some accommodation in there to make it easier to line everything up without needing 3 hands to do so. We also wanted to eliminate the poly bushings and replace them with a solid mechanical joint that could be lubricated for quiet and long lasting operation. We wanted the end link to be somewhat adjustable in length to accommodate irregularities in the alignment of each end of the sway bar. For example, on my rear bar, there is almost an inch difference in the separation on the two ends of the bar, I suspect it was not bent symmetrically. And finally, we wanted to increase the size and strength of the end link to allow use on heavier vehicles and to stand up to the use (and abuse) that these type of parts are likely to see.
Some of the benefits of the v3.0 disconnects are summarized below:
-
The disconnects feature massive 1/2" grease-able heim joints rated
at nearly 3 tons of pull (you could literally hang your vehicle in the
air from one joint).
- For heavy duty applications, an optional 5 ton heim joint upgrade is also available, these joints are not greaseable.
-
The disconnect pins are also 1/2" in diameter and supported in a
double-shear configuration for maximum strength (pin is supported on
both sides of the heim joint by the center tube).
- This is in contrast to the v2.0 disconnects that use 3/8" dia. threaded ends and 5/16" dia. pins.
-
The center tube is heavy wall aluminum alloy and is notched on each end
to allow it to slide on and off the heim joint at either end without
having to push or pull on the sway bar.
- We can also make a 304 stanless steel center tube which would stand up to corrosion better and being harder will resist wear at the steel pins better than the softer aluminum will.
-
The threaded ends of the heim joints allow for about a 1" total
adjustment between the two sides to accommodate differences in the
suspension side to side.
- They use a thin jam nut on top and a thin lock nut on the bottom to make these adjustments. Each end can be adjust up or down about 1/4" from the nominal length, so combining adjusting both ends, you have +/- 1/2" length adjustment on each end link from the nominal length for fine tuning them to fit your vehicle.
-
The heim joints also feature an integral grease fitting to allow for
periodic lubrication and have a polished stainless steel ball and heavy
zinc plated housing for corrosion resistance.
- In contrast, the v2.0 disconnects use poly bushings on the end that are subject to wear over time and also that allow some additional play in the sway bar.
- So while a 4WD truck is not really set up to handle like a sports car, if you have a sway bar it may as well work as well as possible by having end links with little to no play in them at all.
-
Finally, the disconnects were designed to eliminate as many of the
tight clearance points as possible.
- This lessens the impact of mud and dirt on the operation. In this design, the only precision fit is the pin in the two holes in the center section and through the heim joint itself.
- And this makes it much easier to re-install the end links after a day of wheeling off-road. Usually there is no need to crawl under the truck (you'll appreciate this if it is wet or muddy).
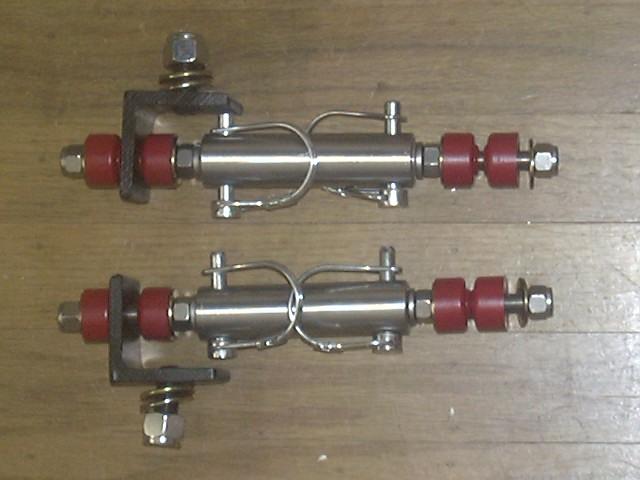
Pictured below is the new design disconnect that was arrived at. You can see the disconnect in it's connected configuration in photo "A" below. Shown in photo "B" is the the disconnect removed, leaving just the two heim joints in place, one on the frame bracket and one on the sway bar end. And in photo "C" is an optional retainer for the two pins. This small bungee cord between the two pin rings helps prevent dropping one in the dirt by accident. The pins themselves have a spring loaded ball bearing at the end that keeps them from falling out once pressed through the end link end. And in photo "D", you can see the use of a right angle adapter (if needed) to attach the disconnects to a sway bar setup where the top and bottom attachment points are not in-line. The adapter may be installed either with the angle facing up (as shown) or down as needed. Be sure to check the attachment point where the adapter will be installed and see which orientation you'll need. The adapter extends 1" up or down from the mounting bolt center, but with the angle up, you'll need room for the 2"x1.5" flat part plus access to the rod end stud and nut. With the angle facing down, the nut and stud are above the mounting bolt. The reason the orientation matters is that it affects the length of the disconnect, angle-up needs a 1" longer disconnect body, angle-down needs 1" shorter. We account for the difference when making the disconnect, but need to know which orientation you'll be using.
 |
 |
| A: Connected | B: Disconnected |
 |
 |
| C: Pin Retainer | D: Right Angle Adapter |
This is not a one-size-fits-all component. You are likely here because you've modified your suspension and are in need of new end links for the sway bar as the OEM links no longer fit. As such, you'll need to provide us with some measurements and layout of the way your sway bar end links would need to be set up. Since the suspension is most likely modified, we can't just use the OEM dimensions.
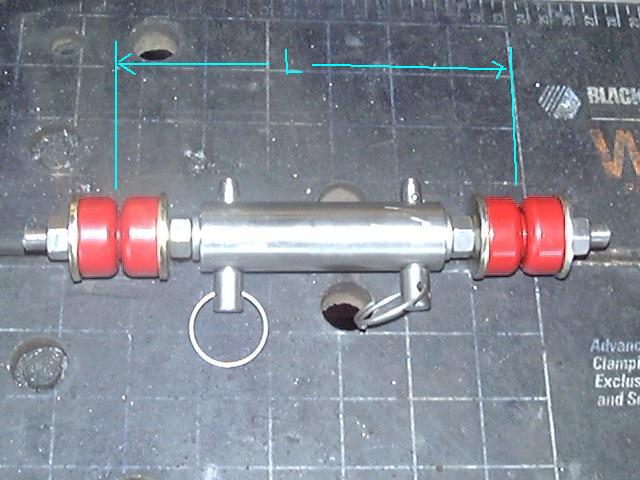
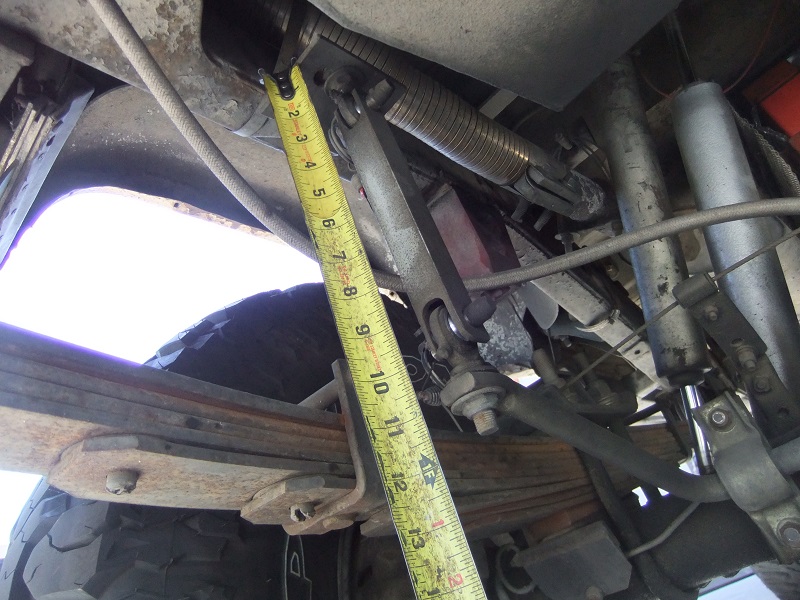
Here is an example of the length measurement: This is on a Toyota rear axle with an aftermarket Addco sway bar. The sway bar is mounted to the axle and the end links attach to the frame rail. If this were the supplied, fixed length end link, it would have 2 poly bushings at the frame bracket on top and 2 more at the end of the sway bar. For this installation, a center-center length of approx. 11 inches was measured from where the center of the end link bushings would be at the frame and axle ends.
Note, in this case, the ends of the bar are angled upwards to the rear. This is not ideal for sway bar operation, as they should be more horizontal. But, in this case, having the ends of the bar up higher gave them more protection off-road. In this example, you'll note the actual length is approx. 10.5 in., on the passenger side, it's about 11.5 in. This is because the sway bar is slightly asymmetrically formed, one end bends up and the other end bends down. The length adjustment afforded by the heim joints allows this offset to be corrected.
We have SOLD OUT of these disconnects.
-
A basic version (6"/150mm center-center length minimum) costs
US$125.00/pr.
- Can be adjusted down to ~5.5"/140mm length and is about as short as we can make the center, removeable section.
- Add US$10.00 per inch/25mm or fraction thereof of additional length
- The "length" you want to measure is from the center of the sway bar to the center of the axle (or frame) attachment point of the other end of the sway bar end link. This is with the sway bar set to approx. it's original orientation, which is typically with the ends of the sway bar horizontal. So, you are basically letting us know how far apart you want those two points to end up with the disconnects installed, not necessarily how far apart they are with the OEM end links.
- One consideration to take on the length is to look at the very ends of the sway bar, where the end links attach. On this rear sway bar, you'll see most of the end of the sway bar angles upward from where it is attached to the axle. But the very end where the end links attach, is bent downwards. So the "proper" orientation for this bar is to have the end of the bar angled upward to the point that the bent ends of the bar sit horizontal. While this orientation does make the bar somewhat less efficient, it keeps the end of the sway bar above the level of the leaf springs. Since this vehicle gets used off-road, having those sway bar ends hanging down lower than the springs would leave the sway bar vulnerable to damage.
- With the heim joints, it's important that both joints can be in the same orientation to minimize binding. For a vertical oerientation, like you have with bushing type end links, the threaded end of the joint will be installed vertical and the spherical bearing can then be turned to face any direction.
- With a horizontal orientation, such as found on end links with tie rod ends, there are two options. One if to install the heim joint horizontally with the threaded end where the rod end used to fit. In this case, the orientation of the spherical bearing will be fixed and that needs to be such that the rotational pivot axis will align with the pivot axis of the suspension member, such as a control arm. Since that control arm rotates up and down along an axis aligned to the frame, the hole in the heim joint needs to also be aligned with the frame. The second option is to install our right angle adapter (see below) and that will allow the spherical bearing to be oriented in any direction.
-
If you want a stronger center section, we can swap out the heavy wall
T6061 aluminum center section for 304 stainless alloy for a cost of
$45.00, or $75.00 if you want a new pair of stainless steel center
sections to replace the existing aluminum parts.
- The stainless steel center section along with the steel pins makes a longer wearing combination as the parts are of similar hardness.
- The stainless steel tube is a little thinner wall thickness, there's space inside to fit plastic washers or rubber o-rings between the tube and the heim joint for quieter operation. This will make installing and removing the disconnects a little more time consuming. You'll insert the pin through one side of the disconnect, slide on an o-ring, the push the pin through the heim joint, and then slip in another o-ring before pushing the pin the rest of the way through. If using plastic washers, you may be able to glue those to the inside of the center section so they remain in place. Contact us for details on this or you can pick up the parts at a local hardware store. You need a 1/2" or 13mm center hole and about 1/16" or 1.5mm thickness.
-
Add US$20.00/pr. for right angle adapters
-
2nd and 3rd gen 4Runners may need a right angle adapter. This is the same adapter as
the v2.0 disconnects used.
- The 2nd gen 4Runner OEM sway bar has the holes in the bar ends horizontal, so the right angle end fits on there. Best fit is to have the flat part of the angle on top. This leaves more room for installing and removing the disconnects with the added inch of clearance. If you have an aftermarket sway bar with vertical holes in the bar end, no adapter would be needed.
-
The 3rd gen 4Runners usually need the right angle facing away from the
disconnect due to clearance issues. On the 3rd gen, the right angle end
is usually on the control arm. Often there is metal protruding below
the end link hole, check how much clearance you have there and let us
know so we can offset the bolt hole in the right angle adapter to fit.
- An alternate configuration that would work on the 3rd gen 4Runner front suspension is to install the lower heim joint horizontally into the control arm. Since the hole in the control arm is perpendicular to the axis the control arm rotates about, the pin in the center of the heim joint is parallel to that axis and thus the joint can rotate freely about it's axis without binding. In this way, you eliminate the need for a right angle adapter.
- With the right angle ends, they can either be mounted with the angle facing towards the end link or away from the end link. This changes the spacing or effective length of the disconnect by 1"/25mm less or 1"/25mm more. We'll account for this length change when we make the disconnects, so just tell us which way you would like the angled ends to face.
-
2nd and 3rd gen 4Runners may need a right angle adapter. This is the same adapter as
the v2.0 disconnects used.
-
Includes 4 steel disconnect pins
- Spare pins are available at a cost of US$7.50/ea.
If your sway bar does not have a straight point to point end link, you'll want to add the right angle adapter in order to properly install these end links on your vehicle. The right angle end bolts into the end of the sway bar that is perpendicular to the end link and provides a horizontal mounting point for the rod end. This is important since it keeps the end link stud in-line with the forces in the end link for maximum strength. Also, with the right angle adapter in place, you are free to orient the heim joint in any direction to let it work freely without binding. The specified length is the vertical separation between the center of the sway bar and the mounting bracket where the end link attaches, with the sway bar at it's normal orientation (typically horizontal). And you really should measure and determine the correct length you need for your vehicle. After all, you are buying a custom made part, so why not get it custom made to fit your vehicle exactly?
Installation:
For installation, just put a heim joint into each end of the sway bar and frame bracket (you do not re-use any of the stock bushings, nuts or washers). Use the thin jan nut first, then a washer then insert the heim joint into position then a second washer and the lock nut. If a right angle adapter is needed, install it first them bolt in the heim joint. On 2nd generation Toyota 4Runners, you can mount the right angle end with the angled end facing away from the end link, on the 3rd generation 4Runners, you want the angled end facing towards the end link due to clearance issues. You may need to do some light filing or grinding of the frame bracket area to get the angled adapter to fit in place. Don't worry if it does not sit perfectly flush to the frame bracket. As long as it is in there solid, the rod end will take care of any slight misalignment angle.
Finally adjust the separation of the two end link pairs so they are equal when sitting on level ground. When equal in length, you'll find the holes on each end link line up with the rod ends when sitting on level ground. If one end does not line up perfectly, adjust the jam and lock nut on one or more rod ends until all the holes line up. Once in place, feel free to use a drop of thread locking compound on the jam nut if needed. You can use the green compound applied to the tightened nut and it will soak into the threads and lock the nut in place, or you can back the jam nut off and apply a drop of blue or red thread locking compound to the exposed threads, then re-tighten the nut.
Once set, align the end link tubes such that they have enough side-side and front-back movement to allow the sway bar and suspension to move without binding. Around the pin, you'll have the most motion (essentially unlimited) and side-side will be somewhat restricted. If unsure which way to line up the square tubes, you can set them at a 45 degree angle and this will give equal motion in all directions, but typically, you want the open side of the tubes facing front and back relative to the vehicle. Typically, the ends of the sway bar are relatively shorter than the width of the axle, so for a given up-down movement of the suspension, the up-down angle on the sway bar ends will be more than the tilt of the whole axle.. This also makes for easier removal and installation as you can reach in from the wheel well to slide the tube into or out of place. Then, snug down the lock nuts and you are ready to go.
Grease the heim joints periodically when you grease other parts of your truck. The joints use 1/4" grease fittings, so make sure your grease gun is set up to handle that size fitting. If you find the grease gun is very hard to get over the fitting, it likely has too small a tip on it and if you force it, it may be very hard to remove or you may damage the fitting. Try finding an adapter for the gun or find another gun that fits better. I find that the same grease gun I use on the rest of my '85 4Runner works fine on these rod end fittings. And be aware that due to the relatively small size of the heim joints requires a smaller size grease fitting and thus they will not be as robust as the larger fittings on the rest of the vehicle. So be sure and take care to not use excessive force when greasing the rod ends. Replacement fittings are available (see above).
For off-road use, you'll want to see if having a single end link connected will work for you. You'll need to check that the end of the sway bar will not get in the way of any suspension or brake lines. Also, you'll need to check that the end links do not bind up from severe articulation. If either the above happen, you'll need to disconnect both end links off-road and then tie the sway bar ends up and out of the way. It is usually easy to install a small screw eye into the frame rail and then use a short bungee cord or length of rope to tie it up.
This design was optimized around ease of use. No need to work on both sides at the same time, just install or remove one side then do the same on the other side of the truck. I have found these disconnects very easy to use. I can just reach into the wheel well, pull the two pins and remove the end link tube to disconnect the sway bar. Re-connection is just as easy, just put the tube over one heim joint, push the pin into the hole and then line up the holes on the other end and push that pin in. No need to get onto the ground or underneath the truck, which is very welcome in muddy or wet conditions. You can hear a little clicking if you wiggle the end links around under the truck. If you have a very quiet vehicle and have the end links up front (closer to the driver) you may be able to hear them a little bit.
Important points:
-
Be sure to check for any binding of the heim joints in the
disconnects as the suspension cycles.
- An easy way to check for binding is to run one tire up on a ramp or use a jack to lift one side of the vehicle up and then feel if the center section of the disconnect still has some free play as you twist it.
- If found, re-orient the heim joints to eliminate binding in normal vehicle operation
- If you examine the heim joint, you'll see in one axis, the center ball can rotate a full 360 degrees. But in the other axes, it can only rotate about 20 degrees before the joint binds up. Look at your suspension and ascertain which direction will create the largest angle change as it cycles up and down. You'll want to orent the heim joints, top and bottom, such that they'll be able to handle those angle changes.
- Don't simply orient the heim joints just to make it easier to disconnect. As a rule of thumb, the pins should be facing front-back, parallel to the frame rails. This way the heim joint ball can roll around freely inside the housing as the suspension cycles up and down.
- If the binding can't be eliminated, you'll need to disconnect both end links and tie the sway bar up and out of the way.
- If you only want to run one disconnect, it may be possible to run the original sway bar end link on the opposite side. That way, that side stays connected all the time and only the disconnect is removed when needed.
-
Be sure to disconnect the end links when going off road or when doing
something like jacking up the vehicle to change a tire.
- Why? Extreme suspension travel can put the end links in a bind and that can cause them to overload and break.
- You purchased the disconnects to be able to disconnect your sway bar for improved off-road suspension travel, so make sure you use them.
- Remember, when in doubt, disconnect!
Disconnects, are they for me?
No hard and fast rule that says yes you must have them, in fact that even goes for the sway bar itself. Only you can decide and the only way to make that decision is to try the various combinations and see how they work. So what combinations are there?
- On- and off-road
- Sway bars connected and disconnected
- Likely you have already tried on-road w/ sway bars connected and likely off-road with the connected as well. At your favorite off-road area, climb under the truck with a couple of wrenches (14mm should do it) and unbolt one or both sway bar end links and make sure the disconnected bar will not get in the way of anything. Then hit some favorite trails or obstacles and see if there is any difference with the bar removed. Make note of your observations and feel free to repeat the same test with the bar connected. Since trails and obstacles can change from day to day, you should test with the bar on and off as close to the same conditions as you can.
Now for on-road with the sway bar off, this is optional. If you do choose to test this setup, try it on a quiet street or parking lot to get the feel of it first. Some folks find a huge difference with the sway bar on and off on the road, others do not. A lot depends on how your truck is set up and your driving style. You especially want to test evasive maneuvers and see if there are any unexpected handling quirks with the sway bars off.
So now, armed with your test results, fill in the following decision table:
Sway Bar On-Road Off-Road Connected -A- -C- Disconnected -B- -D- For example, in box "-A-", if the ride on-road was better with the sway bar connected, put a "YES" there. However, if you noticed little or no difference on the road with the bar disconnected, then put a "YES" in box "-B-" instead. Same way with boxes "-C-" and "-D-", if your truck worked better off-road with the bar disconnected, put a "YES" in box "-D-", and if you noticed little or no difference with the bar connected, then put a "YES" in box "-C-".
So, to analyze your findings:
-
If you have boxes "-A-" and "-D-" with
"YES" answers, then you are a candidate for disconnecting
your sway bar for off-road use.
- Decide how often you might need to do that and decide if it is worth spending money on a set of quick disconnects or whether you can just unbolt your stock disconnects as needed.
-
If you have box "-B-" with a "YES", then a simple
option is just to remove the sway bar all together.
- Costs less than a set of disconnects and is easy to do and only needs to be done once.
-
If you have box "-C-" with a "YES", then just leave
the sway bar connected all the time.
- Skip the disconnects and save yourself the time and money to install them.
And if you decide sway bar disconnects are for you, be sure to use them. Disconnect the sway bars any time you go off-road. Also, consider disconnecting them when doing maintenance work on your truck, such as changing a single tire. Twisting up the suspension does put extreme loads on the sway bars (after all their job is to resist suspension articulation) and having the sway bar end links connected allows those forces to build up. Disconnected, everything will move freely and greatly reduce wear and tear on the components. Any bushings will last longer, the end links will last longer, even the sway bar will last longer.
If you decide that quick disconnects are not of much benefit for your needs, then you may find them to be an annoyance. The steel heim jointa have no cushioning effect like the original rubber bushings did. That may transmit more road and other noise into the cabin. So if you value a smooth, quiet ride in your vehicle, maybe quick disconnects are not for you. If, on the other hand, you take your vehicle off road frequently and find the improvement in articulation is worthwhile, then a set of quick disconnects might be just the ticket.
If your vehicle has front and rear sway bars, then the testing will be a little more involved. Ideally, you'll want to test all the cases:
- Front connected, rear connected
- Front disconnected, rear connected
- Front connected, rear disconnected
- Front disconnected, rear disconnected
So repeat the above tests and then make a decision for each sway bar. For example, you might find that disconnects make sense on the front but not on the rear. But you decide based upon your testing and reactions to how your vehicle handles on the type of driving you do. But if you decide you really want disconnects and really plan to use them, then by all means, we'll be happy to make you a set. But if you are just looking for "bling" or have to have the latest "gadget" and realistically you'll never be disconnecting the sway bar, then you might want to reconsider. We don't want to spend a lot of time making a part that will never be used as intended and you'll be spending a lot of money for something that won't give you much if any benefit.
[Return to the top of this page]
[Last updated: 29.August.2025]

