Toyota Front Differential and Sway Bar Drop Kits

 Designed and manufactured in
the USA by Visual Diagnostics LLC
Designed and manufactured in
the USA by Visual Diagnostics LLC
![]()
Contents:
- Introduction
- On-line ordering
- Installation Instructions
- Related products:
- Contact Info.
After 25 years in operation, it's time to close up shop and move on to other adventures. Thanks to all the loyal customers over the years that helped to make this all possible. The web site will remain live. If you have any Toyota or 4x4 related questions, feel free to drop me an e-mail and I'll try to answer.
Introduction:
On the Toyota Tacoma Pickup (1995.5-2004) and 4Runner (1986-2002) and 4WD Pickup/Hilux (1986-1995) models, with suspension lifts over 2", the front CV axles operate at too great an angle which increases wear and tear and can cause them to break under off-road conditions. One simple cure for this problem is to lower the differential on the front axle to reduce the angle on the CV joints. So with a 1" differential drop (i.e. Diff Drop) on a 3" lifted truck, it returns the CV angles closer to that of a more mild 2" lift.
A differential drop kit is also useful for cases increased engine - differential clearance is needed. Examples include engine swaps where an oil pan may contact the front axle or differential swaps where a larger diameter differential housing is used. In these cases, lowering the front differental can increase the clearance under the engine.
 |
 |
|
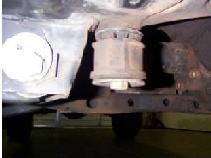
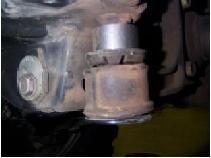
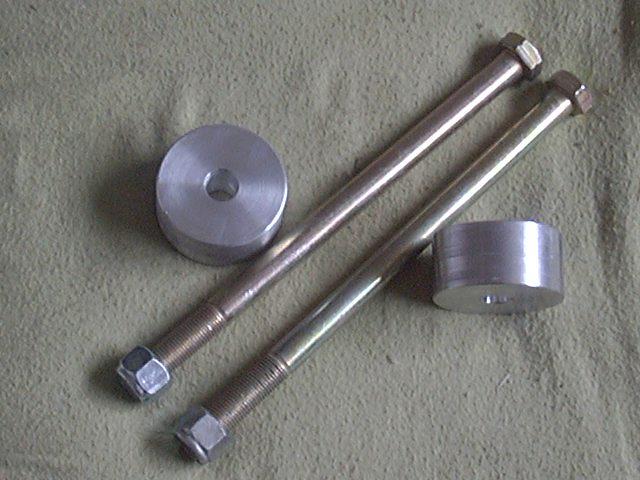
| A: 1" Diff. Drop Basic Kit | B: Stock Setup | C: Drop Spacer Installed |
Pictured above (A) is the diff spacer or drop kit. It includes 2 - 1" tall x 2" OD T6061 aluminum spacers and a pair of longer 1/2" Grade 8 bolts and lock nuts to replace the stock bolt and a pair of 8mm Grade 8.8 bolts (not pictured) to reattach the front skid plate. In (B) above, you can see the stock differential mounts and in (C) you can see the 1" spacer installed which in turn lowers the differential assembly. The differential mount to the rear is left as-is, the front differential assembly pivots down around that fixed point.
Also available for the 1986-1995 IFS Toyota 4WD Pickup/Hilux and 4Runner/Hilux Surf models.
 |
 |
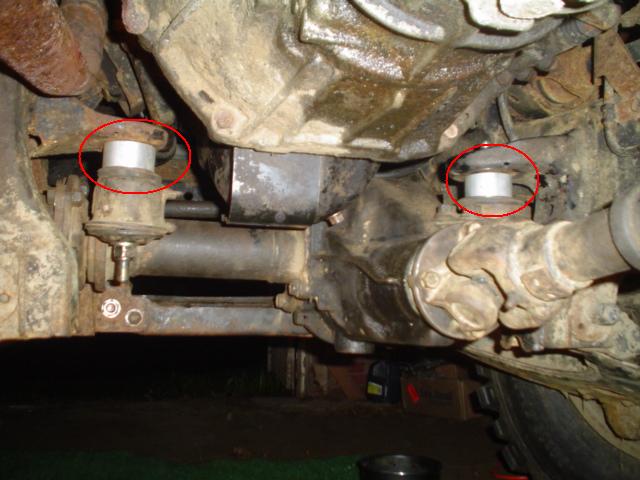 |
| D: 1" IFS Diff Drop Basic Kit | E: 1" IFS Sway Bar Drop Kit | F: IFS Drop Kit Installed |
Pictured above (D) is the 1" IFS front diff. drop kit. The spacers install between the frame and front diff bushing (shown circled in RED in image F above). Pictured above (E) is the 1" front sway bar bracket drop kit. The spacers install between the frame and front sway bar brackets. (sway bar bracket shown for clarity, it is not included in the kit) and lowers the front sway bar 1". This does two things, one is to provide room for the lowered front driveshaft to clear the sway bar (see clearance in image F above). It also lowers the sway bar to help compensate for the suspension lift, restoring the sway bar to a more neutral orientation for better performance. This spacer kit is ideal for trucks with "cranked up" torsion bars or with the popular ball joint spacers.
- IFS Differential Drop Notes:
-
The differential mount to the front is left as-is, the front
differential assembly pivots down around that fixed point. The drop kit
thus will slightly increase the u-joint angle on the front driveshaft,
so it is a trade-off; lowered CV joint angles but increased u-joint
angle. Since the u-joint is operating at a near zero degree angle and
the CV joints are operating at near their maximum angles, this is a
fair trade-off. Also, the front driveshaft will only be turning when
you are actually using 4WD, it will not be turning all the time. The CV
axles can be moving all the time if your vehicle has the popular
Automatic Differential Disconnect (ADD) front axle.
- A diff drop will have no impact you the lift or ride height of the vehicle. It will neither raise nor lower the front suspension. It only affect the location of the front differential relative to the frame. Likewise it will have no impact (positive or negative) on the front end steering geometry (e.g. toe in, camber, caster).
- Front Sway Bar Drop Brackets:
-
With a front suspension lift, you are in effect moving the suspension
control arms away from the frame an amount equal to the height of the
lift. One problem this can cause is that the front (anti-)sway bar, if
attached, is now no longer sitting in it's original horizontal
orientation, since the center of the sway bar is attached to the frame
and the end links are attached to the suspension control arms. This can
lead to less efficient anti-sway bar operation. Why? Because if the
ends of the sway bar are closer to level, one side will twist upwards
and the other side will twist downwards by an equal amount when you are
in a hard turn. It is the torsional stiffness of the center of the sway
bar that resists this twist and helps to level the body by controlling
the body roll (or sway) in hard turns. When the sway bars ends are down
at an extreme angle, you end up with one end twisting down farther and
the other end twisting less far down. With these unequal angles, you
end up needing more twist of the bar to control the body roll and that
means there is more body roll than you had with a level sway bar. See this web
page for a more detailed explanation...
- So there are two ways to fix this issue.
- The first is to add longer sway bar end links, you can either modify your existing end links for the added length, or here is a custom built option.
- A second option that is less expensive, is to simply lower the sway bar mounting brackets under the frame. This can be done with a simple spacer and longer bolts. See above for the IFS Sway Bar Drop Kit. Since the sway bar attaches about half way out on the lower control arm, it only "sees" about 1/2 of the front suspension lift, so a 1" drop spacer is good for around 2" of lift. No need to be exact here, there are no "sway bar police" out there that will be pulling you over to check your sway bar setup. If you have a lift, the 1" sway bar drop kit will help restore your front sway bar to it's factory geometry.
- So there are two ways to fix this issue.
How do I know if a differential drop is needed?
Not every vehicle with a suspension lift will need a differential drop kit installed. How do you tell if your vehicle might be able to make use of one? Well, there are a couple of symptoms which you might want to look for.
- Lift the front tires off the ground and then try grabbing each half shaft of the front axle and slowly turn it through a full rotation. If you feel any binding in the CV joints at this full droop condition, that is your CV joints telling you that they are hitting their angle limit. Also try this with the wheels straight ahead and at full steering lock to test all cases. A CV joint that binds up under load can easily snap on the trail.
-
If you find your CV joint boots are wearing out unusually fast, that
can be a sign of too much angle. Easy check is to examine the upper
ribs of outer CV joint and the lower ribs of the inner CV joint and see
if they are being pinched hard together on the top/bottom side of the
boots. If so, and especially if you have the stock front differential
disconnect (ADD) system and your CV joints are spinning all the time,
this can cause the ribs to wear against each other and eventually wear
through the material and cause the boot to fail. Usually the more ribs
that are touching, the less ideal the CV joint angle is.
- One other fix you can try for boots wearing out is to install manual locking hubs, if you currently do not have that type of hub. With manual locking hubs, unlocked, your CV joints will not be turning all the time like they do with the ADD type drive flanges. On the '95 and earlier trucks (torsion bar front suspension), this is a simple matter of swapping in manual hubs in place of the drive flanges. On the '96 and later trucks (coil spring front suspension) this is a more involved swap as you need to change out more of the front end parts. You can search on any of the popular Toyota web forums for details on doing this swap.
- Another fix for the boot wear issue is to slide the end of the affected CV boot farther along the axle shaft and then glue/clamp it in that slightly stretched location. Search for "Boot Slide Mod" on any of the popular Toyota web forums for details on this simple modification. Essentially you are just stretching the CV boot out a little to pull the ribs apart so they are not rubbing all the time. You don't want to stretch the boot too far or the ribs on the other side may be over stretched and tear.
- Another potential solution is to keep the CV boots clean and lubricated with a dry silicone spray periodically. This will help to keep the friction between the boot ribs to a minimum and keeping grit off of them will help with the abrasion.
- If you find your CV joints are wearing out or breaking more frequently than before you installed the suspension lift, this may also be a sign of the need to reduce the CV joint angles with a differential drop kit.
A diff drop kit will not cause a lot of loss of front ground clearance. As is, the front diff sits higher than the sub-frame/cross members and the diff drop will lower the diff down about to the level of the sub frame/cross member. And the diff. housing is made of pretty thick material to can stand up to a decent amount of abuse. After all, look at your rear differential, it hangs down lower in back. Now, if you have, or plan to install, a front suspension cross member, a diff. drop kit probably will not work, as that cross member will be in the way of lowering the front diff.
And, a related question that is quite common is should I order a diff. drop kit with my mild suspension lift kit? Again, it all depends, on your vehicle, on what you plan to use the vehicle+lift for and what amount of lift you plan to go with.
-
Your vehicle and the condition of the front drive axles will influence
the need for a diff. drop kit.
- If your CV joints are in good shape and have lots of extra travel left in them, you may be fine. If your CV joints are worn out or are already operating near their angle limit, then you may need a diff. drop.
- If you have manual locking hubs and leave them unlocked for the majority of the time, you may be fine without a diff. drop kit. If on the other hand you have automatic differential disconnect (ADD) front end and the CV axles spin all the time, you might need a diff. drop.
- Of course, if you have a 2WD vehicle, no need for a front diff. drop as you don't have a front diff.
-
The times a front diff. drop kit comes into play is when the front
suspension is at full droop. That is the CV axles are at their greatest
angle and thus most likely to bind up.
- Now if you only plan to operate the vehicle on pavement or at most on flat gravel and dirt roads, you may be fine without a diff. drop kit. I can't remember the last time I lifted a front tire while driving on pavement.
- If you intend to off-road the truck and especially if the terrain leads to frequent "wheel in the air" type of situations, a diff. drop may help reduce the chances of a CV joint binding by lessening the angle and load on the CV joint.
- With many front suspensions being adjustable, you can raise or lower the front ride height to suit your needs. If you raise it to the max., chances are you may need a diff. drop kit.
How can I check if a diff. drop kit will fit my truck?
It is fairly easy to check if a diff. drop kit will fit on your truck in case you are concerned about fitment, especially with non-stock lift or suspension parts installed. All you need is a ratchet and socket set and a floor or bottle jack. Simply locate the two vertical mount bolts that attach the front differential to the frame. On the earlier 4WD Pickup/Hilux and 4Runner/Hilux Surf models, those two bolts will be behind the differential. On the later model 4WD Tacoma and 4Runner vehicles, the two bolts will be in front of the differential. There are also horizontal bolts that will attach the differential to the frame on the opposite side of the differential as the vertical bolts, these will not be touched. So, to check, simply place the jack under the front diff so it is close to contacting the housing. Then loosen and remove the two vertical bolts and let the differential drop down with the jack until you have a 1" gap between the frame bracket and rubber bushing on the differential housing. That is how far down the diff. drop kit will lower your front differential. If all is clear, you are good to go. If you find something like the sway bar or skid plate is in the way, see the deluxe diff. drop kit options to address those issues. If you find something like an aftermarket cross member or suspension brace is in the way, then a diff. drop may not be suitable. One option in that case is that we can make a custom sized drop spacer if perhaps 1/2" or 3/4" drop would fit.
What if there is no front diff. or sway bar drop kit for my vehicle?
What if we don't offer a diff. or sway bar drop kit for your vehicle? Well, if you have gotten this far, simply measure the length and diameter of the two mounting bolts and if you think a 1" tall x 2" diameter drop spacer will fit, we'll be happy to look into offering a custom kit for your application.
And for the sway bar, we'll need to know how it is attached to the frame of the vehicle. Usually there is a pair of metal brackets that hold a bushing through which the sway bar held. If those two brackets are bolted up underneath the frame, then a sway bar drop kit is possible. We'll need to know the size of the bolts used; length, diameter and thread pitch. Then we'll need to know what the spacing between the two bolts is as well as the rough dimensions of the bracket (length and width). For the bolt holes, a center-center distance is what we need and if those bolts are not in a line, we'll need a rough idea of the offset of the two holes. So an example might be the bracket is 90mm x 35mm and the bolts are 8mm (1.25mm thread pitch), 25mm long, holes are 65mm apart in the long direction and offset 10mm from each other in the short dimension. On the offset, that could also be stated as the holes being offset 5mm on each side of the center line (for a total of 10mm offset). Some things to watch for is that some vehicles use welded in studs instead of bolts, so in that case, it will be difficult to install much of a spacer atop the stud, but we may be able to design something to work with that.
All the kits we currently offer were developed in this same way, someone asked for the kit, supplied us with the basic dimensions and the rest is history. So if you are willing to do a little measuring on your vehicle, we'll be happy to design and build you a custom diff. or sway bar drop kit as long as it is a suitable application. Realize the vehicle manufactures do not provide us with a handy table of all these dimensions. And they don't inform us when they make changes to a particular model vehicle. They may change suppliers of parts and those parts may have different dimensions and as long as the part works on the vehicle it was intended for, the vehicle mfg. is happy. However, when it comes to adding something to your vehicle like a diff. or sway bar drop bracket, you need to make sure and get the proper sized part and the only way to know for sure is to check the part you intend to modify before ordering and see if it matches what we have to offer. If in doubt, contact us with the measurements of your part and we can check to see if that hatches one of our existing designs.
How do I know if a sway bar drop kit is needed?
A quick way to check the sway bar geometry is simply to look at the ends of the bar where it attaches to the suspension via the end links. Ideally, the end links should be plumb vertical and the sway bar ends horizontal when the vehicle is sitting on level ground. The reason for this is the way the sway bar works is that is resists the tendency of the body to sway or roll to the outside in a turn. When you go around a turn at speed, the centrifugal forces through the center of gravity of the vehicle produce an outward force which loads up the out-side suspension and takes weight off the in-side suspension. This is the cause of the lean you feel and see when you make a turn. The sway bar, being attached to both sides of the suspension is forced up on the out-side and forced down on the in-side and the bar in the center twists to resist that uneven loading and keep the body more level that it would otherwise be. Now if the bar ends start out horizontal at rest, then you'll equal up and down twisting on the ends in a turn and you'll get maximum roll stability. If on the other hand the bar ends are already angled downward due to a suspension lift, then you'll find the the two ends of the bar will be twisted at differing angles, one down more and one down less. This results in less roll stability and thus more body lean in the same turn. Since the sway bars are typically attached to the frame in the center portion, by lowering that attachment point, you can help restore the end of the bar towards horizontal. Also, note that the bar ends only attach part way out on the suspension, perhaps mid-way between the pivot point and the wheel, so they only see about half the actual height of the suspension lift. So a one inch sway bar drop spacer is good for compensating for a few inches of suspension lift.
[Return to the top of this page]
After 25 years in operation, it's time to close up shop and move on to other adventures. Thanks to all the loyal customers over the years that helped to make this all possible. The web site will remain live. If you have any Toyota or 4x4 related questions, feel free to drop me an e-mail and I'll try to answer.
On-line Ordering:
Two main versions of the front differential drop kit are available, machined from billet T6061 aluminum - and as always Made in the USA :
-
For torsion bar front suspension models listed below:
-
For 1986-1995 Toyota 4Runner 4WD
Pickups/Hilux/4Runner/Surf models with torsion bar IFS
- Also for 1996 and later non-US model Toyota Hilux and Hilux Surf models with torsion bar independent front suspensions
- May fit T-100 pickups with slight modification to the rear cross member that sits under the front differential, see instructions.
- These vehicles have original differential mounting bolts about 4" (100mm) long
-
For 1986-1995 Toyota 4Runner 4WD
Pickups/Hilux/4Runner/Surf models with torsion bar IFS
-
For models with coil spring IFS listed below:
- For 1995.5-2004 Toyota Tacoma and 1996-2002 Toyota 4Runner / Hilux Surf and now sway bar drop kits for the Tundra pickup/Sequoia models
- For the 4Runner/Tacoma models, these vehicles have original differential mounting bolts about 7" (175mm) long
- Also available are sway bar drop kits for the above vehicles.
Please be sure to order the right kit to match your vehicle. The "IFS" kits fit the torsion bar front suspension 4WD Pickup/Hilux and 4Runner/Hilux Surf models up through 1995 (in the US anyway). Outside the US, the kits will typically also fit the 4WD Hilux pickups with the torsion bar front suspension. Aside from the suspension, the other distinguishing feature is that the two vertical retaining bolts for the front differential are behind the differential.
The other diff. and sway bar drop kits are for the coil sprung front suspensions on the 3rd gen 4Runner and Tacoma pickups. The two kits are not interchangeable between those generations.
The various differential and sway bar drop kits can be combined for shipping with other parts ordered with the multiple item order form. For international shipping, be advised that there are weight limitations in certain size packages that preclude combined shipping. For example with the ball joint spacers (3 lbs.) plus the IFS diff+sway bar drop kit at ~2 lbs., this exceeds the 4 lb. small package weight limit for USPS shipping. Two options are to place into a medium flat rate box, or of course the order can be shipped in two packages, both under 4 lbs.
[Return to the top of this page]1995.5-2004 Toyota Tacoma and 1996-2002 Toyota 4Runner / Hilux Surf models:
We have a limited stock of items such as:
- Steering Extensions
- Driveshaft Spacers
- Upper Control Arm braces for 2WD Toyota pickups
- Weld-on Cab / Body Mount brackets
- Seat Lift kits
- Starter Solenoid Contacts
- Bilstein Shocks for VW pickups
- H4 switched power headlight relay harness
-
Some customers have reported issues with the Paypal order buttons while using the Safari web browser on an iPhone.
- If so, try a different browser and see if that works better.
| 4Crawler Offroad contact link | MissingLinkZ contact link |
Check out our growing collection of on-line design information so that you can make your own parts. Maybe you have a neighbor or acquanitance that can help or check out a local maker space or adult education machining class. Or engage a local or on-line machine shop to make them for you. Before you ask, no, we're not making any more of these items, rather we wanted to empower YOU to be able to make your OWN custom parts.
You'll find designs for body lift, suspension components and more, below:
- Thingiverse
- Printables
- Cults3D
- Maker World/BambuLab
-
GitHub
-
Includes RockSliderz and IFS Frame Brace designs
There's a wide selection of on-line 3D Printing and Machine Shop services available today. A few that we've heard of:
- Xometry.com, ProtoLabs.com, Mfg.com, eMachineShop.com, Hubs.com, RapidDirect.com, RenovoCNC.com, PartsBadger.com, ProtoTek.com, FicTiv.com, Jlc3DP.com, PCBWay.com, SendCutSend.com, etc.
-
Many of our model files use OpenSCAD and if you need to convert those to other CAD formats, use FreeCAD.
- Simply import the OpenSCAD file into FreeCAD then export it in the desired CAD format the on-line shop requires.
If you have a 1995 or earlier Toyota 4WD pickup or 4Runner, these parts WILL NOT FIT, order one of the IFS kits.
- SOLD-OUT:
-
We've released the 3D CAD files for these kits so you can make your own
- Or you can find many diff drop kits on Amazon
- Basic kit (drop spacers+longer Grade 8 h/w p/n: DiffDropBasic) US$34.00
- Deluxe kit (basic kit + Grade 8.8 skid plate h/w, p/n DiffDropDlx) US$39.00
- Or you can find many diff drop kits on Amazon
| Basic Diff Drop Kit | Deluxe Diff Drop Kit |
 |
 |
| SOLD-OUT - US Delivery | SOLD-OUT - US Delivery |
# # # # # # # # # # # # . |
# # # # # # # # # # # # . |
| SOLD-OUT - Canada Delivery | SOLD-OUT - Canada Delivery |
# # # # # # # # # # # # . |
# # # # # # # # # # # # . |
| SOLD-OUT - Int'l Delivery | SOLD-OUT - Int'l Delivery |
Notes:
- Your order will be shipped via Priority Mail with a delivery tracking number provided at time of shipment
- Shipping weight approx. 2.5 lbs.
- Please be sure to double check your shipping address, both that it is correct and that it is able to receive US Mail deliveries.
Order the basic kit if you do not have a factory skid plate (or intend to remove yours) and order the deluxe kit if you have the factory skid plate as it will need to be lowered to install the differential drop kit. You may also be able to elongate the holes in the factory skid plate to accommodate the diff. drop without the added spacers of the deluxe kit.
Front Sway Bar Drop Kits:
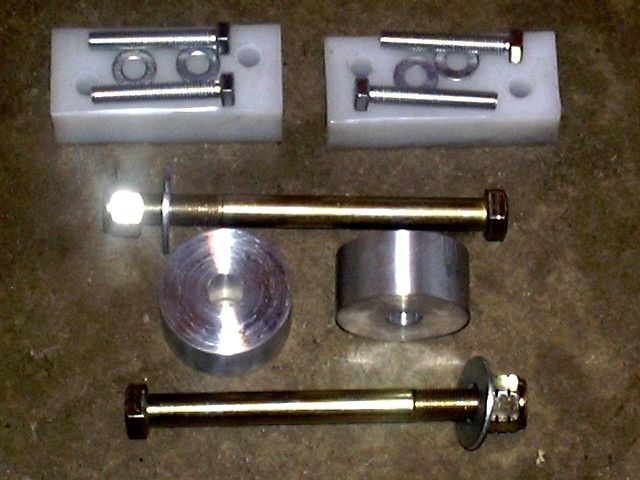
Below are front sway bar drop kits for use on the 1996-2002 Toyota 4Runner / Hilux Surf and 1995.5-2004 Toyota Tacoma vehicles. These will work with the 4WD and PreRunner model vehicles. Note that the Tacoma (2-3/4" center-center, 7/16" offset) and 3rd gen 4Runner (3" center-center, 7/16" offset) sway bar brackets have a different bolt hole spacing (as noted), so be sure to specify which type you need below, and feel free to double check your bolt hole spacing to see if it matches the above dimensions. If not, a custom sway bar drop bracket may be possible. Also note that this drop kit is designed to work with sway bar brackets that either attach with a pair of 8mm bolts or a bolt and stud where there is at least 1" of thread exposed on the stud past the end of the nut. Pictured below is the original white UHMW polyethylene spacers, we are now using a black UHMW at customer request.
Also available for Toyota Tundra pickups/Sequoia.
We have a limited stock of items such as:
- Steering Extensions
- Driveshaft Spacers
- Upper Control Arm braces for 2WD Toyota pickups
- Weld-on Cab / Body Mount brackets
- Seat Lift kits
- Starter Solenoid Contacts
- Bilstein Shocks for VW pickups
- H4 switched power headlight relay harness
-
Some customers have reported issues with the Paypal order buttons while using the Safari web browser on an iPhone.
- If so, try a different browser and see if that works better.
| 4Crawler Offroad contact link | MissingLinkZ contact link |
Check out our growing collection of on-line design information so that you can make your own parts. Maybe you have a neighbor or acquanitance that can help or check out a local maker space or adult education machining class. Or engage a local or on-line machine shop to make them for you. Before you ask, no, we're not making any more of these items, rather we wanted to empower YOU to be able to make your OWN custom parts.
You'll find designs for body lift, suspension components and more, below:
- Thingiverse
- Printables
- Cults3D
- Maker World/BambuLab
-
GitHub
-
Includes RockSliderz and IFS Frame Brace designs
There's a wide selection of on-line 3D Printing and Machine Shop services available today. A few that we've heard of:
- Xometry.com, ProtoLabs.com, Mfg.com, eMachineShop.com, Hubs.com, RapidDirect.com, RenovoCNC.com, PartsBadger.com, ProtoTek.com, FicTiv.com, Jlc3DP.com, PCBWay.com, SendCutSend.com, etc.
-
Many of our model files use OpenSCAD and if you need to convert those to other CAD formats, use FreeCAD.
- Simply import the OpenSCAD file into FreeCAD then export it in the desired CAD format the on-line shop requires.
- SOLD-OUT - Pricing:
-
We've released the 3D CAD files for these kits so you can make your own
- Or you can find many sway bar drop kits on Amazon
- US$14.00 for the basic sway bar drop kit w/ Grade 8.8 mounting hardware (p/n: SwayBarDrop)
- Or you can find many sway bar drop kits on Amazon
|
| ADD ON to a diff. drop kit order |
| # # # # # # # # # # # # |
| SOLD-OUT - US Delivery |
| # # # # # # # # # # # # |
| SOLD-OUT - Canada Delivery |
| # # # # # # # # # # # # |
| SOLD-OUT - Int'l Delivery |
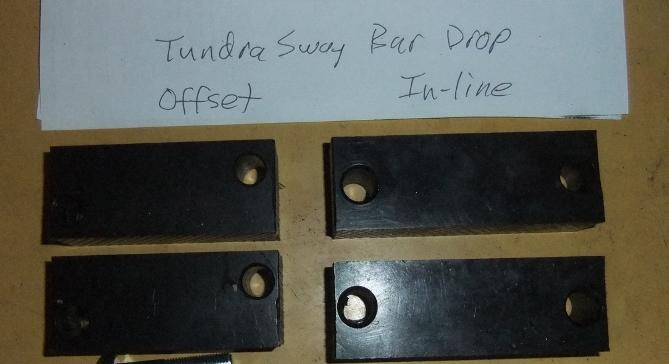
New front Sway Bar drop bracket kits for the Toyota Tundra pickup/Sequoia:
And now for the Toyota Tundra pickup/Sequoia models that use the larger 10mm (14mm head size) or 12mm (17mm head size) mounting hardware for the sway bar brackets, we now have 1" sway bar drop kits for those vehicles. Be sure to check the bolt size on your truck, M10 is a a bit larger than 3/8" and the smaller M8 (12mm head size) hardware like the Tacoma pickups use is about 5/16" and 12mm is just shy of 1/2". The kit will come with a pair of 1" tall UHMW spacers to lower the sway bar brackets, 4 - M10 bolts, about 50mm long or 4 - M12 bolts about 60mm long.
Some of the Tundra and Sequoia sway bar brackets have a stud on one one side with a nut and then use a bolt on the other side with a nut welded to the bracket. You'll need to remove the studs, that are spot welded to the bracket, prior to installing the drop spacer with longer bolts. You'll be re-using the original nut that screwed on the stud as well as the welded on nut with the new bolts. Now, if you find that your Tundra/Sequoia uses 8mm bolts instead of 10mm, you can order the 3rd gen. 4Runner sway bar drop kit above and that has the same bolt hole spacing as the 10mm Tundra/Sequoia but uses 8mm bolts. Also, the kit in the first row is for vehicles with offset mounting holes in the sway bar bracket.
If your vehicle has in-line mounting holes and the mounting bolts are ~1/2" (12mm) in diameter, you'll need to order the 12mm bolt kit that is the 2nd row of order buttons. This sway bar bracket has been observed on some 2012 models, so best to check your bracket before ordering. The 10mm bolt bracket has a pair of holes approx. 3" (75mm) center-center distance and offset about 3/8" (10mm) from each other. The 12mm bolt bracket has a pair of in-line bolt holes 3-3/4" (95mm) center-center distance. We are sorry that Toyota has made the sway bar drop brackets so different, but that is the way they do things. Be sure to check which type of sway bar mounting bracket is on your truck prior to ordering.
- Shipping cost/time via USPS Priority Flat Rate Envelope:
We have a limited stock of items such as:
- Steering Extensions
- Driveshaft Spacers
- Upper Control Arm braces for 2WD Toyota pickups
- Weld-on Cab / Body Mount brackets
- Seat Lift kits
- Starter Solenoid Contacts
- Bilstein Shocks for VW pickups
- H4 switched power headlight relay harness
-
Some customers have reported issues with the Paypal order buttons while using the Safari web browser on an iPhone.
- If so, try a different browser and see if that works better.
| 4Crawler Offroad contact link | MissingLinkZ contact link |
Check out our growing collection of on-line design information so that you can make your own parts. Maybe you have a neighbor or acquanitance that can help or check out a local maker space or adult education machining class. Or engage a local or on-line machine shop to make them for you. Before you ask, no, we're not making any more of these items, rather we wanted to empower YOU to be able to make your OWN custom parts.
You'll find designs for body lift, suspension components and more, below:
- Thingiverse
- Printables
- Cults3D
- Maker World/BambuLab
-
GitHub
-
Includes RockSliderz and IFS Frame Brace designs
There's a wide selection of on-line 3D Printing and Machine Shop services available today. A few that we've heard of:
- Xometry.com, ProtoLabs.com, Mfg.com, eMachineShop.com, Hubs.com, RapidDirect.com, RenovoCNC.com, PartsBadger.com, ProtoTek.com, FicTiv.com, Jlc3DP.com, PCBWay.com, SendCutSend.com, etc.
-
Many of our model files use OpenSCAD and if you need to convert those to other CAD formats, use FreeCAD.
- Simply import the OpenSCAD file into FreeCAD then export it in the desired CAD format the on-line shop requires.
 |
| Tundra /Sequoia offset 10mm and in-line 12mm kits |
- Front sway bar drop kit w/ offset 10mm bolts: US$19.00
- Front sway bar drop w/ in-line 12mm bolts: US$29.00
| Sway bar drop kit w/ offset 10mm bolts | Sway bar drop kit w/ offset 10mm bolts |
| SOLD-OUT - US Delivery | SOLD-OUT - Int'l Delivery |
| Sway bar drop kit w/ in-line 12mm bolts | Sway bar drop kit w/ in-line 12mm bolts |
| SOLD-OUT - US Delivery | SOLD-OUT - Int'l Delivery |
Notes:
- Returns and exchanges
- Cancellation Policy
- Sway bar bracket and bushing (pictured above) not included
- Your order will be shipped via Priority Mail with a delivery tracking number provided at time of shipment
- Shipping weight approx. 3/4 lbs.
- International orders will be shipped via Priority Mail International, 6-10 days delivery time typical.
- Please be sure to double check your shipping address, both that it is correct and that it is able to receive US Mail deliveries.
1986-1995 Toyota 4Runner 4WD, Pickup, Hilux, Hilux Surf models:
Apparently 4Crawler Offroad came up with a quite useful product when we first developed the IFS differential and sway bar drop kits. Nobody else in the industry offered such a product and we designed this at the request of the customer base. Now it seems that several other companies have used our design to come up with their own offerings. So apparently the saying "Imitation is the sincerest form of flattery" applies here as well! In fact we have noticed that some of the online auction sellers of IFS diff. drop kits are selling almost exact duplicates of our product and we even know now that they ordered one of our kits and copied it. We say "almost exact duplicates" because they missed one minor, but crucial aspect of the our design in their copy. We mention that difference in the installation instructions, but in order to not make it easy for the competition to find that aspect of the design, we'll not describe it here. But it sure makes it easy to offer low prices when your R&D budget is negligible - as in you steal all your new designs. Oh, and to top it off, they even our plagiarized our installation instructions, nearly verbatim, even down to the punctuation. If these guys were writing these instructions for a college paper, their professor would likely fail them for plagiarism.
| Option | Width in. | Width mm | Layout |
| PU | 2-5/8" | 67mm | Offset |
| 4R-N | 2-3/8" | 60mm | Offset |
| 4R-S | 2-5/8" | 67mm | Offset |
| 4R-W | 2-7/8" | 73mm | Offset |
| T100 | 2-3/4" | 70mm | Inline |
We have a limited stock of items such as:
- Steering Extensions
- Driveshaft Spacers
- Upper Control Arm braces for 2WD Toyota pickups
- Weld-on Cab / Body Mount brackets
- Seat Lift kits
- Starter Solenoid Contacts
- Bilstein Shocks for VW pickups
- H4 switched power headlight relay harness
-
Some customers have reported issues with the Paypal order buttons while using the Safari web browser on an iPhone.
- If so, try a different browser and see if that works better.
| 4Crawler Offroad contact link | MissingLinkZ contact link |
Check out our growing collection of on-line design information so that you can make your own parts. Maybe you have a neighbor or acquanitance that can help or check out a local maker space or adult education machining class. Or engage a local or on-line machine shop to make them for you. Before you ask, no, we're not making any more of these items, rather we wanted to empower YOU to be able to make your OWN custom parts.
You'll find designs for body lift, suspension components and more, below:
- Thingiverse
- Printables
- Cults3D
- Maker World/BambuLab
-
GitHub
-
Includes RockSliderz and IFS Frame Brace designs
There's a wide selection of on-line 3D Printing and Machine Shop services available today. A few that we've heard of:
- Xometry.com, ProtoLabs.com, Mfg.com, eMachineShop.com, Hubs.com, RapidDirect.com, RenovoCNC.com, PartsBadger.com, ProtoTek.com, FicTiv.com, Jlc3DP.com, PCBWay.com, SendCutSend.com, etc.
-
Many of our model files use OpenSCAD and if you need to convert those to other CAD formats, use FreeCAD.
- Simply import the OpenSCAD file into FreeCAD then export it in the desired CAD format the on-line shop requires.
SOLD-OUT - Pricing:
-
We've released the 3D CAD files for these kits so you can make your own
- Or you can find many diff drop kits on Amazon
- IFS diff drop basic kit w/ Grade 8 mounting hardware (p/n: IFSDiffDropBasic) is US$29.00
- IFS sway bar drop kit with Grade 8.8 mounting hardware (p/n: IFSwayBarDrop) is US$14.00
- - Note: sway bar bracket/bushing not included
- IFS diff drop deluxe kit (IFSDiffDropBasic + IFSwayBarDrop, p/n: IFSDiffDropDlx) is US$39.00
- Or you can find many diff drop kits on Amazon
| IFS Diff. Drop Basic | IFS Sway Bar Drop | IFS Diff. Drop Deluxe |
|
|
 |
| SOLD-OUT - US Delivery | SOLD-OUT - US Delivery | SOLD-OUT - US Delivery |
# # # # # # # # # # # # . |
# # # # # # # # # # # # . |
# # # # # # # # # # # # . |
| SOLD-OUT - Canada Delivery | SOLD-OUT - Canada Delivery | SOLD-OUT - Canada Delivery |
# # # # # # # # # # # # . |
# # # # # # # # # # # # . |
# # # # # # # # # # # # . |
| SOLD-OUT - Int'l Delivery | SOLD-OUT - Int'l Delivery | SOLD-OUT - Int'l Delivery |
Ordering notes:
- Your order will be shipped via Priority Mail with a delivery tracking number provided at time of shipment
- Shipping weight approx. 2. - 3 lbs. depending on kit.
- Please be sure to double check your shipping address, both that it is correct and that it is able to receive US Mail deliveries.
- Sway bar bracket and bushing (pictured above) not included
-
Which kit to order?
- Order the basic kit if you do not have a front sway bar or intend to remove it.
- Order the deluxe kit if you have a front sway bar as it will need to be lowered with the differential drop kit.
-
The sway bar drop kit is available separately and can be
used with other differential drop or suspension lift kits to lower the
front sway bar for better operation.
- You can even make use of the sway bar drop kit if you have simply cranked up the stock torsion bars over an inch.
- Bolt hole spacing is approx. 2.5" (63mm) and offset approx. 3/8"(10mm) if you want to check fitment prior to ordering.
-
IMPORTANT:
-
Some rare vehicles will have one or both of the stock diff mount nuts
welded to the upper cup on the frame bracket (less than 1 in 100
vehicles - in fact we have only encountered 5 such vehicles in the
years we have been shipping these kits). If you think yours may be
welded, an extra long bolt kit is available that lets you run the diff
drop bolt through that welded in place nut and then put a new lock nut
on top of the stock nut.
-
If you think you need the extra long bolt(s), add a note to seller in
the order form to indicate this requirement and indicate how many
longer bolts you'll need (1 or 2).
- Easy to check for this by simply breaking each of the vertical differential mounting bolts loose and feel up on top of the nut is loose or not. If the nut is not loose, it is likely welded in place.
- Or if you find you need the extra long bolt after ordering, you can usually pick up a 1/2"x5-1/2" bolt at the local hardware store or you can order one/two bolts below. Over the years we have used both fine (20tpi) and coarse (13tpi) threaded bolts, so let us know which type you have:
-
And why do we not use a longer, stock threaded bolt?
- The main reason is that with the drop spacer installed, the bolt angle is not perfectly vertical and it'll be very hard to get the longer bolt threaded into that welded nut without cross-threading and stripping out the nut. Also, that extra long, fine threaded metric bolt, if available, is very expensive, so would increase the cost of every kit, whether it is needed or not.
- So by using a slightly smaller diameter bolt, you can pass the bolt through the welded nut and install a new nut on top without the problems of cross threading.
-
If you think you need the extra long bolt(s), add a note to seller in
the order form to indicate this requirement and indicate how many
longer bolts you'll need (1 or 2).
-
Some rare vehicles will have one or both of the stock diff mount nuts
welded to the upper cup on the frame bracket (less than 1 in 100
vehicles - in fact we have only encountered 5 such vehicles in the
years we have been shipping these kits). If you think yours may be
welded, an extra long bolt kit is available that lets you run the diff
drop bolt through that welded in place nut and then put a new lock nut
on top of the stock nut.
| SOLD-OUT - Longer Bolt(s) - US shipping | SOLD-OUT - Longer Bolt(s) - Int'l shipping |
[Return to the top of this page]
Installation Instructions:
|
|
 |
| A: Stock Setup | B: Drop Spacer Installed | C. T-100 rear cross member |
Allow approximately 30 minutes for the installation, assuming you don't run into any rusted or damaged fasteners. You'll need an assortment of wrenches and/or sockets plus a torque wrench to tighten the differential mounting bolts. Read through the instructions below to familiarize yourself with the steps involved. Note these instructions cover installation on both:
- 3rd Gen 4Runner and Tacoma vehicles (highlighted in RED)
- 2nd/3rd Gen 4WD pickups and 1st/2nd Gen 4Runners (highlighted in GREEN)
- As well as the Sway Bar Drop Bracket kit installation
and cover installation of all components. Depending on your vehicle type and kit ordered, you may not need to do every step listed below:
-
For Tacoma and 3rd gen 4Runner / Hilux Surf:
-
Remove both skid plates under the front of
the vehicle
- Save the OEM bolts, a total of nine 12mm bolts
-
Remove both skid plates under the front of
the vehicle
- Support the differential with a floor jack, if needed.
-
Remove factory bolts and nuts, supporting the front
(or rear) of the differential
- See picture A above for the stock configuration
- Save the OEM washers for re-installation
- Lower differential far enough to allow insertion of the 1" drop spacers
-
Install the 1" spacers between the two front
(or rear) differential supports and
cross-member
-
See picture B above
- On the '95 and older vehicles, if one spacer is taller than the other, install that on the farther back differential mount.
-
Fasten to cross-member using new 1/2" bolts and nuts (making sure
to reuse the factory washers, if possible. If that's not possible, use
the washers supplied with the bolts. You can also use those washers to
increase the drop of the spacers by stacking them above the spacers.
-
We recommend that you test fit the nuts and bolts by hand prior to
installing them to make sure the threads are clean and the nuts screw
on and off easily.
- Sometimes the bolt threads might have been nicked in shipping, so make sure to check the fit of the nuts and bolts before you install them.
- Once installed, you'll be working in a cramped space getting the bolt threaded into the nut, so knowing that it should go on easily beforehand will be helpful.
- If the stock washers hang up on the bolt threads, try dropping the bolt, head first, into a length of tubing or between the jaws of a vise, so that its hanging from the washer. Then use a hammer to drive the bolt out of the washer
-
Some rare vehicles will have one or
both of the stock diff mount nuts welded to the upper cup on the frame
(way less than 1 in 100 vehicles). If you think yours may be, an extra
long bolt kit is available that lets you run the diff drop bolt through
that welded in place nut and then put a new lock nut on top of the
stock nut.
- If you think you need the extra long bolt(s), add a note to seller in the order form to indicate this requirement.
- Or if you find you need the extra long bolt after ordering, you can usually pick up a 1/2"x5-1/2" fine thread bolt at the local hardware store or you can order one for US$8.00 (including US shipping or $20.00 international)..
-
We recommend that you test fit the nuts and bolts by hand prior to
installing them to make sure the threads are clean and the nuts screw
on and off easily.
-
Tighten to the factory specifications, consult the Factory Service Manual for torque
specifications
- If you don't have the factory specs, 50 ft.lbs. (68 Nm) should be adequate for this size bolt and note that our bolts use nyloc nuts, so they do not need as high a torque as the FSM lists since the lock nut will hold the nut in place as opposed to a very high torque.
-
See picture B above
-
For Tacoma and 3rd gen 4Runner / Hilux Surf:
-
Install the front skid plate using three
(3)OEM bolts on the front and two (2) new 8mm bolts and spacers in the
rear
- The back of the front skid plate will need to be spaced down to clear the now lower differential.
-
If needed, you may need to
elongate the holes about 1 hole diameter, so consider drilling a small
pilot hole next to the existing hole, then enlarge it and trim out the
metal in between the two holes
- The holes may need to be elongated/enlarged because the skid plate is not resting at an angle and thus the diagonal distance between the mounting bolts is longer than when it was resting flush.
- Or you may be able to elongate those bolt holes if you ordered the basic kit..
- DO NOT TIGHTEN YET
-
To install the rear skid plate, elongate the
rear mounting holes, again if needed, with a round file or drill bit
for fitment
- You may need to elongate the holes about 1 hole diameter, so consider drilling a small pilot hole next to the existing hole, then enlarge it and trim out the metal in between the two holes
- Once holes are elongated, mount rear skid plate with OEM M8 bolts
-
Torque all skid plate bolts to the factory
specifications
- Consult the Factory Service Manual for torque specifications
- If you don't have the factory specs, 10-12 ft.lbs. ((13-15 Nm) should be adequate for this size bolt
-
Install the front skid plate using three
(3)OEM bolts on the front and two (2) new 8mm bolts and spacers in the
rear
- For the T-100, there may be a factory rear cross member located behind and underneath the back of the front differential. If so, it will need to be modified to allow clearance for the dropped differential. You can see the image (C) above with a modified cross member. This can be done by notching it out or bending it slightly to allow clearance for the back end of the front diff. You can see the way the rear cross member is bent/notched compared to the straight forward cross member in the photo. If you do not want to modify this item, you will not be able to install the diff. drop kit.
-
Sway Bar drop bracket
kit installation:
-
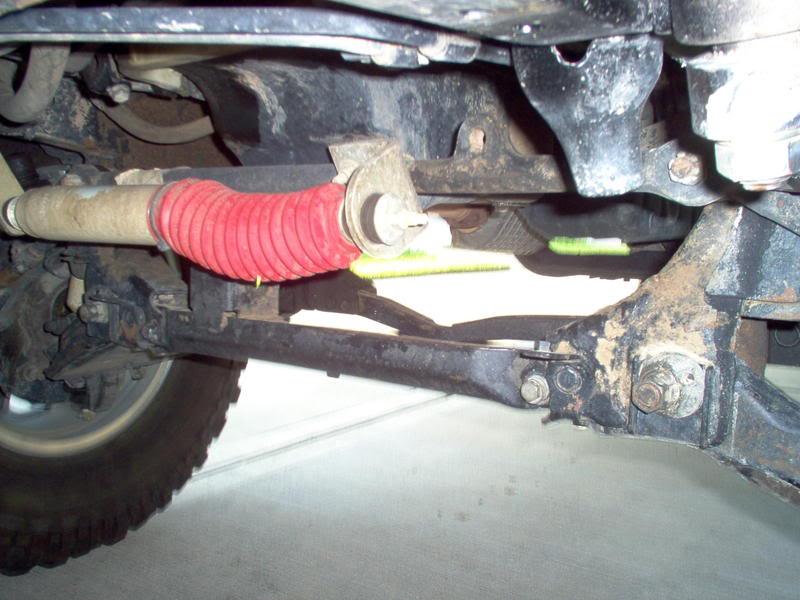
Remove the 4 bolts holding the stock sway
bar brackets to the frame (if present)
- Be careful removing the bolts, if they don't come out easily, spray some penetrating oil up inside the frame onto the ends of the bolts to help free them.
- Forcing the bolts too hard can break off the nuts welded up inside the frame
- On the Tundra pickup/Sequoia, there may be a stud spot welded to the sway bar bracket. Use a hammer to knock it loose and remove it, so the supplied longer bolt can fit through the hole the stud occupied. Be sure to save the nut you removed from the stud for use on the new bolt.
-
Insert the sway bar drop brackets between
the frame and the stock brackets and attach them back in place with the
longer bolts supplied.
- Use of an anti-sieze compound is a good idea.
-
Tighten the bolts until snug and until you just see the spacer start to
compress slightly with the larger diameter bolts.
- For the 8mm bolts, 9 ft.lb. is plenty
- For the 10mm and 12mm bolts, around 20 ft.lb. is plenty
-
The slight compliance in the UHMW spacer acts like a lock washer and
will maintain pressure on the bolt to prevent it from loosening.
- At 20 ft.lb. torque, you're appling about 2 tons of clamping force per bolt, that spacer and swar baracket won't be going anywhere.
- There's no point in over torquing the bolts, you run the risk of breaking the nuts loose that are welded inside the frame.
- Feel free to apply some thread lock compound to the bolts.
-
Remove the 4 bolts holding the stock sway
bar brackets to the frame (if present)
- After a few hundred miles of driving, its a good idea to re-check the bolts and make sure they are still tight.
-
Here are a few installation write-ups:
- http://www2.innevi.com/~chris/images/rbrown/ link seems to have vanished
- http://www.toyotasurf.asn.au/techsite/customsuspension.htm
-
http://www.tundrasolutions.com/forums/1gen-tundra/242778-sway-bar-spacer/
- Note that this write-up is for a DIY sway bar drop kit, so ignore the steps related to making the blocks and drilling out/threading the nuts as you won't need to do that.
- With the Tundra,/Sequoia some models may have studs welded to the sway bar brackets. You can put the bracket in a vise and use a hammer to break the spot welds that hold the stud to the bracket loose. Alternately, you can center punch the head of the stud and then use a drill bit to drill through most of the head to allow it to be removed.
 email: sales@4Crawler.com
[Last updated: 25.May.2026 ]
Visitor # since 04.OCT.2003