
2air/4air/6air Tire Inflator/Deflator System
After 25 years in operation, it's time to close up shop and move on to other adventures. Thanks to all the loyal customers over the years that helped to make this all possible. The web site will remain live. If you have any Toyota or 4x4 related questions, feel free to drop me an e-mail and I'll try to answer.
Contents:
[Return to my ForSale main page... ]Description:
Air pressure in your tires is the one of the most important factors that affect the performance of you vehicle off-road. Too much air and you loose traction, damage tires, break drive line components and have a rough ride. Too little air and you may loose a bead, pinch the tire between a rock and the rim, damage the rim, etc. With experience, you'll learn to choose the correct pressure for the type of terrain you'll be traveling over. However, knowing the pressure you want and getting the tire pressure in all 4 tires to that value is time consuming if you have to do one tire at a time. There are numerous products on the market that can speed the process for airing down, but none also help you when you air back up at the end of the trip.
You can now air down or up in one easy fast process, all 4 tires at once, with the 4air. Air down all four tires from 30 psi to 10 psi in about 90 seconds and assure exact tire pressure in each tire. Quickly air up all four tires at once, too. Sizes to fit most 4 wheel drive vehicles. This system is modeled after the Quadra-Flate system popular back in the mid-90s (no longer available), but has been refined after over 10 years of extensive field use. The 4air system will let you air up all your tires at the same time and maximize the air output of your air source. As soon as the first tire is connected to the air hose, air will be flowing from your air source into your tire. As you hook up each additional tire, air continues to flow to all connected tires with pressures equalizing automatically. So all the while you are moving from tire to tire connecting the hose, air is flowing. So the minute or so you spend connecting all the tires is used to pump air into your tires. And unlike using a single air hose to air up one tire at a time, you may be wasting that time between filling one tire and moving to the next one.
Sure, you may have an air tank in the system to let your compressor store air between tires, it is likely of a small capacity and as it fills, the pressure can rise quite high, cutting into your compressor output. An advantage of the 4air hose is that you are essentially using the tires as your air tank and tires are much larger than a typical air tank. What that means is that if you have a small "tank" and a large "tank", the pressure in the large tank will rise much slower than the small tank for a given flow rate. And look at any compressor flow vs. pressure rating and you'll see the flow drops off as the pressure rises. So if you have a small air tank in your system, its pressure might rise to 90 or 100 psi in between tires. For example the compressor we use in our shop truck puts out 2.2 CFM at 0 psi but that falls to 1.8 CFM at 30 and about 1.0 CFM at 90 psi. So if I take a minute to move from one tire to the next and the small 2 cu.ft. tank in the truck hits 90 psi, the compressor output falls to about 1 CFM, so at that point the compressor output has dropped in half. With the 4air system, airing up tires from say 8 psi to 30 psi, as each tire is connected initially, the pressure is low, down around 8 - 10 psi, so the compressor output remains fairly near it's maximum output, perhaps 2 CFM. So you can nearly double the effective air output by keeping the air pressure as low as possible for as long as possible. This also puts less load on your compressor motor (assuming electric) and keeps the heat buildup in the compressor itself, higher pressure = higher temperature. And if you have no storage tank with your compressor, then if you move from one tire to the next tire, the compressor will shut off and you get 0 CFM out of your compressor. Pretty simple to do the math there if the compressor is not running, you are not filling your tires.
This system has a number of benefits:
- Transfer air between tires or between vehicles
- Equalize pressure between tires on the same axle (important for lockers)
- Air up a low tire without use of a compressor
- Saves time and energy before and after the trail run
- Increase driving safety
- Get longer and more even tread wear on your tires
The 4air system is available in 3 standard sizes:
-
Small
- Up to 90" wheel base, e.g. Jeep CJ/TJ, Suzuki Samurai, Landcruiser FJ-40, Defender 90, etc.
-
Medium
- Up to 110" wheel base; e.g. Toyota 4Runner and short bed pickup, Jeep Cherokee, etc.
-
Large
- Up to 130" wheel base; Toyota Extra Cab, Landcruiser wagon, SUVs, etc.
-
Custom lengths (longer or shorter) are available, too.
-
Note that hose length is somewhat of a compromise.
- The shorter the better in terms of cost, weight, bulk, air flow rate and time you will spend uncoiling and coiling the hose over the years.
- Long enough to reach all the tires you want to air up or down is important, but making the hose longer than needed will make it harder to handle.
- The standard setups we offer are generally sized as the bare minimum lengths that will work on smaller vehicles commonly used for off-road driving. If you have a longer wheel base or a full sized, wider vehicle you will likely want to customize the hose lengths to fit your vehicle. You can use some rope or a garden hose to mock up what sort of hose lengths you might want to use. Lay out the hose/rope and use masking tape to mark where you would want the control valve/manifold and tee fittings and let us know.
-
If your vehicle is close to the maximum wheel base for a given hose or
if you have a full sized vehicle or have tires of 35" or taller,
you may need either extra width or extra length, be sure and check and
see what length hose system you might require:
- The standard hoses are set up with 56" of hose on either side of the control valve/manifold to the tee fittings. From there is a 24"(0.61m) stub hose to the front tire and then a 96"(2.43m)/116"(2.94m)/136"(3.45m) long hose to the rear tire (small/medium/large respectively).
- In the 2air systems, the small/medium/large hoses are set up like one side of the similar 4air hose, with one hose out of the manifold to a single tee fitting with one short and one long hose to reach the front and rear tires on one side of the vehicle.
-
The 2air-a system is set up like the front half of a 4air hose, with
one 56" hose segment off each side of the central manifold with a
tire chuck at the end of those two hose segments.
- You can add length to the front 56" segments for a wider vehicle or if you have a lot of front/rear overhang on the vehicle (i.e. at the end where you want to control the air valve from).
- You can add length to each of the stub hoses for larger tires; use 1/2 the tire diameter plus 1/2 the wheel diameter as a rough guide. For example a 36" tire on a 16" rim would be 18"to the hub plus 8" to the top of the rim, so that valve stem might end up 24" off the ground, which is the default stub hose length.
- You can add length to the long hose segment off the front tee for a longer wheel base. To determine the length you might want, add the vehicle's wheel base plus the diameter of the wheel (not the tire) since the worst case is if you stop with the rear valve stem all the way in back and the front valve stem all the way in front. So a vehicle with 128" wheel base and 16" wheels might want to use a 144" long rear hose segment, or round that up to 148" which is one foot (12") longer than the default 4air-l hose.
- In all cases of added hose length on the 4air systems, be sure and add the same hose to both sides, so figure out how much added length you want, then double that when ordering additional hose length, and leave a comment in the special instructions section of the order form to let us know where you want the additional hose length added (for reference 4air-l is 36 feet of hose in total).
- Add $1.50/ft. for standard hose (4air-ash) and $2.00/ft. for extreme duty hose (4air-aeh).
-
We can also add connections for additional
tires (dual wheel axles) or dual axles.
-
To accommodate the additional fittings, we add a pair of additional tee
fittings at the ends with stub hoses (typically 2' long) to service the
first set of tires then off the back of the tees, we can add a length
of hose with additional tire chucks for the 2nd set of tires. So we'll
need to know how much hose you need to have us add.
-
Cost for the additional set of tees and fittings will run $30.00 (order
item: 6air-tee) plus the cost of the additional hose (see above) and
the cost of the tire chucks desired.
- If ordering upgraded tire chucks or fittings for a 6air hose kit, be sure to order 1 ea. of the 4air-xxx and the 2air-xxx items in order to get a total of 6 upgrade chucks or fittings. For example to get 6 Euto-style chucks, order 1 - 4air-euc and 1 - 2air-euc, or 1 - 4air-edf and 1 - 2air-edf to get extreme duty fittings for a 6-way air hose.
- So for example, assuming you need 3.5' of hose from the tee to the rear most axle/tire, you would need 7' of additional hose on the two sides plus the additional 2' x 2 stub hoses, or 11' of total extra hose length, so $17.50 additional for standard hose or $22.00 additional for the extreme duty hose on top of the $30.00 for the additional tees and fittings.
-
Cost for the additional set of tees and fittings will run $30.00 (order
item: 6air-tee) plus the cost of the additional hose (see above) and
the cost of the tire chucks desired.
-
To accommodate the additional fittings, we add a pair of additional tee
fittings at the ends with stub hoses (typically 2' long) to service the
first set of tires then off the back of the tees, we can add a length
of hose with additional tire chucks for the 2nd set of tires. So we'll
need to know how much hose you need to have us add.
-
Note that hose length is somewhat of a compromise.
We also can make systems to handle 2 (2air), 4 (4air), 6 (6air) or more tires, as you need. Systems are designed to work with tires up to about 44" in diameter (thus 24" length of the stub hose at each tee fitting). The hose lengths are designed to accommodate the maximum wheel base in the size range above (including the worst case situation of having valve stems end up on opposite sides of the wheels), but can be used on vehicles with up to 15" longer wheel base if needed. Built with high-pressure 1/4" ID hose and uses 1/4" NPT threaded connections throughout for easy repair or modification. Quick release chucks at all tires provide hands-free airing up and down.
The standard configuration includes 2 - 56" long hoses from the central air manifold to the first tee, where a 24" long stub hose is attached to connect to the tires on that axle. This is setup works will for connecting to a front mounted air source. If you wish to use the 4air from a rear air source or you have a very wide axle or extra long front overhang, additional runner length is available, $1.50/ft. for standard hose (4air-ash), $2.00/ft. for extreme duty hose (4air-aeh). The 2air systems can be set up to handle tires on one side (2air-s, 2air-m, 2air-l) or on one axle (2air-a) of a vehicle depending on your requirements.
For emergency use, you can air up a low tire by connecting the 4air to the low tire and your spare or to one or more good tires. The air pressure will self-equalize. For example, with one flat tire and three good ones at 32psi, you should end up with four tires at 24 psi, which would be enough to get you home.
Most importantly, the 4air, unlike the Quadra-Flate, is designed for total flexibility. With the use of standard pipe thread fittings, it is possible to reconfigure the unit to meet your needs. We prefer an air chuck and Schrader valve on ours, but you may want a Schrader valve and a gauge, 2 wheels or 4 or 6. With quick disconnect air couplers, you can change configurations in the field. Automotive type air couplers are readily available at hardware and auto parts stores, or we can supply custom setups. We also carry a small kit of fittings (see pictures following) including flexible air hose, quick connect tire chucks, various combinations of air hose couplers, so if we find an air source, we can usually air up from it, otherwise we use our on-board air compressor.
Some folks may look at a 4air hose system as a frivolous accessory or "bling". When I first saw one, I too thought the same thing. But after having and using one for better than a dozen years now, I can tell you it is the one off-roading accessory that I carry in my truck that I do use each and every time I go off-road, in fact at least twice on every trip. Once to air down and once to air up at the end of the trail. The winch on my truck has been used maybe half a dozen times in that same period of time. The Hi-Lift jack maybe twice that many times, my on-board welder, a couple of times, etc. But that 4air bag is right on top and gets pulled out at the start of the trail and I am always waiting for the other folks to finish airing down their tires and the sam thing at the pavement at the end of the trail.
Regarding the ParksOffRoad.com review of the 4Air system, we have identified the source of the slow air up/down times to a faulty batch of tire chucks that were internally restricting air flow. We have since changed suppliers for those parts and now test each and every chuck for adequate air flow upon kit assembly. So there should no longer be any significant difference in the time to air up or down one tire vs. all 4, since the basic bottleneck (source of air flow restriction) is the Schrader valve on the tire and not what is connected to that/those valve/valves.
[back to the top]Specifications:
Standard 4air system includes:
- 2 side air hoses
-
4 air chucks
- Either the standard clip-on chuck
- Or optional clipless chuck
-
Solid brass air control valve
- With a male quick-connect coupling installed in the inlet/outlet
-
Schrader valve for checking pressure or airing up from a service
station compressor
- Also available in a one-sided and one-axle configuration - 2air (i.e. one air hose and 2 chucks)
- A pair of captive velcro straps for securing the coiled up air hose
2air/4air/6air options include:
-
Built-in air gauge (replaces the Schrader valve)
- Choice of 0-30psi, 0-60psi and 0-100psi analog gauges and a 0-100psi digital gauge (more information)
-
All gauges can be either screwed into the air manifold or can attach
via one of two quick disconnect options, 4air-qd1 or 4air-qd2
- The 4air-qd1 option uses a euro-style tire valve chuck on the gauge to allow it to be attached to the 4air manifold or to a tire, so you can use one gauge for all readings.
- The 4air-qd2 option uses a regular quick disconnect air coupler for a 100% secure and leak free connection of the gauge.
- If ordered with one of our air pressure guages, we'll install the chuck onto the gauge. Or, if you want to supply your own gauge, either quick disconnect will fit an air pressure gauge with a 1/4 in. pipe thread.
- With either of these two options, you could have 2 gauges, say a 0-30psi gauge for airing down (for better low pressure readings) and a 0-60psi or 0-100psi gauge for airing up if you need the higher pressure for the road.
-
All gauges will read the pressure continuously, including the digital
gauge, which also has a HOLD mode to take an instantaneous reading and
hold that reading in the display.
- Note that many digital tire pressure gauges only take a single reading and then you need to hit a reset button or disconnect/reconnect them to take another pressure reading, so having a continuous readout is a bit time saver if you are trying to zero in on a specific pressure in your tires.
- The digital gauge reads out to 0.1psi resolution, and reads down to about 2psi and uses a standard 9 volt battery and has an auto-off feature to conserve battery power and also has a back light option for night time use.
-
Quick disconnect air coupler for connecting to on-board air sources
such as listed here:
- Makes an excellent add-on for the PowerTank CO2 air system with the extreme-duty hose (4air-edh) and brass fittings (4air-edf) and the PowerTank (4air-pt) quick disconnect coupler upgrades.
- Coiled air hose with quick disconnect couplers for extending the reach of the system
- You can also use a user-supplied digital tire pressure gauge with accurate readings to 2.5 psi for getting really low
- Custom/extra ports on the central air manifold for custom connections such as SCUBA tank fittings, etc.
- Spare hose sections are available for fast field repairs
-
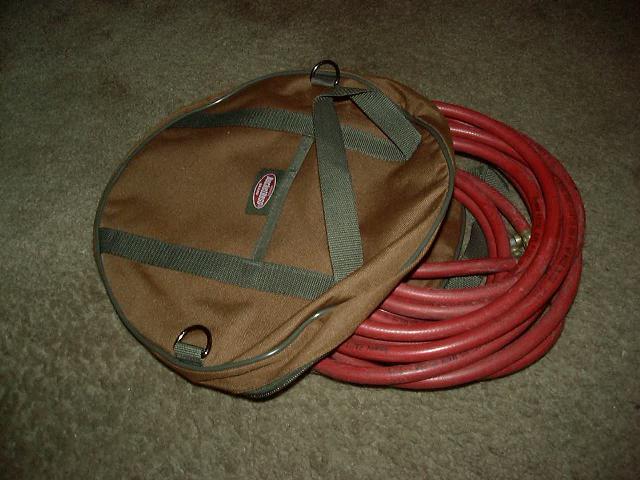
2 different size storage bag:
- The regular bag (4air-bag) is ~14" dia. and 3" deep and can store up to a 4air-l hose
- The extra large bag (4air-XLbag) is 19" x 14" and 8" deep and can store the largest air hose plus extensions and other air accessories
-
For extreme conditions, I offer an extreme-duty version, with higher
pressure, all metal fittings, hose flexible to -40°F(or °C).
- The current hose and fittings are rated for 200 psi and -20°F.
-
A 5th tire valve chuck and coupler for use in airing up from a spare
tire. Hook the 5th chuck to the manifold and spare, open the valve and
use the air in your spare to increase the other 4 tires.
- Assuming an equal sized spare, divide the pressure difference of the spare and the other 4 tires by 5, this is the amount of air you can increase the tire pressure by. For example, spare at 50psi, tires at 10psi, difference is 40psi, divided by 5 is 8psi. Therefore all 5 tires will end up at about 18psi (10+8) after they equalize.
- More information on this available here.
(1) (2)
(2)
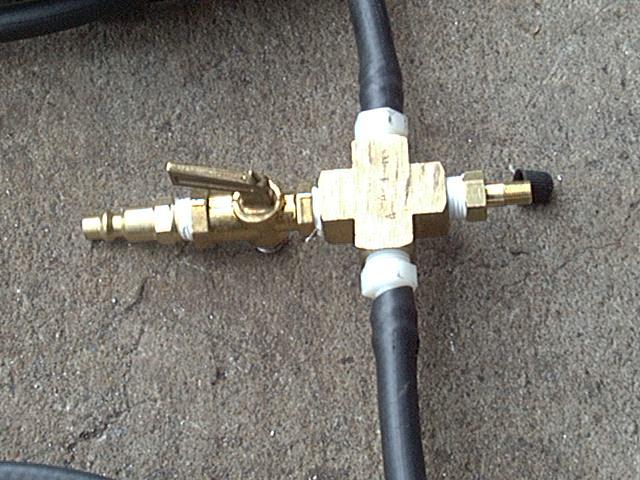
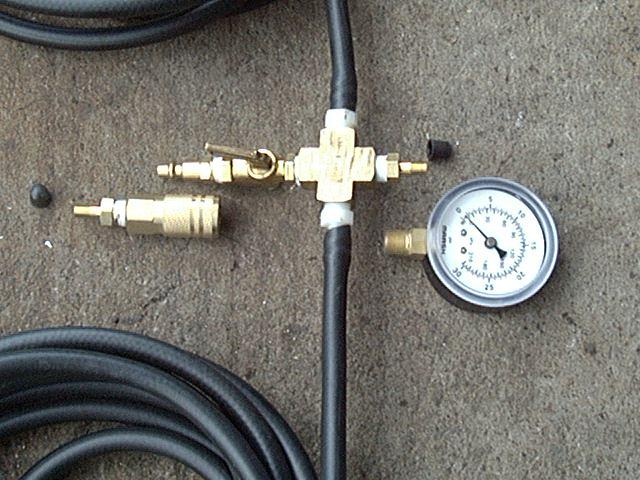
-
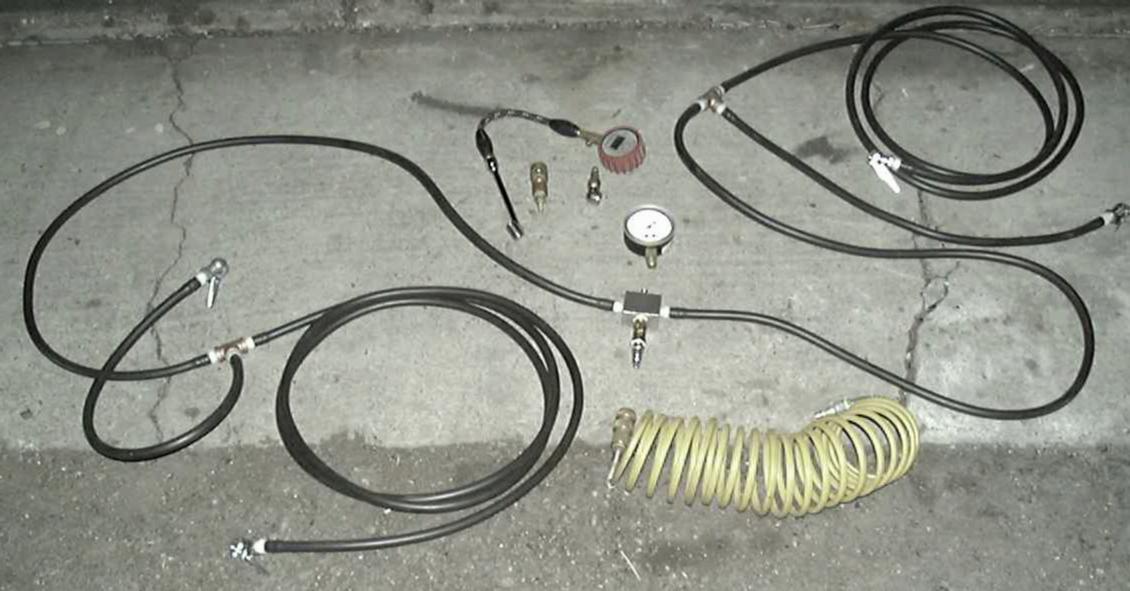
In the top-left picture (1) you can see the following:
-
The basic 4air system in the center (black hose
and fittings)
- An optional integral air pressure gauge to replace the Schrader valve port on the manifold block
- Also pictured is a user-supplied digital air pressure gauge that can be used with the system, this is the one I personally use, reads to as low as 2.5 psi in 0.5 psi increments
- An optional (yellow) coiled air hose with quick-disconnect coupler to hook you your on-board air compressor
-
Also pictured, below the digital gauge, are some adaptors I've found
useful:
- On the left is a quick-connect Schrader valve that can be used for airing up from gas station air compressors, handy if you have the integral pressure gauge installed
- On the right, is a quick-connect coupler with chuck, to plug into the coiled hose if you only need to air up one tire, saves unpacking the larger hose
-
The basic 4air system in the center (black hose
and fittings)
-
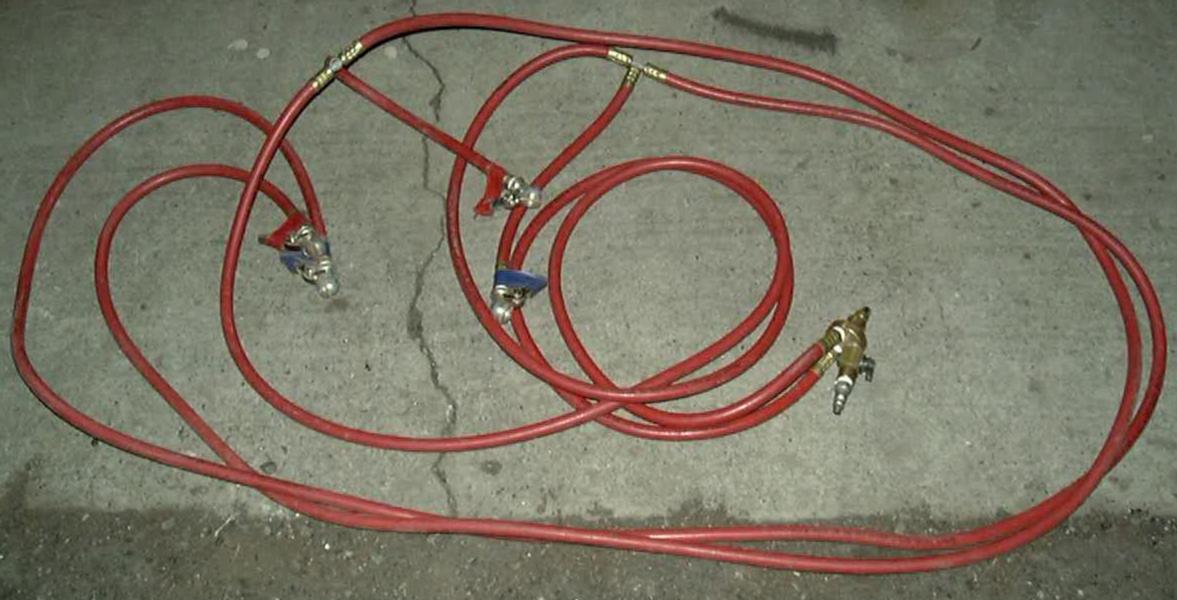
In the top-right picture (2) you can see the original
Quadra-Flate design and some of my mods:
- The nylon T-fittings have crimped-on hose ferrules, making field repair or modifications difficult without the proper tooling.
- The front wheel side hose section is too short for typical off-road tires sizes. This results in the whole hose hanging off the valve chuck, which can cause it to leak or fall off. I would have lengthened mine, but since the fittings are crimped, I couldn't justify the $200 for the crimping tool just to modify two hose ends.
- The length of the rear wheel hose is not long enough to reach between my 105" wheelbase 4Runner, if the valve stems end up on opposite sides, I have to air up the front then the back tires separately.
- The cheap plastic handle on the main air valve broke off years ago, making it hard to operate and to see which way the valve is turned,
- The integral air gauge got banged around in use and became inaccurate, I replaced it once then removed it and installed a Schrader valve. To measure pressure, just hook up your favorite gauge, to air up at a gas station, put the air chuck on the fitting, no fuss, no muss.
(3) (4)
(4) (5)
(5)
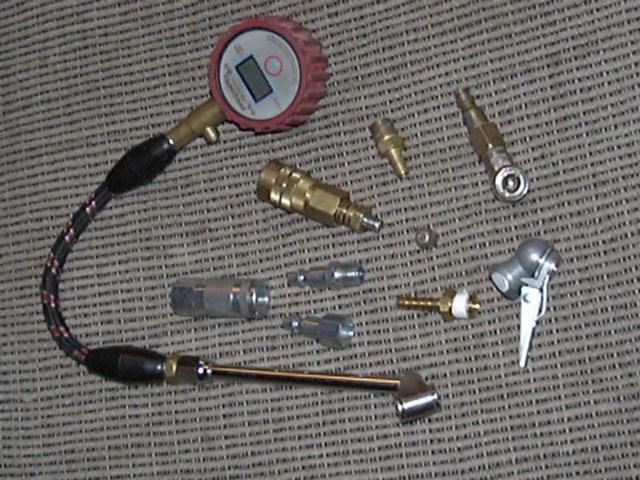
-
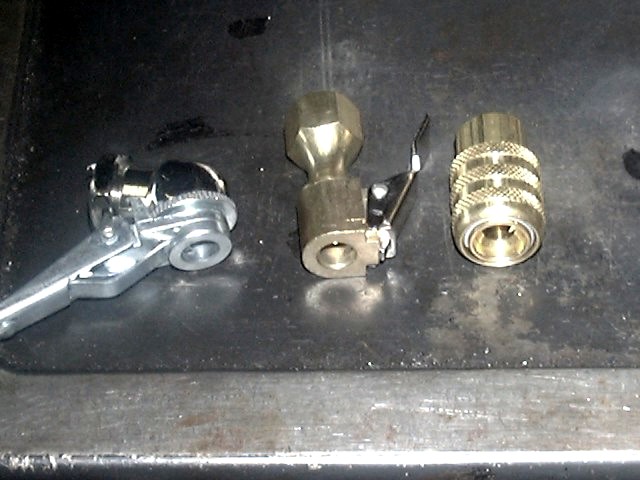
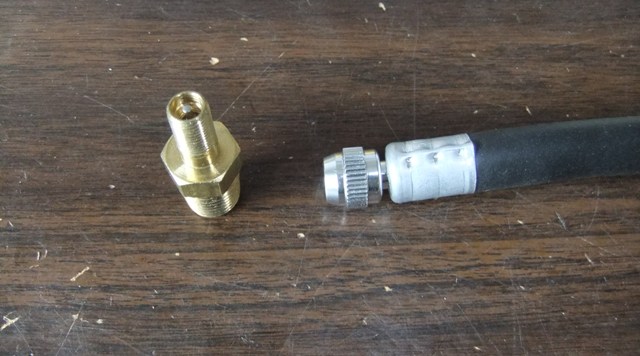
In the left picture (3), you can see a closeup of some of
the various attachments and fittings I can supply with the system or
you can add them yourself:
- To the far left is a digital pressure gauge to use on your tires or on a Schrader valve on the 4air system
- Just to the right of pressure gauge hose is a quick connect coupler and male and female 1/4" NPT fittings
- Above that is a quick-connect coupler with a Schrader valve installed, this is an easy way to air up from a gas station compressor, just clip this onto the 4air fitting and air right up. Just to the right of the coupler w/ valve is a separate Schrader valve that came with my Quadra-Flate system for comparison.
- In the upper-right corner is a quick-connect press-on tire chuck, which is a handy attachment with the extension air hose (pictured to the right) to air up one tire
- Below the press-on air chuck is a clip-on air chuck, just like the ones used on the 4air system.
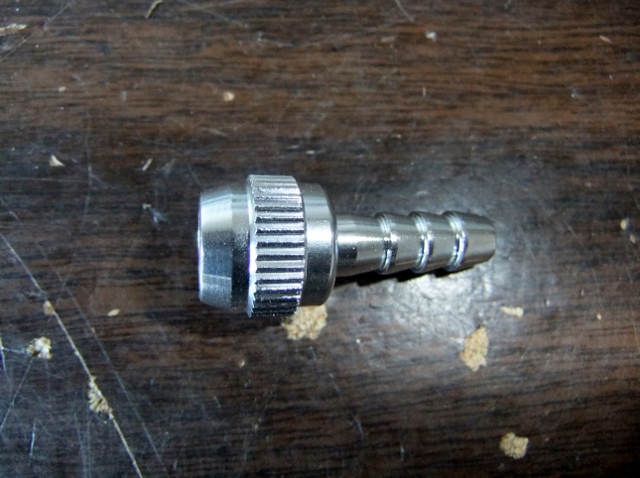
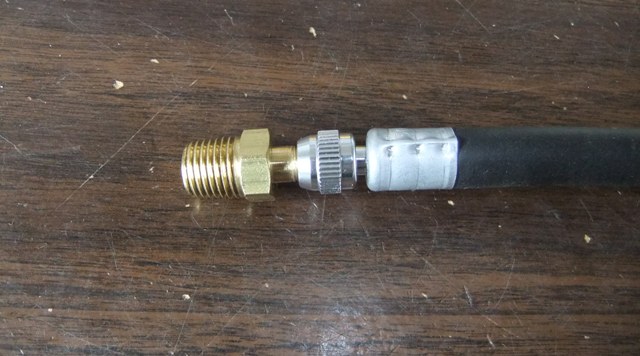
- To the left of the clip-on chuck is a pipe thread to hose barb adapter, this would allow you to splice your existing 1/4" ID air hose to the 4air system or make field repairs, etc.
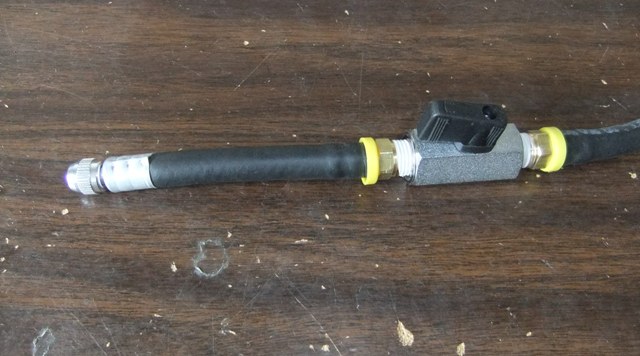
-
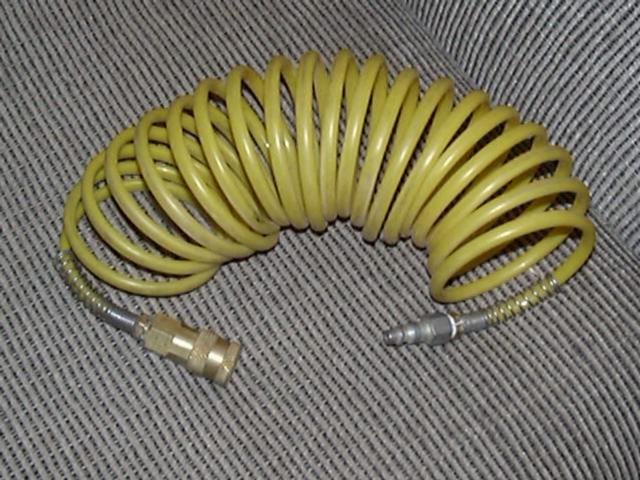
In the center picture (4) is a closeup of the coiled
extension air hose with quick-connect couplers.
- I outfit my on-board compressor with one of these couplers (it shuts off the air flow when disconnected)
- When I need to air up, I plug the coiled hose into the compressor coupler then plug the 4air into the extension coupler
- If I only need to air up one tire, the coiled hose and the press-on air chuck are all I need
-
In the right picture (5) is a picture of the optional
storage bag for the 4air system.
- This heavy canvas bag is just the right size to hold the coiled air hoses and keep them from getting tangled and protects the hose and fittings from dirt and damage while not being used.
- I also try to keep a tire patch kit and other tire-related items in my storage bag.
(6) (7)
(7)
-
In the left picture (6)
is a close-up of the tire valve chuck options:
-
On the left is the basic right-angle clip-on chuck
- This is the default tire chuck included in basic air hose setups
-
In the center is the straight-on (Euro) style clip on chuck
- Air hose systems may be updated to this type of chuck with the 4air-euc option
-
On the right is the straight-on clipless style chuck
- Air hose systems may be updated to this type of chuck with the 4air-clc option
-
Valve stem fitment:
- The clip-on chucks (right angle and Euro-style) require approx. 3/8" of valve stem thread to seat fully
- The clipless chuck needs almost 1/2" of valve stem length with 3/8" threaded plus an additional 1/8" that can be unthreaded but the same OD as the threads.
-
In summary:
-
The clipless chuck offers the most secure seal since it grips on
opposite sides of the valve stem, but is the most demanding of the
valve stem shape (as noted above).
- It also requires the most finger dexterity since you need to grasp the hose in your palm and then squeeze the chuck body with a thumb and finger and pull back to release the grip.
-
The basic right angle clip-on chuck is the most affordable and fits the
widest variety of valve stems.
- It is the only one allowing right angle access to the valve stem.
- So if you have a hard to access valve stem, this chuck requires the least clearance above the end of the valve stem as it clips on at a ~90° angle.
- It is also the only chuck that is easy to open up for cleaning and to replace/flip the rubber sealing washer if needed.
-
The Euro-style chuck offers the best combination of valve stem fitment
and sealing integrity.
- It is as easy to use as the right angle chuck with just a simple lever squeeze.
-
Also consider your access to the valve stems when selecting a chuck.
- The clipless chuck goes straight onto the stem, requires minimal space to the side.
- The basic clip-on chuck need the most room to one side since the air hose and clip come out at a right angle to the valve stem.
- The Euro-style chuck is someplace in between, it needs some room to one side for the clip, but the hose comes out in line with the valve stem.
-
And rest assured, all the above chucks fit the standard Schrader valve
that is used on tires world-wide. In the topsy-turvy world of tires
that can have a metric section width dimension, a dimension-less aspect
ratio and an imperial wheel diameter (i.e. P225-70R15), the venerable
Schrader valve is one common and unchanging and actually not metric or
imperial in dimension. The Schrader valve cap thread is ~0.305"
dia. and ~32 threads/inch or in metric M7.7x0.794.
- Interestingly, it is this odd size, because back in 1844 when August Schrader invented this valve (that is named after him), that is the size thread cutting die he had in his shop, so that is what he used. The rest is history, nearly 170 years later all Schrader valves have that odd thread pitch cap as well as the 0.209"x36 thread pitch for the valve core.
- Outside of the thread dimensions, there is no other standard applied to valve stems. They can be any length both in the stem overall as well as the threaded length, any diameter (beyond the threaded portion), any shape or material, etc. This all plays into the next item, that being how a given clip-on chuck will fit a given valve stem...
-
No matter which style chuck you use, you may run into a
case where a given chuck does not fit well on a given valve stem.
- Think about it, if there were indeed a clip-on chuck that would work with every single valve stem ever made, there would likely only be that one design available and you would not have all these options to select from.
- Often it is just a matter of working with that chuck/valve combination, seating and re-seating it a few times to loosen things up and get the hang of using that chuck on that valve. Often times, a little shot of dry silicone spray lube inside the chuck will help if something is sticking inside.
- Luckily, it is easy to swap the 4air chucks around on the hose to get a good fit, so give that a try. We sometimes find chuck-A will not work with valve-B and chuck-C will not work with valve-D, but swap them around and chuck-A works fine with valve-D and chuck-C works fine with valve-B.
- And tire valve stems do wear out over time, especially when used off-road. They get dirty, scraped on rocks, etc. and at some point, no chuck will seal up to them. That is probably one reason tire shops always push the new tire valves when you replace tires. So if you have one valve that just will not work, it is easy to have it swapped out at a tire shop.
-
The clipless chuck offers the most secure seal since it grips on
opposite sides of the valve stem, but is the most demanding of the
valve stem shape (as noted above).
-
On the left is the basic right-angle clip-on chuck
-
In the right picture (7) is close-up of the extreme-duty
hose and all-brass fittings and clipless chucks.
- This hose (Buna-N rubber) has a temperature range to handle CO2 inflation systems like the Power Tank.
- It is also more flexible than the standard duty hose (thermoplastic rubber)
- The brass fittings and stronger hose have higher pressure ratings than the standard hose and fittings
- All the 2air/4air systems make use of press fit hose fittings for clean appearance and tangle-free operation. No hose clamps to snag everything in sight, and unlike the crimped type hose ends, the all-threaded assembly allows for field modifications and repairs. For example, a 2air system could be converted to a 4air with a few extra fitting and hose sections. I found the crimped on hoses of my old Quadra Flate were a severe limitation to modifying it, which is why I ended up designing the 4air system.
We also have a leak-free screw-on tire valve chuck options available:
(8) (9)
(9)
(10) (11)
(11)
- This is the solution for tough to seal tire valve stems. These valve screws screw fully onto the tire valve stem and have a rubber o-ring that seals tightly against the top of the Schrader valve stem (4air-soc for 4air Screw On Chuck)
-
In photo (8) above, you can see the screw on chuck by
itself, note that it uses a hose barb type fitting, so you can attach
it to your 1/4" ID rubber air hose with a simple hose clamp (not
included).
- And for custom setups, we can build most any sort of assembly off these chucks that you want, we can add stub hoses, a valve, a gauge, etc.
- Just let us know what you are looking for and we'll be happy to give you a quote.
-
For example:
- We have been asked in the past to supply a multi-way air hose with screw on fittings to attach to multiple inner tubes in a floating raft to allow maintaining equal pressure in the tubes with a permanent, leak-free air hose attachment.
- And we have been asked to supply a custom screw on nitrogen pressure gauge with the screw on chuck and a pressure release valve on the air hose between the chuck and gauge so that internal pressure can be released prior to unscrewing the chuck.
- And although the basic screw-on chuck is only available in a hose barb fitting, we can custom build a chuck with a very short section of rubber hose, just long enough to press a 1/4" NPT hose fitting (male or female thread) into so that the chuck can easily be screwed onto the end of a threaded end hose. This would be ideal for retrofitting an older 4air hose or adding to your own air hose.
- In photo (9) above, you can see the chuck screwed down snugly onto a Schreader valve stem.
- In photo (10) above, is the same chuck removed from the Schrader valve (note: Scrader valve not included)
-
These chucks are a bit different than the other ones we use (pictured
in the section above), in that they are not available in a 1/4"
NPT pipe thread version, so instead we have to use a crimped hose
connection instead.
- This is a solid, leak-free connection and should hold up for the life of the hose, but it is not field replaceable like the threaded chucks.
-
The other difference is that these chucks are "open".
That is they flow air at all times, connected or not.
- The other chucks we use are "closed" chucks and have internal valves that shut off the air flow when they are not connected to a Schrader valve.
-
This may be an advantage or disadvantage depending on the application:
-
Advantages of the open chuck are:
- They flow more air as there is no restrictive valving inside.
- Less likely to be affected by dirt and grit getting inside and clogging up the internal valving
-
And for applications where you want to leave the hose connected to the
tire all the time, open/closed makes no difference.
- One request we have had in the past for a permanently connected hose was for inflatable rafts or boats where you want to connect multiple air chambers or inner tubes together permanently for easy inflation and pressure adjustments.
-
Disadvantage of the open chuck is that as you disconnect each chuck
from a tire, air will leak out that fitting and continue leaking out
until you disconnect the last of the chucks (2 or 4) from the other
tires.
- For larger tires or a large compressor, this may not be an issue especially if you have an assistant for the other side of the vehicle and you work in tandem.
-
But we have a solution for the open chuck and that is a small in-line
air valve (4air-vlv) shown in photo (11) above.
With that valve, you can manually open or close the air flow to the
chuck.
- Some benefits of this manual valve is that if you wanted to air up one axle to a different pressure than the other axle, you could fill to the lower pressure, then shut off the air to the tires you want at the lower pressure then continue filling the other tires to a higher pressure.
-
Also, for use in sand and similar conditions, you can use the valve to
help blow the tire valve chucks clear of sand, dirt or mud.
- To do this, hook the 4air hose to the compressor, and pump the compressor up to pressure.
- Then at each valve, open the valve briefly to purge any dirt out of the chuck, then close the valve and screw it onto the tire valve stem. Repeat at each tire. Then, if airing down, disconnect the 4air hose from the compressor and let the air out of the tires.
- The in-line valves can be placed at each chuck for maximum flexibility or to save money, we can put one on each side of the 4air hose, so you could shut off air to one side and quickly disconnect the two chucks on that side and then shut off air to the other side and repeat, or put the valves in the hose between the front and rear tires on each side. Then shut the valves, disconnect the 2 rear tires then disconnect the front tires with minimal air loss. So we can set it up any way you want.
-
Advantages of the open chuck are:
-
And the screw-on chuck can also be used to repair an existing air hose
or even an old bicycle pump or 12 volt compressor with a leaking tire
valve chuck.
- Simply cut off the old chuck and slip the barbed end of the screw-on chuck into the rubber hose and use a hose clamp to secure it in place.
- The chucks fit typical rubber air hose with 1/4" inner diameter (ID).
- You'll need to supply the hose clamp of suitable size to fit the outer diameter (OD) of the hose you have.
The question always comes up, "which is the best tire chuck?". That is a good question and the answer is "it depends". Think of it like a socket set for a ratchet wrench. There are 6-point and 12-point sockets, there are deep well sockets, impact sockets as well as the normal size sockets. So which is best? Well, for strength, a 6 sided impact socket is the best. But if you have a 4-sided nut, that won't work, so a 12-point socket is better. If you have a lot of thread sticking out of the nut, a deep well is better, but if the nut is in a tight space, a shallow socket might be better. So all the tire chucks work, we have used them all at various times and had them work fine most of the time, but run into situations where one or the other did not work as well. They have differing ways to actuate the locking mechanism, they attach to the Schraeder valve in a different orientation, they grip the valve stem in a different manner, etc. Typically the better the chuck seals, the more tedious it is to operate, so the screw-on chuck is a perfect seal, but takes a significant amount of time and finger dexterity to attach and remove. The clip-less seals pretty good, attaches and removes fairly easy, but does take more finger dexterity to operate than the two clip-type chucks. The clip-less and euro-style chucks also requires a direct in-line path to the valve stem, while the right angle clip-type chuck comes in at a 90 degree angle.
[back to the top]Theory of Operation:
The key to the 4air (and 2air) system is the central manifold. This is the key part that connects the two sides together to a common point and is also where the main controls are located as well as where optional accessories can be added:
 |
 |
| Basic manifold: - Male chuck - Control Valve - Schrader valve |
Adding options: - Clip on Schrader valve - 4air-30/60/100 psi gauge replaces the Schrader valve |
 |
 |
| 4air-60 + 4air-qd1 - Pressure gauge w/ euro chuck |
4air-60 + 4air-qd2 - Manifold w/ female disc. - Pressure gauge w/ male disc. |
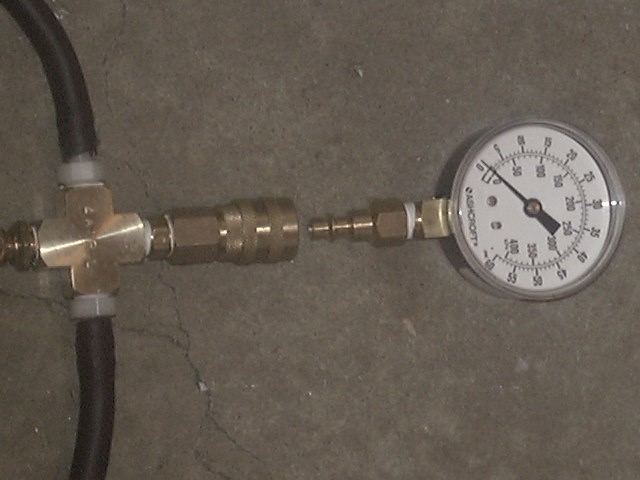
Think of the manifold as one of those round Tinker Toy pieces to which you can plug in various rods and other parts. You have 4 ports, two go to each side hose, one has a manual valve and exhaust port for airing down. The 4th port can have something in it. I prefer the basic Schrader tire valve, it lets me check the system pressure with a gauge, I can air up at gas stations, etc. If you prefer, a pressure gauge can replace the Schrader valve. Note that the digital gauge can't be installed on the manifold, it needs to use a Schrader valve connection.
I personally don't like having the pressure gauge hard mounted on the manifold (from deccades of experience).
-
First, the gauge is prone to damage and simply getting knocked out of
calibration.
- You'll be tossing and dragging the hose on the ground and in your truck
-
Second, I like a separate gauge, and I use a digital version
- It is accurate down low and accurate up high
- I like ONE gauge that is relatively accurate and reliable
-
Third, I like to use the SAME gauge to check the 4air pressure and
sometimes I like to double check the individual tire pressures
-
If you have two (or more) gauges, its unlikely they will all read the
same, check out Segal's
Law
- If you want to use 2 gauges, take note of each gauge reading at your typical on and off road pressure
- E.g. if one gauge reads 30psi and the other 31psi, note the difference for future reference
- Assuming you already have a tire pressure gauge you like, just use it on the manifold valve stem, no need to purchase another gauge
-
If you have two (or more) gauges, its unlikely they will all read the
same, check out Segal's
Law
-
Our shop truck air hose is set up with just a plain Schrader valve on
the manifold.
- You can connect any guage you have to that valve stem
- You can also fill air from a gas station air compressor without needing our 4air-sv
- You can also screw on an automatic deflator to the valve stem if you want to use that deflation method
- Two options for a quick disconnect gauge are shown above:
-
4air-qd1: Install it off a quick disconnect tire valve chuck and then
you can clip it onto the Schrader valve on the 4Air manifold or connect
it to a tire valve stem to check it's pressure.
- The cost of this option is $10.00 (4air-qd1) plus the cost of the gauge, specify the type of valve chuck you want attached; standard, Euro-style or clip-less chuck.
- 4air-qd2: Install a female coupler on the manifold and a male coupler on the gauge.
- The cost of this option is $15.00 (4air-qd2) plus the cost of the gauge. This offers the most secure and leak free gauge attachment option.
- If you wish to use the gauge to check the tire pressure, you can connect it to a spare tire air chuck (4air-ac).
- Either of these options will let you connect the gauge to the 4Air manifold when needed and take it off when its not needed.
- The cost of this option is $10.00 (4air-qd1) plus the cost of the gauge, specify the type of valve chuck you want attached; standard, Euro-style or clip-less chuck.
With experience, you'll be able to tell air pressure by the sound of your compressor while airing up tires and by the sound of the escaping air when airing down and also the appearance of the tires. I find I'm usually within a few PSI of the actual pressure by the sound alone, then if I'm shotting for an exact pressure, I'll pull out a guage and check.
Then, off the exhaust port and its quick disconnect air hose coupler, you can add other accessories for other purposes:
- Connect to an on-board air compressor or Power Tank via an extension hose and female chuck
- Connect to a spare tire with another tire chuck and extension line to fill a low tire
- Connect a Schrader valve to air up at a gas station
All these options are not meant to be confusing, its just a very flexible system. I have developed and used them all to address various needs in years of field use of the 4air system. Start out with the basic system and as you use it and encounter situations where you need to do something different, chances are. I've come up with something to address that need.
The tire valve chucks (either clip-on or clip-less) include automatic shutoff valves inside so they only flow air when connected to a Schrader valve on your tire. If left disconnected, they shot off the air flow. This allows you to connect the chucks to the tires without the air leaking out of the connected tires. Also, it allows you to set different pressures for different axles. For example, if you wanted to air up your back tires to 25 psi and the fronts to 30 psi, you could air up all 4 tires to 25 psi, then close the air valve at the manifold, disconnect the 2 rear tire chucks, then re-open the manifold valve and continue airing up the remaining 2 tires to 30 psi. With tires connected to the air hoses, and the manifold valve closed, the air pressure in all the connected tires will equalize automatically in a few seconds.
If you still are having trouble configuring a system for your own needs, send 4Crawler Offroad an e-mail and tell us what you want to be able to do and I can help you configure a 2air or 4air system to fit your needs. As mentioned elsewhere, I've set up systems to work off of Scuba tanks, I've built systems for big rigs to air up their "dualies", I've made systems that let you air up from a spare tire, etc.
[back to the top]Chucks and more Chucks:
If you are confused by this chuck and that chuck, so was I (and still am to some degree :). In this page, there are two basic types of chucks, although to try and keep things straight, we will refer to things that connect/disconnect air hoses as couplers and things that attach to tire valve stems as chucks.
-
Chucks to connect up to a Schrader valve on a tire
-
We have several types:
- One that has an external clip
- One that has an internal clip
- One that screws onto the valve stem in place of the valve cap
-
We have several types:
-
Quick disconnect couplers, of which there are many varieties
- They come in male and female versions
Seems like every maker of anything to do with air has come up with a coupler of one sort of another. They all had perfectly good reasons for their own design, but invariably the different couplers will not fit each other.
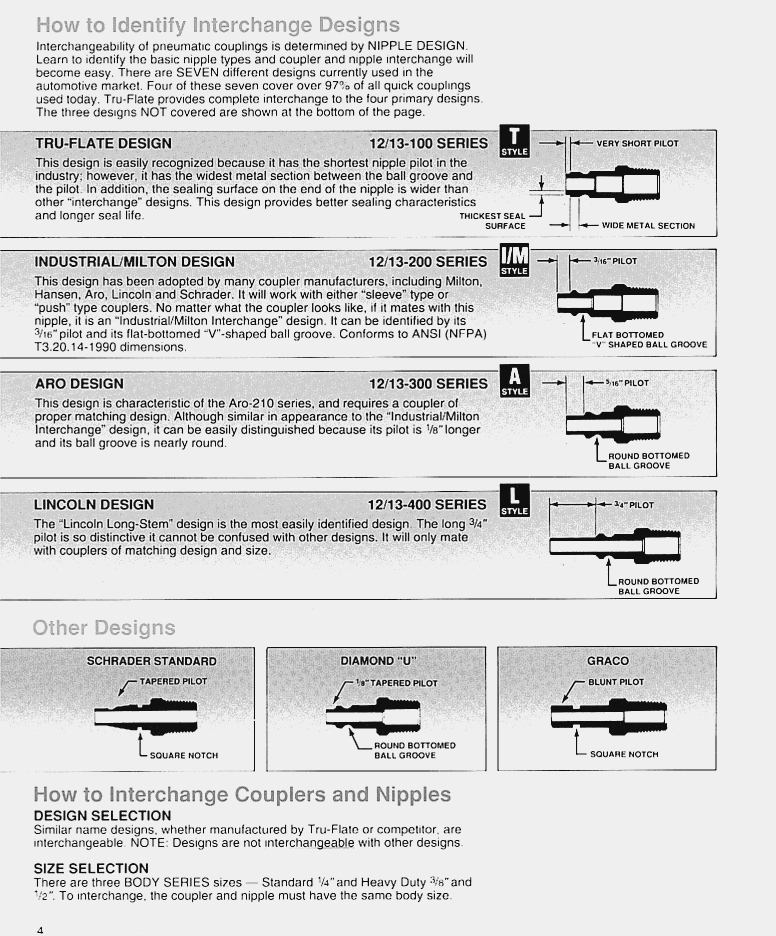
Click on the image above for a summary of the most common air coupler designs. We use the Milton or Industrial (M or I) type chuck, since it appears to be the most common coupler design. Air tools use it, most hardware and auto parts stores carry it and there is even a "universal" female chuck that fits both it and the type "T" coupler. Type T is made by TruFlate and is supposed to be a superior design (according to TruFlate) and they are pushing it for automotive use. The folks at Power Tank sometimes use type T couplers. We offer an upgrade to Type T chucks with the 4air-pt option (see below). If planning to connect the 4Air system to another air system, be sure to check the type of coupler required:
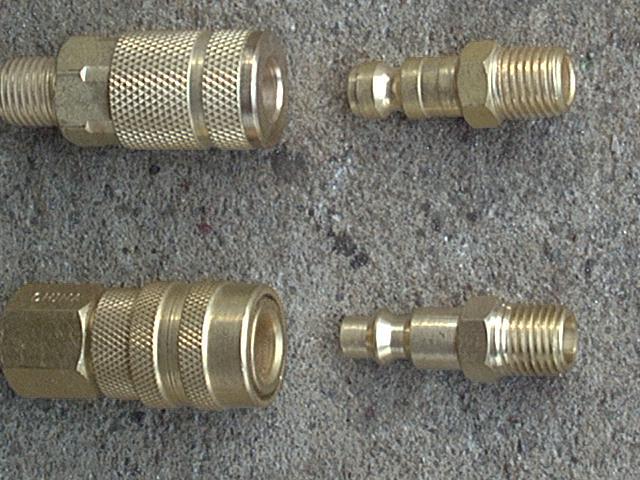
Pictured above are the female and male Type T couplers on top and the Type I female and male couplers on the bottom. They are slightly different. Which one should you use?
- If you already have air equipment set up with one type of coupler, get the 4air set up with that same type of coupler
- If you are planning to get air equipment set up with a particular type of coupler, then get the 4air set up the same way
- If this is your first piece of equipment with an air hose coupler, get Type I and then if you later add more air equipment, get Type I as well.
- If you later have to change, all is not lost. All parts are field replaceable, you can find replacement couplers most any auto parts or hardware or wecan supply you with the type you need.
Instructions:
Using the 4air system is very easy. In the picture, above, I've connected the 4air hoses to my valve stems, then connected the manifold to my compressor, using a coiled air hose. The chucks stay on the valve stems and I can walk away and do other things while the compressor fills the tires. To air down, just open the air valve and let the air out, in detail:
-
To air down:
-
Unroll the hoses, running one down each side of the vehicle
- Be careful to not place the hose too close to the tires at this point.
-
As you air down, the tire will flatten and trap the hose.
- If this happens, you may have to roll the vehicle off the hose before you can put it away.
-
Remove the valve caps and clip on the corresponding air chuck
-
To prolong chuck and valve stem life, depress the lever on the chuck,
push it onto the stem, then release it to avoid wearing out the threads
on the valve stem itself. The retaining clip is spring steel but your
valve stems are probably made of brass
- Once the threads get worn too much, the chucks may not stay fastened securely
- If you do wear out the valve stem threads, you can have them changed (good idea with new tires) or screw on a valve stem extender. I carry a set of these with me, also handy if you have hard-to-reach valve stems
- With the clip-less chucks, you can also get a tighter seal by turning the chuck about 90 degrees after installing it, the opposing clamping jaws will follow the valve stem thread and "screw down" tighter
-
To prolong chuck and valve stem life, depress the lever on the chuck,
push it onto the stem, then release it to avoid wearing out the threads
on the valve stem itself. The retaining clip is spring steel but your
valve stems are probably made of brass
- Open the control valve to release the air in the tires
-
Periodically test the tire pressure by closing the valve and reading
the air gauge
- With practice, you get used to both the air down time and also sound change as the pressure drops
-
When the desired trail pressure is reached, close the control valve and
allow the tire pressures to stabilize and recheck.
- Sometimes one tire will air down a bit slower and you may find that the pressure comes up a bit
- Disconnect each air chuck, reinstall the valve cover and roll up the air hoses
-
Unroll the hoses, running one down each side of the vehicle
-
To air up:
-
Turn on your on-board air compressor so the tank is filling (if
applicable)
- If your system has no air tank/storage or lacks a high pressure shutoff switch, leave the compressor off until you have the air hose connected to the tires. You can connect the compressor output hose to the 4air manifold now as long as it is a leak-free connection.
- Unroll the hoses, running one down each side of the vehicle
-
Remove the valve covers and clip on the corresponding air chuck
- To prolong chuck and valve stem life, depress the lever on the chuck, push it onto the stem, then release it to avoid wearing out the threads
- Connect the your air source to the 4air system
-
Open the control valve to allow air to enter the tires
- If you are using a lower pressure built-in air gauge, open the valve slowly to avoid over pressuring the gauge.
- If your air system lacks storage or a high pressure shutoff switch for the compressor, you would simply connect the 4air manifold to the compressor (if not already connected), with the 4air manifold valve open and then turn on the compressor to avoid high pressure spikes.
-
Periodically test the tire pressure by closing the valve and reading
the air gauge:
- You can check pressure with the valve open, but it'll read a bit high depending on your air source flow rate
-
When the desired street pressure is reached, close the control valve
and allow the tire pressures to stabilize and recheck, sometimes one
tire will air up a bit slower and you may find that the pressure drops
up a bit
- If your compressor lacks a high pressure cutoff switch or an air storage tank, you'll want to turn the compressor off prior to closing the 4air manifold valve to keep from over pressuring the compressor.
- Disconnect each air chuck, reinstall the valve cap and roll up the air hoses
-
Turn on your on-board air compressor so the tank is filling (if
applicable)
-
A couple of tips when using the 4air system:
- Sometimes the air chucks will stick open and allow air to leak out, this most often happens when you are airing down, since the internal pressure is low. Usually rapping the chuck on the side of the tire or the ground will knock the internal piece loose that seals the chuck. I also find a shot of silicon spray into each chuck once or twice a year helps keep them working smoothly.
- If you find the air chuck levers get tangled in the hose as you unroll it, take some electricians tape and wrap it around the lever and chuck body. I color coded mine with different colors on each side so I could sort out the two side hoses easier.
- I carry a set of metal valve stem extensions in my air up kit. In the event you run into a valve stem that won't hold the chuck, or a tire with too short a valve stem, simply screw on an extension and hook up the chuck.
-
One option is to combine the 4air
system with an automatic deflator that screws onto a
standard Schrader vavle stem.
- By setting one of these deflators to your normal off-road tire pressure, you simply screw it onto the 4air system and it'll take all 4 tires down to that pressure, without the hassle of getting all 4 deflators set to the same exact pressure. Here's a picture of the Oasis Deflator installed on the 4air manifold
-
For faster deflation times, you can air down the tires most of the way
with the open air valve then when you are 5-10 psi above your target
pressure, install the deflator and let it take the pressure down the
rest of the way. These deflators are somewhat flow-limited as you
essentially have 2 small Schrader valves in series. While airing down
all the way with the deflator does work, it can take about 3-4 times as
long as the 4Air alone. So by releasing the bulk of the air before
attaching the deflator can help speed things up.
- You can also carry several deflators and have each one set to a different pressure if you use different tire pressures for different conditions. For example 20 psi on gravel roads, 15 psi in the rocks and 10 psi in the snow or sand.
-
When using the clip-less chucks, see below for proper use:
- Pull back on the housing to release the spring tension on the internal gripping jaws as shown below-left
- Then slip the chuck over the valve stem, pressing it down firmly before releasing the housing as shown below-right
- Removal is the reverse, push down on the chuck and pull back on the housing to release the jaws
- While it is possible to push the chuck down over the threads, the hardened steel jaws will quickly strip the soft brass threads on the valve stem


-
If using the 4Air system with a CO2 type air tank (Power Tank for
example)m you may find the air valve gets too cold to handle due to the
extremely low temperatures of the expanding CO2 gas.
- In this case, use the valve on the CO2 tank to turn the gas on and off.
- You might also be able to wear a pair of heavy gloves to insulate your hands from the cold.
- Or use a long, coiled polyurethane air hose between the CO2 tank and the 4Air valve. This may let some of the cold dissipate before reaching the air valve.
One benefit of airing up all 4 tires at once, is that it slows the rate of pressure rise. This allows you more time to get your gear packed for the trip back home, re-connect sway bars, mud flaps, etc. without having to constantly check air pressures. With 33x9.50 tires and a 2.2 CFM on-board compressor, it takes about 6-7 minutes to air up from 15 to 30 psi, or about 2 psi/minute. With larger 33x15.50 tires it takes about 15 minutes to go from 10-30, so you have plenty of time to do other things without checking on the tire pressure or moving the air hose from tire to tire. If you have a high-capacity air system, this may not be as big a benefit, but for an electric compressor, this alone will pay for the system.
I have a page with information on tire inflation and deflation information located here. I did some timing measurements with deflating a set of 33x10.50-15 tires from 30 psi to 15 psi.
- With the 4air all by itself I measured 2 minutes including one stop to check the air pressure at 1 minute (this is for all 4 tires combined).
- With a single Oasis Deflator on one tire, I timed about 4.5 minutes for the same pressure drop.
-
With a single Oasis Deflator on the 4air manifold, I
timed about 15 minutes for the deflation.
- It seems the Oasis Deflator is flow rate limited to something under 1 CFM.
- The advantage of this setup is there is no need to "baby sit" the deflator, you can be doing other things while the tires are deflating.
- Or, for faster deflation with the Oasis deflator, first let out the majority of the air through the main air valve, then as you get to the last 5 psi or so, close the main vale and let the Oasis deflator finish up.
- Of course, smaller tires will have shorter times and larger tires will have longer times, directly related by the tire volume which I have listed on the page referenced above.
- Important Notes:
-
1. If you have a 2air or 4air system with a
built-in gauge, especially the lower pressure versions (0-30psi), you
need to exercise a little caution with how you connect the system and
use it. What you want to do is avoid over pressuring the gauge with
air. So for example, to air up your tires, you would first want to
connect all the air chucks to the tire valve stems. Only then do you
want to connect your air source to the chuck on the inflator manifold,
doing so with the air valve closed. Then, slowly open the air valve to
allow air to flow into the tires. If you were to first connect the air
source to the manifold and open the air valve, the air hoses (and
gauge) would run up to air pressure of your air source, maybe 100psi or
higher.
- Several options are available if you still wish a built-in gauge but want to be able to disconnect it when not needed. You can order the gauge of your choice with an extra air chuck to screw onto the gauge and a Schrader valve to screw into the manifold. This way you can clip the gauge to that manifold Schrader valve and it'll work just like it is built in and you can also use that same gauge on individual tires as well. Another option is to attach a female coupler on the manifold and a male coupler on the gauge and this way you can put the gauge in place and it'll be as solid as if it were screwed into the manifold and you can easily unplug it if needed.
- 2. And fear not if you do happen to over pressure the gauge. You may notice that the gauge reading is off afterwards. But it is a simple matter to unscrew the face off the gauge and remove the two small screws in back and slide out the gauge workings for adjustment. There is a copper "Bourdon Tube" that operates the gauge. Is is essentially a flatten copper tube wound into a "?" shape. It is very easy to adjust the tube, just like they do in the gauge factory. Take a pair of small needle nose pliers, wrap the tips with some tape to protect the soft copper. Then gently fold the tube near the middle of the curved part (you do not want to apply any force on the pliers) and gently twist the tube inward to reset the needle. The way the tube works is that as pressure builds inside, it tries to straighten out (kind of like one of those party toys you had as a kid). So if the tube is over pressured, it will be a little too straight and you want to very gently bend some curve back into it. Start easy and give just the slightest twist with the pliers, then release the tension and see where the needle points. If it needs to go farther to sit properly at 0 psi, then repeat the twist with just a tiny bit more pressure and recheck. Once you get the feel for it, you can usually get the needle back to 0 in a few tries. The key is to be GENTLE, you don't want to crush or kink the tube. I have used this technique many times and it has worked well for me. Have even used it to "calibrate" the gauge for a more accurate reading, at least compared to a second gauge. This way I can make say a 30 psi reading on the 4air gauge match the 30 psi reading on my regular tire gauge.
- 3. Also, you should take care of the tire valve chucks on the end of the hose. They are, after all, precision devices in order to fit the valve stems on your tires and seal properly. And they are often used in less than pristine environments, since the reason you are airing your tires down or up is that you are (or have been) off pavement. So take care not to needlessly expose the chucks to too much dirt and sand. They will tolerate some dirt, but you don't have to over-do it by dragging the chucks through deep sand or mud or step on them and crush sand/dirt into them, etc. If mine do get dirty, I'll hold them up and tap on a piece of wood or a tire sidewall to shake any trapped dirt loose. With the clip-less checks, you can also find grit getting into the sliding outer part. If that happens, hole the chuck with the hose end down and operated the sleeve up and down until the grit has worked free. If it gets really jammed up, you can pop the snap ring on the very end loose (do so some place clean and where parts will not fly out of sight). Then the sleeve can be slid off, exposing the internal spring and pair of clamping jaws. Note that the jaws are 4-sided, so can be rotated to expose a sharp corner if you find the exposed corner has rounded off with use. I've not had to do this with mine in over 10 years of use, so not a common thing that needs to be done. And, if you find any of the chucks getting stiff over time, a light spray of dry silicone lube on the moving parts (including inside) can help free them up. Avoid using any lube that will leave a sticky residue as this will just attract dirt over time.
- 4. For very dirty environments, the screw on chucks with individual air valves are perfect. With this setup, you can attach your air supply to the manifold and open the main control valve. Then at each tire chuck, simply crack open the air valve and blow the chuck clean before screwing it onto the valve stem. Repeat for all the chucks and you'll have a leak free seal in the dirtiest conditions, like out in the sand dunes or at the beach.
- Several options are available if you still wish a built-in gauge but want to be able to disconnect it when not needed. You can order the gauge of your choice with an extra air chuck to screw onto the gauge and a Schrader valve to screw into the manifold. This way you can clip the gauge to that manifold Schrader valve and it'll work just like it is built in and you can also use that same gauge on individual tires as well. Another option is to attach a female coupler on the manifold and a male coupler on the gauge and this way you can put the gauge in place and it'll be as solid as if it were screwed into the manifold and you can easily unplug it if needed.
Configuration and options:
Configuration of the 4air/2air system components is listed below:
-
The lengths below refer to the wheel base capabilities of a given air
hose setup.
- Ideally, select a system with a length equal to or greater than the wheel base of the vehicles(s) it will be used upon.
-
The 2air systems have 2 tire chucks instead of 4 like the 4air system,
they airing up 2 tires at once.
- The 2air-s/m/l systems are essentially 1/2 of the similar 4air system, basically the manifold and a hose to run down one side of the vehicle to allow filling two tires on one side of the vehicle at once.
- The 2air-a system is for filling both tires on one axle at the same time (2 tires with AIR on one Axle). It is like the front half of a 4air system, manifold in the middle and a hose to each side for each tire. So fill the front tires, then move to the back of the vehicle and and fill the back tires.
- 4x4Wire did a good review on the 2air system.
-
The basic air systems are priced with the
standard clip-on style tire chucks.
- For the Euro-style, clip-less or screw-on chucks, add the appropriate upgrade item below (4air-euc, 4air-clc, 4air-soc / 4air-vlv)
-
The basic air systems have the nylon threaded fittings on all the hose
ends.
- For the brass threaded fittings, select the 2/4air-edf (extreme duty fitting) option for your order.
- The brass fittings are $1.00/ea. additional, so for custom air hoses with more than 6 hose segments (12 fittings) adjust the pricing as needed.
- Any part numbers with links will bring up an image of the item.
So, which parts do I need? Well, it all depends on what you want to do.
- The 3 basic 4air systems will let you hook up to 4 tires and add or remove air from them at the same time
- The 3 basic 2air systems will let you hook up to 2 tires and add or remove air from them at the same time
The 2/4air-s/m/l hoses are set up assuming an air port in front of the vehicle with enough hose (56"/1.42m) to run to the front tire(s), as pictured here. If you have your air port some place else, like in back or on the side or your vehicle has an extra long front overhang, you may want more hose length to each side, so be sure to measure what you need prior to ordering. You can add additional hose to both side or one side or even specify that the main manifold is offset to one side or perhaps even in the middle of one of the side hoses. Grab some string, rope or garden hose and lay out the hose like you want it set up and let us know the lengths you need.
The systems will have an air control valve to let air in or out and a Schrader valve on the manifold to let you check air pressure with your tire pressure gauge or add air from a gas station air hose. The basic systems will also have tire valve chucks for all the tires they are designed to connect to and those chucks have automatic shut-offs to keep air from leaking out when not attached.
Then there are a number of adapters or upgrades you can add onto the basic system to suit your needs:
- Then there are a selection of air pressure gauges that can attach to the manifold to monitor the air pressure in the hose and several options if you want to have the gauges removable, 4air-qd1 and 4air-qd2.
- There is an extension hose to use to connect the air manifold to your air compressor, 4air-ext
- Adapters to let you add a Schrader valve to the manifold which either gives you a second air addition port or can restore the Schrader valve lost with a hard mounted gauge, 4air-svf and 4air-svm.
- An adapter to clip onto a spare tire or other air storage with a Schrader valve and use that air to add to your other tires.
- A handy canvas bag to store the coiled up air hose and adapters, 4air-bag.
- Options to upgrade thee basic air hose to a heavy duty version that is more flexible and can tolerate lower temperature such as with CO2 inflator tanks or for use in extreme winter conditions. Likewise an upgrade from the basic nylon hose fittings to an all-brass option for more durability, especially in cold conditions.
- Then there are options to change out the tire valve chucks to different designs that attach and operate in different ways to suite your needs.
- Then you may already have a different style of air chucks on your existing air compressor or CO2 tank system and you can swap out the default type-I chucks for the type-T chucks. Type-T chucks are often used on the popular Power Tank CO2 systems, so be sure to check what type of chuck you already have.
- Finally, you can customize your 4air or 2air hose with additional hose length, say you have a 160" wheel base and the 130" 4air-l system would be too short to reach from the front to the back wheels. So that is 30" (or 2.5 ft.) of extra hose on each side for a 4air system, so add 5 feet of additional hose to your 4air-l order and we'll add 2.5 feet to each side to extend the 4air-l to 160"(4.06m) wheel base.
- And the last option is an adjustable, automatic tire deflator that you can screw onto a Schrader valve and have it automatically let air out of the attached tires until the pre-set pressure is reached.
So, determine what all sorts of things you want to do with your 4air/2air system and the figure out which adapters/upgrades you need to do that. Or drop us an e-mail with a list of what you want to do and we can configure a system for you.
- Don't just e-mail us and ask us what system you need, because we don't know what you want to do, tell us what you want to do with the system as well.
You can think of this system like a set of Tinker Toys, everything pretty much is plug and play.
- The tire chucks fit onto standard tire Schrader valves.
- The quick disconnect couplers all plug into the mating coupler.
- The default air manifold will have one Schrader valve and one male quick disconnect coupler.
About the only consideration you need to make is that there are male and female chucks and Schrader valves
- So just like your old Tinker Toy set, you have to have one rod (male chuck) and one joint piece (female chuck) to be able to attach the pieces together.
And Schrader valves and different couplers.
- 4air-sv(f/m) provides a male Schrader valve attached to a female or male quick disconnect coupler
- 4air-ac provides a (female) tire chuck attached to a male quick disconnect coupler
And if you are looking just for tire valve chucks, we have those available
- Items Euc, Clc and Soc will get you the Euro-style, Clip-Less or Screw-On Chuck separate of the air hose system.
- The items *air-euc, *air-clc and *air-soc are the items to use to upgrade an air hose system to that type of chuck.
- So if you want just chucks, order the plain items, not the ones with 2air- or 4air- in front of them, and be sure to add the small item postage to your chuck order.
And don't worry, if there is some combination of chucks/genders/types that we don't list, ask and we can probably come up with a solution for you. The big advantage to our system is that we make use of standard 1/4" pipe thread fittings on everything so it is usually just a matter of screwing the right bits together to make up a custom adapter or fitting. Some examples of custom systems we have made are a 4air/6air system with quick disconnect couplers to separate the 2 extra hoses for the 6air system from the 4air. This owner had two different vehicles, one with 4 and one with 6 tires and wanted a syatem to work with both, but did not want the additional hoses getting in the way with the 4 tire vehicle.
Pricing and ordering:
We have a limited stock of items such as:
- Steering Extensions
- Driveshaft Spacers
- Upper Control Arm braces for 2WD Toyota pickups
- Weld-on Cab / Body Mount brackets
- Seat Lift kits
- Starter Solenoid Contacts
- Bilstein Shocks for VW pickups
- H4 switched power headlight relay harness
-
Some customers have reported issues with the Paypal order buttons while using the Safari web browser on an iPhone.
- If so, try a different browser and see if that works better.
| 4Crawler Offroad contact link | MissingLinkZ contact link |
Check out our growing collection of on-line design information so that you can make your own parts. Maybe you have a neighbor or acquanitance that can help or check out a local maker space or adult education machining class. Or engage a local or on-line machine shop to make them for you. Before you ask, no, we're not making any more of these items, rather we wanted to empower YOU to be able to make your OWN custom parts.
You'll find designs for body lift, suspension components and more, below:
- Thingiverse
- Printables
- Cults3D
- Maker World/BambuLab
-
GitHub
-
Includes RockSliderz and IFS Frame Brace designs
There's a wide selection of on-line 3D Printing and Machine Shop services available today. A few that we've heard of:
- Xometry.com, ProtoLabs.com, Mfg.com, eMachineShop.com, Hubs.com, RapidDirect.com, RenovoCNC.com, PartsBadger.com, ProtoTek.com, FicTiv.com, Jlc3DP.com, PCBWay.com, SendCutSend.com, etc.
-
Many of our model files use OpenSCAD and if you need to convert those to other CAD formats, use FreeCAD.
- Simply import the OpenSCAD file into FreeCAD then export it in the desired CAD format the on-line shop requires.
We have sold out of the 4Air systems.
NOTES:
- * Clip-less chucks are available as a separate item or as an upgrade to existing 2/4air systems
-
** Euro-style clip-type chucks with the same options as the clip-less
chucks. They feature a straight on design, vs. the right angle of the
regular clip-type chucks, and have a more secure engagement than the
regular clip-type chucks
- If ordering upgraded tire chucks or fittings for a 6air hose kit, be sure to order 1 ea. of the 4air-xxx and the 2air-xxx items in order to get a total of 6 upgrade chucks or fittings. For example to get 6 Euto-style chucks, order 1 - 4air-euc and 1 - 2air-euc, or 1 - 4air-edf and 1 - 2air-edf to get extreme duty fittings for a 6-way air hose.
-
*** Quick disconnect air pressure gauge upgrades, described in detail here, must also order a
gauge kit (4air-30, -60 or -100) to upgrade.
- Also noted that with the 4air-qd2 option, you replace the default Schrader valve on the 4air/2air manifold with a quick disconnect chuck. So if you still want the option of a Schrader valve on the system, order a 4air-sv (quick disconnect Schrader valve).
- Likewise, if you order a hard-mounted air pressure gauge (4air-30, -60, or -100), the gauge replaces the default Schrader valve.
- Or you can order the -qd1 or -qd2 option and then supply your own gauge as long as it uses a 1/4" NPT male thread base.
-
All parts are field serviceable:
- 4Crawler Offroad can supply replacement hose sections, chuck replacement kits, etc. as needed
- For example, on the clip-on air chuck, the inner rubber sealing washer can wear out over time
- A quick fix that will nearly double its life it to open up the chuck, remove the washer and flip it over to start using the un-worn surface
-
Kits are built to order.
- Allow 1-2 weeks for fabrication and 2-3 days for US shipping and 6-10 days for international shipping.
-
State, country or zip code needed for shipping/sales tax calculation:
-
- Add 9.0% sales tax for shipments to a California address:
- Automatically added if using the Buy Now buttons below
- If your billing address is outside of California, no sales tax applies
- Add $15.00 for regular or $18.00 for insured shipping on complete air hose systems, assuming US delivery, for a total
-
Inquire for international shipping options:
- New flat rate shipping to Canada of US$59.95 for all the above kits
- New flat rate shipping to most of Europe/Asia/Australia of US$89.95 for all the above kits
- Typical international shipping time is 6-10 days
- Extra large, custom air hose systems may not fit in the flat rate boxes and incur additional postage based upon size, weight and destination.
- For smaller items like air chucks (up to qty. 4), shipping rates are typically US$5.00 for first class or US$9.00 for priority mail in the US or US$33.00 for international shipping.
-
- Questions?
- Returns and exchanges
- Cancellation Policy
Shipping and Ordering options below:
Note:
- Extra large, custom air hose systems may not fit in the flat rate boxes and incur additional postage based upon size, weight and destination.
- We try to use USPS flat rate shipping, and as such, we can only fit one 2Air, 4Air or 6Air hose in a single box. Multiple systems will need to add separate postage, we'll try to ship in one large box, by weight, but if that comes out higher than 2 flat rate boxes, we'll ship the most economical way.
...
...
...
For custom orders, add parts total and select shipping option below:
[back to the top]Custom Systems:
If none of the above systems fit your application, custom 4Air systems can be designed to exactly fit your needs. Examples of custom systems are extra long wheelbase and/or extra wide 4Air hoses for full sized pickups. For this application, just supply the wheelbase and/or track width of the vehicle and add the cost of the extra hose length to the cost of the desired system above (don't forget that you need extra hose on each side of the 4Air system). Other custom systems include 6-way air hoses for vehicles with dual rear wheels such as RVs or dual rear axles, such as trailers. Also available are custom locations for the 4Air manifold (the place where the air compressor connects). Other custom system designs have adapted the 4Air hose to fit up to a Scuba tank regulator with a user-supplied air chuck fitting. We have also designed systems for people who want to permanently install the air hose on their vehicle and then have quick couplers at each wheel well to connect up the 4 tire valv e chucks for airing up and down. We have supplied systems that have quick couplers in the middle or at the ends to convert say from a 4-way to a 6-way system. In one case, the customer had a 4x4 and also a motor home with dual rear wheels, so he wanted the 6-way hose to work on the RV but didn't want to drag the extra house around when he had the 4x4 off road. We have also designed custom systems for use on boat lifts or rafts that use multiple inner tubes for flotation.
If you have an idea for an air hose setup, let 4Crawler Offroad know what it is you want and we'll see if we can design something to suite your requirements.
For custom systems, just specify the lengths of each hose segment of hose you need to reach from tire to tire and where you want the air manifold located. For easier measuring, you can use a length of rope or garden hose to run from point to point, allowing enough slack in the rope/hose to allow for easy access and then measure the length of the rope/hose needed. These systems are prices based upon the amount of hose and fittings needed.
[back to the top]Background:

If you've read this far and are still confused as to what this is all about, perhaps a little background information is in order. Back in the late 1990's, an outfit called Quadra-Flate Enterprises was making a nifty gadget called the Quadra-Flate. They seem to have since gone out of business as far as I can tell. Anyway, when I got into 4-wheeling, I bought a Quadra-Flate system, based partly on this product review. Anyway, I used the QF system for a while, but began to run into some things I didn't like about it.
- First off, I found you needed 3 hands to operate the thing, one to hold your air chuck, one to hold the QF manifold and another one to open and close the air valve to check the air pressure. So I installed a quick-connect coupler so I could just plug it into my on-board compressor.
-
I already mentioned the gauge problems, so I installed a standard
Schrader valve stem on it so I could hook up nice accurate digital
pressure gauge that I carried separately.
- This also let me use the same gauge to check the tire pressure separately.
- I found using two different gauges only meant that I didn't know what pressure I had, since its hard to find 2 gauges that read the same.
-
I assume the QF was originally designed for use on a Jeep, as it would
probably be ideal for an 80" wheel base vehicle.
- Any more than that and the hoses may not always reach, and in any even they seem to have been designed to fit 26" street tires, not the 33"+ off-road tires that I run.
- And since the hose fittings were crimped on, any modifications to the unit meant tearing it apart and replacing 90% of it.
- Also, the chintzy plastic air valve handle was not up to the rigors of off-road use.
So after making all these changes, I ended up ditching the QF system and designed my own from scratch to avoid all these problems. The key features I found for off-road use are flexibility, reliability and redundancy. Over the years, I assembled a good collection of attachments for the QF system to make airing up and down easier.
- For example an air chuck on a quick-connect coupler is handy for airing up one tire (for example after plugging a puncture or reseating a bead) without having to unroll the entire set of hoses.
- Also, the air chuck by itself makes a handy tool for airing down one or two tires, push it on the valve stem and out comes the air.
- The long hose set is useful by itself, I have hard-mounted my on-board air compressor, so I need a long enough hose to reach all 4 tires, with the QF and now the 4air I can not only reach all 4 tires, but reach them all at the same time. The Schrader valve stem on the 4air manifold lets me hook up an air gauge, but it also handy at filling stations, where you can't disconnect the air chuck from the hose. This really pays for itself at those coin drop air stations, you can just get everything hooked up, drop in your quarter and get all the tires done in one shot. You save the time of running from wheel to wheel and fumbling for more quarters in your pocket.
I also designed the system so that it could be easily modified to adapt it for custom applications. All the fittings are standard 1/4" NPT (National Pipe thread Tapered), so you can unscrew one thing and screw in something else. For example, one customer uses his at an ocean resort where they need to pull boat trailers out of the water several times a day. He airs down then airs back up with a SCUBA air tank and SCUBA air fitting that simply replaces the quick-connect coupler. The pressure gauge, if you decide to use one, is easily replaced if damaged (trust me it *will* get damaged). I only use parts that I (and you) can easily obtain from most any hardware store. As such, I can built a 4air system to meet your needs, or you can modify it yourself if you are so inclined.
With the disappearance of Quadra Flate Enterprises and their excellent product, I wanted to make my version available so others could benefit from it. I find this is one of the most useful tools I carry in my 4x4, it gets used at least twice every trip. If you would like to own a real Quadra Flate, I no longer use mine and will sell it for $60 plus shipping. I've rebuilt most of the air chucks, the air valve handle is a bit broken but it still works. I could install a new brass valve for $10 additional. If interested, please contact me.
And, what's up with the name, anyway? When you pull out that coiled up hose and start hooking it up to your valve stems and someone walks up to you and says:
- "What is that thing for?"
- You can reply:
- "Its 4air!" ( for air :)
Harry Lewellyn wrote an excellent article on "Tire Pressures for 4-Wheeling", highly recommended reading.
[back to the top] [Return to 4Crawler Offroad main page... ] <---
Comments
<---
Comments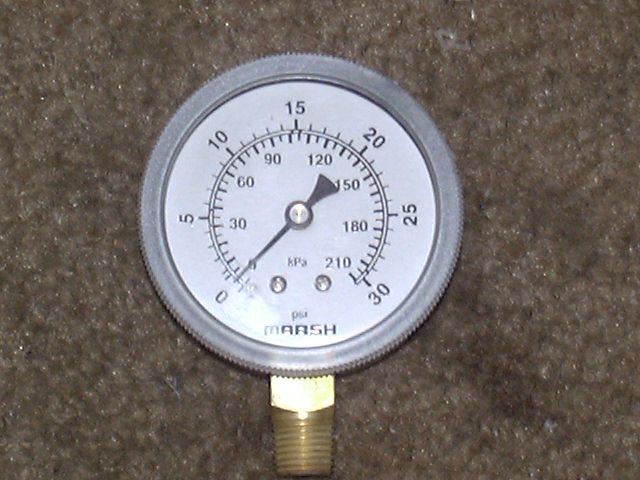
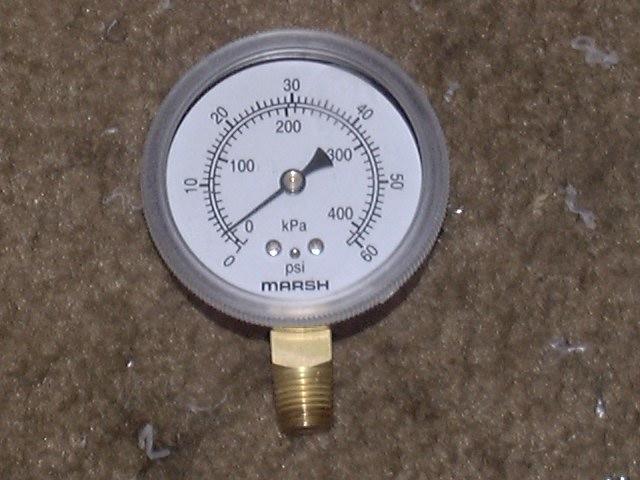
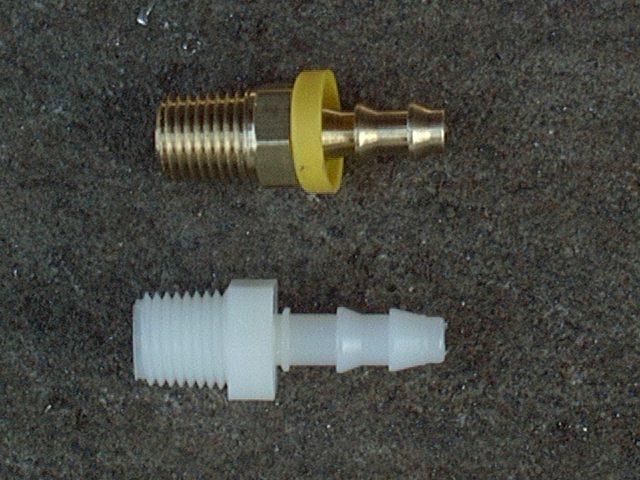
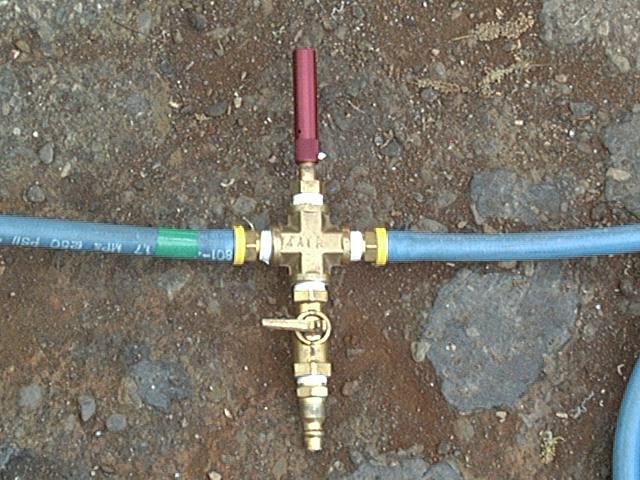
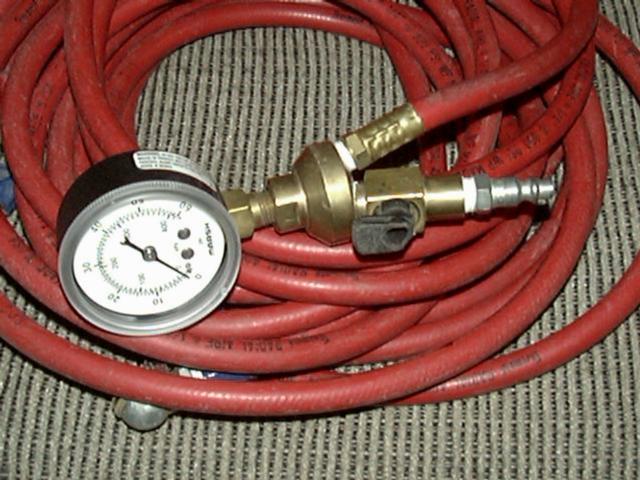
[Last updated: 31.December.2024 ]
Visitor # since 13.AUG.2001
![]()