
VW Accelerator Pedal Bushing
a product of Visual Diagnostics LLC
After 25 years in operation, it's time to close up shop and move on to other adventures. Thanks to all the loyal customers over the years that helped to make this all possible. The web site will remain live. If you have any Toyota or 4x4 related questions, feel free to drop me an e-mail and I'll try to answer.
Contents:
[Return to the main VW For Sale page...]Introduction:
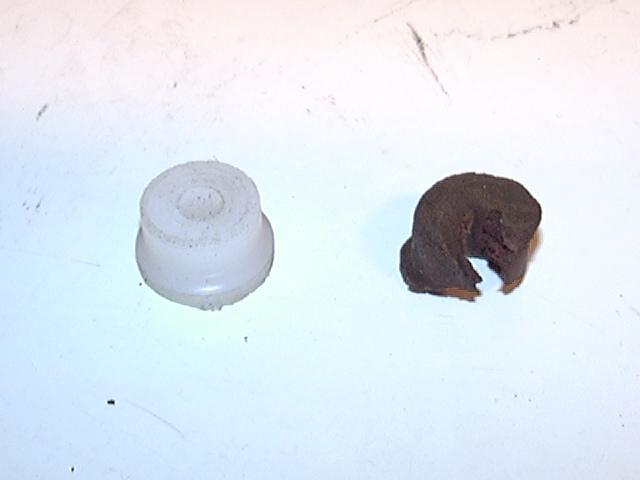
Ever get the feeling you have the accelerator pedal floored but are not getting full throttle? Assuming your throttle cable is properly adjusted, you may have a worn accelerator pedal bushing. This bushing is located in a loop on the end of the linkage arm attached to the accelerator pedal. The stock A1 bushings were made of a foam rubber and an upgraded solid rubber one is available for the A2s as a replacement. Over time, even the upgraded rubber bushing deteriorates and eventually disintegrates, like the one below did. Did you ever find a pencil in an old desk drawer and try to use the eraser only to have it crumble to pieces? Well, that is what happens to the rubber bushing given 5-10 years.
 |
 |
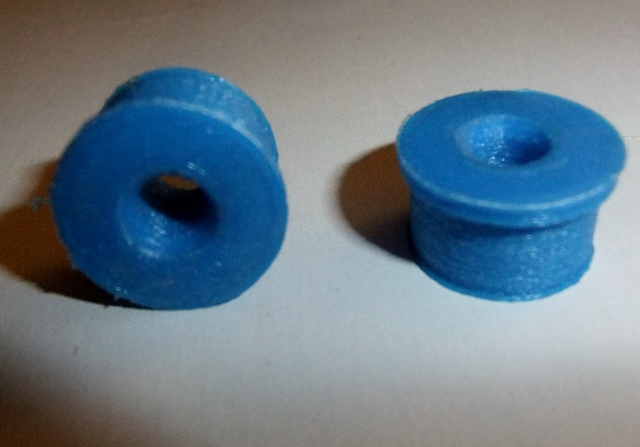 |
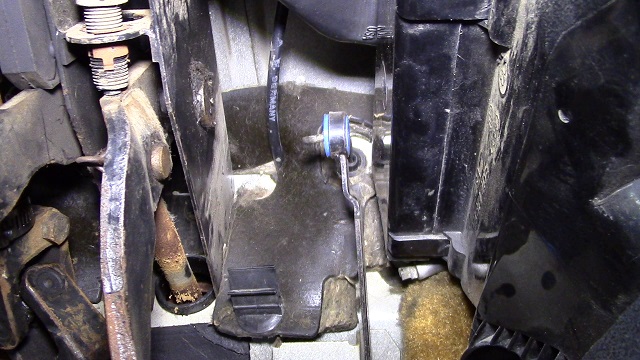
| A. New bushing vs. stock | B. New bushing installed | C. 3D Printed Bushing |
In the image A above, you can see the remnant of the OEM bushing on the right. While replacements are available, Missing LinkZ wanted something better. So we machined out a replacement bushing out of some Ultra-High Molecular Weight Poly-Ethylene (UHMW-PE). This is a direct fit for the stock A1 or A2 bushing (see installed image B, but will not age like the rubber bushing. It is also a stiffer material than rubber, so you won't have the sponginess of the stock bushing. Bushing is ~17mm in diameter and ~8mm thick plus a ~2mm flange to fit the hole in the upper end of the accelerator pedal.
Note: Some vehicles, including the 16V engine models, may have a significantly smaller diameter loop. If you have such a vehicle. contaqct us prior to ordering with a measurement of the inner diameter of the loop. We'll see if it's possible to print you a custom sized bushinhg. See installation notes below for other options,
And to improve on a good thing, we're now introducing a new 3D printed bushing made of a tough Nylon6 material, a pair shown in image C above. The 3D printed part provides a number of advantages over the original UHMW part. First is the tolerances are tigher on this part, typically to 0.2mm (200 microns). This is because UHMW is hard to machine in such a small size since it is both slightly soft and very slippery. And third, the 3D printing process lets us add small features such as the tiny rim on the small end. This protrudes about 0.5mm fron the main diameter to allow for a press fit into the hole in the accellerator pedal. It should give enough to be popped into place. And since there is some variation in the size of that hole, the Nylon6 material is more easily sanded down to size than the UHMW. And if the hole in the pedal is slightly oversize, the Nylon6 material is more easily glued in place than the UHMW. All in all, this is a better material for this bushing, giving more installation options and with the same durability of our original UHMW part.
While I like working on my VW, I don't like working on the same part every few years, I want to fix it once and have it last. I've now run run the prototype bushing for over 12 years now and it has no signs of wear.
[Return to the top of this page...]Ordering Information:
We have a limited stock of items such as:
- Steering Extensions
- Driveshaft Spacers
- Upper Control Arm braces for 2WD Toyota pickups
- Weld-on Cab / Body Mount brackets
- Seat Lift kits
- Starter Solenoid Contacts
- Bilstein Shocks for VW pickups
- H4 switched power headlight relay harness
-
Some customers have reported issues with the Paypal order buttons while using the Safari web browser on an iPhone.
- If so, try a different browser and see if that works better.
| 4Crawler Offroad contact link | MissingLinkZ contact link |
Check out our growing collection of on-line design information so that you can make your own parts. Maybe you have a neighbor or acquanitance that can help or check out a local maker space or adult education machining class. Or engage a local or on-line machine shop to make them for you. Before you ask, no, we're not making any more of these items, rather we wanted to empower YOU to be able to make your OWN custom parts.
You'll find designs for body lift, suspension components and more, below:
- Thingiverse
- Printables
- Cults3D
- Maker World/BambuLab
-
GitHub
-
Includes RockSliderz and IFS Frame Brace designs
There's a wide selection of on-line 3D Printing and Machine Shop services available today. A few that we've heard of:
- Xometry.com, ProtoLabs.com, Mfg.com, eMachineShop.com, Hubs.com, RapidDirect.com, RenovoCNC.com, PartsBadger.com, ProtoTek.com, FicTiv.com, Jlc3DP.com, PCBWay.com, SendCutSend.com, etc.
-
Many of our model files use OpenSCAD and if you need to convert those to other CAD formats, use FreeCAD.
- Simply import the OpenSCAD file into FreeCAD then export it in the desired CAD format the on-line shop requires.
We have SOLD OUT of these parts. If there's interest, we can provide a
3D printer file for this part.
If you are interested in replacing your worn bushing with an upgraded
replacement for all A1 and A2 model VWs (gas or diesel); Cost: US$10.00,
ships via first class parcel:
| First Class shipping: SOLD OUT | Priority Mail Shipping: SOLD OUT |
| ~~~~~ | ~~~~~ |
| SOLD OUT / Canada: | SOLD OUT / International: |
-
Notes:
- Parts are shipped from zip 94087 (CA)
- A tracking number will be provided
- Contact us for more information or for other options to order a replacement bushing
Installation Notes:
Please refer to the following notes for installation. Unless requested, no printed installation notes will be shipped with the bushing.
 |
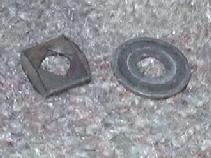 |
| A: Removing lock washer | B: Lock washer and washer |
 |
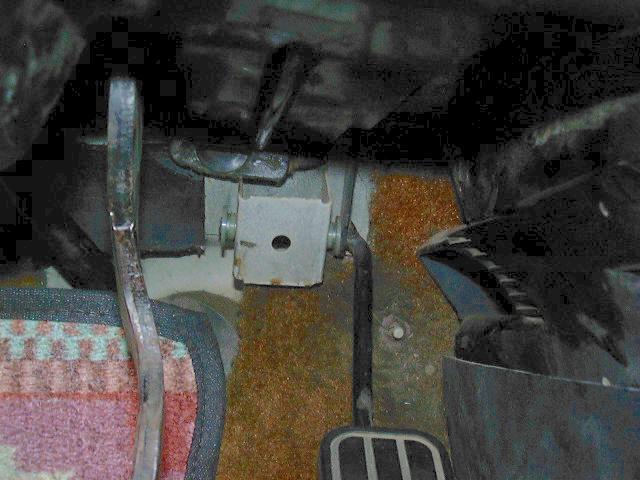 |
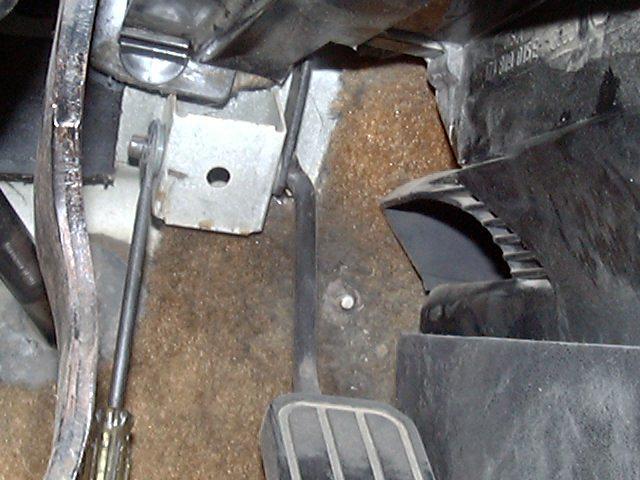
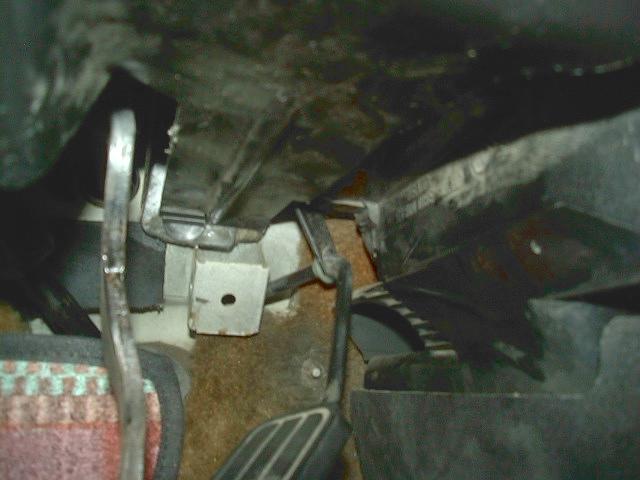
| C: Installing accelerator | D: Installing bushing |
-
Since the new bushing material doesn't compress like the stock rubber
bushing, it's designed to be a press into the hole in the accelerator
pedal. The new 3D printed Nylon6 bushing has a small lip around the
small end to facilitate pressing into place. This makes it much more
like the OEM rubber or foam bushing.
-
Probably easiest to do with the accelerator pedal removed from the
vehicle, but it can be done in place.
- If your vehicle has A/C, you may find the heater vents are larger and higher up than the one pictured above (C). In that case, removal and reinstallation of the accelerator pedal may be difficult. It may be a better idea to use a pair of pliers, vice grips or a clamp to press the new bushing into the end of the pedal arm.
- If you can't find a way to press it in, use a file or some sandpaper to reduce the OD of the lip on the bushing a little so its no longer a press fit, then slip it in and glue it in place.
- Note: Some vehicles, including the 16V engine models, may have a significantly smaller diameter loop. If you need to remove alot of material, chuck the bushing up in a drill, using a 4-5mm" bolt, and then spin the bushing against a file or coarse sandpaper to reduce the outer dimension to fit your vehicle.
-
If (and only if) you need to remove the accel. pedal
from the bracket to install the new bushing, you can use a screwdriver
to gently pry off the lock washer on the end of the accelerator pedal
shaft (see photo A above)
-
Be careful, the lock washer can fly off and get lost
very easily!!!
- If lost the VW p/n is: N-012-327-6 (or equivalent), a new one is NOT included with the bushing kit (see photo B above)
-
It is easiest to slip the pedal shaft out part way, then remove the
outer nylon bushing, then pop the inner bushing free and pivot the
pedal assembly free of the bracket, disconnecting the throttle cable
before removing it.
- Important note: If you find you have to really force the pedal assembly to remove it, realize that it may be even harder to put it back into the bracket, so you may want to consider replacing the bushing with the pedal assembly in place.
-
Be careful, the lock washer can fly off and get lost
very easily!!!
-
Depending on the amount of wear on the hook end of the cable, you may
find it's a tight fit into the hole in the bushing. It may be easier to
fit the cable into the end of the bushing before fitting the bushing
into the pedal loop.
-
If it's too tight a fit, a few options:
- Try soaking the bushing in some hot water for a few minutes to soften the Nylon and see if that helps with the hook insertion
- Use something like a small knife blade, deburring tool or a small drill bit to open up the hole in the busing just a bit.
-
If it's too tight a fit, a few options:
- And if you can get the bushing installed with the pedal in place, you are all set, no need to mess with removing the pedal from the bracket!
-
Remove the old bushing and
install the new one
-
It is a good idea to apply some adhesive or sealant on the back side of
the bushing to hold it in place.
- That side is left rough for better adhesion, I used Loctite Plastix Advanced Plastic Bonder on mine.
-
Note that the hole for the throttle cable can be slightly offset from
the center.
- This allows for fine tuning the pull on the throttle cable. In the picture above, I put the hole closer to the top, to give a slightly longer cable pull, as I was not getting enough throttle travel on my diesel injector pump. If the hole is offset to the front, you'll keep the same travel and down will shorten the travel.
-
It is a good idea to apply some adhesive or sealant on the back side of
the bushing to hold it in place.
- Install the inner nylon bushing and get the accelerator pedal shaft into the bracket (photo C above), this is a tight fit and you may have to use a little force to get it into the hole.
- Slide the shaft in and through both holes in the bracket and install the outer nylon bushing, washer and lock washer (see photo D above)
-
Probably easiest to do with the accelerator pedal removed from the
vehicle, but it can be done in place.
-
It is also a good idea to check your throttle cable adjustment at this
time, especially if you had changed it before replacing the bushing.
- Since this bushing material has very little compliance, you need to make sure that the throttle cable is not hitting the throttle stop before the pedal hits its stop.
- If it is, you could stretch the cable.
- Adjust the throttle cable by loosening the retaining nut under the ball stud and move it in or out along the throttle arm as needed.
- In some applications, a custom-sized bushing may be required. If you think you may need one, contact us for more details with the link below. We'll need a fairly accurate measurement of the inner diamter of the loop on the end of the throttle pedal. With our 3D printer, we should be able to make a custom size part in a few days.
[Return to the main MissingLinkZ page.. ]
[Last updated: 17.November.2025 ]
Visitor # since 21.MAR.2002