Coil Spring Spacers and Panhard Rod Drop Bracket
For 1990-1995 (2nd gen.) 4Runner/Hilux Surf and 1996+ non-US Hilux Surf models
Contents:
- Introduction
- Related Products
Introduction:
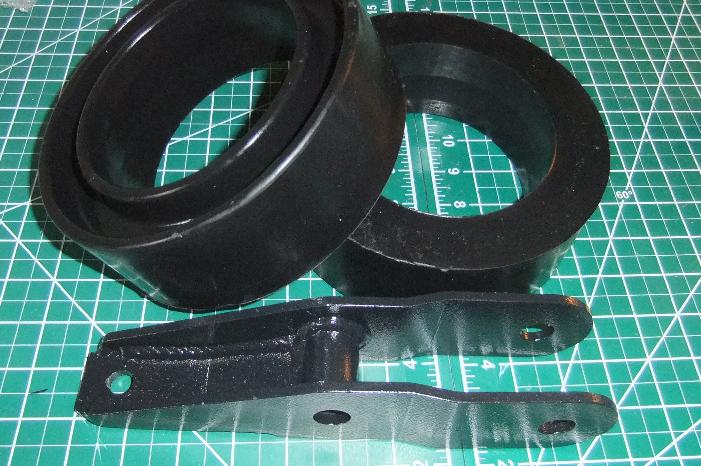
1.5" Lift Coil Spring Spacers are now available from 4Crawler Offroad Products! Some of the photos below may still be of our old 2" spacers which are no longer available. The 1.5" spacer looks very similar, just the height is different. They measure ~2-1/4" tall with a 3/4" deep recess that locates the top end of the coil spring.
 |
|
| '90-95 4Runner Coil Spacers and Panhard Drop Bracket |
A Coil Spacer Installed |
They are a good match in height when used in conjunction with the 1.5" ball joint spacers up front. Or by themselves, these spacers are just the ticket to counteract the classic rear end sag common on the 2nd generation 4Runner (1990-1995). The coil spring spacers only provide lift for the rear end of your 4Runner.
The spacers are designed to slip in on top of the stock rear coil spring. Made of resilient polyurethane, they should give many years of trouble-free and noise-free use. The inside of the spacer is designed to slip over the upper coil spring seat on the frame and then provides a new seat for the spring to rest on. The inner lip helps keep the coil spring centered on the spacer. The groove in the spacer is 5.25" (130mm) inner diameter and 6.625" (170mm) outer diameter, sized to fit the OEM 4Runner coil springs. If your springs are larger outside diameter, you may need to modify the spacer by trimming off the outer lip, easily done with a serrated knife lubricated with water or thin oil like WD40.
Coil spacers are an effective, low cost choice for leveling the rear end sag on the 2nd generation 4Runner. This is if you are otherwise happy with the rear springs, aside from their lack of height. If you find the rear coils are worn out and just too soft, then the spacer is probably not the best choice, since it will do nothing to stiffen up worn out coil springs. In that case. a set of heavy duty or lift coil springs would be a wise investment.
Will anything else in the rear suspension need to be changed after adding the coil spacers or installing new (or used) coil springs? Well as always, the answer is "it depends". If you have a typical 2nd gen 4Runner with 30+ year old stock springs that are sagging from their original ride height, then adding the coil spacers will essentially just get you back to stock ride height. As such, it is unlikely that you'll need to change much of anything in back. However, if you have recently replaced the springs, either stock height or lifted, then yes, you may need to change some things in back to account for the lift. How to tell what may be needed? Grab a tape measure and start checking things. For the shocks, you can jack up the rear end to let the tires hang freely and measure the extended shock length. Then unbolt the bottom of the shock and see if it can extend any farther and if so by how much. If it can extend about 1.5", then it'll be fine with the spacers, if not, you may need a longer shock. On the panhard rod, measure the height of the bolts at each end of the rod and if those are not close to the same, you may need to install a panhard drop bracket along with the coil spacers.
f you notice your rear brakes are a little weak, you may need to adjust the sensing rod on the Load Sensing / Proportioning Valve (LSPV) on the inside of the passenger side frame rail. For small adjustments, you can use the adjusting nuts on the rod end, otherwise, an LSPV bracket may be needed.
For more information, feel free to contact 4Crawler Offroad.
[return to the top of this page...]On-line Ordering:
2nd generation 4Runner coil spring spacers:
- Coil spring spacers via Amazon
- While listed as 1.25", these spacers measure 1.5" tall.
- Or paste this p/n into your favorite search engine or the search box below: Daystar KT09100BK
|
|
|
| 1 Pair 1.5"/38mm Coil Spring Spacers, US Delivery Panhard bracket not included with the spacers |
1 Pair 1.5"/38mm Coil Spring Spacers, Canada delivery Panhard bracket not included with the spacers |
1 Pair 1.5"/38mm Coil Spring Spacers, International Delivery Panhard bracket not included with the spacers |
| ################################ | ################################ | ################################ |
 |
|
|
| 1 Pair 1.5"/38mm Coil Spring Spacers and 1 Pair 1.5"/38mm Ball Joint Spacers; US Delivery |
1 Pair 1.5"/38mm Coil Spring Spacers and 1 Pair 1.5"/38mm Ball Joint Spacers; Canada Delivery |
1 Pr. 1.5"/38mm Coil Spring Spacers + 1 Pr. 1.5"/38mm Ball Joint Spacers; International Delivery |
Be sure to to bookmark, download or print out a copy of the installation instructions below. Printed instructions are not included with the spacers.
[return to the top of this page...]Installation Notes:
Replacing the rear coil springs on a 4runner is relatively easy. The short step by step is:
By jamming a piece of wood (2x4 or similar) between the brake drum and the wheel well, the axle should be low enough to work on the springs. The only tricky part of this, if using the spacers with lift springs is getting the springs compressed a couple of inches, as the spring compressors are difficult to work with in this confined area.
Here is a write-up on the installation process with additional photos and tips:
With variations in rear suspensions, you might find that the rear springs might pull away from the coil spacer under full spring droop. If this happens there are several options available. One option is to install some limiting straps on the rear axle to keep it from dropping low enough to take the tension off the springs. Straps are available from many off-road parts shops. Another option is to ensure your rear shocks are not too long. By design, the rear shocks are supposed to just limit the suspension down travel to prevent the coil spring from falling out.
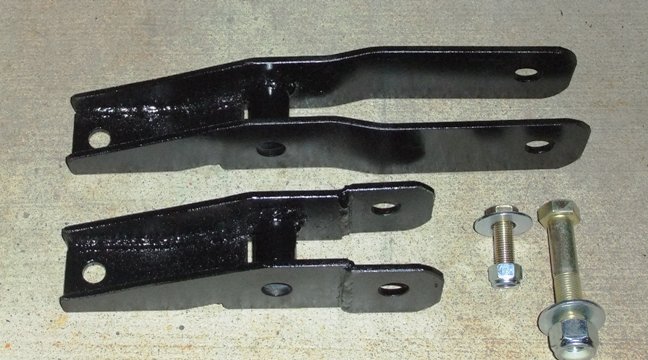
[return to the top of this page...]Panhard Drop Bracket for 1990-1995 (2nd gen.) Toyota 4Runner/Hilux Surf:
- YouTube video on how the panhard brackets are made:
- https://youtu.be/N0w3Bgzg2nY
The panhard rod drop bracket lowers the frame end of the panhard rod to compensate for the rear end lift. The panhard rod helps to locate the rear axle side to side and if not adjusted for the lift, it will tend to pull the axle towards the right side due to its higher angle from the frame to the axle bracket. Don't just go by the lift height on the box your springs came in. The best way to check the offset on the panhard rod is to use a tape measure and measure the height off the ground of the center of the mounting bolt on each end of the rod. The height difference between the two ends would be amount of drop your rod needs to be restored to level. Note that it is not critical to match that height difference exactly. For example, if you have recently installed new springs, you might want to allow for a little spring settling over time, so if you measure a 5" panhard end height difference, a 4" bracket may be just about right when the new springs settle an inch or so as all springs will do in time. See the image below for a view of what all this looks like:
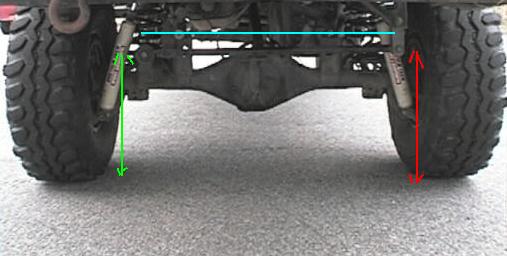 |
| Panhard Rod Overview |
In the above image, you can see how the rear end of the suspension should look like. The light blue line is horizontal and it lines up with the panhard rod showing that it is close to level. To ensure it is level, simply measure the height of the two ends of the rod from the ground (shown with the green and red arrows in the above photo). If the left and right side heights are the same, then the bar is level. If they are not equal, then the difference is the height of the panhard drop bracket required to restore the rod to horizontal. If you can look closely in the above image, you can see this 4Runner has a 4" panhard drop bracket installed and it also has 3" lift coil springs installed. This just goes to show it is better to measure the height of bracket you need than to just go with the advertised lift of the springs. This page has a good description of the Panhard Rod Geometry. about half-way down the article. And as quoted in this article from suspension designer John Hotchkis. And here's a short YouTube video on the same subject.
"The Panhard Rod should be as long as possible and be mounted horizontal at static ride height. An angled Panhard Rod will cause the suspension to move side to side during suspension travel."
Note that if you search the web for Panhard Rod geometry, you will find references to angled Panhard Rods, however, these are typically found on circle track race cars where you can adjust angle and location of the Panhard Rod in order to improve tire bite in one turn direction. While this works fine on a dedicated race vehicle, for an on-the-road type vehicle, it is probably more important to have equal handling in both left and right hand turns.
If you want to calculate what sort of affect a given panhard bar drop bracket (or lack thereof) will have on your rear suspension and axle location, you can try the link below:
Here's a really handy Java applet for calculating triangles side lengths and angles.
Simply choose the "2 sides and non-included angle" triangle calculator and enter two of the side lengths and one angle and it will figure out the length of the 3rd side for you (where was this tool in that high school geometry class?). So what measurements do you enter? Well, one is the length of the panhard bar, which is approx. 37" long, center to center, enter that number as the "side AC" length. Then for "side AB and AD", enter the difference in height of the two ends of the panhard bar that you measured on your truck. For example, lets say you measured 5" difference. Then the angle is easy, for a right triangle, that angle is 90°, so enter 90 in the "angle ACB" box and hit enter. There are two pieces of information to take out of the results, one is the "side CD" length, in this example it is 36.6". What this tells you is that the horizontal separation of the two ends of the panhard bar is 36.6". Now if the panhard bar were perfectly horizontal, then those two points would of course be 37" apart (i.e the same as the panhard bar is long). Since the frame end of the bar can't move, that means the axle has been pulled ~0.4" (37 - 36.6) towards the passenger side. And realize that the driver's side of the axle is pulled inward by that same amount so you'll see the rear tires offset by twice that amount; that is, the driver's side will be closer to the body by ~0.4" and the passenger side farther away from the body by ~0.4" so you'll see a difference side-side of nearly 0.8". The other item of note is the "angle ABC" that is about 7.7°. This is the angle that the panhard bar is currently sitting at. Ideally it should be around 0° if it were horizontal. So, given the setup in this example, if a 4" drop bracket were added to the passenger side of the frame, the current 5" difference would be reduced to 1" (5" - 4" = 1") and plugging that new number (1") into the "side AC" box, you'll find that the panhard angle has dropped to 1.5° and the offset of the axle is now about 0.02" (nearly 0) which is probably what you are looking to do. Your numbers will most likely be different, but you get the idea. And the main point to take away is that you only need to get the size of the drop bracket within an inch or so of the actual offset, since the panhard bar will be "close enough" with an inch or so of offset side-side. So don't worry about trying to get your measurements to some ridiculous degree of accuracy, getting within and inch or two is fine. It is not like there are any "panhard bar police" that will pull you over for a spot check!
Notes:
- This drop bracket kit is the perfect addition to to complete the popular FJ80 Land Cruiser coil spring swap. The cruiser coils give about 3"-4" of lift and that works great with the 4" panhard drop bracket to keep your rear axle centered under the vehicle after the lift. One other "clue" that you may need a Panhard Rod drop bracket is that after installing your lift springs or spacers, if you have to struggle to get the Panhard Rod back into the bracket, you may need the drop bracket. Also, it is a good idea to add a matching bracket to raise the sensing rod for the rear brake Load Sensing Proportioning Valve (LSPV). Also, the panhard drop bracket provides no lift of it's own, it is designed to restore the stock rear end suspension geometry that was thrown off due to some form of suspension lift.
- A DIY option is to lengthen the panhard rod itself. To do so, simply cut the bar in half and you can easily meansure the gap between the two ends in the middle. Either cut a piece of round stock to fillthat gap or cut a length of tubing, that fits over the rod, to span the gap and in either case, weld the added steel in place. This way you get an exact fit at a very minimal cost. No need for special jigs, just tack weld it in place then remove and finish welding.
 |
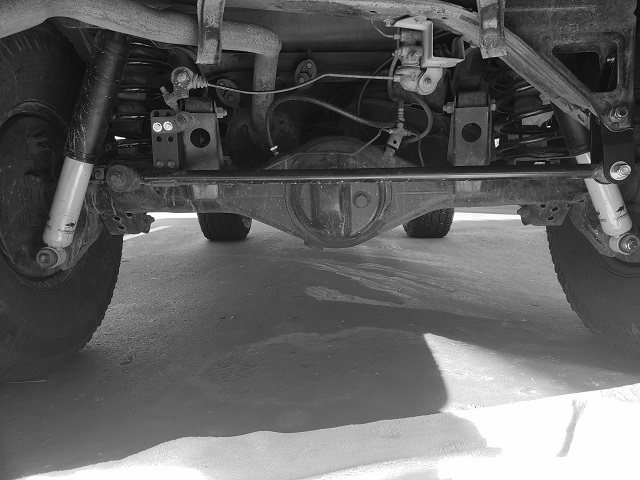 |
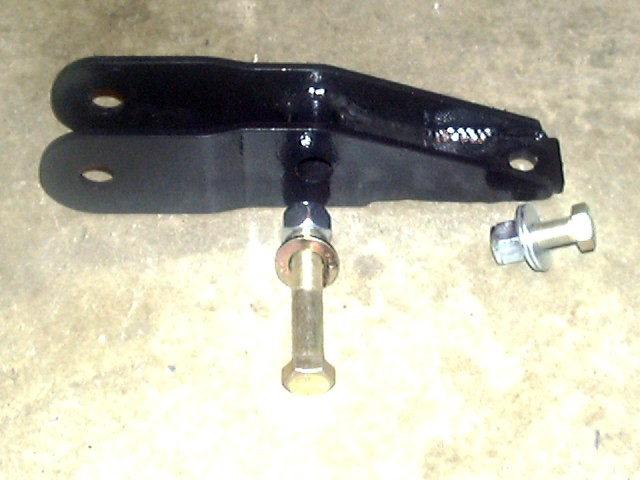
| Panhard Rod Drop Bracket | Panhard Drop Bracket and LSPV Installed |
[return to the top of this page...]
On-line Ordering:
4Crawler Offroad is no longer making these panhard drop brackets.
-
Brackets may be available from: Pro-Comp, 4WheelParts, Summit Racing
- Search for "Explorer Pro Comp 91-1268"
-
If you want to make your own bracket, here's a YouTube video with the details
- More information, including a 300dpi scan of the parts needed.
- Search for a local welder or fabricator if you don't have the skills to make one yourself.
-
Nolathane makes an adjustable length panhard bar that will help re-center your rear axle
- How? By making the panhard bar longer, that will push the axle towards the driver's side. This is a simple bolt-in solution.
- You can accomplish a similar effect by lengthening the stock panhard bar by cutting it and welding in an extension.
- Nolathane also makes polyurethane bushings to rebuild the original bar
These were the drop brackets we used to make:
-
Single drilled brackets from 2-1/2" up to 6" drop
- p/n: PanhardBktKit1X - SOLD OUT
- Cost: US$99.00
-
Double-drilled drop brackets have 2 holes, 1"/25mm apart for adjustability
- p/n: PanhardBktKit2X - SOLD OUT
- Cost: US$109.00
-
Triple-drilled drop brackets have 3 holes, 1"/25mm apart for adjustability
- p/n: PanhardBktKit3X - SOLD OUT
- Cost: US$119.00
- The multiple hole brackets are a good option if you're planning to install lift springs but don't want to wait and measure the actual lift height.
- All kits include the mounting hardware.
- Ships in USPS padded flat rate envelope
- Shipping weight approx. 3 lbs.
These brackets will not fit on the 3rd generation or later 4Runner models, try this instead.
Sizes available below:
Model Single Double Triple Drop(s) 2.5" - - 3.0" - - - 3.5" - - - 4.0" 3.0 - 4.0" - - 4.5" 3.5 - 4.5" - - 5.0" 4.0 - 5.0" 3.0 - 4.0 - 5.0" - 5.5" 4.5 - 5.5" 3.5 - 4.5 - 5.5" - 6.0" 5.0 - 6.0" 4.0 - 5.0 - 6.0" We've disabled the BuyNow buttons below. For questions, please contact 4Crawler Offroad. Pictured below, in the Single Drop kit column, is an example of the shortest and longest custom length brackets. Only 1 bracket is needed in any given application and the ordering is for a single bracket, unless you set the order Quantity to 2 or more.


Single Drop Kit
US DeliveryDouble Drop Kit
US DeliveryTriple Drop Kit
US Delivery################################ ################################ ################################ Single Drop Kit
Canada DeliveryDouble Drop Kit
Canada DeliveryTriple Drop Kit
Canada Delivery################################ ################################ ################################ Single Drop Kit
Int'l DeliveryDouble Drop Kit
Int'l DeliveryTriple Drop Kit
Int'l Delivery-
Please Note:
-
These drop brackets fit 1990-1995 Toyota 4Runner/Hilux Surf models and
also should fit 1996 and later Hilux Surf models outside the US,
i.e. torsion bar front and coil spring rear suspension.
- These brackets will not fit on the 3rd generation or later 4Runner models, try this instead.
-
These drop brackets fit 1990-1995 Toyota 4Runner/Hilux Surf models and
also should fit 1996 and later Hilux Surf models outside the US,
i.e. torsion bar front and coil spring rear suspension.
- You will need to drill one hole in the existing panhard bar frame bracket to install this drop bracket.
- Be sure to to bookmark, download or print out a copy of the installation instructions below. Printed instructions are not included with the spacers.
Panhard Drop Bracket Installation Notes:
If installing a lift at the same time as the drop bracket, first remove the passenger side panhard rod bolt. Then install the lift before proceeding. For easiest removal and installation of the panhard rod, do so at normal ride height on level ground and not while the rear tires are off the ground.
If a lift has already been installed, you may find it necessary to compress the rear suspension somewhat to aide in panhard bar removal or installation. A few people on the rear bumper or add several hundred pounds of cargo on the back may do it. You are trying to reduce any tension on the panhard rod in order to allow the eye bolt to be removed. Alternately, you can try running one of the rear tires up on a small vehicle ramp to compress the suspension on that side. You could also try lifting the rear of the vehicle (block the front tires to prevent rolling) up so the tires leave the ground. Then, see if you can move the rear axle side to side to get into a more centered position before lowering it back down. Another option is to use a ratchet strap or Come-A-Long to pull the axle into better alignment with the body/frame. Or if access to the upper bolt is difficult, try removing the lower bolt on the driver's side, before removing the passenger side bolt.
The issue in all the above cases is that the rubber bushings in the suspension links may have taken a set, shifting the axle to one side or the other. You may not be able to move those just by pulling/pushing on the panhard bar by hand. Another thing to try is temporarily loosening the control arm bolts at the frame and axle to allow some movement in those bushings. Be sure to tighten those back up afterwards. Once you've corrected the panhard bar alignment, with the drop bracket, those bushings will gradually revert to their original alignment.
Insert the drop bracket into the factory panhard rod bracket and insert the larger bolt (if ordered) to locate the drop bracket. Mark the location of the upper bolt hole and drill it out to fit the small bolt (7/16" - 1/2" hole), if needed. Some vehicles may have an existing hole to use. Make sure the upper part of the drop bracket fits down deep and flush into the existing frame bracket. If not, make sure to clean out any excess factory undercoating or other material that may prevent the drop bracket from sitting flush inside the frame bracket.
Then, install the smaller bolt (if ordered) loosely, then the supplied 9/16" bolt and finally the factory panhard rod bolt through the passenger end of the panhard rod. Once all 3 bolts are in place, first tighten the upper bolt in the drop bracket, then the middle bolt and finally the panhard rod bolt.
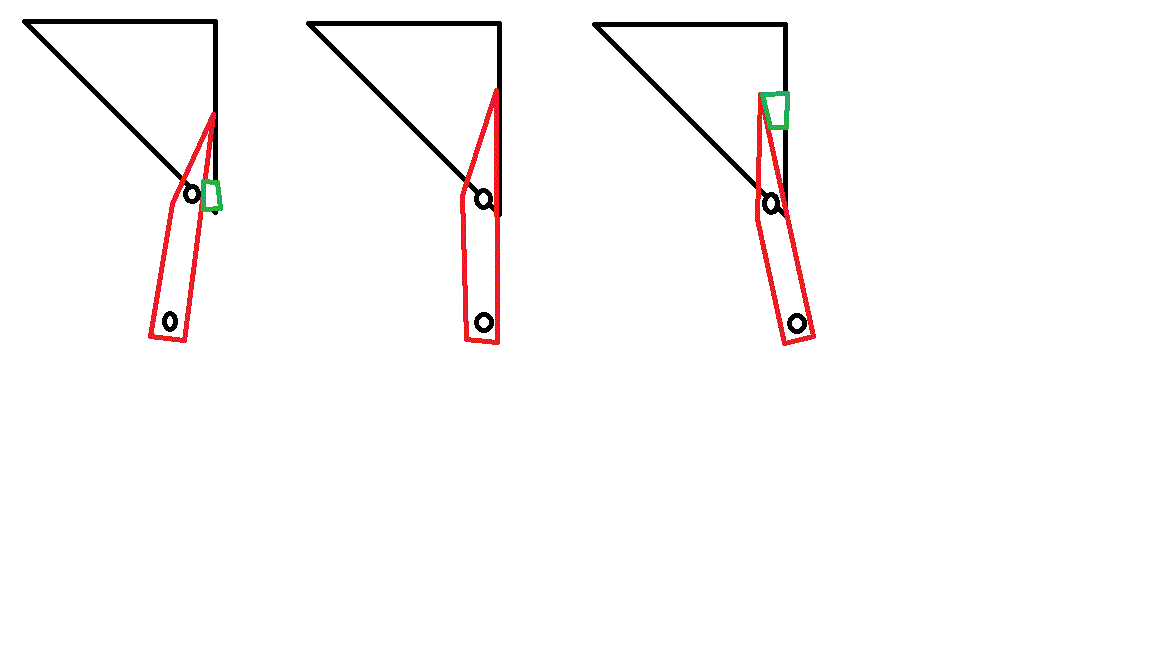
Note that is is possible to make small side-side adjustments on the end hole of the drop bracket if you find you need to move the bottom hole to the passenger or driver side to get your rear axle centered at normal ride height. To move the bottom of the bracket to the passenger side, just insert one or more washers between the drop bracket and top hole in the frame bracket before installing the upper bolt. To move the bracket to the driver's side, you can slide some shim material of the needed thickness behind the bottom part of the drop bracket, behind the through-bolt. If needed, you can enlarge/elongate the holes in the frame bracket to allow for the thickness shim you need. With the geometry of the mounting holes, you can get about a 2:1 motion of the bottom of the bracket to the shim/washer thickness. That is, 1/8" of shim or washer would move the bottom hole about 1/4". If using shims on the bottom, be sure that they are secure in place and won't fall out. You could tack weld a steel shim in place, or even use some exterior construction adhesive to hold it in place. See the diagram below for the basic idea of adjusting the panhard bracket offset. In the middle is the basic configuration with the drop bracket mounted vertically in the frame bracket. On the left is the bracket shimmed at the bottom to push the bottom hole farther towards the opposite side (compensates for a too short panhard rod). And on the right is shimmed at the top to move the bottom hole away from the opposite frame rail (compensates for a too long panhard rod). You can click the diagram below for a larger version. Black is the stock frame bracket, red is the installed drop bracket and green denotes where to shim the bracket:

You'll want to drive the truck around a bit after making any adjustments before measuring any changes. Why? Well, if you have the vehicle sitting there on 4 tires and the body and frame on top, simply changing the way that single suspension component sits will not do much of anything other than change forces applied to various suspension and frame parts. After a bit of driving, with cycling the suspension up and down and side to side, that will let everything come back into their natural positions. And if you still find some offset in the rear axle and have everything else in correct alignment, one solution is to lengthen or shorten th panhard rod to make the final adjustment. Making the panhard rod longer will push the axle towards the driver's side, shorting will move it to the passenger side. A simple way to change the rod length is to measure the offset distance you wish to compensate for and also the outer diameter (OD) of the rod itself. Then find some steel tubing with an inner diameter (ID) matching the OD rod and get a few inches of that material (we can likely supply the rod given the ID and length you require). Then cut the panhard rod, make the length adjustment and sleeve the gap with the tubing and weld the ends of the tube to the rod. Prime and paint and reinstall. Alternately, you could probably use a longer section of tubing and then drill a couple of bolt holes through the sleeve and rod ends for a pair of bolts on each side of the cut.
- NOTE:
- Since you had to adjust the panhard rod for your lift, you'll want to make a similar adjustment on the sensing rod for the rear brake Load Sensing Proportioning Valve (LSPV) in order to return the rear braking to their original effectiveness. To do so, a simple bolt-on bracket to raise the sensing rod off the axle mounting bracket is available here.
Frequently Asked Questions:
- Will longer shocks be required?
- Can I use these spacers with lift springs for more height?
- Will I need any other parts to install these spacers?
- Which is better lift option; coil spacers or new, longer coil springs?
- What are the dimensions of the spring spacers?
- 1. Will longer shocks be required?
-
- It is hard to say for sure. The best option is to measure the compressed and extended shock lengths needed for the spacers once they are installed. If the shocks do not limit spring travel, then they are fine to lease as-is. If the shocks only slightly limit the downward spring travel and you don't take your 4Runner off-road, that may be OK, since normal street driving is likely to push the suspension anywhere close to its limits. If they severely limit the spring travel, or you take the 4Runner off-road, the shocks should probably be replaced with longer parts. Then order a shock that meets those needs. Here is a table of some common longer shocks that may be suitable.
- 2. Can I use these spacers with lift springs for more height?
- Yes, no problem using the spacers on top of lift springs. See the installation instructions and the write-up there for some considerations.
- 3. Will I need any other parts to install these spacers?
-
Lets start out by saying "it depends". That
is it depends on what the ultimate goal of installing these spacers is
and what else you are doing to the rear suspension. If you only goal is
to get rid of the "butt sag" common on the 2nd gen 4Runner
vehicles, then installing the coil spacers with the stock sagging rear
springs is essentially just restoring the factory ride height. As such,
the shocks will be fine (assuming they were fine before), the panhard
rod will be back to its original position, the LSPV sensing rod will be
back to normal and the brake line will be fine.
- However, if you are installing the spacers along with some other lift springs, then you'll want to adjust the rest of the suspension to account for the lift you are installing plus the height of the spacers. So, you'll probably want to adjust the Load Sensing Proportioning Valve (LSPV) sensing rod attached to the axle to account for the lift. This rod senses the ride height and adjusts the rear braking bias up or down depending on the sensed load. Unfortunately a "suspension lift" looks to the LSPV as if there is no weight on the back axle and thus it cuts the rear brake pressure to a minimum. By raising the sensing rod off the axle an amount equal to the lift height will compensate for the lift and restore normal braking effectiveness. A simple bolt-on, custom height LSPV relocation bracket is available here. You'll likely need to install a panhard relocation bracket if going up above 1.5" of lift from stock and likely you'll need longer shock absorbers sized for the total lift.
- 4. Which is better lift option; coil spacers or new, longer coil springs?
- It all depends on the condition of your existing coil springs, the amount of lift you are looking for and your load carrying needs. So if you are otherwise happy with your existing coil springs, aside from the ride height, and are looking for about 1.5" of lift over what you have now, then the coil spring spacers are an excellent option. You retain the stock ride, get rid of the sagging rear end look and save money over buying new springs. However, if you find your existing springs are too soft, for example you bottom out the rear suspension when heavily loaded, you may find longer coil springs as a better option. One popular spring is off an FJ-80 Land Cruiser, you can search the 2nd gen 4Runner forum on http://www.yotatech.com/ for more information.
- 5. What are the dimensions of the spring spacers?
- The spacers are sized to fit the factory rear coil springs on the 2nd generation (1990-1995 models) Toyota 4Runner/Hilux Surf. As such, the outer diameter of the spacers fit into the spring cup on the frame and are approx. 7-3/16" (180mm) outer and 4-7/8" (125 mm) inner diameter. A groove for the coil spring on the other side is 6-5/8" (~170mm) outer and 5-1/4" (~130mm) inner diameter. A 3/4"tall inner/outer lip at the top of the spacer rests around the coil spring and locates the spring on the spacer. And of course from the bottom of the spacer to the bottom of the groove that the spring rests on is 1-1/2", so overall with the lip, the spacer is 2-1/4" tall.
[Last updated: 12.January.2026 ]
Visitor # since 14.OCT.2005