
Custom Body Lift and Removal Information
 Designed in the USA
After 25 years in operation, it's time to close up shop and move on to other adventures. Thanks to all the loyal customers over the years that helped to make this all possible. The web site will remain live. If you have any Toyota or 4x4 related questions, feel free to drop me an e-mail and I'll try to answer.
We have a limited stock of items such as:
- Steering Extensions
- Driveshaft Spacers
- Upper Control Arm braces for 2WD Toyota pickups
- Weld-on Cab / Body Mount brackets
- Seat Lift kits
- Starter Solenoid Contacts
- Bilstein Shocks for VW pickups
- H4 switched power headlight relay harness
-
Some customers have reported issues with the Paypal order buttons while using the Safari web browser on an iPhone.
- If so, try a different browser and see if that works better.
| 4Crawler Offroad contact link | MissingLinkZ contact link |
Check out our growing collection of on-line design information so that you can make your own parts. Maybe you have a neighbor or acquanitance that can help or check out a local maker space or adult education machining class. Or engage a local or on-line machine shop to make them for you. Before you ask, no, we're not making any more of these items, rather we wanted to empower YOU to be able to make your OWN custom parts.
You'll find designs for body lift, suspension components and more, below:
- Thingiverse
- Printables
- Cults3D
- Maker World/BambuLab
-
GitHub
-
Includes RockSliderz and IFS Frame Brace designs
There's a wide selection of on-line 3D Printing and Machine Shop services available today. A few that we've heard of:
- Xometry.com, ProtoLabs.com, Mfg.com, eMachineShop.com, Hubs.com, RapidDirect.com, RenovoCNC.com, PartsBadger.com, ProtoTek.com, FicTiv.com, Jlc3DP.com, PCBWay.com, SendCutSend.com, etc.
-
Many of our model files use OpenSCAD and if you need to convert those to other CAD formats, use FreeCAD.
- Simply import the OpenSCAD file into FreeCAD then export it in the desired CAD format the on-line shop requires.
For example with Thingiverse:
- Body lift blocks and hardware
- Radiator brackets
- Bumper brackets
- 2-piece body mount bushings
- Shift lever extensions
- There are 3D printable models, or you can generate a number of CAD file formats with the OpenSCAD files.
- See if you can find a local shop or one of the many on-line shops (above) to make any of those parts for you if you lack the ability to make them yourself.
Contents:
- Introduction
- Vehicle Applications and pricing / Information on various body lift kits we used to make:
-
Body Lift Kit - options
- Standard vs. Ultimate blocks, what's that all about?
- Standard vs. Heavy Duty hardware, what's that all about?
- What about manual transmissions and transfer case shifters?
- What about automatic transmissions?
-
What about steering?
- Limited supply of steering spacers available
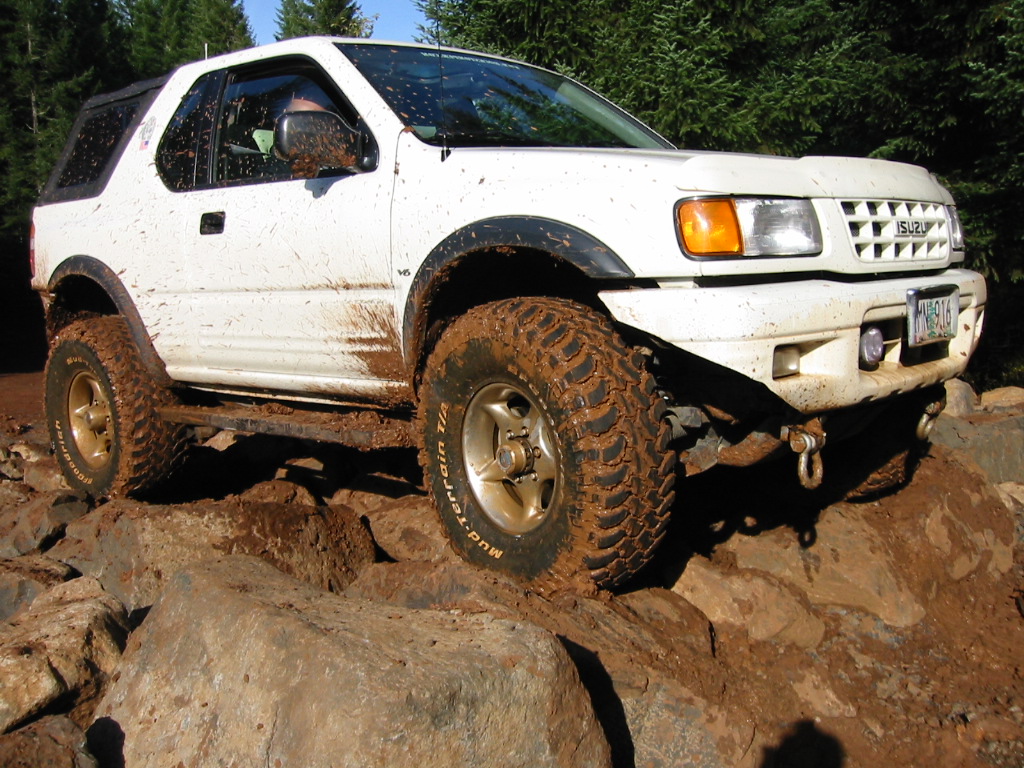
- Steering extensions for 4th gen. 4Runner, FJ Cruiser and Isuzu Rodeo
- Bumper relocation
- Radiator relocation
- Bed Spacers for pickup models
- Polyurethane Body Mount Bushings
- Body Mount Brackets
- What about wheel well liners or Gap Guards?
-
Frequently Asked Questions (and answers, too!)
<<< Please read this section
- If you are looking for a new body lift kit design <<< Please read this answer
- Lifts in General
- Body Mount Tech
- Materials
- Disclaimer
- Installation instructions
[ E-mail for additional product information or to place an order ]
NOTE: If you e-mail 4Crawler Offroad a question, . We get several e-mailed questions a week with invalid return addresses. We try to answer all e-mail questions in 24-48 hours, if you've sent a question and have not received a reply in that time, feel free to e-mail again (with a valid e-mail address to reply to). Also, if you utilize a Spam blocker, please be sure to allow a reply from the e-mail address "sales@4crawler.com". Please consult the Frequently Asked Questions section prior to e-mailing a question and if you want to get an idea on kit pricing, see the pricing tables here. Your answer may already be there!Here is a plain e-mail link
Here is one you can cut and paste into the To: field of your e-mail program >>> sales@4Crawler.com <<<
Introduction:
So, why in the world did 4Crawler Offroad decide to make body lift kits? There were a few reasons:
-
When many folks want to do a "mild" 1" body lift, and
there was nothing commercially available.
- You either made your own or bought a 2" or 3" lift kit and cut it down to size
- Either option requires a fair amount of time and money
- Also, there are countless horror stories of improperly designed body lifts failing, such as drilling holes in hockey pucks, etc.
-
A few companies offer 1" body lift blocks:
- Rusty's Offroad, uses a cast block (not sure what metal is used), with holes that are too large for the stock Toyota hardware
- Another option is to buy a readily available 2" or 3" body lift kit, cut down the blocks and buy new, shorter hardware and the bracketry will be the wrong size
- It was apparent from the supplied components that it is doubtful anyone ever tried to actually install these kits on the target vehicle; bolts that are too long or too short, generic instructions, and general poor quality materials.
- Use "hockey pucks" or washers, or other spacers, which may not last long in this application
-
Finally, there are a number of "orphan" vehicles for which
there is little or no aftermarket support for due to low demand.
- If it has body-on-frame construction, it should be possible to make a body lift kit for it!
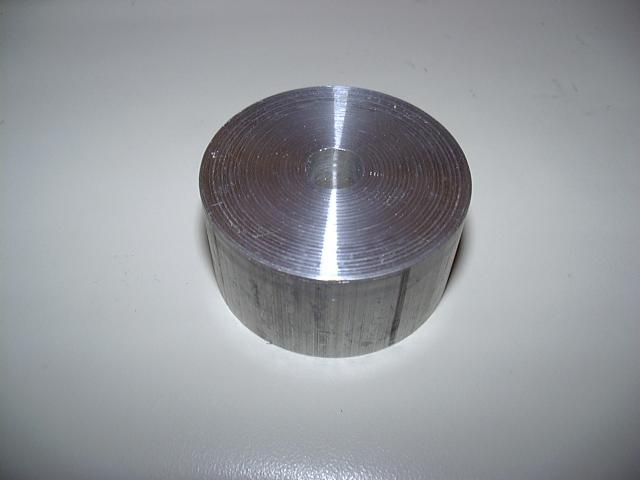
When it came time to upgrade a home-made 1" body lift, 4Crawler Offroad researched available materials and first decided to make a billet aluminum body lift block, similar in shape and size to the more common cast aluminum (at least that's what they claim they are made of) blocks, but out of stronger, solid material. The aluminum blocks were fine for a 1" lift, but a set of 3" tall blocks were made and installed, it just didn't look right. The 2" dia aluminum rod used was just not wide enough to offer support at 3" tall. While a larger diameter aluminum rod could have been used, it starts to get much more expensive and is harder to work.
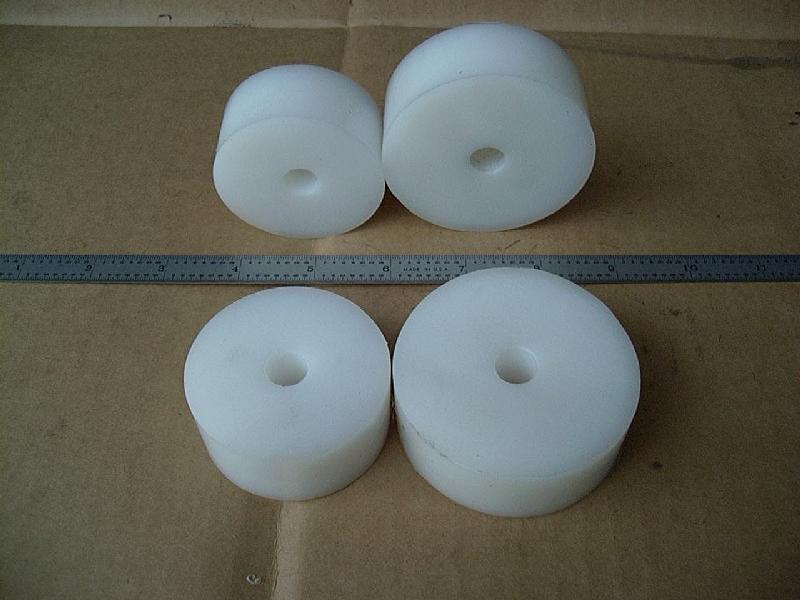
After searching for a better material, Ultra High Molecular Weight (UHMW) polyethylene rod was selected and is available in a variety of sizes perfect body lift blocks. It has all the desirable properties one would want in a body lift block. Since this rod comes in long lengths, it can be cut any length desired from 1/2" up to 3" and anything in between. It takes a fairly significant investment in machinery and tooling to work this material. Also, since the parts are built to order, adapting them to other vehicles is not a large issue. After all, lifting a Toyota 4Runner 1" is fundamentally no different than lifting a Landcruiser or other vehicle 1". If it's got a body on frame construction and some way to get a spacer between the two, you've got a body lift.
At this point, you may be wondering what the heck a body lift is and why would you even want one...
[Return to the top of this page]Lifts in General:
So why a body lift and what other lift options are there? In general there are three basic techniques available to lift a vehicle:
- Install larger diameter wheels and/or tires
- Modify the suspension ride height
- Raise the body off the frame (assuming its not a unitized body construction)
Usually, installing larger tires (#1) require that either #2 or #3 be done to provide adequate clearance for the tires within the wheel wells. Suspension lifts (#2) can be simple or complex, depending on what is modified and how it is done. Similarly, body lifts (#3) can be simple or complex, but are generally simpler and less complex and expensive than suspension modifications. Since the body lift only raises the body, it has less adverse impact on the vehicles center of gravity than other lift techniques, since the frame, engine and drive train remain at the original location.
If you assume a typical vehicle with perhaps 25% of it's mass in the body and perhaps 10% in the axles/wheels/tires, then look at the various types of lifts:
- Taller tires will raise nearly 100% of the vehicle's mass higher at the rate of 1" for every 2" of increase in tire diameter, since essentially every part of the vehicle is raised. Thus a 2" taller tire (i.e. 1" of lift) will raise the vehicle's center of gravity 1".
- A suspension lift will raise about 90% of the vehicle's mass (all but the ~10% unsprung weight of the axles, wheel and tires) at a rate of 1" for every 1" of lift. Since 90% of the mass is being raised 1", the center of gravity will raise about 0.9" as a result.
- A body lift will raise only 25% of the mass of the vehicle (i.e. only the body) so a 1" body lift will only change the center of gravity of the vehicle by that same ratio, or 0.25".
- So, while all the above lifts will raise the center of gravity of the vehicle, they do so at different rates for the same amount of lift. And it is the overall impact of all the lift that a given vehicle has that will ultimately affect it's stability.
By raising the body up off the frame, you can gain needed room for larger tires and/or added ground clearance to protect the body from trail damage. However, a body lift will do nothing to change the operation of your suspension by itself. However, by combining a mild body lift, with a mild suspension lift may allow fitting a taller tire and result in a combined system that functions better than the individual components.
"Lift as much as needed, but as little as possible"
Each type of lift has its advantage and disadvantages. After all if there were just one perfect way to lift a vehicle, everyone would use that technique and you would have no other choices.
- Taller tires increase ground clearance under every part of the vehicle and work better off road as they give more traction and are able to tackle bigger obstacles. On the downside, taller tires often require regearing to make up for the lost torque due to the greater tire diameter. Likewise a taller tire needs more room to fit under the vehicle without rubbing. So you can either trim the body away to fit the tire or somehow lift the body away from the tires to make room for them.
- One way to make room between the body and tires is to raise the suspension. A suspension lift may offer better performance off road if it is capable of increased wheel travel and articulation. However, this is not always the case since some suspension lifts use stiffer, less flexible springs or blocks or drop brackets that do little to improve suspension capability, aside from the lift. On the down side, suspension lifts test to be expensive and the taller the lift the more the cost, since more issues arise that need to be addressed. Along with the lift, you may need longer shocks, longer brake lines, longer drive shafts, etc. Suspension geometry may be negatively impacted. And on some vehicles, there is an upper limit to high high a lift can be done. Also, suspension lifts may be advertised as X", but you may see more or less lift than advertised.
- This leads to the 3rd lift option of a body lift. Body lifts tend to be less expensive than suspension lifts. They are also more predictable in terms of lift height. After all you are placing a known thickness block between the frame and body and you will see exactly the amount of lift that the block is tall. So this makes a good alternative to getting that little extra lift you may find you need after installing a suspension lift, for example. A body lift will not affect drive shaft, shock absorber, or brake hose lengths. It will also not impact suspension or steering geometry. A body lift is a passive form of lift, in that it will not do anything to make your suspension work any better off road, aside from giving more room for the tires to move around under the body without making contact. Also there will be no increase in under vehicle ground clearance (a.k.a. break over angle), unless you also raise the drive train and other low hanging components up to match the lift. However, if bumpers are raised to match the body lift, you may see increase approach and departure angles.
See the following section for a list of frequently asked body lift related questions...
[Return to the top of this page]Here are some frequently asked questions:
- What constitutes a "mild" body lift?
- So, 1" isn't all that much, is it even worth doing?
- What about taller body lifts?
- Why might I need a body lift at all?
- I've got an XYZ vehicle, do you make a lift kit for it?
- What if I have a flatbed on my pickup and only need to lift the cab, do I have to buy a "full kit"?
- What is included in the body lift kit?
- How much does it cost?
- How long will it take to get the kit?
- How large a tire can I fit with X" of lift?
- What if I already have a body lift and want to remove it, reduce it's height or adapt it to another vehicle?
- I'm looking for an "RB" or "Roger Brown" body lift kit, where do I find that?
- What are bed spacers and do I need them?
- I already have a suspension lift and have some tire rubbing, can I add a body lift on top of the suspension lift?
- Is 4Crawler Offroad still in business and making body lift kits?
-
Does a body lift replace the body/cab mount bushings?
Have a question not listed above, send an e-mail and we'll try to answer it.
1. What constitutes a "mild" body lift?
- In our definition, this is any body lift you can install before encountering major modifications.
- With the stock Toyota design, there are two likely "mild" lift points, one at about 1/2" and another at 1".
-
At 1/2", you may be able to re-use the stock fasteners, taking
advantage of the excess bolt length, to get a little bit of lift.
-
This assumes you have at least 1/2" of exposed bolt length past
all the body mount nuts, check to be sure, this varies by year and body
style.
- If needed, 1/2" longer than stock hardware can be supplied.
- Useful for installing rock sliders - exposes a bit more frame for stronger attachment.
-
This assumes you have at least 1/2" of exposed bolt length past
all the body mount nuts, check to be sure, this varies by year and body
style.
- At 1", you'll need to replace the stock fasteners and possibly make minor modifications to a few other parts.
- Beyond 1", you'll start to have issues with more components like shift and steering linkages, gas tank filler hoses and other frame-body inter-connections, but on some vehicles, 1.5" or 2" lift is still pretty easy to do.
-
An automatic transmission has more complex linkages than a manual
transmission.
- Most Toyota automatic transmission linkages can accommodate a 1" body lift without adjustment and there is a bolt-on bracket for 2" and 3" body lifts on 1st and 2nd gen 4Runner and pickup. The 3rd gen 4Runner and Tacoma A/T linkage is fully adjustable, so no bracket is needed up to a 3" lift.
-
For the newer model Toyota vehicles with rack and pinion steering (like
'96 and newer 4Runners, Tacomas, etc.) anything over a 1/2" body
lift will likely require modification of the steering shaft.
- A bolt-on steering shaft extension is available.
- Note that certain localities may have their own definition of mild (i.e. allowed) body lifts. For example, in Hawaii, there seems to be a 2.5" body lift height limit, such that 2" lift is OK and 3" is not. So be sure to check your local vehicle regulations prior to ordering or installing a body lift. Other states may have overall lift height limits, or height limits on for example bumpers or headlights, etc. Here is an old page that had a decent summary (may be outdated by now):
2. So, 1" isn't all that much, is it even worth doing?
- One way to look at that, is that using a 2" taller tire (say going from 31" to 33") will raise your vehicle 1", granted all points of the vehicle will go up 1", including the body, but an inch is an inch.
- From a simple-minded perspective, using a 2" taller tire, will require 1" additional wheel well clearance (may need more) and a 1" body lift can provide that 1".
- Toyota trucks have fairly long front and rear overhangs, anything you can do to raise the ends of the vehicle will increase your approach and departure angles.
-
If you are planning to install body protection like nerf bars and
bumpers, then raising the body up and tucking the protection in
underneath will give you the protection and preserve the clearance
angles.
- Certain aftermarket bumpers are not possible to raise without major modifications. For example, the ARB pickup bumper is mounted in such a way as to make lifting it difficult. However, it is possible to leave it attached in the stock location.
- On vehicles with independent front suspensions, lift options are limited, so every little bit can help.
- For leaf springs, more arch in the spring, often implies a stiffer spring rate as well. For example if 4" of lift is needed for a given tire size, then a 3" spring and 1" body lift may give a better result than a stiffer 4" spring by itself. By spreading the lift over different components, the impact on any one component is lessened. For example a 4" spring lift may require drive shaft modifications, while a 3" lift may not. Its all a matter of degree and cost vs. benefit.
- A 1" body lift can make accessing parts on the engine like filters and the starter *so* much easier, this is an often overlooked side benefit of a body lift. Also, certain engine modifications like V6 headers, engine or transmission swaps require some body lift to be installed at all. An example is the popular 3.4L V6 engine swap in the earlier Toyota pickups and 4Runners. That generally requires a 1" - 2" body lit to fit the taller intake under the hood. Without a body lift, a hole must be cut into the hood to let the intake components fit.
- Removing and installing the transmission can also be easier since you have access to to the upper mounting bolts.
- Finally, you may find in certain states and/or countries, only a certain amount of lift is allowed on a given vehicle in order to pass inspection. While you might like to lift the rig 3", it'll only be legal at a 1" lift. Be sure to check your local vehicle regulations prior to installing any lift.
3. What about taller body lifts?
As you raise the body higher off the frame, you may run into more issues that need to be addressed. It is difficult to give a precise list of what issue will be encountered at an exact lift height, because there are some many variations in vehicles, when they were built, how they were built, etc. Some folks can thrown on a 2" body lift and have no issues at all. Others may run into issues at a 1" lift. Basically you can think of the relationship of lift height vs. potential issues you might encounter as a probability; the higher you lift the more likely you are to run into a particular issue. So, as mentioned elsewhere on this page; "Lift as much as needed, but as little as possible."
Best to consult the installation notes for your specific make/model/year vehicle to see what sort of issues that you may encounter.
- While a 1" body lift is considered mild, there are many folks running 2" and 3" body lifts. 3" is pretty much the maximum lift you should consider on the stock mounts. Above this and you should consider raising the mounting bracket on the frame to reduce the leverage caused by the taller blocks.
- At 2" on most Toyotas, you will find that in addition to the items that a 1" lift affects, you may need to extend the hydraulic line to the clutch slave cylinder and at 3" you'll likely need to extend it.
- At 1" the radiator shroud was probably OK as-is, but at 2", you should drop the radiator to re-center it on the fan.
- Same story on the shift levers, while modifications are optional at 1", they will probably need to be done at 2" and for sure at 3"
- You'll also need to let the steering shaft lengthen a bit and chances are the upper engine ground strap may need to be lengthened.
- With a 1st gen. 4Runner, a 2" lift allows you to raise the gas tank 2" using the existing pickup mounting holes on the cross member.
-
At 3", in addition to the above items need attention as well as
dealing with fuel lines at the gas tank. One option at the 3"
stage is to also lift the entire drive train by a similar amount.
- For example, the engine and transmission could be raised for additional break-over angle, the fuel tank could be raised, etc. This will restore many of the interference areas to their original position.
- This is what I chose to do on my 4Runner and you can find out more on that project here.
- Above 3" and you are asking for trouble and 4Crawler Offroad won't provide any components for that application. Best bet above 3" is to fabricate new body mount brackets raised up the desired amount and attach the body to the raised brackets without any lift blocks.
4. Why might I need a body lift at all?
- Lets assume you have installed a suspension lift in order to run larger tires. On level ground, you'll have lots of clearance between the tire and body. But, if your suspension has a decent amount of flex to it, when you bottom out the springs on the bump stops, what happens to the larger tire? Well, its now trying to fit into the same wheel well opening that was designed for the stock size tire and you may experience interference. So, by lifting the body up off the frame, you can gain clearance for larger tires to fit in off-road conditions. Other options are to trim the sheet metal around the wheel wells or run springs that are so stiff that they won't compress to the frame. Many people prefer a soft flexible spring with just enough lift to fit the tires, then a body lift to gain the clearance needed for off-road use.
- Body lifts are also commonly used with engine swaps and modifications like installing exhaust headers, etc. Lifting the body off the frame a bit gives a bit more room for larger engines, exhaust tubing or other components to fit. You may also find the increased clearance helps in routine maintenance tasks like working on starters, fuel filters, transmissions, etc.
5. I've got an XYZ vehicle, do you make a body lift kit for it?
- XYZ is not any specific vehicle, replace XYZ with Dodge, Jeep, Ford, Nissan, or whatever vehicle you have and are interested in having a body lift kit designed for.
-
If you are willing to do the small amount of research needed,
you may be able to build your own kit.
-
First, verify that the vehicle uses a body-on-frame construction.
- Many modern vehicles use a uni-body or uni-frame construction where the body and frame end up being one piece.
- If there are no body mounts, bushings or bolts visible underneath, then chances are the body can't be raised off the frame with a body lift.
-
Then, you need to know how many body mounts the vehicle has
- And a rough idea of what size they are (i.e. 2" dia, 2.5" dia., etc.)
-
Then you will need to know what size the mounting hardware is:
-
Diameters and working lengths for each mounting bolt.
-
Be sure to measure the actual outer diameter of the threaded portion of
the bolt.
- On rare occasions, OEM bolts may have different diameters along the length of the bolt, either a shank (un-threaded part) that is larger or smaller in diameter than the actual threads.
-
Be sure to measure the actual outer diameter of the threaded portion of
the bolt.
-
Sometimes there is unused thread on bolts, so if you see more than
1/2" of exposed thread beyond any body mount nut, note that
information as it'll help size the replacement hardware properly.
- Bolts commonly come with only 1" of threaded length, but some OEM hardware is custom designed with 2" or more threaded length to account for the excess length, probably because of some automated manufacturing issue.
- Another way to think about this is if you were to cut the bolt off just past the tightened nut, how long would the remaining bolt be? That is the actual working length of the bolt.
-
Diameters and working lengths for each mounting bolt.
-
If items need relocating like bumpers, radiators, etc., we'll need to
know details on how they are mounted to the frame.
-
You'll need to supply information on the size of the mounting bolts and
the spacing of the holes:
- E.g. 2 - 12mm bolts, 60mm on center horizontally oriented - then we can design a bracket to raise that bumper to match the body lift.
-
You'll need to supply information on the size of the mounting bolts and
the spacing of the holes:
-
Getting this data won't be all that hard, get under your rig and count
the body mount locations. Find where all the bolts are, you should be
able to loosen and remove one at a time, pull it out, measure it and
put it back.
- Get dimensions, take pictures, and send them to 4Crawler Offroad.
- Bolt lengths are measured from the bottom of the head to the end of the shaft, DO NOT include the height of the head in the length. Also, some vehicles have, for example a 5" long bolt, but with 1" of thread exposed when installed, so, this should be noted, e.g. 'Bolt 5" long w/ 1" exposed thread'.
- Bolt diameters are measured at the shaft, its not the size of wrench that fits on the head.
- If a bolt goes into a captive nut inside the body, then the thread pitch (i.e. SAE, this will be Threads Per Inch, and if metric it'll be in mm/thread) will need to be measured.
- Don't assume all bolts are the same diameter or length. They are usually the same side to side, but can be vastly different sizes in different locations. And don't just measure down from the underside of the floor or guess, you really need to pull the bolt out, measure the length and best if you can send a photo of all the bolts side by side with a ruler for scale. If should be no problem to remove a body mount bolt, no vehicle support is needed, gravity will keep the body in place, just make sure you put them back before driving it!
-
So you provide 4Crawler Offroad with the specifications, you will get a
"custom" kit with no extra charge for the custom design work.
- 4Crawler Offroad will hope to make up the design cost in additional sales of kits for that application.
-
This also assumes that 4Crawler Offroad is able to source the required
hardware and other parts needed for the lift.
- For example certain sizes of metric hardware is difficult to find in lengths over 120mm long.
- This was recently done for the Kia Sportage and Sorento body lift kits. Within a few weeks of the initial contact, a kit had been designed, manufactured, and installed on the owners truck. A similar turnaround was seen for the 3rd and 4th generation Toyota 4Runners, the FJ Cruiser and the various other Landcruiser models.
-
A 3" body lift is the tallest that is safe and reasonable. Many
state/country vehicle codes may have 3" or even lower height
limits on body lifts, so be sure to check the regultions in your area
before ordering.
- If planning a body lift over 3", please consider cutting the brackets off the frame and raise them up the desired amount and weld them on with added bracing. The life you save may be your own!
-
Cost will depend on the quantity and size (outer diameter - OD) of the
blocks and hardware desired, here is some typical prices of some of the
items:
- 2" (50mm) OD Aluminum (aluminium) blocks run US$10.00/ea. up to 1"/25mm tall.
- 2" (50mm) OD UHMW blocks are US$5.00/ea. up to 1" (25mm) tall; add US$1.50/inch (25mm - or any fraction thereof) over 1" tall.
- 2-1/2" (64mm) OD UHMW blocks run US$7.00/ea. up to 1" (25mm) tall; add US$2.00/inch (25mm - or fraction thereof) over 1" tall.
- 3" (76mm) OD UHMW blocks run US$8.00/ea. up to 1" (25mm) tall; add US$3.00/inch (25mm - or fraction thereof) over 1" tall.
-
3-1/2" (90mm) OD UHMW blocks run US$10.00/ea. up to 1" (25mm)
tall; add US$4.00/inch (25mm - or fraction thereof) over 1" tall.
- Center holes are drilled by default, unless otherwise specified a hole to accommodate a 3/8" / 10mm bolt will be drilled.
-
If no hole or larger holes desired, specify with order.
- Add US$1.00/block for holes of 1/2" (12.5mm) or larger in diameter.
- Longer bolts are available, cost varies with length, diameter and grade.
- Bed spacers for pickup lifts go between the bed and frame rails to provide overload support where the bed is not bolted to the frame. Most applications can use 0, 1 or 2 pair of bed spacers:
-
First, verify that the vehicle uses a body-on-frame construction.
6. What if I have a flatbed on my pickup and only need to lift the cab, do I have to buy a "full kit"?
- No problem, every kit is built to order. If you only need 6 blocks for the cab, that's what you order. If you've bobbed the bed on your pickup and only have 6 bed mounts instead of 8, that's what you order. If you only want 3/4" or 1.5" instead of 1" or 2", that's what you order. For example, an Ultimate lift kit for a pickup cab (only - bed replaced w/ a frame-mounted flatbed) would include 2-2" and 4-2.5" dia. blocks and 1/2 of a pickup hardware kit, since the flat bed is attached to the frame directly and probably won't be lifted. Contact 4Crawler Offroad for special pricing on these combinations.
7. What is included in the body lift kit?
- What is included in your kit depends on what you need. See above question for the case of a pickup cab only, no need to purchase the bed hardware. Each "kit" is built to order to meet your needs. See the pricing and options pages here for some common combinations. If the combination you need is not listed, don't worry, it is likely available.
-
Basically, you need:
- Blocks to raise the body off the frame
- Longer bolts and hardware to fasten the body back to the frame
- Assorted brackets, spacers, etc. to relocate items that cross the frame<->body interface
- Need some help designing your kit? I'm available by e-mail to discuss your particular needs.
8. How much does a body lift kit cost?
- Here are some common vehicles with kit pricing listed separately:
- Some other vehicle kit options are listed elsewhere on this web page
9. How long will it take to get the kit?
-
4Crawler Offroad tries to stock most of the common parts for the
various lift kits (nuts, bolts, etc.) Other parts are hand
crafted as needed to fill your exact order. Think of the
popular fast food place, your hamburger is made to order while you
wait, "Have It Your Way". For us, this can take 1
- 2 weeks, depending on backlog (as noted below).
- So what is a backlog? Well that means the time it will take before we can get to or start working on your kit order. Then once we start working on it, then it'll take the time noted above to finish it. It is hard to be more specific, since every order is unique, including your order and all the orders in the queue before yours that we need to finish first. And since every order is unique, it can take a variable amount of time to finish and when those unique orders are submitted in a random order and all have their own special requirements, trying to predict fabrication times to the day for any given order is impossible. So the above estimates are typical, meaning that some orders may take that amount of time, some a little less and some a little more.
- Realize that we are not just sitting here waiting for your order to arrive, so there are likely quite a few orders ahead of yours in the queue. It may take less time for simple orders and up to a week more for complex kits. So don't place an order a couple of days before you have time scheduled for a shop to install your kit.
- And while it would be nice if we had a huge warehouse full of every single component we make that we could just pick from to fill your order, we don't. In fact, companies that have huge warehouses full of inventory, usually only stock a limited selection of top sellers. In fact they will usually drop items that don't sell because it costs too much capital to produce and store the inventory on slow moving items. We can't hope to compete with those "big box" shops on either price or volume, so we don't even try. The reason you likely have some to us is that nobody else makes what you are looking for. We can "afford" to have items we might only sell a few of a year, since if nobody orders that item, it costs us very little as we don't manufacture the item until it is ordered. One way to be able to stay in busines making relatively low volume products is to make a variety of different items. So when we produce items, instead of making one X then one Y then one Z then another X, etc., we instead try to group up similar orders and make up similar components of those orders at the same time, so we would make 2X's, then Y then Z. It is more efficient in terms of machine setup, etc. to do this, so we can keep out costs down. But it can result in a delay in you getting your order. If you happen to order the day after we just finished a run of the item you ordered, it may be a week or two before we get back to making that exact part. Also, if your order includes 10 different items, it is going to take longer to fill your order than it if for another order that may only need 2 different items. And some items we do make in larger volumes, so if you happen to order when we have some of that item in stock, you may get it right away, but if we are out, then it will take some time to make another batch of that item. So this is a case where making many of a part may be faster or it may be slower, just depends on what we have in stock the day you order. So when you ask us "how long will it take?", we really can't give an exact time, we'll probably send you a link to this section of the web page.
- Parts are shipped via US Mail by default. Delivery time depends on shipping distance and method, Priority Mail is the default shipping method, 2-3 day typical delivery time in the US and 6-10 days for international delivery. Parts may also be picked up in the SF Bay Area of California if you prefer.
-
How will I know my order has been received?
- An acknowledgement will be sent by e-mail when your order is received. If the order was placed via Paypal, you'll see the transaction status change to "In Process" once the order is received or "On Hold" if further information is required. Note that "In Process" indicates that the kit is IN the PROCESS of being fabricated to your specifications. Unfortunately, due to some changes made in the Paypal order system, this feature is not working at the current time. If you don't receive an e-mail confirmation from us, it might be your order was one that we did not get notified about, so feel free to send us a copy of your order confirmation so that we can look it up in our on-line system.
-
How will I know when my order has been
shipped?
- A package tracking number will be e-mailed to you, if applicable, when the parts ship. Again, on Paypal orders, a shipping status e-mail will be sent from Paypal with any applicable tracking information and likewise, the transaction status page will show the same information and your package will generally be shipped the same day you get the shipping notification e-mail. Note on orders shipped via US Mail, the tracking number may not update as frequently as with other carriers. This is because the tracking number is only guaranteed to be scanned upon delivery of the package. You may be able to get more accurate tracking information by taking the tracking number to the Post Office and have them look up the status on their internal system. And just like the hamburger place, 4Crawler Offroad does not keep stacks of orders sitting around that are ready to ship. When your order is complete, it is boxed, labeled and dropped off at the shipper typically on the same day.
-
What if something is wrong with my kit when
I receive it?
- If the package was damaged in shipment and some parts fell out or if you think you received incorrect parts or are missing parts, please be prepared to provide photographic documentation of the contents of the package. Contact 4Crawler Offroad via e-mail and state the nature of the problem and attach any images you have. If parts are missing or damaged, 4Crawler Offroad will attempt to send out replacements in a timely manner and also file a claim with the shipper on insured shipments. You must of course request insured shipping if you wish to have that coverage. If parts of of an incorrect size or application, please let us know and we'll try to work out the issue. The only way that 4Crawler Offroad will know about these sorts of issues is to get feedback. And it is not unheard of to run into a vehicle with odd-sized hardware, probably happens every few years. We'll ship hardware exactly like we have used on many dozens to hundreds of similar vehicles only to find out on one particular vehicle that the mfg. changed the size.
-
Can I return lift kit components I don't
use?
- Yes, any lift component can be returned, in unused condition, for exchange or refund (less a restocking fee) if not needed for the lift:
After 25 years in operation, it's time to close up shop and move on to other adventures. Thanks to all the loyal customers over the years that helped to make this all possible. The web site will remain live. If you have any Toyota or 4x4 related questions, feel free to drop me an e-mail and I'll try to answer.
10. How large a tire can I fit with X" of lift?
- There is no way to provide an exact answer to this question, at least in general. There are so many variables, the actual diameter and width of the tire, the profile of the tread, the size and offset of the wheel, the suspension mods on the vehicle, your willingness to make minor of major mods to the body (fender trimming) all come into play.
-
The best bet is to locate a lift vs. tire size chart for your vehicle
and see if that helps. For example, if you have a Toyota Tacoma, then
the Tacoma Territory Tire and Lift FAQ section
should have your answer.
- If that file is not available, an alternate version is available here...
-
If you have a vehicle that is similar to another, for example the 3rd
gen 4Runner and the Tacoma are very close in design, so the above lift
vs. tire size chart should be pretty close. Or the FJ Cruiser and 4th
gen. 4Runner are almost identical to each other, so expand your seach
to similar vehicles.
-
Find a vehicle specific forum and ask other owners what they are
running, lift-wise for a given tire size.
- There are lots of on-line forums where it should be easy to find someone with a similar setup to what you want to do.
- There is a good write-up on the inner fender trimming process (aka Pinch Weld Mod) about half way down this web page.
-
Find a vehicle specific forum and ask other owners what they are
running, lift-wise for a given tire size.
- Short of a vehicle specific forum, you can try measuring. A body lift will raise the body up and most tire fitment issues are with the front wheels, because of the steering. See if you can find the worst case suspension/steering combination and then carefully measure clearance around the current tire and allow for the larger tire. For example, assume you want to go from a 31x10.50 to a 33x12.50 tire on the same rim. The new tire will therefore be 1" wider on the inside of the wheel, 1" wider on the outside and will extend 1" farther out from the wheel. So, if you had a 1" square block and could run that around the face of the tread and sidewalls all they way around the wheel well without hitting anything, chances are that tire would fit. If it does hit something like the fender, would raising it, say 1", make any difference? If it hits some part of the steering or suspension, then a body lift won't help.
-
Another way to measure would be to use a bumper jack to lift one or
both ends of the vehicle up the desired lift height and then do your
measuring with that simulated body lift. This is fairly safe to do, you
are not actually lifting the tires off the ground, just taking a little
weight off the vehicle and letting the body rise up an inch or two to
simulate where it would be with a similar amount of body lift. That way
you can see exactly how it will look and measure to the "pinch
points" where rubbing might occur. And you can try and correlate
clearances measured raised and lowered to see what affect various lift
heights will give you.
- On some of the later model Toyota vehicles, you may find that the A-pillar body mount bracket is a limiting factor on tire size. You can raise the body with a body lift to let that clear the tire, but the body mount bracket itself is attached to the frame. It will stay there after a body lift. You can find write-ups on-line on how that bracket can be modified for additopnal tire clearace.
-
For the IFS Toyota pickups/4WD and 4Runners/2WD/4WD ('86-'95) the
following tire/lift combinations apply (note 2WD pickups sit a few
inches lower and thus need more lift to fit the same size tire as a
4WD):
- 31x10.50 will fit fine, no mods
- 32x11.50 should fit, may require minor adjustments
- 33x9.50/10.50 may fit w/ no lift on stock wheels w/ minor fender trimming and torsion bar adjustment
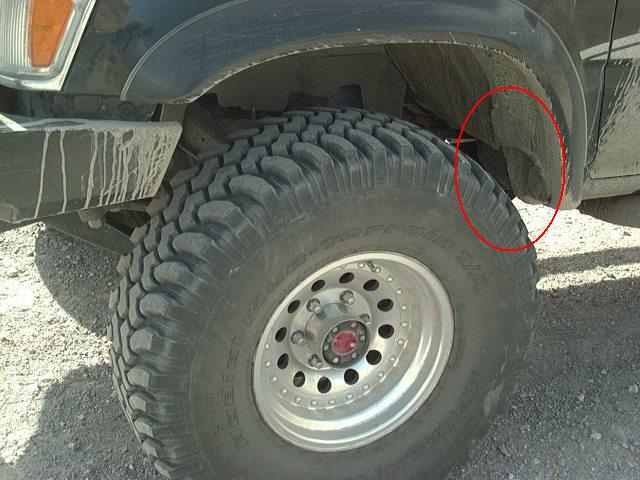
- 33x12.50 on 15x8/4.75" backspace wheels needs 1" body lift, and front torsion bar lift (1"-2") or 1.5" ball joint spacer and some sort of rear suspension lift (such as longer spring shackles or a coil spring spacer) to level the truck, plus some fender trimming. Here is a picture of this combination showing the minor front fender trimming needed to fit the tires. Conventional wisdom suggests a full 4" IFS lift for this wheel/tire combination, but using a combination of milder lift components will produce the same end result that will function as well if not better than the taller all-in-one lift kit and at less cost. And in case you think this won't work, take a look at this very combination in action in 4x4Wire's Hot Toys write-up on Don West's '94 pickup.
- 35x12.50 on 15x8 w/ 3.75" backspace wheels needs 4" IFS suspension lift plus 2" body lift for good fit. Many IFS lifts require less backspacing on the wheels to clear the dropped A-arms, this in turn pushes the wheels/tires out farther from the body, making tire/body contact more of an issue. The 2" body lift can help reduce rubbing. Less lift may be possible with more fender trimming.
-
With all lifts, whether body or suspension: "Lift as
much as needed, but as little as possible"
- What this means is that for best results add as much lift as needed to meet your needs but no more. If 1" of lift is enough for your application, going to 2" or 3" is just extra cost, more installation issues you may encounter, etc.
-
So, I want to do a mild lift, which type of lift do I choose,
suspension or body?
- Ideally, you would want to get the suspension set up first. Why? Because suspension lifts are the most variable in terms of how much lift you will get. That is you may get more or less lift than the kit was "advertised" to provide. Nothing wrong with this, it is just life. Your vehicle may be lighter or heavier than what the kit was designed for. Also, things like springs settle over time. Also suspension lifts vary in flexibility, so your new suspension may or may not allow the wheels to compress up as much as stock.
- All this said, if after setting up the suspension to your liking and installing the desired size tires, and you find out you get some tire rubbing, then is the time to size up the body lift. When you can see how much tire rubbing you are getting, you can decide if some inner fender trimming is all that is needed, or if raising the body up vertically 1", 2", etc. is what is needed.
-
And a lift is not always the answer. This just goes to show you need to
identify the cause of the tire rub:
- In the case of the Toyota FJ Cruiser and 4th generation 4Runners, the most likely cause of tire rubbing is due to an oversize body mount bracket behind the front wheel well. This is a case where a body lift will have absolutely zero affect on the tire running as that bracket is part of the frame that the body rests on. So short of a suspension lift to move the tires far below the frame, modifying the body mount bracket is the way to go: Body Mount Chop How-To...
11. What if I already have a body lift and want to remove it, reduce it's height or adapt it to another vehicle?
- 4Crawler Offroad is happy to work with you to do this. We can offer kits to replace the body mount hardware to restore the vehicle to stock height. We can also supply lower height lift blocks in almost any combination and can also supply components needed to adapt a lift kit for one vehicle to another. Just drop us a line and we'll be happy to help you with your project.
-
If you have a vehicle with an already installed body lift and you want
to remove it, for many vehicles
listed below, simply order the typical 0" kit
to get a set of stock height hardware to allow for a body lift to be
removed.
- Or you can simply measure the length of the bolts you are removing and then subtract the height of the lift blocks you are removing to come up with the length of bolts needed to replace the extra long lift bolts.
- With this information, you can visit a local hardware store and purchase hardware of suitable dimension to replace what's there. Another option is to visit your local dealer parts counter and they can often supply stock hardware. So you don't need to purchase our removal kit if you want to do it yourself.
- And removal is the reverse process of installation. In short, you'll need to remove all the relocation brackets that were installed with the lift. These may include the bumpers, radiator, steering shaft, gas tank filler hoses, etc. Then you'll remove the body lift blocks and longer bolts, lower the body down and the replace those bolts with the stock length bolts (kit D as mentioned above).
-
One question that always comes up when removing a body lift is what
about the body mount bushings? One common misconception is that a body
lift replaces the body mount bushings with the body lift blocks. Except
in a few cases where the body lift is done via taller body mount
bushings, you generally leave the body mount bushings in place and then
add the body lift blocks between the body mount bushing and the body, as noted in this section of this web page.
- Now that is not to say that you might want to replace the body mount bushings along with removing the body lift. Inspect your body mount bushings and see if they are worn out or damaged. With the older factory rubber body mount bushings, time and the added wear and tear of the body lift blocks (especially the undersized blocks commonly used in the various after market kits out there), those bushings may be ready for replacement. Simply add kit P to your parts order and get a new set of poly urethane body mount bushings to swap out for the worn out rubber parts. And there is no better time to do this, as you'll have perfect access to the body mount bushings when you remove the body lift.
12. I'm looking for an "RB" or "Roger Brown" body lift kit, where do I find that?
- 4Crawler Offroad is the name of the company that was created and is owned by Roger Brown. So some people mistakenly call the kits "RB" or "Roger Brown" body lift kits. 4Crawler Offroad would like to encourage everyone to use the official company name when referring to these products to help avoid confusion and for legal reasons as well. It would be the same as walking into your local computer store and asking for a copy of "Bill Gates Word" or "Larry Ellison Database" software. Hopefully you would get what you were looking for, but you may not. So, to answer the Frequently Asked Question "Where can I find an RB body lift kit?" The answer is there is no such a thing.
13. What are bed spacers and do I need them?
-
In many vehicles, the bed of the vehicle rests on the frame without
being physically connected, as at a real body or bed mount bracket.
This typically happens under the rear wheel well, where it would be
difficult to add a support bracket to the frame to attach the bed to.
Instead, the bed rail (on both pickups and also on many full-bodied
vehicles like 4Runners) simply rests on the frame rail. In cases where
the bed is heavily loaded and tries to sag, that point of contact will
support the load in the bed without it bending in the middle. This is
mainly useful if you carry heavy, unsupported loads, such as sand,
gravel, sod, etc. If you instead carry loads like a motorcycle, lumber
or other cargo capable of supporting itself in the middle, then the bed
is less likely to sag. When a body lift is installed and the bed is
raised above the frame, this contact point no longer is effective. This
a "bed spacer" can be attached to the frame to provide a
raised point of contact for the bed. So the questions that come up with
bed spacers are do you "need" them and how many do you need?
- Need is determined by how you use your vehicle, specifically for cargo carrying. If the most you put in your vehicle's bed is a cooler and pair of folding chairs, then you probably don't need the spacers, at least to support the bed. If you haul heavy, bulk cargo, then yes, you do need them. And as to how many? Look at your vehicle, locate and count the number of places the bed rests on the frame. Typically there is just one contact point on each side in the rear wheel well, you one pair of spacers is what you need. Some pickups, have to sets of contact points, but they are nearly at the same place. So you could get by with one pair or put spacers at both pair of locations. It is all up to you and what you want your body lift to encompass.
14. I already have a suspension lift and have some tire rubbing, can I add a body lift on top of the suspension lift?
-
Sure, there are generally no issues combining the two. A suspension
lift raises the frame above the axles. A body lift raises the body
above the frame.
- If you consider the two lifts, you could imagine supporting the frame on jack stands and removing the front and rear axles, the body would not "know" the difference. This would be an "infinite" suspension lift, not very practical, but just to illustrate the point. Likewise, imagine removing the body entirely from the frame and moving it some place else. This would be an "infinite" body lift, again not practical, but illustrates the point that the frame, suspension and axles could "care less" that the body is not present. Practical suspension and body lifts leave their respective parts connected and just provide a reasonable amount of lift.
- So, within reason, a suspension lift and a body lift can be installed on the same vehicle. This is often a good combination, letting a mild suspension lift be combined with a mild body lift to allow a larger size tire to be fitted without rubbing than could be fit with one or the other lift alone. Likewise, the cost of say a 2" suspension and 2" body lift may by much less than to buy a full 4" lift kit with complex brackets, etc.
- And, if you need for example 4" of total lift to fit a given size tire, you can generally add the combined height of the suspension and body lift to get to this total lift height. So if you had say a 2.5" suspension lift, you could add a 1.5" body lift to reach that desired 4" total lift height.
15. Is 4Crawler Offroad still in business and making body lift kits?
- We're no longer making full kits but do have a limited stock of some components and we're in the process of uploading some of our designs here so you might have a go at making your own. That's how we got started.
16. Does a body lift replace the original body/cab mount bushings?
- Generally no. Our body lift blocks are designed to sit on top of the body or cab mount bushings. These bushings help to isolate the body/cab from road vibration and also allow the frame to twist and flex below the more rigid body. This applies in reverse as well, if removing a body lift, you generally just remove the lift blocks and set the body back down on the original body mount bushings. That said, you can replace the OEM rubber body or cab mount bushings with polyurethane material. There is at least one company that offers a replacement poly bushing kit that incorporates a mild body lift by using taller than stock body mount bushings. We chose the separate lift block approach because it gives the customer the option of changing the body lift height or removing it and going back to stock height. Also this allows us to offer custom body lift heights without the significant expense of designing and producing custom polyurethane bushing molds.
[Return to the top of this page]
Body Mount Tech:
Body mounts are what connect your trucks frame to the cab and/or bed. For strength, pickup beds are typically bolted directly to the frame, while the cab is mounted with compliant bushings (usually rubber or polyurethane) to isolate the cab from road noise and vibration. Starting at the front, there are two mounts behind the bumper, two more are located at the front foot well, two more behind the front seats. Then, in the 4Runner, there are two more in the rear passenger seat well, and two more at the rear of the cargo area. The pickup has 8 mounts on the bed (4 on each side), two near the front of the bed and two near the rear. You should try to locate each mounting point, and be sure you can gain access to both the top and bottom of each mounting bolt before undertaking a body lift.
The body/bed are connected to the frame by the mounts, as described above, to brackets (or horns) attached to the frame. In a body lift, spacers are installed between the body and the mounting brackets or bushings to lift the body above the frame.
From the factory, you'll find rubber body mount bushings. Over time, the rubber cracks and weakens with age. This can lead to what is called "shudder", which is a sort of side-to-side shaking felt when hitting bumps on the road. I tried everything to correct this problem on both my Toyota Landcruiser ('74 FJ-55) and later on my '85 4Runner, but nothing seemed to help until I installed polyurethane body mount bushings. It seems counter intuitive, that putting on a stiffer, less compressible bushing material would actually reduce this vibration, but that's what seems to happen. I think the vibration is actually caused by the relative motion allowed by the softer rubber. In technical terms, the resonant frequency is proportional to the stiffness of the compliant member. The rubber is soft and very compliant, leading transmission of the low frequency shudder, that is within the frequency range of bumps transmitted up from the road. The stiffer polyurethane (approx. 92A durometer), shifts the resonant frequency up to a higher value, which is effectively absorbed by the suspension of the vehicle.
All this leads to the point that if you are going to the trouble of installing a body lift, why not also put in some new polyurethane bushings, too. They will make a dramatic improvement in the ride quality of your vehicle if your old rubber bushings are damaged or worn out. If done in conjunction with a body lift installation, there is minimal extra work required. If you don't change out the stock bushings, the added leverage of the lift blocks may contribute to a worsened ride quality. A couple of polyurethane bushing manufacturers are:
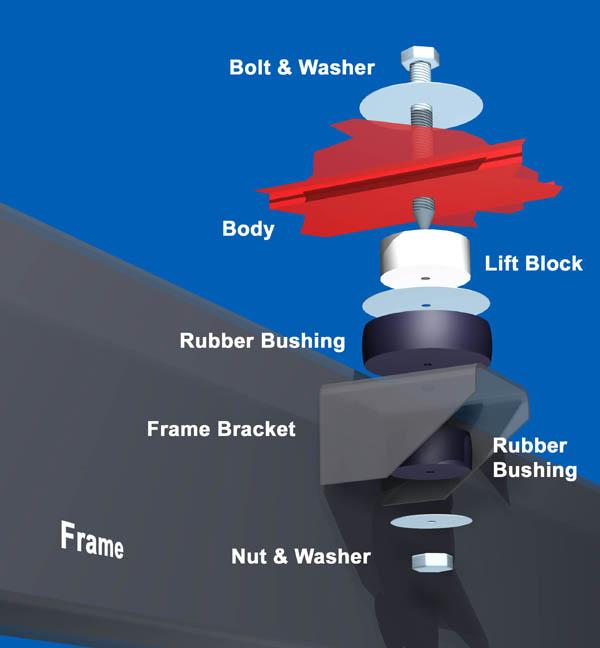
More information below. Typically, body mount bushing kits often include no instructions and even if they do, make no mention of body lift blocks. See the schematic diagram, below, for a simplified cross section of a properly installed body lift and bushing together. Note that not all vehicles will have all the parts below, for example, washers may or may not be present, bushings may be two-piece (as pictured) or one-piece:
- Color Code:
-
Part supplied in body lift kit
- Part supplied in poly bushing kit
- Original or existing part
- Part supplied in poly bushing kit
      XX        New longer bolt
     ----       Factory Washer, either tabbed or round
~===========~   Floor of the cab or bed
    +----+
    |    |      Body Lift Block, if applicable
    |    |
    +----+
   --------     New washer (if supplied w/ poly bushing kit)
   +------+
   |      |     Larger poly bushing (Body or cab only)
   +------+
  ==========    Bracket off of the frame
    +----+
    |    |      Smaller poly bushing (Body or cab only)
     \--/
     ----       Factory or HD washer
      XX        New lock nut

If re-using the stock body mount bushings, the picture is a little different:
      XX        New longer bolt
     ----       Factory Washer, either tabbed or round
~===========~   Floor of the cab or bed
    +----+
    |    |      Body Lift Block
    |    |
    +----+
   --------     Factory top washer (may be bonded to body mount bushing)
   +------+
   |      |     Upper factory rubber bushing (Body or cab only)
   +------+
  ==========    Bracket off of the frame
    +----+
    |    |      Lower factory rubber bushing (Body or cab only)
     \--/
   --------     Bottom factory washer(may be bonded to body mount bushing)
      XX        New lock nut
There is a metal bushing that goes inside the poly bushings, it gets sandwiched between the two washers outside the poly bushings and keeps them from getting compressed too much. When you tighten down the bolts, you bottom out this internal bushing. Note that not all vehicles will have all the parts below, for example, washers may or may not be present, bushings may be two-piece (as pictured below) or one-piece. You can think of the body mount bushing like an Oreo-type cookie. The top and bottom washers are like the cookie wafers and the rubber part is like the creme filling. Without the sleeve in between the washers, the filling (i.e. rubber bushing) would squeeze out when you tightened the body mount bolt. Since the body lift blocks are not compressible, they do not need a sleeve or top/bottom washers to work. Rather they just get clamped in between the top washer of the body mount bushing and the floor of the cab/body. The clamping force of the body mount holds the block in place.
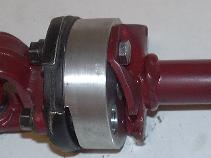
The following image is an excellent rendering of a typical body mount, courtesy of John Evaskovich:
One concern with body lift blocks is possible electrolytic corrosion due to dissimilar metals touching. This can be a problem with aluminum blocks and the steel of the body. If you wish, you could apply a heavy paint or spray-on undercoating to the top of the blocks. Anotehr option would be to cut out some plastic washers from an old plastic milk jug and use that to separate the aluminum and steel if desired to prevent possible electrolytic action. The big advantage of the UHMW polyethylene body lift blocks is that they eliminate this possible problem, as polyethylene is inert and self-lubricating, so you won't even have problems with the paint wearing off the steel and causing rust as is common with extruded fiberglass blocks.
[Return to the top of this page]Body Lift Kits:
What exactly is in a body lift kit?
- Something to put between the frame and the body (lift blocks)
- Longer-than-stock bolts to hold the body to the frame (mounting hardware)
-
Various brackets to relocate items that connect between the frame and
body, such as:
- Bumpers, front and rear
- Steering Shaft
- Radiator
- Shift Linkage
So, which vehicles do these kits fit?
We've released CAD models and information so you can make your own kit.
There are other companies that make body lift kits if you want something pre-made. Fire up your favorite search engine or AI assistant to find one.
Below is information on various body lift kits that we used to make:
-
Toyota:
- 1979-1995 2WD/4WD Pickup/Hilux/Trekker and T-100
- 1984-current 2WD/4WD 4Runner/Hilux Surf and Lexus LX-450/60/70 models
- 2WD/4WD Tacoma, Tundra and Sequoia
-
Landcruiser:
- Including: FJ-40, 45, FJ-55, {F,B,H}J-6{0,1,2}, FJ-70, FJ-80 (and Lexus LX-450) and, FJ Cruiser
- Mitsubishi
- Kia
-
Isuzu:
-
Amigo - Tony Vang has a nice
2" lifted '99 Amigo
- Uses 8 - 2.5" OD blocks, cost: 1" - $56.00, 2" - $72.00, 3" - $88.00
- This is a block-only kit at this time, for a more complete lift kit, provide the information requested here...
-
Rodeo - 1/2" and 1" lift kits
- 2WD uses 10 - 2" OD blocks (cost $60.00)
-
4WD uses 10 - 2" OD and 2 2.5" OD blocks (cost $74.00)
-
For the 1" / 4WD lift, 4 hardware options:
- Supply your own
- 6 longer metric bolts for the rear, cost $36.00
- 6 longer metric rear and 6 longer SAE bolts for the front, cost $66.00
- 12 longer metric bolts for all body mounts, cost $72.00
- 1/2" lift can re-use stock hardware
-
For the 1" / 4WD lift, 4 hardware options:
-
Taller lift blocks (only) (1.5", 2" and 3") are
available for special order
- Add $15.00 per extra inch (or fraction) of height for 2WD kits and $19.00 for 4WD kits
- Should also fit Honda Passport models
-
Trooper:
-
Uses 4-2.5" and 8-3" dia. lift blocks typically
- Hardware, mix of 6 metric (M10) and 6 SAE (3/8") bolts $65.00, all 12 bolts in metric (M10)
- FlatOutOffroad has body mount bushings
-
Uses 4-2.5" and 8-3" dia. lift blocks typically
-
Amigo - Tony Vang has a nice
2" lifted '99 Amigo
-
Nissan
-
Frontier pickup
-
Uses 4-6 2" OD blocks (bed) and 6-8 2.5" OD blocks (cab)
(total of 12-14 typically) and 1-2 pair of bed spacers
- 2" blocks drilled for 10mm bolt and 2.5" blocks drilled for 12mm bolt
- 2" OD blocks/ea.: $5.00/1", $6.50/2", $8.00/3"
- 2.5" OD blocks/ea.: $7.00/1", $9.00/2", $11.00/3"
- Metric hardware now available, $65.00 for the 8 - 12mm and 4 - 10mm on the double cab models
- Order Bed Spacers
-
For a typical double cab model, typical kit of ultimate blocks
(4-2"OD, 8-2.5"OD) + hardware + 2 pr. bed spcrs, cost:
- 1" - US$161.00 + applicable sales tax and shipping
- 2" - US$187.00 + applicable sales tax and shipping
-
Note that there is some variation in the bolt
lengths for the Nissan Frontier pickup models.
- So to ensure best hardware kit fit, you may want to send us the measurements of the bolt lengths and diameters for your particular vehicle so we can verify problem bolt lengths for the body lift kit.
-
Typically all cab bolts are 12mm dia. and all the same length, 8 in
total
- If you have 2 or more longer bolts, then add $25.00 to the hardware kit price for those longer bolts.
- Bed bolts are 10mm in dia. and all the same length, 6 in total.
- If it's easier, we can send the default hardware and then if needed work with you to exchange needed bolts afterwards.
- Note that these are not complete kits, for other hardware/brackets, see this section of the web page.
-
Uses 4-6 2" OD blocks (bed) and 6-8 2.5" OD blocks (cab)
(total of 12-14 typically) and 1-2 pair of bed spacers
-
Frontier pickup
-
Note that the applications below are body lift blocks only
- For other hardware/brackets, see this section of the web page and let us know what you'll be needing...
- Don't order the lift blocks and then complain that you didn't get bolts or other brackets!
-
IH Scout
-
80 and 800 series, 9 - 2" OD blocks, 7/16" center hole
- 1" - $45.00, 2" - 58.50, 3" - $72.00
-
80 and 800 series, 9 - 2" OD blocks, 7/16" center hole
-
Other vehicles - Information on custom applications
-
Jeep CJ, TJ, XJ (SWB) use 10 - 2" OD blocks,
- $50.00 - up to 1", $65.00 - up to 2", $80.00 up to 3"
-
Range Rover uses 10 - 2" OD blocks w/ 10mm
holes,
- $50.00 - up to 1", $65.00 - up to 2", $80.00 up to 3"
-
early Ford Bronco uses 8 - 2.5" OD blocks,
- $48.00 - up to 1", $64.00 - up to 2", $80.00 - up to 3"
-
Chevy S10 Blazer uses 10 or 12 - 2.5" OD blocks w/ 12mm holes:
- 10 mounts: $60.00 - up to 1", $80.00 - up to 2", $100.00 - up to 3"
- 12 mounts: $72.00 - up to 1", $96.00 - up to 2", $120.00 - up to 3"
-
Jeep CJ, TJ, XJ (SWB) use 10 - 2" OD blocks,
Below are some examples about what kind of options are available:
 |
 |
| Aluminum Lift Blocks | UHMW-PE Lift Blocks |
 |
 |
| Toyota 4Runner Kit | Toyota Pickup Kit |
 |
 |
| Toyota {F,B,H}J-6{0,1,2} Landcruiser | Kia Sportage |
 |
 |
| Pickup/Tacoma Bed Spacers | Steering Shaft Extension |
-
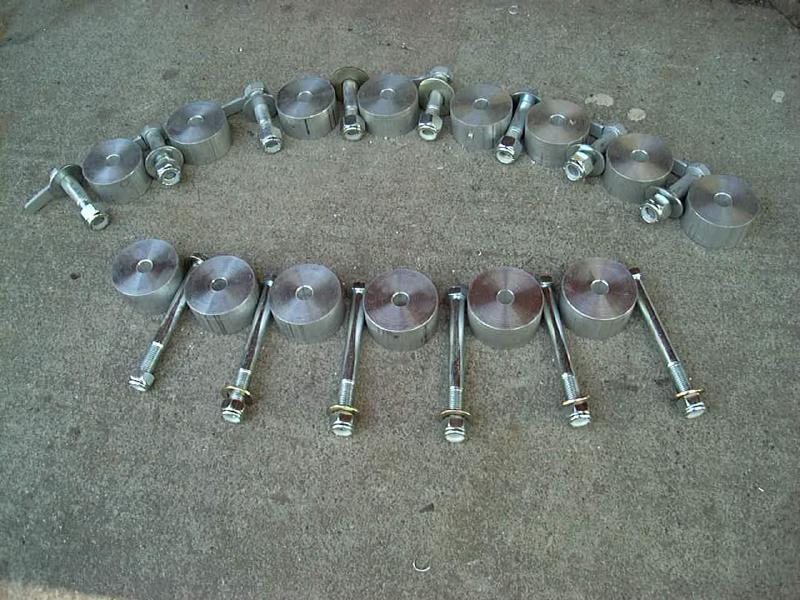
Body lift blocks
-
1/2" - 3" lift w/ or w/o hardware:
-
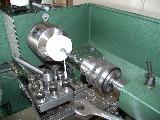
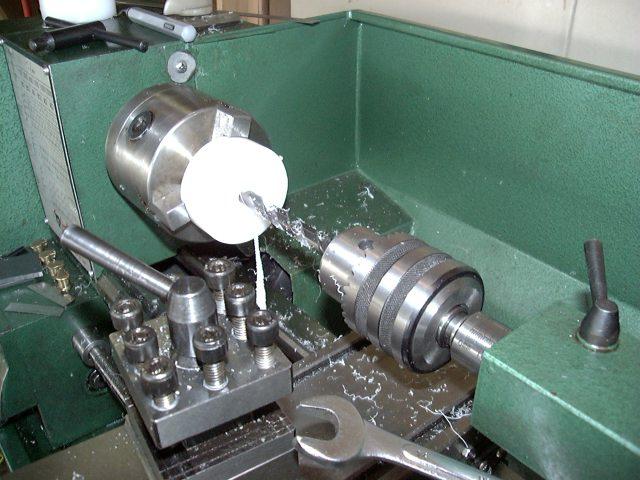
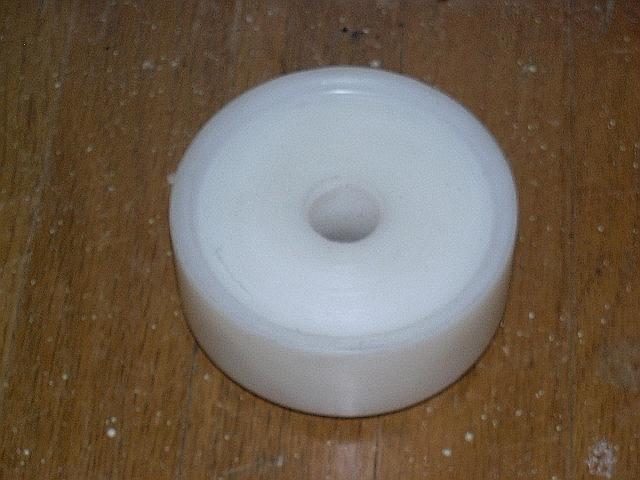
A lathe is used to drill the bolt hole in the center of the block
- A close fit is an important design feature as it keeps the body from shifting around on the frame, taller lift blocks have slightly larger holes drilled to ease installation of the longer bolts.
- Cast blocks often have oversized, irregularly shaped holes due to the nature of the mfg. process
- On UHMW blocks taller than 1", you may notice a slight deviation of the hole from the center of the block due to variations in the block diameter in the extrusion process. Since the blocks are slightly oversized in most applications, the slight offset from center has no affect on the function of the block.
- The one face of the block is than machined square to the axis of the center hole
- Then the opposite face is machined square and the edges are slightly chamfered to reduce stress concentrations
-
A lathe is used to drill the bolt hole in the center of the block
-
Lift block options:
-
2" dia. billet Aluminum
Blocks
- Cost is $9.00/ea for the 1" tall blocks; taller blocks not available.
-
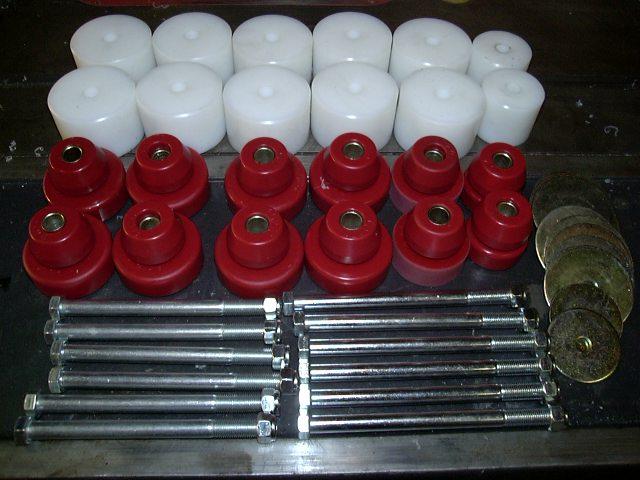
UHMW Poly
Ethylene blocks
- Available in 2", 2.5", 3" 3.5" nominal diameter blocks.
- UHMW is a dense plastic, that will eliminate possible corrosion and squeaking problems that could potentially happen with a metallic block.
-
UHMW blocks are available in two sizes:
-
Standard body lift:
- All 2" dia. blocks
-
Ultimate body lift:
- Combination of 2" dia. for front and bed mounts, and 2.5" dia. for remaining cab mounts:
- The Ultimate blocks are the same diameter as the larger cab/body mounts so offer the ultimate in strength, both in the block itself as well as spreading the load of the body over the sheet metal contact point.
-
Custom height lift blocks are
available as well:
-
Any size lift from 1/4" to 3", no-cost consultation on your
custom applications
- Specify center bolt hole size for drilling
- A 1/2 " body lift is an interesting proposition, as many stock mounting bolts have approx. 1/2" of excess length, so this height lift, while not a lot, can be done without the added expense of replacing the stock bolts. If interested in this option, 4Crawler Offroad can make 1/2" blocks, drilled for the 10mm stock bolts
-
Any size lift from 1/4" to 3", no-cost consultation on your
custom applications
-
Standard body lift:
-
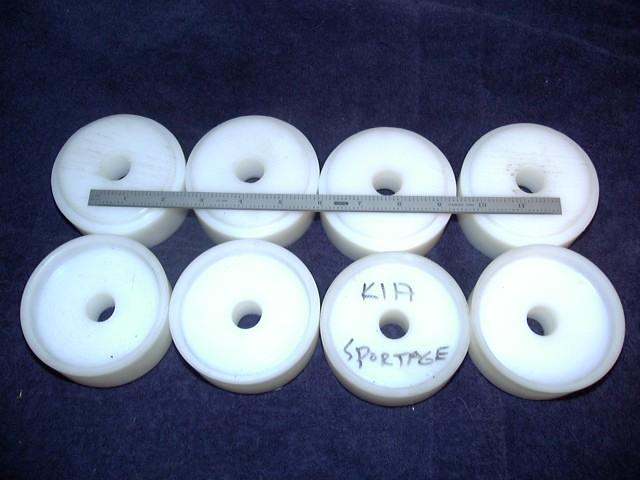
A new product addition is a 1-3/8" body lift block for the Kia
Sportage. This block has a number of important features:
- It is 3.5" in diameter with an integral "cup" to contain the rubber body mount bushing as well as a tapered end that fits into the "cup" on the underside of the body.
- It has a 19mm center hole to accommodate the factory body mounts bolts and is the tallest lift possible with the existing hardware, a total of 8 are required.
-
2" dia. billet Aluminum
Blocks
-
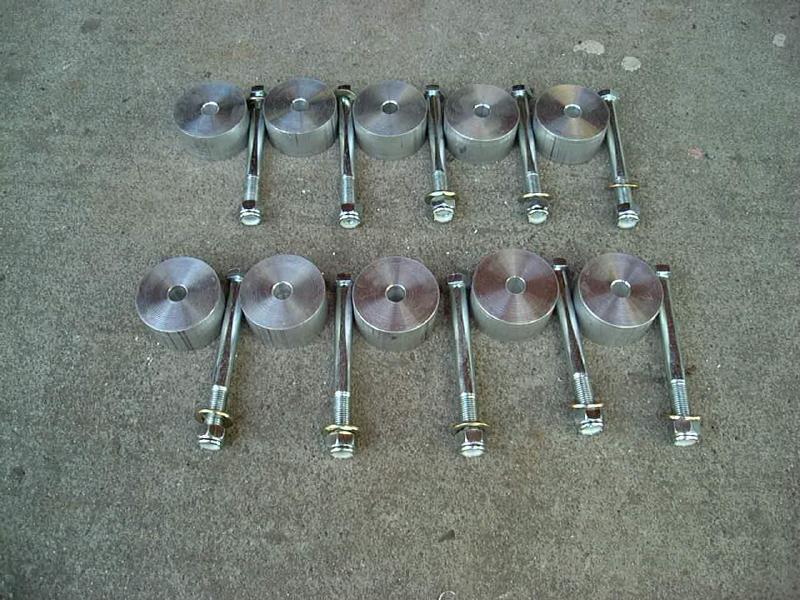
Longer bolts and nylon lock nuts:
- The stock bolts will not work beyond about 1/2" of lift on most vehicles
-
Several hardware options are
available:
- Standard, heavy duty, stainless steel and metric.
- Standard bolts have approx. the same strength as the factory hardware and will fit the stock body washers without modification
- Heavy duty bolts are about 25% stronger than stock and will fit into the stock mounting holes and body washers with some slight modifications.
- Stainless steel hardware is rust resistant.
- Metric hardware is just that, same diameter and grade as stock, although thread pitch and head size may differ from stock. While we try to get metric in a zinc plated finish, sometimes we can only source a particular length and thread pitch in black oxide finish. For these bolts, you can either oil them periodically (that's how they are intended to be used), or you can clean and paint them prior to installing.
- The pickup bed bolts (or nuts) include tabs (like stock, where applicable) for ease of installation.
-
Hardware is SAE Grade 5 or better, which combines good tensile as well
as shear strength.
- Hardware is either zinc or cadmium plated for corrosion resistance
-
You may also supply your own mounting hardware
- If you want to use custom size bolts, blocks can be drilled to your specifications or even supplied un-drilled
-
Radiator drop brackets (if needed):
-
The radiator (and fan shroud) are attached to the body, the engine (and
fan) to the frame
- Fits standard 20cm Toyota radiator bolt spacing, drilled for 1" and 2" drop
-
You may be able to simply remove the lower radiator shroud extension
-
With a 1" lift, you will have to modify the radiator flange a bit
to install the bracket
- Please refer to the installation instructions for details
- An electric radiator fan eliminates this problem as the fan is attached to the radiator and not the engine
- Tacoma trucks do not require a bracket and it is possible to simply use existing or new mounting holes
-
With a 1" lift, you will have to modify the radiator flange a bit
to install the bracket
-
The radiator (and fan shroud) are attached to the body, the engine (and
fan) to the frame
-
Stock front bumper drop bracket and hardware (if needed):
-
Will raise stock bumper to original height as bumper will no longer fit
with body lift
- On 4Runners, the rear bumper is attached to the underside of the body
-
Will raise stock bumper to original height as bumper will no longer fit
with body lift
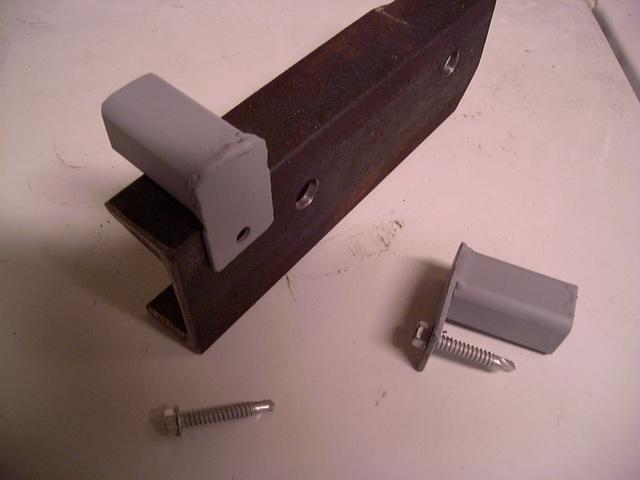
-
Stock rear bumper relocation hardware (Tacoma pickups)
- Hardware kit allows existing rear bumper brackets to be modified to match body lifts from 1"-3" and re-use the stock bumper bracket bolts.
-
A bracket for raising Toyota
A/T transfer case lever for 2" - 3" lifts is now
available:
- Bracket includes mounting hardware.
-
A steering shaft extension
for Toyota rack and pinion as well as recirculating ball steering box
steering:
- Extension bolts on to the stock rag joint and extends the shaft 1" or more
-
Bed Spacers
- For certain vehicles, there are places where the bed or body is supported by contact with the frame. While the body lift blocks and longer bolts will properly support the bed or body, for added load capacity, a separate bed spacer can be bolted or welded to the frame to provide a contact point.
-
If you want to "roll your own", click here for a VRML model of a
body lift block
- A proper body lift block should be uncompressible, there should be minimal play between the bolt and block to prevent it from racking
-
If interested in "rolling your own", I'd be more than happy
to supply you with a suitable quantity of material:
- 2" UHMW rod at $2.00/inch, 2.5" at $3.00/inch and $1.00 per cut on either item
-
1/2" - 3" lift w/ or w/o hardware:
One thing about many of the commercially available body lift kits is that they are an all-in-one package, one size fits all:
- If you want just the blocks, you have to buy the whole kit and throw away the parts you don't need.
-
If you want shorter blocks, you cut the taller blocks in two and throw
away the parts you don't need.
- Much of the hardware supplied is specific to the amount of lift in the blocks, so it can't be re-used.
- Bolts only have thread on the lower inch or so of the bolt, so if its shortened more than this, its no longer a bolt, its just a round rod with a hex head on top.
So, 4Crawler Offroad has chosen to supply a body lift in an "ala carte" form, e.g. you want blocks, you order the blocks; you want bolts, you order the bolts, etc. Here is a list of some common combinations of parts that are typically ordered.
[Return to the top of this page]Poly Urethane Body Mount Bushings:
-
Check out this photo album for more details on our polyurethane body mounts.
- Click on any of the image thumbnails to see a larger photo plus information.
- Here are CAD files and information on 2-piece Toyota body mount bushings.
- Here are CAD files and information on 2-piece Mitsubishi body mount bushings.
While not required, it is a good idea to check the condition of the stock rubber body mount bushings and if cracked or worn out, change them to polyurethane (PU). PU will withstand the added strain of the taller body lift, and it actually transmits less noise and vibration from the frame to the body than rubber.
If planning to install a body lift kit on your vehicle, it is a good idea to inspect your original body mount bushings to see what condition then are in. Look for any deep cracking or tears in the rubber bushings. And with the one piece bushings, look for separation of the rubber from the surrounding steel bracket or places where the bushings have collapsed and are allowing the body to rest directly on the frame bracket (usually you'll hear squeaking or rattling noises if this happens). If you have any doubt about the condition of the original rubber body mount bushings, there is no better time than when installing a body lift to swap out those bushings, since you can easily swap out the bushings prior to putting in the body lift blocks.
Speaking of squeaking, there's a common misconception that poly urethane body mount bushings are prone to squeaking. While it is true that poly urethane suspension bushings are prone to squeaking, realize the squeaking happens when there's something moving against the poly bushing. Imagine a spring shackle or control arm bushing as the suspension cycles up and down. The bushing will be rotating against whatever is touching it and that's where the squeaking comes from. Common solutions are to apply lubricant to the poly or use a black, graphite loaded urethane material. On the other hand, a poly body mount bushing is a different application. The body sits on the bushing and the bushing captures the body mount bracket and all that is held together with a bolt. For squeaks to happen, something has to move across the poly bushing. If your body is sliding around atop those bushings, something is seriously wrong, i.e. body mount bolts are loose or missing. If that is the case, fix the problem and the squeaks should go away. Long story short, no need for additional lubrication with poly body mount bushigs.
Especially on the newer model full bodied vehicles, the trend is the the mfg. to install taller, softer rubber bushings for a quieter ride on the road. However, in off-road use, those large squishy factory bushings can allow excessive body movement relative to the frame. If you have aftermarket bumpers, rock sliders or other trail protection (like a roll cage) install, the body may move enough to make contact with that trail armor and cause noise. Also, those soft rubber bushings are more prone to tearing when subjected to the extreme stresses of off-road driving. In these cases, the firmer polyurethane bushings are a good upgrade.
What makes the bushing kits offered by 4Crawler Offroad different than those from other companies?
- We offer kits for many vehicles for which there are no aftermarket kits available.
- We offer any combination of bushing components, if you need 1 or 2 bushings or need to add or subtract bushings from an existing kit, no problem.
- We hand inspect and test-assemble each bushing kit in most cases. Amazing as it seems, we find that at least 25% of the boxes of supposedly complete bushing kits we open are missing parts. So we try and make sure each kit is complete and order extra parts from the bushing mfg. to make up any shortages before the bushing kit gets to you.
- We custom drill all the bushing washers to fit the size hardware you'll be using with the bushings. Most aftermarket bushing kits will not work with stock size hardware, strange as it seems. So let us know what size/diameter hardware you plan to use with the bushings, and we'll do our best to accommodate that. There may be an additional charge to drill out these components, or you are welcome to perform that operation yourself.
Note that PU body mount bushings will likely look different than the OEM rubber bushings. There are several reasons for this, mostly to do with the different materials and molding operations. Rubber tends to be "squishier" than PU. As such, bushings are often designed to compress to a greater degree when made of rubber. So they will appear taller when uncompressed. Also, OEM rubber bushings are often molded with washers, sleeves and other metal parts bonded together inside in complex clamshell molds. This is how rubber has to be molded, it's put in a mold and then put under heat and pressure to allow the vulcanization process to occur. PU, on the other hand, is poured into an open mold as a liquid then heated in an oven to cure the polymer. PU molds have to allow for the cured part to be removed and thus they can't have the intricate ribbing and details like the rubber bushings. Case in point, look at the tire on your truck and compare that to a PU skateboard wheel. Also, with PU, the exact mechanical properties, like durometer, can be easily controlled by the polymer ingredients. With a rubber bushing, you have less control over the material properties and instead rely on the bushing shape to produce the desired bushing properties. That's why the rubber bushings often have complex ribbing and narrower/thicker sections to allow for the desired compression characteristics.
Polyurethane body mount kits are offered in the following configurations. Can be used as-is or with a body lift. Polyurethane is 92A durometer. On all our bushing kits, we hand-assemble each kit to ensure no missing components, unlike with the off-the-shelf kits where missing parts are common. Likewise, if you need just 1 or 2 bushings, we can supply that for most or our kits. Click the link for each main vehicle type to go to that particular page for detailed options and ordering:
-
Toyota
- Bushing kits available in black by default
- Some bushing kits may be available in red by special order and additional cost
-
Pickup:
-
('79-'88) - 6 cab mounts, 6 2-piece bushings
- Available in black bushing material
-
('89-'95) - 6 cab mounts, 2 2-piece and 4 1-piece bushings
- Pickups have no bushings between the bed and the frame.
- Available in black only.
-
All years
- 8 poly urethane body isolators to replace the OEM rubber bed isolator pads
- Helpful if removing a body lift or if you are restoring a stock height vehicle
- Not needed with out UHMW cab/bed lift blocks as they serve the same purpose
-
('79-'88) - 6 cab mounts, 6 2-piece bushings
-
4Runner:
- ('84-'89) - 10 body mounts, all 2-piece bushings
- ('90-'95) 10 body mounts, 6 2-piece and 4 1-piece bushings
-
('96-only)
- 9th and 10th body mount brackets+bushings+bolts in weld-on and bolt-on versions:
- Or 8 bushing kit available in black only.
- ('96-'99) - 10 body mounts, 8 2-piece, and 2 1-piece bushings
-
('00-'02) - 10 body mounts, 6 2-piece, and 4 1-piece bushings
- Available in black or red by special order/additional cost.
- We have the pictured bushing kit which requires added UHMW spacers (not pictured) and this provides a more rigid body to frame attachment.
- We also have a bushing set that is factory height polyurethane which would offer a slightly more flexible body to frame attachment.
- Both options work equally well, which to chose depends on what your goal is for replacing the bushings:
- - The UHMW spacer version is good if you're looking to control body motion causing bumpers or sliders to make contact with the body.
- - The factory height poly version will offer a bit of a softer ride, midway between the factory rubber and the spacer version.
-
Landcruiser
-
FJ-40
- (1/'64 - 12/'78) - 12 - 2"x2" and 1 - 2"x4" body mounts
-
FJ-45
- 12 - 2"x2" and 1 - 2"x4" body mount and 2 2.5" dia. round or 50mm square bed mounts
-
FJ-55
- (1968 - 7/'80) - 10 2-piece bushings, sleeves and washers w/ up to 6 - 1/4" spacers if needed
-
{F,B,H}J-6{0,1,2} (see notes
below)
- (all years) - 12 body mounts, includes custom mix of sizes to fit the body mount cups, as needed, see #3 below
-
{F,B}J-70 (see notes below)
- (all years) - 8 body mounts, includes custom mix of sizes to fit the body mount cups, as needed, see #3 below
-
BJ-73 (see notes below)
- (all years) - 10 body mounts, includes custom mix of sizes to fit the body mount cups, as needed, see #3 below
-
FJ-80: (see notes below)
- (all years) - 10, 8 or 6 2-piece body mount bushings, see note 3 below.
-
FJ-40
-
Tacoma:
- 1995.5 - 2000 (all models) - 6 cab mounts, 2 2-piece and 4 1-piece bushings
- 2001 - 2004 (std. and xtra cab models) - 6 cab mounts, 2 2-piece and 4 1-piece bushings; 2 tall and 2 short
- 2001- 2004 (double cab models) - 6 cab mounts, 2 2-piece and 4 tall 1-piece bushings
- 2005-2012 2WD and 4WD models - 6 cab mounts, 2 2-piece and 4 tall 1-piece bushings
- 6 or 8 poly urethane body isolators to replace the OEM rubber bed isolator pads
- Helpful if removing a body lift or if you are restoring a stock height vehicle
- Not needed with our UHMW cab/bed lift blocks as they serve the same purpose
- We've sold out of this item.
- Polyurethane bed isolation washers, US$3.00/ea., p/n: PolyBedWasher
- Poly bed isolation washer photo
- Pickup/Hilux typically need 8
- Tacoma models typically need 6
- Ships in USPS 1st class parcel
US Delivery Canada Delivery Int'l Delivery Bed isolation washer
Bed isolation washer
Bed isolation washer
-
Mitsubishi
-
Montero/Pajero/(Dodge
Raider):
- LWB: 12 body mounts, all 2-piece
- SWB: 10 or 8 body mounts, all 2-piece
-
On some Generation 2 Monteros, the front pair of body mounts is a 1
piece unit and can't be replaced.
- If so, leave these body mounts as-is and replace the remaining ones.
- You can order a kit with 2 fewer mounts if this applies or return the unused bushings.
- The bushing kit may not fit the 1994 Pajero Exceed model which has more oval shaped mount mount bushings.
-
D50/MityMax Pickup:
- Cab-only: 6 cab mounts, all 2-piece
-
Montero/Pajero/(Dodge
Raider):
Note: Bushing kit prices typically discounted with body lift kit purchase.
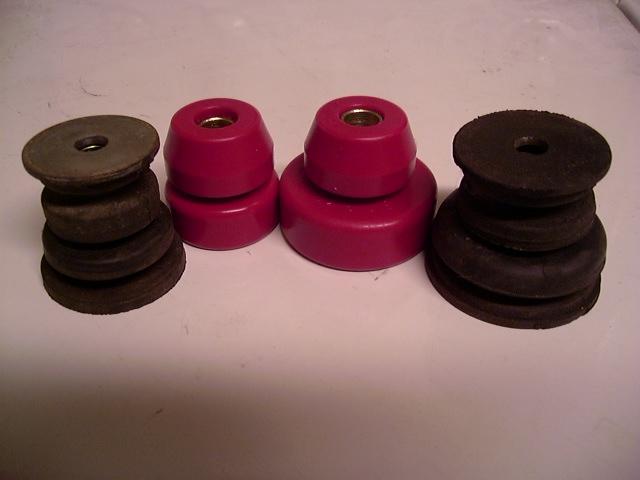 |
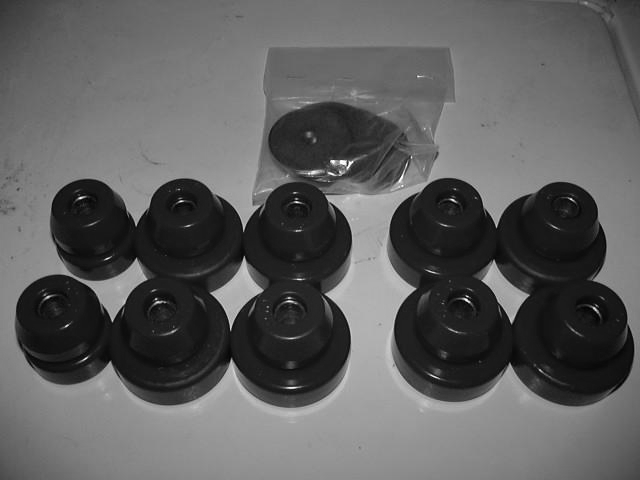 |
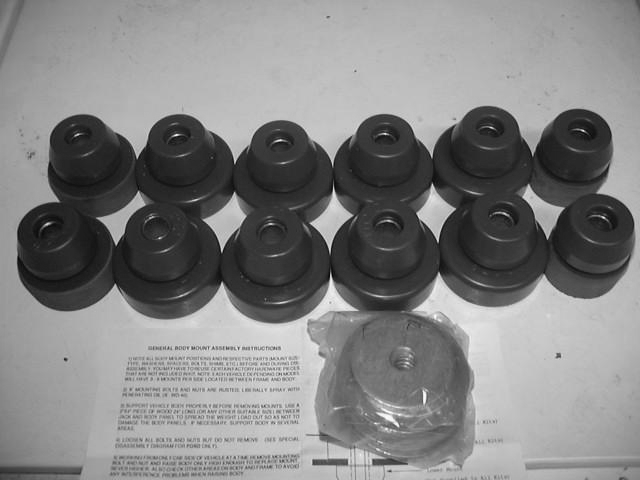 |
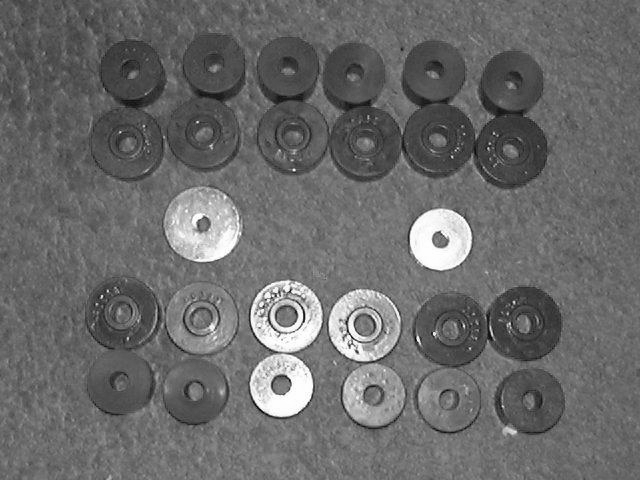 |
| 1. Stock rubber vs. Poly Urethane | 2. Pickup('79-'88) 4Runner('84-'89) Bushings Current bushing set is available in black only |
3. FJ/BJ/HJ-60/61/62 Body Mounts Current bushing set is all black |
4. Montero LWB - SOLD OUT |
 |
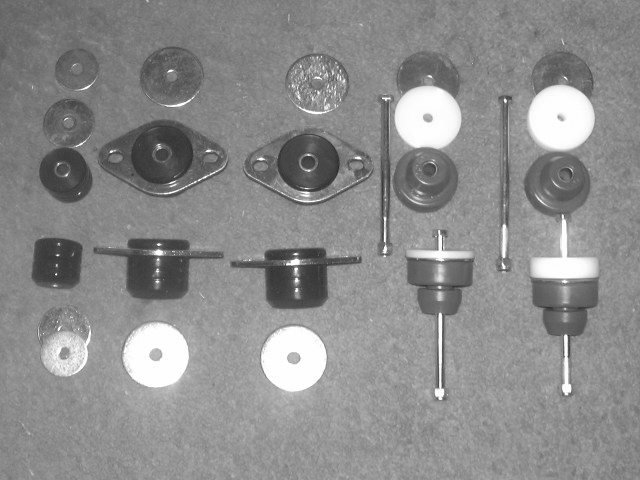 |
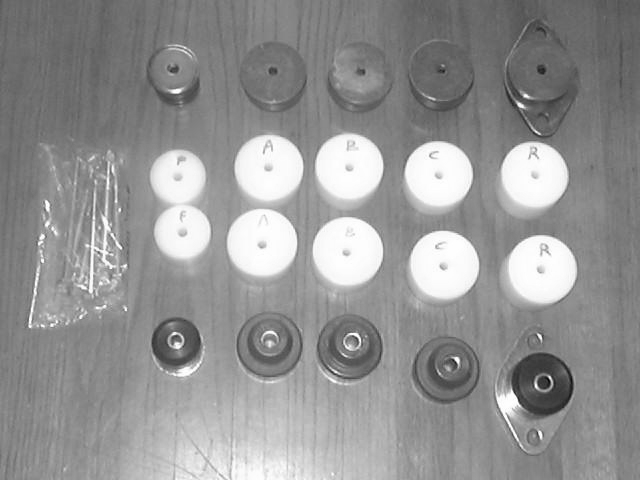 |
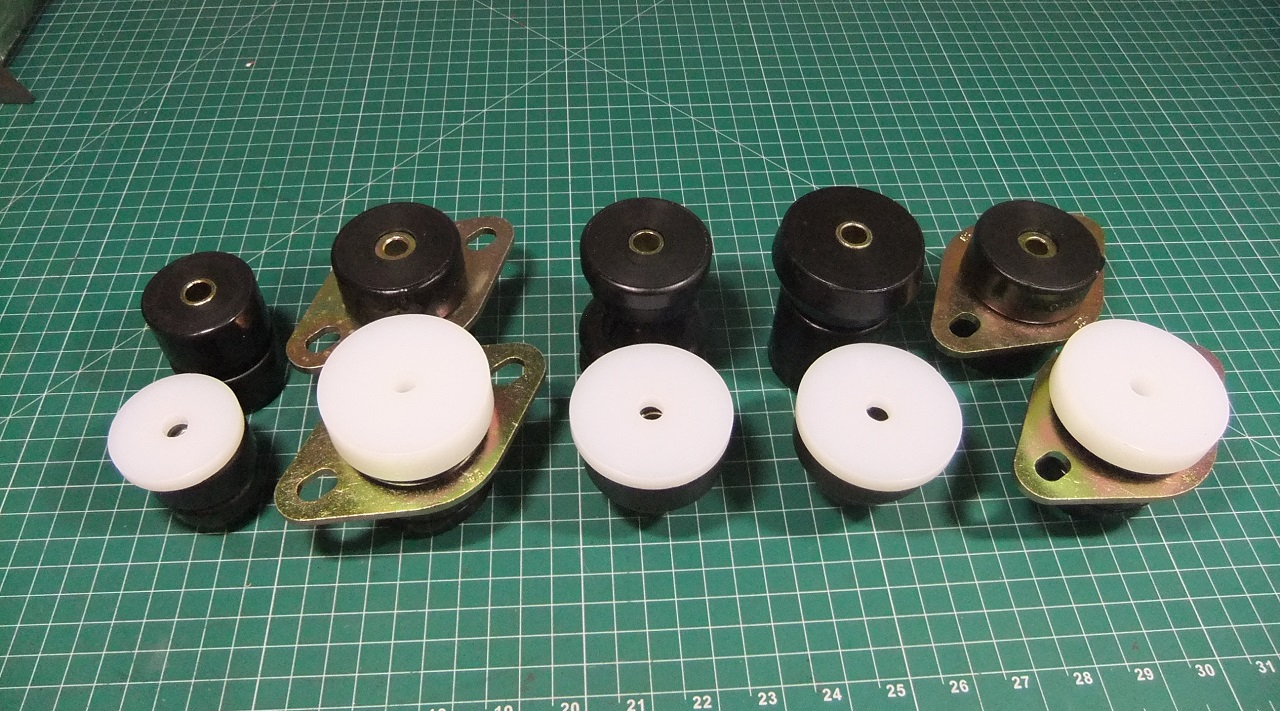 |
| 5. Pickup '89-'95 & Tacoma '95.5-'00 Mounts |
6. '90-'95 4Runner Mounts Current bushing set is all black, |
7. '96-'99 4Runner Mounts Current bushing set is all black |
8. '00-'02 4Runner Mounts |
| image soon | image soon | . | . |
| '01-'04 Tacoma Extra cab mounts | '01-'04 Tacoma Double cab mounts | '05-'12 Tacoma Double cab mounts | '13-'-- Tacoma Double cab mounts |
Pictured above:
-
A set of stock rubber body mount bushings (black) and
replacement poly urethane bushings, 92A durometer, (red)
- Large bushing: 62mm OD x 16mm ID x 21mm H x 24mm frame bracket hole
- Small bushing: 45mm OD x 16mm ID x 19mm H x 24mm frame bracket hole
- Lower bushing (all the same size): 42mm OD x 16mm ID x 23mm H
- Steel sleeve: 16mm OD x 12.5mm ID x 42mm long
-
Note, the above dimensions are measured un-compressed. In the
compressed state, the outer diameters will increase about 10-12% and
the height will reduce slightly. For example:
- The 62mm OD bushing will increase to 68-70mm, the 45mm OD will increase to 50mm, etc.
- The height will decrease (for example the 21mm height will drop to about 19mm) as the bushings are compressed. The small bushings do not compress much at all as they have less weight on them.
- Heights also do not include the separate top washer (factory washers are bonded to the upper bushing half), and that washer is approx. 3mm (1/8") thick and the diameter of the washer matches the diameter of the bushing.
-
A typical polyurethane pickup (1st/2nd gen) / 4Runner (1st gen)
cab/body mount kit.
- To the left is a 1st/2nd gen. pickup kit, with a total of 6 cab mount bushings
-
With all 10, you have a 1st gen. 4Runner kit.
- Also shown at the top are the new top washers which are drilled to accept either stock or or the larger body lift mounting bolts.
- The stock body mounts have the washers bonded to the rubber, so they can't be easily re-used.
-
A typical Landcruiser {F,B,H}J-6{0,1,2} body mount kit has 12 body
mount bushings with custom sized bushings as needed as well as FJ-80
models with 10 bushings:
-
Generally your vehicle may have a mix of bushing sizes (and yes we have
tried to find some system to this but just when we think we have it
figured out, along will come a vehicle that is different):
- 2 - 4 of the small sized bushings
- 0 - 6 medium sized (~55mm dia.) bushings
-
And the remainder of 12 large bushings on your {F,B,H}J-6{0,1,/2}
depending on year:
- Please advise what you need so that proper size bushings can be supplied.
- The main issue is that the large size bushings will typically not fit into the medium sized bushing cups on the frame brackets as they are approx. 62mm in dia. and the cups are 55mm in diameter.
- Your vehicle may have bushings with 65mm - 70mm diameters and those will be replaced with the kit's large diameter bushings.
-
Pictured above (3) you can see a kit with 4 - smaller and 8 larger
bushings (total of 12), your mix of sizes will vary to match your
vehicle.
- Large bushing: 62mm OD x 16mm ID x 21mm H x 24mm frame bracket hole
- Medium bushing: 55mm OD x 16mm ID x 21mm H x 24mm frame bracket hole
- Small bushing: 45mm OD x 16mm ID x 19mm H x 24mm frame bracket hole
- Lower bushing (all the same size): 42mm OD x 16mm ID x 23mm H
- Steel sleeve: 16mm OD x 12.5mm ID x 42mm long
-
Note, the above dimensions are measured un-compressed. In the
compressed state, the outer diameters will increase (for example the
62mm OD will increase to 68-70mm) and the height will decrease (for
example the 21mm height will drop to about 19mm) as the bushings are
compressed.
- Heights also do not include the separate top washer (factory washers are bonded to the upper bushing half), and that washer is approx. 3mm (1/8") thick and the diameter of the washer matches the diameter of the bushing.
-
Note that the medium (55mm) bushings are cut down on a lathe to reduce
the diameter to fit the 55mm dia. frame bracket cut. As such, their
exterior surface will be a rougher finish than the small and large dia,
bushings.
- It will not affect their operation or durability, but if you want to have a similar appearance to the non-machined bushings, you could spray the bushing circumference with a black vinyl paint. That will dry to a shiny, smooth black finish and be stretchy enough to accommodate the bushing flexing.
- The other option is to remove any 55mm cups on the frame brackets (with a grinder or cut-off saw) and then use large instead of medium sized bushings.
-
Generally your vehicle may have a mix of bushing sizes (and yes we have
tried to find some system to this but just when we think we have it
figured out, along will come a vehicle that is different):
-
A Mitsubishi Montero has has 8 to 12 body mounts
- Upper bushing: 60mm OD x 17mm ID x 23mm H x 29mm frame bracket hole
- Lower bushing: 51mm OD x 17mm ID x 33mm H
- Steel sleeve (not included): 17mm OD x 12.5mm ID (est) x 50mm long (est)
- '89-'95 Toyota Pickup and '95.5-'00 Toyota Tacoma 1-piece body mount bushings
-
2nd Gen 4Runner ('90-'95) body mount bushing kit, a hybrid kit of 6
1-piece bushings and 4 2-piece bushings.
- Note the arrangement of the bushing parts, shown front-rear (left-right) and the thin (1/4") and thick (1/2") spacers, or with a body lift, the rear most lift blocks will be 1/4" and 1/2" taller than the rest of the blocks, respectively.
- Bushings and blocks are labeled front to rear with the capital letters: Front, A-pillar, B-pillar, C-pillar, Rear
- With stock hardware, you can re-use the existing bolts, but if purchased with a body lift kit, then the 4 rear most bolts (shown in the photo but not included in the bushing kit), will need to be 1" shorter than with the OEM mounts.
- If you want to replace the body mount bolts along with the bushings, you can order our 0" (i.e. stock height) hardware kit, see the 4Runner kit page for details.
-
3rd Gen 4Runner (1996-1999) body mount bushing kit, 2 1-piece bushings
and 8 2-piece bushings (picture shows combined 1" body lift and
poly bushing kit)
- With no body lift, you'll have an assortment of thin spacers to make up height differences between the stock and replacement bushings and with a body lift, the lift blocks will have differing heights, ranging from 7/16" to 7/8" taller than the ordered kit. Again, this is to make up for the difference in height between the stock body mount bushings and the new poly bushings. When installed, the combination of the shorter poly bushing and the taller block will be the same height as the stock bushing and shorter block.
- Bushings and blocks are labeled front to rear with the capital letters: Front, A-pillar, B-pillar, C-pillar, Rear
- 3rd Gen 4Runner (2000-2002) body mount bushing kit, 4 1-piece bushings and 6 2-piece bushings
-
If you want to change the color of the bushings, you can paint them
after installation.
- Clean the bushings off with a good solvent, rough up the surface gloss with some sandpaper and then apply a spray paint of the desired color once they are installed.
- Rubberized undercoating spray works as well and can be applied with the bushings in place and without surface prep. This has the advantage of matching the look of the factory undercoat to make the lift blocks belnd in.
-
This can also be done on the bushings that we have to reduce in
diameter, such as the 60-series, 70-series and FJ80 bushings. This can
help to restore the glossy finish lost when trimming the bushing outer
diameter.
- Alternately, if uniform bushing appearance is a concern, you can always request unmodified bushings and then you can modify them or modify the body mount brackets on the vehicle to fit the unmodified bushings. Same with any bushing hardware that we could otherwise modify. If you are building a show quality vehicle and want every part to look perfect, by all means you can get our unmodifed parts and take all the time you want to modify them in whatever way you wish. We assume customers want parts that fit a range of vehicle and do the job, so that is what we focus on.
-
On some of the Toyota Landcruiser bushing kits, we have two options for
the larger diameter bushings.
- The first option is a one piece top bushing of approx. 62mm OD (uncompressed).
- The second option is we can supply a small center bushing with an enlarging polyurethane ring around the outside that brings the OD up to about 70mm.
- Let us know if you have a preference, although we can't guarantee which style parts we'll have on hand at a given time.
- Don't need a full set of bushings? No problem, individual bushings are available for purchase. Contact 4Crawler Offroad with your requirements...
What if there is no bushing kit available for my vehicle?
If you have a vehicle not listed above, that uses 2-piece rubber body mounts, and would like to see about upgrading to poly urethane, contact 4Crawler Offroad and we'll be happy to work with you to develop a solution if possible. You'll need to supply detailed dimensions of the existing bushings, inner and outer diameters, height of upper and lower halves. Basically we will need the type of information listed in the prior section regarding the bushing dimensions. For mounts that bolt onto frame brackets, we'll need to know how the mounts attach to the frame, how many bolts, what size and spacing, etc. And you can browse the available bushing kits and sizes listed above to see if there is something that is close. We can change diameters and heights of the various bushings listed above to fit other vehicles. But don't despair, almost all the bushing kits listed above were developed by 4Crawler Offroad based upon customer input just like requested.
[Return to the top of this page]
Body Mount Brackets:
Certain vehicles, namely the 1996 (and some 1997) Toyota 4Runner, are missing the B-pillar body mount brackets from the factory. For some reason, the brackets weren't attached to the frame, although the mounting plates and holes are present in the floor of the body. Because of the added stress of a body lift, its important to have all the body mount locations available for the most support. On other vehicles, the origial body mount brackets may be damaged by rust or you may need to install new brackets such as when converting a pickup from one cab style to another, such as a regular to extra cab.
Below is a picture of our new universal body mount bracket options. Our new brackets will work with frame to body/cab mount bolt spacing of 2-1/2" up to 3-1/2" (63mm - 88mm) or even wider. This includes Toyota pickup/Hilux cab mount brackets 1979-1995, Toyota 4Runner/Hilux Surf body mount brackets 1984-2002, Toyota Tacoma cab mount brackets 1995.5-2004 and T100 pickups. We sized these brackets to fit the majority of the Toyota models we had information for.
Also will fit a wide variety of other pickup and SUV models like Ford, Chevy, Dodge, GMC, etc. as is or with some monor modification. Measure the distance horizontally from the face of the frame to the center the body or cab mount bolt for sizing. The brackets feature a long slotted hole to allow the bushing to move in or out to align with the body or cab mount bolt for a perfect fit, eliminating the need for precise measurements. Just get within +/- 1/2" (12.5mm) and that's all you need.
- Brackets are made of laser cut and formed 3/16" steel plate.
-
Bracket is 3" tall where it attaches to the frame
- Width (front-back) is 3-1/4" overall
- Depth (frame - end of bracket) is just under 4-1/4"
- Top slotted hole is 1" diameter and 2" long, sized to fit a bushing with a 1" dia. raised center lip.
- Will work with frame to body/cab mount bolt spacing of 2-1/2" up to 3-1/2" (63mm - 88mm) in stock form
- Width (front-back) is 3-1/4" overall
- If you want to know if we have a bracket to fit your vehicle, first check the dimensions of our brackets (above) against that of the bracket(s) you wish to replace.
-
The most important dimension is how far away from the frame is the center of
the body/cab mount bolt. If that falls within the adjustment range of our bracket,
then the bracket should fit as-is.
- If you need a wider or narrower spacing, and you plan on welding the brackets to your frame, you can likely handle extending or trimming the bare bracket(s) to fit.
- If you want a ready to bolt on bracket, then you'll need to tell us the frame to cab/body mount bolt spacing so that we can modify the bracket, if needed, to fit.
- Pricing for those options as well as a YouTube video and photo album below with more details.
- If you need a wider or narrower spacing, and you plan on welding the brackets to your frame, you can likely handle extending or trimming the bare bracket(s) to fit.
The information following is not meant to be confusing and we did not try to come up with dozens of options just because. Rather, we are trying to describe the various options that customer's have requested over the years. We are trying to be transparent on the pricing of these various options. This will allow you to decide if you might need a given option and if so, how much it will cost. If you have questions on a specific option or need something that is not covered below, let us know what you are having trouble with or need.
For deeper applications, a thicker plate can be welded to the back side of the bracket. For example adding a 1/2" plate to the back side will fit up to a 4" frame - bolt spacing, or you can add a 1/4" fishplate to the frame and 1/4" plate to the bracket for a 1/2" deeper bracket. With any of these size modifications, you won't need any precision cut material, just standard width steel flat bar available at most hardware stores will do. If you can handle this yourself, just order the weld-on bracket, with or without the polyurethane bushing. This was done for the GMC Sierra bracket that you can see in our photo album, link below
Also possible to weld on 1", 1.5" or 2" wide extensions to the back side of the bracket for even wider applications. See the YouTube video below for a Dodge Durango bracket where 2" wide flat bar was added to the back side of the bracket and then a bolt-on plate added onto that to fit a 5" frame - cab mount distance: Likewise, we can also cut off a bit of the back side of the bracket to accomodate narrower frame to body mount bolt spacing. This material is readily available at most hardware / big box stores or on-line if you want to do this yourself. You need 3 straight pieces of steel of the desired width, cut to fit on the back side of the bracket. Tack those pieces to the bracket and then weld out the seams and you now have a wider or deeper bracket.
Likewise, if you needed a bracket that is 4" or 5" wide to fit a larger diameter bushing, the vertical sides could be cut off and a 1/2" or 1" wide flat bar welded in place on each side to widen the bracket accordingly.
They'll fit body mount bushings that have a 1" dia. raised center lip. They are available in a weld-on (left in image below) and a bolt-on (rght in image below) version. The bolt-on version comes with self-tapping screws for attaching the bracket to the frame. The bolt-on version will require a flat area of frame to mount to, so any old bracket would need to be completely removed. The weld-on bracket would only need clean, flat steel around the outside for welding. It can also be welded onto a wider bracket, such as under the A-pillar.
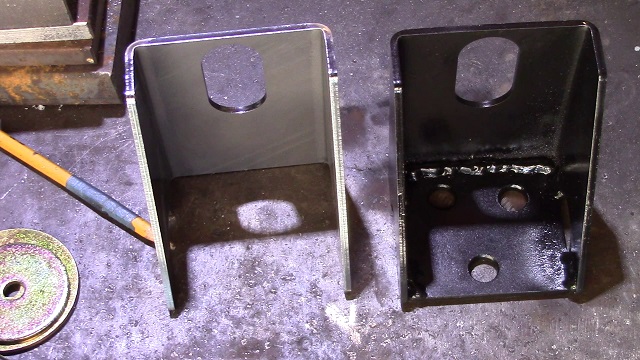 |
| Body Mount Bracket Kit |
This kit can be used with or without a body lift. Brackets are available in single units, so order 2 if you want one for each side of the frame. Also available with our round polyurethane bushings. If you are replacing a bracket with bushings that bolt in place, you'll need to order the version with new bushings. We have bushings available in a 45mm, 62mm and 70mm diameter. The bushings come with the top and bottom cushions, a steel sleeve and a steel top washer. Also available is a heavy duty bottom washer (1/8" thick x 2" diameter) if you want to replace the original bottom washer from your old body mount bushing. Bushings can accomodate up to 1/2" diameter bolts. They come set up with 3/8" dia. holes in the washers and you can drill these larger if needed.
Pricing:
-
Weld-on:
- Bare bracket - US$25.00 ea.
- In stock and can ship within a day or two.
- Add on backing plate for weld-on bracket, 3/16" steel, US$7.50 ea.
-
Bolt-on:
-
Bracket with 2 self-tapping mounting screws - US$35.00 ea.
- Bolt-on plate is typically 3/16" thick steel and can either be welded inside the bracket, preserving the 2.5" - 3.5" spacing or can be welded outside the bracket, pushing it out 3/16" wider. Please let us know if you have a preference.
-
For added width, we can weld on 1", 1.5" or 2" wide
extensions between the bracket and mounting plate for applications with
a wider frame-mount bolt spacing.
- E.g. a 1" extension moves the bracket out to fit 3.5" - 4.5" frame to mount bolt spacing.
- Add US$32.50/bracket for the added width.
- We also can add a 1/2" thick bolt-on plate to the back of the bracket, to fit 3" - 4" spacing, add $10.00/bracket
- For narrower width, add $7.50/bracket to have up to 1/2" of the back side cut off to fit narrower body mount applications.
-
Painting:
- Add $2.50/bracket for a primer coat
- Or add $5.00/bracket for primer + black enamel paint finish
- Or you can finish the brackets as you desired.
-
Bolt-on brackets come with 2 - 3/8" self tapping bolts and 3
pre-drilled mounting holes
- Add $2.50/bracket for an additional self-tapping bolt if you want to use all 3 holes
- Or add $5.00/bracket for 2 additional bolts and a 4-hole bolt-on plate.
- You can also use regular 3/8" coarse threaded bolts after tapping holes with the self-tapping bolts.
- Allow a week for fabrication (and painting) time for the bolt-on brackets.
-
Bracket with 2 self-tapping mounting screws - US$35.00 ea.
- Brackets will work with this type of bushing, 3D-printable or see description for a pre-made bushing kit link.
-
Additional hardware:
-
New body mount bolt/nut, US$6.00/bolt SAE Gr5 or $7.50/bolt in Gr8, Stainless Steel or Metric Gr8.8
- You should be able to re-use your existing body mount bolt as long as it's 1/2" or smaller diameter
- Can supply new hardware: 3/8", 10mm, 7/16", 12mm or 1/2" bolts up to 6"/150mm long
-
We'll need to know the diameter and length hardware that you need.
- With our poly bushings, the overall stack height of the top and bottom bushings and washers is approx. 1.9" or 49mm.
- A 3" long bolt fits well with a single wall floor design where there's a single layer of metal that the body mount bolt fits through, with the upper bushing just below that metal. If your body mount bolt passes through additional material, adjust the length accordingly.
- If your existing bushings are significantly taller (or shorter) than this, let us know so we can adjust the hardware length.
- For the 1996/7 4Runner or other vehicles where these brackets are being added to the frame where a factory bracket is missing, add $2.50 for a new heavy duty top washer that will sit over the hole in the floor panel to support the body mount bolt. We have washers in 1-3/4" and 2" diameter, let us know which size would work best for your vehicle (you'll need to check for clearance around the hole in the floor).
- New bottom bushing washer: US$2.50/ea.
-
New body mount bolt/nut, US$6.00/bolt SAE Gr5 or $7.50/bolt in Gr8, Stainless Steel or Metric Gr8.8
-
Shipping and ordering options
- Up to 4 brackets + bushings can ship for the medium flat rate box postage in the US or Internationally.
For bolt-on installation, you'll need to grind the frame flat over about a 3" x 3" square area and have sufficient frame wall thickness (at least 1/8" or 3mm) for the self-tapping bolts. One option with the bolt-on bracket is you can do the grinding and bolting of the bracket to the frame with simple home tools. Then you could drive to a welding shop and have them run a bead around the bracket to permanently attach it to the frame. This would save a lot of the installation cost that a shop would charge for the full install.
The weld-on bracket only requires clearing the frame in the area where you'll be welding the bracket to. It also works well if you find you need to fish plate the frame rail to repair rust-thinned metal there. Do that then weld the bracket in place. The weld-on bracket is also good if you need to customize it by adding additonal material to space it out from the frame.
Contact us for custom applications and shipping details. Please provide the frame to body mount bolt distance if enquiring about a bolt-on bracket: sales@4Crawler.com
[Return to the top of this page]Standard vs. Ultimate vs. Mega Lift Blocks:
Most (if not all) commercial body lift kits we've looked at use a "one size fits all" approach. You get one diameter of lift block (usually 2" OD) and that is to be used in all body mount locations. If you are a bit confused about the difference between the Standard and Ultimate body lift blocks, below are various combinations (of lift blocks - white UHMW or aluminum) installed on actual Toyota body mount bushings (the black rubber things) so you can see the differences:
 |
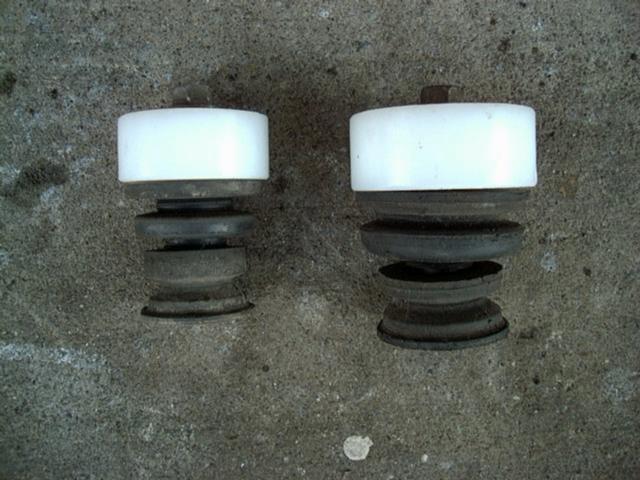 |
| A. 2-piece body mounts | B. Ultimate Lift Blocks |
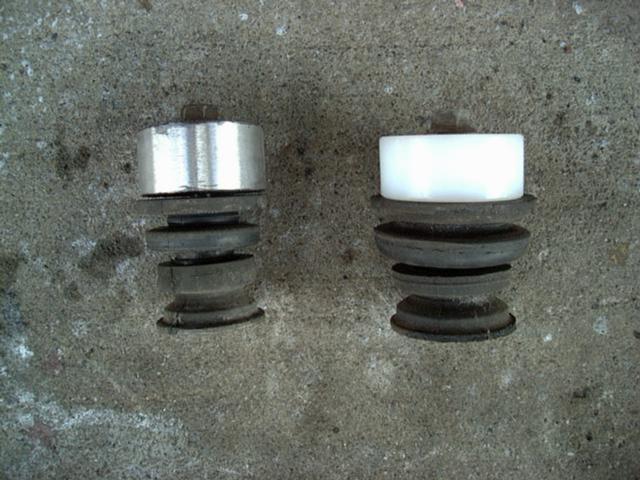 |
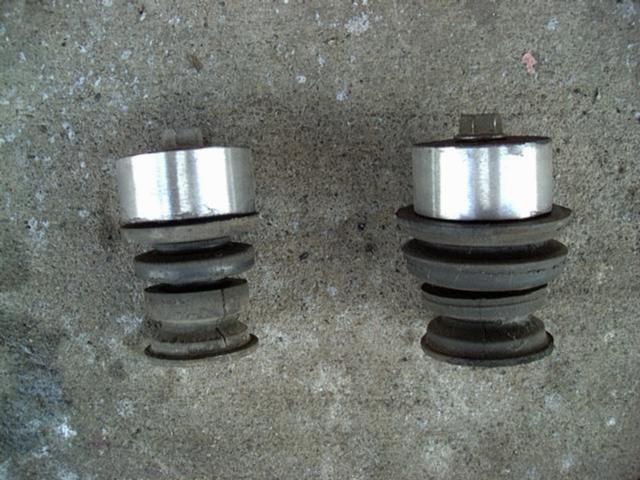 |
| C. Aluminum vs. UHMW | D. Aluminum Lift Blocks |
-
Photo A is an example of the 2-piece body mounts common in '79-'88
pickups and '84-'89 4Runners (i.e. 1st generation). The smaller mount
is found under the radiator support, the larger mount is used for the
rest of the cab/body, 4 in a pickup, 8 in a 4Runner.
- On top, from left to right, are a 2" dia. aluminum block, a 2" UHMW block, and a 2-1/2" UHMW block.
- Photo B, shows how the the Ultimate blocks match the diameter of the stock body mounts.
-
Photos C and D show the 2" dia. aluminum blocks compare to the
2" dia. of the UHMW blocks
- The UHMW material is slightly over nominal size
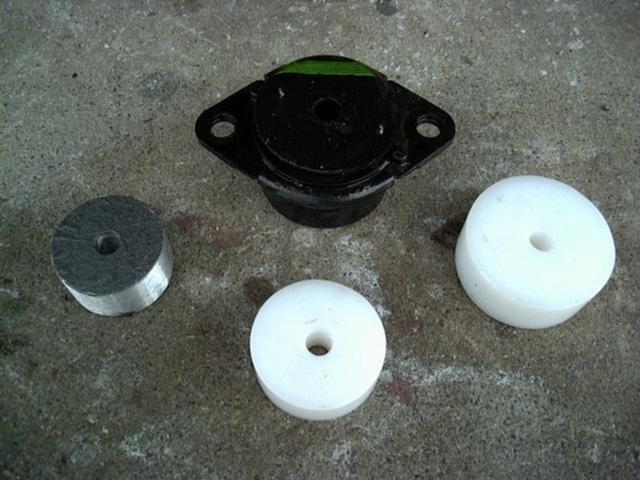 |
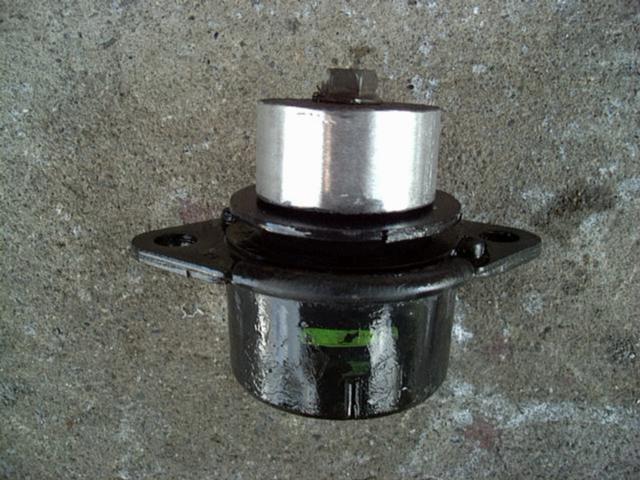 |
| E. 1-piece body mount '89+ pickup/Tacoma w/ the various lift blocks |
F. 2" aluminum block |
 |
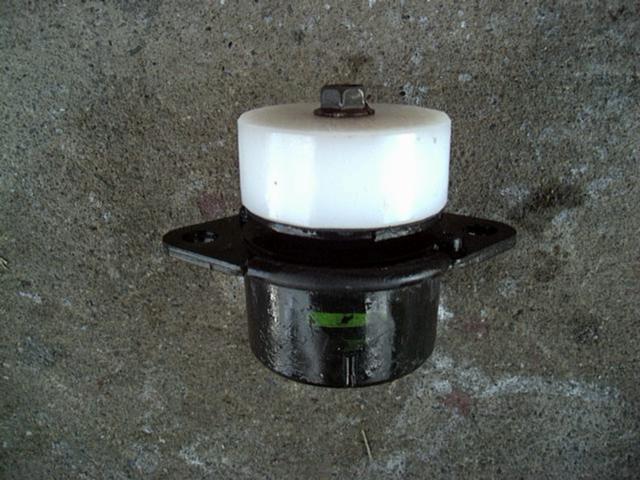 |
| G. 2" UHMW block | H. 2-1/2" UHMW block |
While a few eighths of an inch doesn't sound like a big deal, the difference in area is dramatic, the 2" UHMW block has nearly 27% more surface area than an actual 2" block and the 2-1/2" UHMW block has nearly 80% more surface area. Surface area equates directly to pressure on the floor of the cab/body of the vehicle. Many aftermarket body lift kits only supply 2" dia. blocks which are probably sufficient for on-road and mild off-road use, but for extreme off-road service, you need all the surface area you can get, or something like this can happen (image I below):
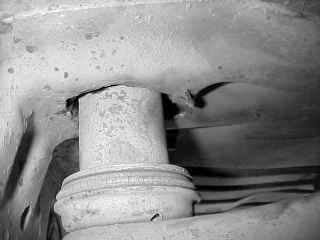 |
 |
| I: Problem with too-small lift block | J: Larger Diameter Block |
So if larger blocks are better, why stop at 2.5"? A few reasons not to use larger blocks:
-
Certain body mount locations are fairly constrained and a larger block
simply won't fit
- In fact in image J above, observe how a larger block would have trouble resting flat against the cab floor due to the curve of the sheet metal
- The body mount bushing and reinforced pad on the body are only so large. Having excess block material hanging over the edge provides no added benefit
- Larger blocks use more material and cost more money, so best to use a block that approximates the size of the body mount
On some vehicles, we do offer a Mega lift block option. The Mega blocks are typically 3" to 3.5" in diameter for those vehicles where the body mount bushings are that large and the owner wants to use a block that more closely matches the diameter of the bushing. Examples of vehicle with the Mega blocks are the later model FJ Cruisers, some 4th generation 4Runners and of course the Kia Sportage where we only offer that size.
Bottom Line: The Ultimate blocks simply are larger in diameter to more closely match size of the existing body mount bushings, the Mega blocks are even larger while the standard blocks are all the same (smaller) diameter.
[Return to the top of this page]What color are the body lift blocks?
The UHMW material comes in a natural white color, as shown in the section above. As a material, it is somewhat similar to Teflon in that it is very stain-resistant and most dyes and paints will not stick to the natural surface of the lift blocks. However, it is possible to sand the surface of the block, making it able to accept paint for those wishing a color other than white. This process is available at an additional cost and is currently available in flat black. Click here to see an image of a colored 1" tall block. This is specified by ordering the CLR option.
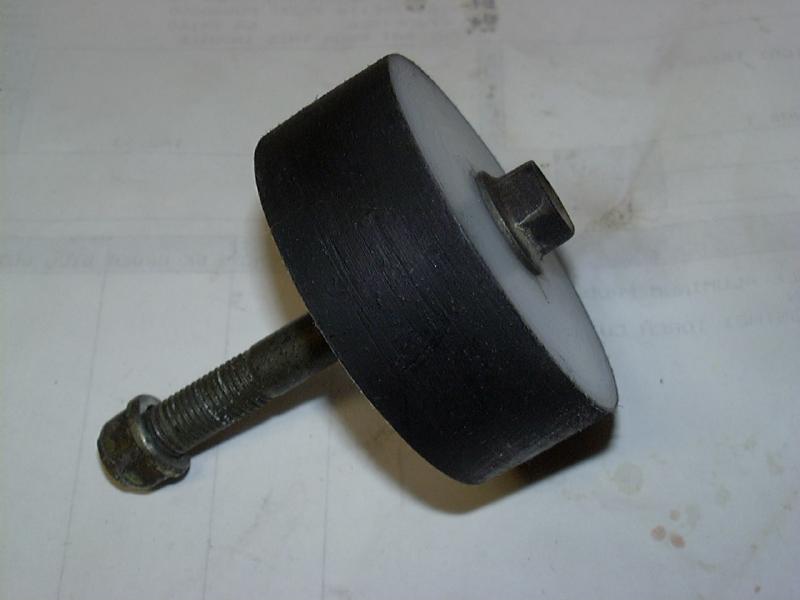
The default color is black, but if you wish to paint the blocks yourself, add the CLR option and specify unpainted and then you can apply your desired color paint. Likewise, you can sand the blocks yourself if you want to save money. Easiest way to do that is to stack up one or more blocks on a bolt with washers on each end and then secure them with a nut. Chuck the end of that bolt into a drill chuck and spin the block(s) against a piece of coarse sand paper until they have a dull finish, usually takes 30 seconds to a minute of sanding.
Another option for a black block color is to apply a rubberized undercoating spray. That will stick to an unsanded or sanded block and will match the underside of the vehicle.
If the block coloring is slightly scratched during shipment or installation, it is easy to touch up with a flat black spray paint. The coloring process also affords UV light protection for blocks that may be exposed to direct sunlight.
Generally, however, the body lift blocks are not visible or exposed to direct sunlight. But you can make that decision for yourself, examine your vehicle and look for the body mount brackets and bushings and decide if you'll be able to see the lift block sitting on top of that bushing.
NEW: By popular demand, we now have a limited supply of solid black UHMW material in the 2" and 2.5" diameters. If we have this on-hand, we'll try to use it for your body lift blocks when ordered in the black color (CLR option).
Of course, the 1" tall aluminum blocks are natural aluminum color. You may paint, powder coat or anodize them to your color preference.
[back to the top]Standard vs. Heavy Duty Mounting Hardware:
Mounting hardware is offered in both a standard and over size and also in standard and heavy duty grade (see bottom of this section for more information on the standard size, heavy duty grade hardware).
- Standard Grade, Standard Size hardware:
- is designed to fit all the stock washers, bushings, etc. as-is, without need for modification. It is also of equal strength to the stock hardware (SAE Grade 5 ~ Metric Grade 8.8). The hardware kit cost varies depending on application. Standard grade hardware is approx. 115,000 - 120,000 psi tensile strength.
- Standard Grade, Oversize hardware:
-
The larger heavy duty hardware, is designed to be the maximum size and
strength that can be installed in the vehicle without requiring major
modifications. It may require re-drilling holes in some of the stock
body mount washers (see
installation instructions), but in the case of the pressed on
tabbed washers, the oversize bolts have the larger diameter of the
factory bolts under the head where they are enlarged for the press fit
washer, so the old washers will often press fit back onto the new body
mount bolts like stock. This option is only available on the early
Toyota pickups and 4Runners and on some Tacoma models. Bottom Line: If
you lack the ability and/or tools to drill holes (7/16" or 12mm or
1/2") dia. in steel washers, then go with the standard size
hardware, or see below for other hardware options.. With the larger
surface area, the oversize hardware is approx. 35% stronger than the
standard size hardware (assuming a 7/16" vs. a 10mm dia. bolt with
similar metallic strengths). For for vehicles with 10mm stock size h/w,
you can request the HD hardware option and advise us that you would
like the oversized hardware standard grade in place of the standard
size heavy duty grade.
- On the 4th generation 4Runner and FJ Cruiser body lift kits, this is the default hardware option, with the stock size hardware being 12mm and the oversize hardware is 12% stronger at 1/2" and the standard size hardware is 7/16".
- Heavy Duty Grade Hardware (HD kit option)
-
Another option for upgraded hardware is using standard size, heavy duty
grade (Grade 8) bolts, or in the case of the 4th generation 4Runner and
FJ Cruiser kits, you also have the option of both standard size and
oversize heavy duty hardware. This option adds approx. $15 to the cost
of the hardware kit and includes Grade 8 bolts for all the cab/body
mounts. You can specify the type of hardware you desire at the time of
ordering. With the standard size Grade 8 hardware, no modification to
the stock body mount hardware is required. This option, listed as kit
HD, can be specified on almost all the body lift kits. This option is
generally recommended on lifts of 2" and higher, This option is
available for all applications that list the HD option in the kit.
Heavy duty grade hardware is made from an alloy steel that is tempered
for approx. 150,000 psi tensile strength and is in the range of 25% -
30% stronger than stock.
- We typically supply a heat treated Grade 5 lock nut with the HD bolts. Since body mount bolts are not torqued down to a high pre-load, the hardened Grade 5 nuts offer more than enough clamping strength. The only visible difference will be the color, the nuts will be a silver colored zinc plate finish while the bolts will be a yellow zinc chromate finish.
- If you want to have matching colors or must have Grade 8 nuts with the Grade 8 bolts, add the HDnuts kit item to your order, along with the HD (bolts) option. We don't list this in each lift kit pricing table, but the kit option and price should apply to all the lift kits that use bolts and nuts and offer an HD option. Note that with metric hardware, this is not an option. Likewise on pickup kits, the nuts on the bed bolts are not upgradeable and on the Tacoma models, the bed hardware is metric only and the nuts are typically part of the bed or frame and are re-used.
- If you don't want to re-use your factory bushing bottom washers or want an upgraded bottom wahser, we offer the HDwash kit item. This adds hardened, oversized wahsers for the bottom of all the body mount bolts. Think of a fender washer (large diameter washer with a smaller hole in the center), but way thicker and made of hardened steel. This option works well if you are installing poly body mount bushings and your original rubber bushings have the bottom washers bonded to the rubber bushing.
- We typically supply a heat treated Grade 5 lock nut with the HD bolts. Since body mount bolts are not torqued down to a high pre-load, the hardened Grade 5 nuts offer more than enough clamping strength. The only visible difference will be the color, the nuts will be a silver colored zinc plate finish while the bolts will be a yellow zinc chromate finish.
- Standard Size, Stainless Steel Hardware (SS kit option):
-
Available for certain applications is a marine grade 316 alloy
stainless steel hardware kit (316 alloy is highly resistant to salt
corrosion). This option adds approx. $30-40 to the cost of hardware kit
Stainless steel offers superior corrosion resistance over the zinc
plated steel used in the standard and heavy duty hardware options.
Stainless steel hardware is available by special order. One draw back
of stainless steel is that it is only about 85,000 psi tensile
strength. But if rust is a big issue for you, the world's strongest
steel will lose strength rapidly as it rusts away, while stainless
steel "takes a licking but keeps on ticking" to quote a
popular watch commercial. And while there are higher grade stainless
steel alloys available, they are very expensive and very hard to find
on the extremely long lengths needed for body lift applications. If
you opt for the SS hardware upgrade, be sure to use an
anti-seize compound on the bolt threads prior to installing the nut.
Stainless steel threaded fasteners are prone to galling when tightened
and if you ever want to take the nut off the bolt in the future, the
anti-seize compound will ensure the nut comes off without trouble.
- Pickup and Tacoma lift kits don't list SS hardware options, but we can supply SS hardware for the cab mounting bolts if desired. We are unable to source the long, extra fine threaded stainless hardware required for the bed bolts on these vehicles. Inquire for pricing and availability.
- The SS kit option upgrades both the nuts and bolts to stainless steel.
- If you also wish to have stainless steel bottom washers, you can add the SSwash kit option for an additional cost of US$20.00/kit to add or upgrade the washers on the bottoms of the body mount bolts to stainless steel. Note that this option is not listed on the regular kit pricing tables, but if a kit offers an SS hardware option, you can add the SSwash kit item to get stainless steel washers along with the stainless steel bolts/nuts. Otherwise, kits will either include zinc plated bottom washers for those kits that require washers, or you will re-use the existing bottom washers on those vehicles that have re-useable washers.
- Pickup and Tacoma lift kits don't list SS hardware options, but we can supply SS hardware for the cab mounting bolts if desired. We are unable to source the long, extra fine threaded stainless hardware required for the bed bolts on these vehicles. Inquire for pricing and availability.
- Same size as stock metric hardware (MET kit option):
- Certain lift kits offer a metric body mount hardware option This option is for folks who want to retain all metric hardware on their vehicle, Although depending on bolt and nut availability, the thread pitch and head size may vary from stock, as it is very difficult to find some metric thread pitches in the extra long bolts needed for a body lift. And note that long metric bolts are fairly expensive here in the US, thus the added cost of that option. Metric Class 8.8 hardware (which is what is offered in the MET option) typically runs about 116,000 psi tensile strength, so about the same as SAE Grade 5. While there are stronger classes of metric hardware (such as 10.9 and higher), they are very hard to find in the US, and especially in the extremely long lengths needed for body lift applications.
- So which hardware option does 4Crawler Offroad recommend?
-
If low cost is important, get the standard grade hardware, this is the
default
- If ease of installation is important, specify the standard size hardware with your order
- If maximum strength and ruggedness is important, get the heavy duty hardware kit upgrade (HD), if available
- If corrosion resistance is important, get the stainless steel hardware kit upgrade (SS), if available
- If you prefer to have metric hardware, get the metric hardware kit upgrade (MET), if available
- If ease of installation is important, specify the standard size hardware with your order
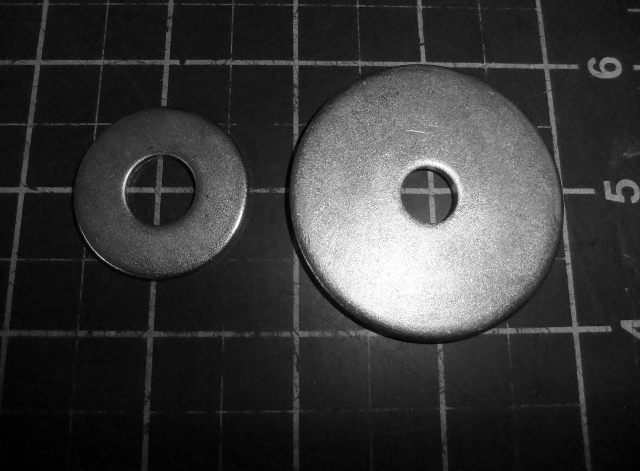
And of course, you can also supply your own hardware, if you want all metric or something even larger or heavy duty stainless steel, it is your choice. Just let us know what diameter bolts you plan on using so the blocks can be pre-drilled to fit.
And finally, why are the above hardware options "mutually exclusive"? That is why can't I order Heavy Duty Stainless Steel Metric hardware? Well, several reasons. If you look at the "universe" of bolts available, you can get most anything as long as you don't care what you are getting. But as you start narrowing down the bolt specifications, you'll find that "universe" rapidly collapses. Body lifts inherently need long bolts. Why? Well vehicle manufactures are using body mount bolts upwards of 6"/150mm long in stock form and by the nature of a body lift, the bolts have to be longer than stock, so up to 8"-9" long in some cases. Length is one factor that limits bolt availability as does size, since body mount bolts tend to be in the 3/8"-1/2" size. Then start tacking on things like Grade 5 or Grade 8 and the selection of bolts falls off, but ask for stainless steel or (at least in the US) metric, and your choices are very limited. And this is just using one choice or grade/size, but start combining them and you can just about write off any chance of finding an off-the-shelf bolt. And in fact you'll find that some some lift kit applications, certain options are only available up to a certain lift height or on certain vehicles. This is typically due to length issues, above a certain bolt length, that combination of bolt specifications is not economically available, so will be marked "n/a" (or Not Available).
Sure, you can get something custom made or from a specialty supplier, but the cost in small quantities is very high. For example, look at an engine head stud kit, they use high strength alloys (190,000 psi is common) but you are looking at $15-$20 per stud and nut for that hardware. Multiply that by 10-14 bolts needed for a body lift and you get the idea.
And while in certain cases, some combination of hardware options might be available, there is the cost of sourcing and stocking that rarely ordered hardware option in all the lengths and diameters needed, not to mention the space used to store that hardware is prohibitive for something that might only be ordered once every year or two. For example, we only ship a few kits a year w/ the stainless steel hardware and even less with metric hardware.
[back to the top]What about manual transmission and transfer case shifters and clutch hoses?
Manual transmissions and transfer cases have shift levers that are attached to the transmission (or transfer case) and extend up into the passenger compartment for access. Since the transmission or transfer case is attached to the frame, when the body is lifted, the shift lever "sinks" into the floor of the vehicle. With a 1" lift, this would probably not even be noticed. On a 2" - 3" lift, it probably is noticeable. The shifter(s) will still work like normal, given you address any clearance issues with the floor penetration/shifter boot(s). Most people have no issue with the lowered shift levers, you usually adjust to the change in a few days of driving. However, some folks find this situation bothersome. They are used to reaching out for the shifter and don't find it where it used to be, or they find they are missing shifts, etc. So, if you fall into the latter group, by all means, extend the shifter(s).
Several options exist to correct this problem.
- One option is to cut the shift lever off near the base and have a section of 1/2" dia. steel rod welded in to lengthen the shifter. This consists of one or more lengths of 1/2" steel rod, available in 2" and 3" lengths, see ordering options below. Installation requires cutting the shifter down near the pivot point (where it is ~1/2" in dia.) and welding in the rod to lengthen the shifter. When doing this, you also have the option of angling the shifter in a different direction if that helps with shifter clearance. Click here for a picture of a pair of 2" weld-in extensions.
- Another option is an extension that can be added to the top of the shift lever. As such, the extension will have an internal thread to match the end of the shifter and an external thread to accept the shifter lnob to be re-installed on top. Note that this extension will only work on shifters that have a screwed on shift knob and only on ones without any sort of switch or actuator on the knob. Also note that this extension will typically not help reduce shifter binding at the floor penetration due to a body lift, it will only raise the shifter knob up higher.
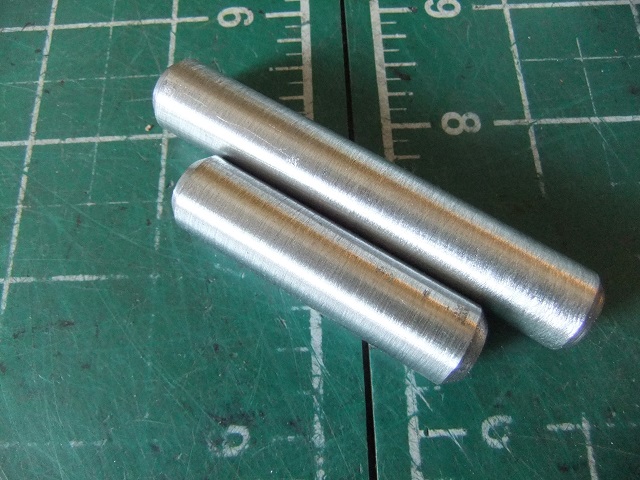
When deciding to extend the sifter(s), you can decide if you want to du just the transmission or the transfer case shifter(s) as well. All can typically be extended, but realize you will be using the transmission shifter many, many times each time you drive the truck, so extending this shifter gives the best "bang for the buck". The transfer case shifter(s) are typically not used that much, unless you take your truck off-road every day. And even if you do, how often do you find you are shifting the transfer case gears. So there is much less benefit to extending those shifter(s), but you can if you want to.
So bottom line is if having lowered shifters, due to a body lift, will bother you, by all means extend them. If it does not bother you, by all means leave them as-is. After all, there are no "shifter police" that will be pulling you over on the road to check the height of the shifters :)
We now offer a selection of thread sizes for different vehicles. Toyota mainly uses M12x1.25 (12mm dia. and 1.25mm extra fine thread pitch) up until the 2nd generation Tacoma pickups that seem to use M8x1.25, as does the Kia Sportage. M10x1.25 seemes to be used on the Mitibishi Montero/Pajero vehicles. Many European vehicles use M12x1.50 thread. US built vehicles commonly use 1/2"-20 (NF or fine thread).
-
Conversions:
- 8mm is ~5/16", 10mm is ~3/8" and 12mm is ~1/2"
- 1.25mm thread pitch is ~20 TPI (threads per inch), 1.50mm is ~16 TPI
Best to check which thread size you need by unscrewing the shifter knob and checking. You can use a bolt or nut of known diameter and thread pitch to check if you're uncomfortable measuring.
 |
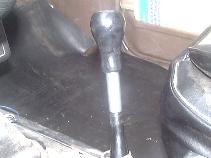 |
| 3" Extension (top) 2" Extension (bottom) |
Shifter Extension Installed |
- We've sold out of this item.
- 1.5" Shifter Extension (ToyMT_SL1.5): US$20.00 + shipping
- 2" Shifter Extension (ToyMT_SL2): US$20.00 + shipping
- 3" Shifter Extension (ToyMT_SL3): US$25.00 + shipping
- DIY Shift lever extension CAD files
| Order Shift Lever Extension w/ US shipping |
| ========== |
| Order Shift Lever Extension w/ Canada shipping |
| ========== |
| Order Shift Lever Extension w/ Int'l shipping |
| ========== |
| Order Shift Lever Extension add on to existing order |
- One extension will be needed for each shift lever that you want to lengthen.
- The extension length is measured along the smooth section, with an extra inch being threaded to accept the shifter knob.
- Ships in USPS 1st class parcel
For a weld-in extension, you'll have to remove the shifter from the vehicle and then cut the smaller diameter portion of the shift lever below where the boot sits. Then you'll need to line up and weld the extension in place. You can also use this opportunity to angle the shifter as needed to allow for full range of shifter motion with the body lift. You can find 1/2" or 12mm round bar as most hardware stores or just grab an old bolt of that diameter, cut the head and threads off and use that.
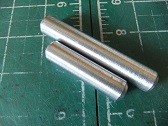 |
. |
| Weld-in Extension | . |
- We've sold out of this item.
- 2" Weld-in Shifter Extension (ToyMT_WSL2): US$5.00 + shipping
- 3" Weld-in Shifter Extension (ToyMT_WSL3): US$6.00 + shipping
- Ships via USPS First Class parcel (see rates here)
| Order 2" Shift Lever Ext w/ US shipping | Order 3" Shift Lever Ext w/ US shipping |
| Order 2" Shift Lever Ext w/ Int'l shipping | Order 3" Shift Lever Ext w/ Int'l shipping |
| Order a 2" Shift Lever Extension add on to existing body lift kit order |
Order a 3" Shift Lever Extension add on to existing body lift kit order |
- One extension will be needed for each shift lever that you want to lengthen.
- The extension length is measured along the smooth section, with an extra inch being threaded to accept the shifter knob.
- Ships in USPS 1st class parcel
One issue that shift levers can cause with body lifts is that as the shifter "sinks" into the floor, the distance from the lever's pivot point to the floor penetration is increased. This means that the shift lever sweeps out a wider arc in the various gear selection positions. Enlarging the hole in the floor is one option or bending the base of the shift lever is another option. A simple extension, while it makes the shift lever longer, will not help alleviate the clearance issues at the shifter boot. A better option to both extend the shifter and to shorten its throw is a short shift kit. Here is a short throw kit that bolts onto the Toyota transfer case shifters.
Clutch Slave Cylinder Hose:
A second issue that may crop up on manual transmission Toyota trucks is the flex hose for the hydraulic clutch where it drops down from the firewall to the clutch slave cylinder. In stock form, on the '84-'95 pickups and 4Runners, the flex hose is usually good for a 2" body lift, but at 3" it may be pulled a little too tight.
- One option is to relocate the lower end of the hard line closer to the slave cylinder.
- A second option is to replace that hose with a stock front brake flex line that is typically about 2" longer. This option is good if you have replaced the stock rubber brake hoses with flexible s/s hoses and have your old brake hoses laying around.
- A third option is to replace the stock rubber clutch hose with a longer braided stainless steel (s/s) line. This option is good if your old hose (clutch or brake) is old and cracked and you do not want to reuse it.
Pictured below (bottom to top) are the stock rubber clutch flex hose (approx. 10.5" long end-end) and a plain s/s flex hose and a s/s flex hose with polyolefin cladding over the s/s braid for added longevity. Both the s/s hoses are approx. 14" long, so 3.5" longer than stock to allow for more lift and flex between the engine/transmission and the body/frame.
The factory clutch hose seems to have 2 different ends, one with a slot in the hex and one with a slot on the round part for a retaining clip. For our s/s hoses, we can only get them in one style, that is with the clip slot in the round portion. Also, the slot for the clip is built to work with a variety of retention methods, so is wider than the slots in the OEM hose ends. You may need to adapt the OEM brackets and clips to work with the new hose ends. Re-using an OEM front brake hose will typically fit w/o modification.
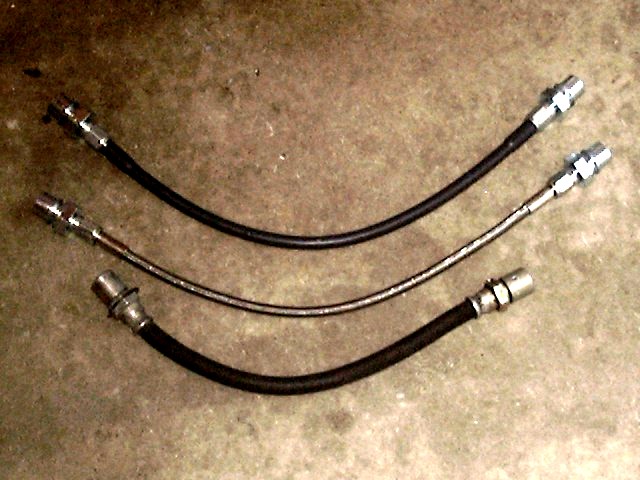 |
| Clutch Hose options |
Order a replacement s/s clutch hose below:
- We've sold out of this item.
- Bare s/s hose (ToyBareSSHose): US$40.00 + shipping
- Clad s/s hose (ToyCladSSHose): US$50.00 + shipping
- Ships in USPS Priority Flat Rate envelope
| Bare s/s hose US Delivery |
Clad s/s hose US Delivery |
| Bare s/s hose Int'l. Delivery |
Clad s/s hose Int'l. Delivery |
| Bare s/s hose add on to existing body lift kit order |
Clad s/s hose add on to existing body lift kit order |
[back to the top]
What about automatic transmissions?
Most Toyota 4WD body lift kits would not work on vehicles with automatic transmissions. The A/T shift linkage on most Toyota 4WD pickups and 4Runner (up through 1995) consists of two main parts, the transmission shift lever and the transfer case shift lever. The transmission lever is adjustable and can handle up to a 3" body lift with simple adjustments. There are two types of 4WD, or transfer case, shifters. The most common type is an external linkage, on the other hand will only work up to about a 1" body lift without modifications. Above 1", a bracket is required that lifts the transfer case shift lever up so that body lifts in the 2" to 3" range can now be done on A/T equipped Toyota 4WD vehicles. A less common type of transfer case shifter goes directly into the transfer case, just like a manual transmission setup (see above section) and this bracket setup is not needed. You should examine your transmission/transfer case linkage to verify which type you have before ordering and installing a body lift lit.
The table below lists some typical vehicle applications for which body lift kits are available and whether that application will require brackets for the automatic transmission linkage. Note that "Y" indicates a bracket kit is required to install the body lift and "N" means that one is not needed, although some linkage adjustments will typically be required:
| Application | 1" Lift | 2" Lift | 3" Lift |
| '79-'88 Toyota Pickup | N | Y | Y |
| '84-'89 Toyota 4Runner | N | Y | Y |
| '89-'95 Toyota Pickup | N | Y | Y |
| '96 and later Hilux, gas engines | N | Y | Y |
| '90-'95 Toyota 4Runner | N | Y | Y |
| '96 and later Hilux Surf, gas engines | N | Y | Y |
| T-100 | N | Y | Y |
| '95-'04 Toyota Tacoma (US) | N | N | N |
| ''96-'02 Toyota 4Runner (US) | N | N | N |
| '03-'xx Toyota 4Runner | N | n/a | n/a |
| FJ Cruiser | N | n/a | n/a |
| '05-'xx Tacoma | N | N | n/a |
| Tundra | N | N | N |
| Toyota {F,B,H}J-6{0,1,2} Landcruiser | N | N | N |
| Mitsubishi Montero | N | N | N |
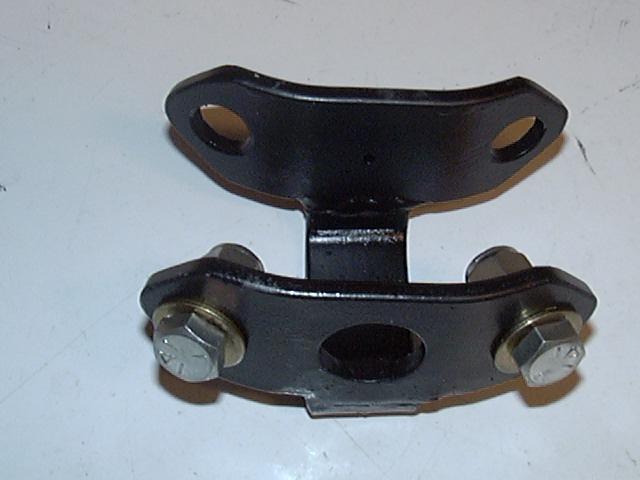 |
 |
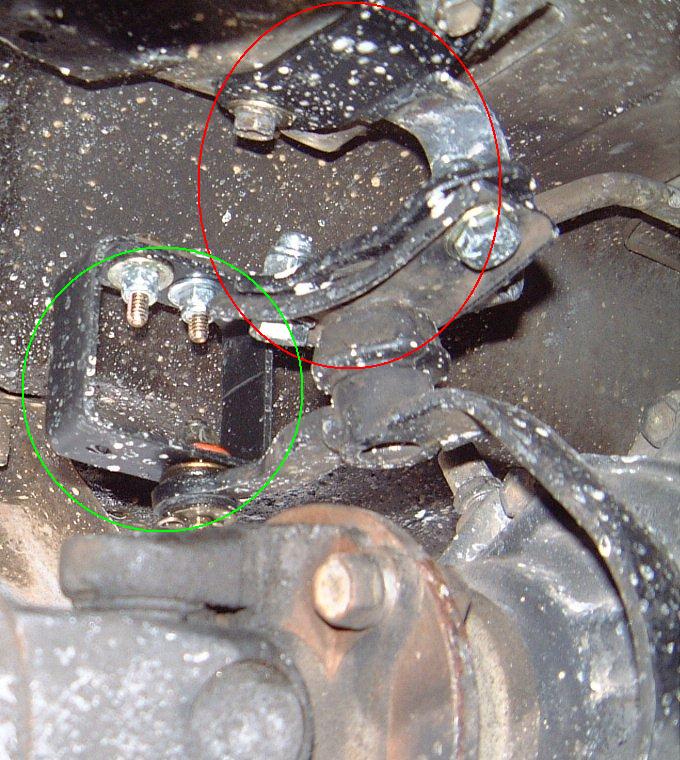 |
| A/T T-case Shift Lever Bracket | Bracket Install Location(s) | A/T Shifter Bracket & Linkage Extension Installed |
The bracket is fabricated from heavy gauge steel and includes new mounting bolts to attach the lower bracket to it, the existing hardware is then used to attach the bracket to the stock location (circled in red in the above-right image). The A/T linkage extension is a bolt-on extension for the upper shift linkage (circled in green in the above-right image) to prevent binding in the 2H position. Also available for customers who have another A/T shifter bracket, the A/T linkage extension is available separately (this is the square piece in the A/T bracket kit). The linkage extension is useful in those situations where you "run out" of adjustment in the stock shift linkage. The extension allows you to raise the shift linkage attachment point up to minimize the effect of the body lift. And on the 2WD pickups and 4Runners, this linkage bracket may be the only bracket you need since your truck lacks the transfer case shifter. Again this linkage extension is typically needed at a 3" lift and optional at 2" lift.
We have redesigned the A/T shifter kits so that all parts can be used on 2" and 3" lifts interchangeably. So while most folks typically only need the A/T shift lever bracket at 2", you can install the A/T linkage extension if you wish. Likewise, while most folks typically need both the bracket and linkage extension at 3", some only need the shift lever bracket, so you can now mix and match the parts as you wish. Consult the installation instructions for more details.
The A/T shift lever bracket is priced at $45 (typically for use on 2" lifts) or the full bracket plus linkage extension kit for $55 (typically for use on 3" lifts). If you have another brand body lift that does not include the A/T linkage brackets, this is the kit for you. A 2" or 3" lift is a 2" or 3" lift no matter what brand lift kit is used. Also you can use either the bracket or linkage extension on either a 2" or 3" lift.
Before ordering these bracket kits, see the important notes below:
Pricing:- A/T bracket (ToyAT_Brkt): US$50.00
- A/T Linkage Extension (ToyAT_Ext): US$15.00
- A/T bracket Kit (ToyAT_BrktKit): US$60.00
- Ships via USPS small box (see rates here)
We've sold out of this item.
| A/T bracket only | A/T Linkage Extension only | A/T bracket Kit |
| US Delivery | US Delivery | US Delivery |
| ~~~~~ | ~~~~~ | ~~~~~ |
| Canada Delivery | Canada Delivery | Canada Delivery |
| ~~~~~ | ~~~~~ | ~~~~~ |
| Int'l Delivery | Int'l Delivery | Int'l Delivery |
Notes:
- Ships in USPS Small Flat Rate box or 1st class parcel
- You should make sure you have a linkage-style transfer case shifter. Some A/T-equipped trucks have transfer case shifters that go directly into the transfer case, just like a manual transmission truck has. If this is the case, then do not order this adapter/bracket, IT WILL NOT WORK FOR YOU. Other options are to extend the transfer case shift lever, or convert it to a short throw setup.
- For the Tacoma ('95.5 onwards) and 3rd. gen 4Runner ('96-'02) applications, the shift linkage only requires adjustment, no bracket is needed.
What about steering?
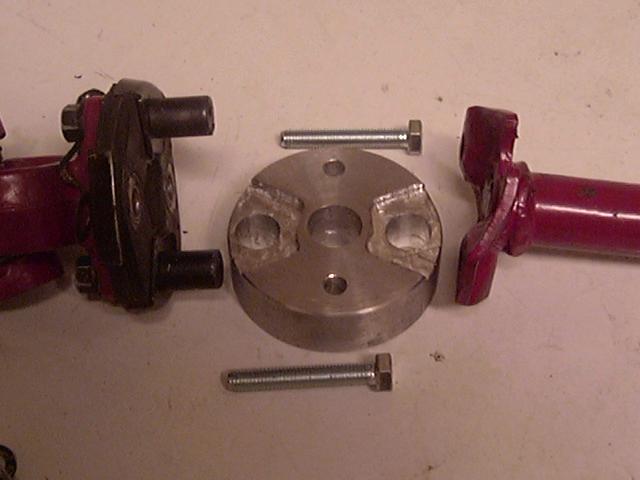 |
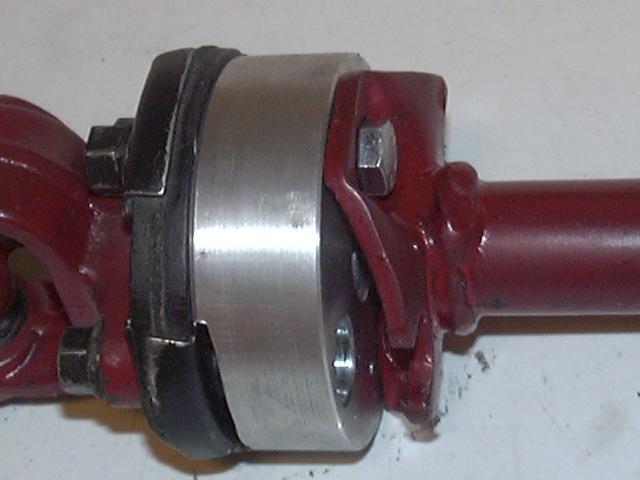 |
| A: Steering shaft disassembled | B: Steering shaft extended |
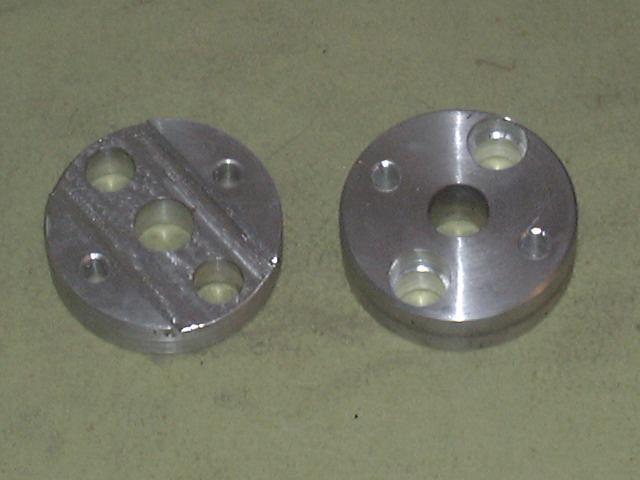 |
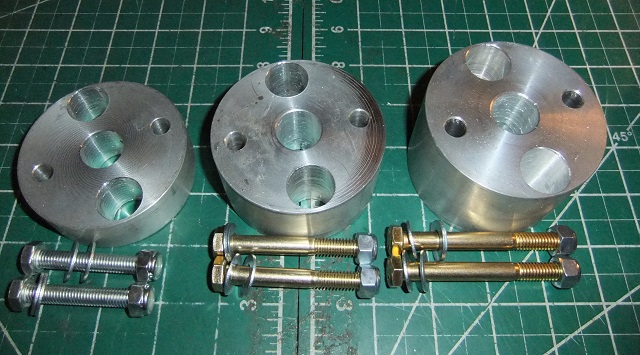 |
| C: Recirc.Ball vs. Rack&Pinion | D: 4th Gen 4Runner/Tacoma |
Pictured above are a selection of our 1" (25mm) nominal spacers. We have taller versions up to 3" (75mm) nominal and they are the same design, differing only in height.
Many vehicles use a rubber "rag joint" in the steering shaft to help dampen out road vibrations in the steering wheel. It is used to joint two sections of the steering shaft via a round rubber disc. One section of shaft is attached to the rubber disc via a pair of studs. The other end of the shaft is attached via a pair of bolts or rivets. The attaching flange has two slots that fit around the studs. These slots allow the studs to move around as the rubber twists under load and vibration. Before the rubber can twist too far, the studs make contact with the side of the slots.
Our spacers are designed to fit over the studs with over sized holes allowing the studs freedom of movement. The spacer is bolted to the other side of the steering shaft. This way it extends the function of the slots. Another common type of steering extension has a male and female spline section joined in the middle. These can often have a sloppy fit, especially over time as they wear and are also prone to breakage at the thin joint between the male and female section. Our spacer, on the other hand, are a full 3" (75mm) in diameter of solid, billet T6061 aluminum. They rely on a pair of grade 8 bolts to clamp them securely to the rubber rag joint, just like the OEM shaft was originally. No fine splies to wear out, no finicky alignment of those splines, no thin, necked down section to fatigue and break.
Many vehicles use a similar style rag joint, including Toyota, Isuzu, etc. To check if your vehicle has a similar rag joint, the rubber disc is approx. 3" (75mm) in diameter and the holes are on a 2-1/8" (55mm) diameter bolt circle. Bolt size is 5/16" (8mm) and the slots for the studs are approx. 3/4" (19mm) across. The spacers are machined from billet 6061-T6 aluminum alloy for strength and come with a pair of longer bolts and lock nuts to replace the original bolts.
Toyota vehicles with rack and pinion steering typically use a nearly vertical steering shaft that runs from the steering column penetration of the firewall to the steering rack mounted on the frame. Since the shaft is vertical, it is directly affected by a body lift. There is some amount of adjustment at the lower clamp, sometimes and inch or more of excess shaft is inside the clamp. However, it is difficult to ascertain the amount of spline remaining inside the clamp without removing the steering shaft. At the base of the steering shaft is the "rag joint", that allows for slight misalignment and also helps to absorb jolts from the road. It is possible to slightly extend the length of the shaft with washers on top of the rag joint. Beyond about 1/2" and the stop bolts on the rag joint will slip past the slots on the steering shaft and this would leave the rag joint unsupported and subject to damage. Therefore, an extension of some is required. In the above images, you can see the rag joint disassembled and the extension that slips over the stop bolts and is then bolted in between the rag joint and steering shaft. Due to the angle of the steering shaft, the spacer can be a bit less than the amount of body lift, for example, for a 3" lift, the spacer is 2.5" tall. In our experienhce, it's much easier to pull the male spline out of the upper shaft clamp a little bit, if needed, then it is to push the male spline farther into the clamp. This is becuase the female splines farther up in the pinch clamp are often rusty or dirty and would require dissembline the clamp to clean out the splines. The table below lists some typical vehicle applications for which body lift kits are available and whether that application will require extensions for the steering shaft. Note that "Y" indicates an extension is likely required to install the body lift and "N" means that one is likely not needed, although some adjustment of the steering shaft may be required (click here for details). On certain models, Toyota changed from the recirculating ball steering box to a rack and pinion type steering around 1995-6 time frame. The vehicles listed in Bold/Italic represent the rack and pinion type steering extensions, vs. the other vehicles that use the recirculating ball steering box. Easy to check which type of steering you have. The recirculating ball steering box will be attached to the outside of the frame, up in front of the front axle on the driver's side. The rack and pinion steering is located in the center of the vehicle, down low on the firewall behind the front axle. So be sure and check your vehicle to see which type of steering you have before ordering an extension.
| Application | 1" Lift | 1.5" Lift | 2" Lift | 3" Lift |
| '79-'88 Toyota Pickup / Hilux | N | N | N* | N* |
| '84-'89 Toyota 4Runner / Hilux Surf- 1st gen | N | N | N* | N* |
| '89-'95 Toyota Pickup / Hilux | N | N | N* | Y/1" |
| '90-'95 Toyota 4Runner / Hilux Surf- 2nd gen | N | N | N* | Y/1" |
| '96 and later Hilux / Hilux Surf | N | N | N* | Y/1" |
| '95-'04 Toyota Tacoma | Y/1" | Y/1.5" | Y/2" | Y/3" |
| '05-'xx Toyota Tacoma | N* | Y | Y* | n/a |
| '96-'02 Toyota 4Runner - 3rd gen | Y/1" | Y/1.5" | Y/2" | Y/3" |
| '03-'xx Toyota 4Runner - 4th gen | N* | Y | Y | n/a |
| FJ Cruiser | N* | Y | n/a | n/a |
| Toyota {F,B,H}J-6{0,1,2} Landcruiser | N | N | N | N |
| Toyota FJ80, Lexus LX-450 | N | N | N* | Y |
| Tundra/Sequoia | Y** | Y** | Y** | n/a |
| Mitsubishi Montero | N | N | N | N |
| Isuzu Rodeo | N | N | Y* | Y* |
- N* Extension not needed but 1" extension can be installed if desired
- N Means an extension is not needed
- n/a Means a steering extension for that lift height is not available
- Y or Y/x" Means that an extension is needed and if so, what height
-
Y* Means that an extension is needed and it needs to be custom extra
tall version
- '96 and later Hilux / Hilux Surf imply non-US models which are closer to the '95 and earlier US models -
Y** For Tundra models:
- With a bolted steering rag joint can use the same rack and pinion extension as the 1st gen Tacoma picjups use
- For a riveted steering rag joint, we can make custom steering shaft extensions,inquire for pricing
- Photo album with additional photos and information on the various steering extension options
The 1" lift rack&pinion extension (pictured right in image "C" above) is priced at $30.00 for use with existing body lifts. Extensions for 1.5", 2" and 3" lifts are available for use on existing body lifts as well. On Tacoma 4WD pickups with 4" ProComp lifts, steering extension beyond 5/8" tall may not clear the steering rack drop bracket.
Use the convenient on-line ordering buttons below to order stand-alone steering shaft extensions for use with your existing body lift: (if ordering with a 4Crawler body lift kit, do not order below, contact 4Crawler Offroad for a kit discount). A shipping charge is added automatically with the ordering buttons below for Priority Mail delivery, please be sure to provide a VALID mailing address. Order the steering extension designed for the type of steering:
- Ships in USPS Small Flat Rate box
- Recirculating Ball Steering Shaft Extension for Toyota pickups and 4Runner (1984-1995), T-100 pickups, FJ-80 Landcruiser and Lexus LX-450, also Hilux/Surf models 1996+
- Rack and Pinion Steering Shaft Extension for Toyota Tacoma 1995-5-2004 and 4Runner 1996-2002
- Rag Joint Steering Shaft Extension for Toyota 4Runner 2003-2008, FJ Cruiser and Tacoma 2005+
Rack and Pinion Extension for 1995.5-2004 Tacoma, '96-'02 4Runner as well as Tundra/Sequoia with bolted rag joint (SE1):
-
1": US$35.00 - for 1" body lift applications, p/n: TRP_1SE - Limited stock
- Physical height = 7/8"
-
1.5" US$45.00 - for 1.5" body lift applications, p/n: TRP_1.5SE - Limited stock
- Physical height = 1-5/16"
-
2": US$50.00 - for 2" body lift applications, p/n: TRP_2SE - Limited stock
- Physical height = 1-3/4"
-
3": US$60.00 - for 3" body lift applications, p/n: TRP_3SE - Limited stock
- Physical height = 2-1/2"
- Shipping:
We have a limited stock of these items.
| US Delivery |
| ~~~~~ |
| Canada Delivery |
| ~~~~ |
| Int'l Delivery |
Extensions over ~2.5" tall will not fit un-lifted rack&pinion vehicles due to rag joint / frame interference, but this is tall enough for a 3" body lift, due to the angle of the steering shaft. These extensions can also be combined with upper spline extensions used in other lift kits, such as what PA supplies, or it can be used to replace the problematic and breakage-prone spline extensions. Also note that on Tacoma Pickups with Edelbrock headers, you may be restricted to about a 1" tall spacer, due to header/rag joint clearance issues.
Recirculating Ball Steering Shaft Extension for 1984-1995 Toyota pickup and 4Runner applications, T-100 pickups and FJ-80 Landcruiser/Lexus LX-450:
1" spacer shown, 1.5" and 2" look similar, only taller
For recirculating ball steering (pictured left in image "C" above), generally the steering shaft is extendable (and collapsible for crash safety). But if you can't extend the shaft, a similar bolt-in rag joint spacer is available. Since the steering shaft is at an angle, you usually only need extensions over 2" of lift and then only at 1/2 the amount of lift. For example a 1" spacer (3/4" actual height) should be enough for a 2"-3"lift or when moving the steering box forward, as with a Solid Axle Swap (SAS). Due to the extra machining for this type of rag joint, the 1" spacer runs $40.00 for use on existing body lifts, or $35.00 when purchased as part of a 4Crawler body lift kit. This type of spacer can be used on 2"-3" lifted Toyota 4x4 pickups and 4Runners from 1995 and earlier and T-100 pickups. Note that it is not required as it is usually easy to extend the stock steering shaft. Also, be sure to specify whether you need the rag joint clearance slot/pockets (see picture "C") in line with the large or the small holes. Note that the extension may have either two pockets or one slot machined for clearance, either one will work fine. The large holes fit over the studs in the rag joint, the small holes are for the bolts that hold it together. The slots provide clearance for the tabs the encase the rag joint rubber and allow the spacer to sit flush to the rag joint. The 2" and 3" spacer can be used for applications where the stock steering box has been relocated farther forward on the frame or where the existing steering shaft is not long enough with the 1" spacer, an example application shown in this link. Also available a 1.5" spacer for those in-between situations.
-
1": US$45.00 - for 2"-3" body lift applications, p/n: TRB_1SE - Limited stock
- Physical height = 7/8"
-
1.5" US$55.00 - For body lift plus steering box moved forward/SAS, p/n: TRB_1.5SE - Limited stock
- Physical height = 1-5/16""
-
2": US$60.00 - For body lift plus steering box moved forward/SAS, p/n: TRB_2SE - Limited stock
- Physical height = 1-3/4"
-
3": US$70.00 - For body lift plus steering box moved forward/SAS, p/n: TRB_3SE - Limited stock
- Physical height = 2-1/2"
- Raw spacers in stock as noted, allow a few days to a week for custom machining
- Shipping:
We have a limited stock of these items.
| US Delivery |
| ~~~~~ |
| Canada Delivery |
| ~~~~~ |
| Int'l Delivery |
Rag Joint Steering Shaft Extension for Toyota 4Runner 2003-2008. FJ Cruiser, Tacoma 2005+, and Isuzu Rodeo:
A steering shaft extension is also available for the 4th generation Toyota 4Runner, FJ Cruiser and some 2005+ Tacoma models with bolted rag joint steering shafts (and it is such a good design that other lift kit manufacturers. have stolen our design for use in their own kits!). These spacers aslo work on the Isuzu Rodeo and similar vehicles with a ~3" dia. rubber rag joint.
On the later model Tacoma pickups (2005 and later), some steering rag joints are bolts and some are riveted or have pressed in studs. If you have a riveted rag joint, you'll need to be able to remove that steering shaft in order to drill or press out the rivets/studs before you can install the steering shaft spacer and also order a special version of the spacer what is drilled out larger in the center to clear the riveted rag joint - the special version adds $15.00/spacer to the cost of those below. Contact us for details. So be sure you ascertain what setup you have prior to ordering.
Extension bolts on to the rubber rag joint in the driver's side foot well. It features a drilled out center hole (3/4" - 19mm nominal) to fit over the steering shaft and through holes to allow the existing bolts to fit inside.
-
Spacers, nominal height:
-
1": US$45.00 - for 1"-1.5" body lift applications, p/n: T4R4_1EX - Limited stock
- Physical height = 7/8"
- If looking to extend your steering spacer to 1-3/4" and you have a 7/8" spacer, order another and let us know you need longer bolts
-
1.5": US$55.00 - for > 1.5" body lift applications, p/n: T4R4_1.5EX - Limited stock
- Physical height = 1-5/16"
-
2": US$65.00 - for > 2" body lift applications, p/n: T4R4_2EX - Limited stock
- Physical height = 1-3/4"
- Raw spacers in stock as noted, allow a few days to a week for custom machining
-
1": US$45.00 - for 1"-1.5" body lift applications, p/n: T4R4_1EX - Limited stock
- Shipping:
-- 1" -- 1.5" -- 2" --
We have a limited stock of these items.
| 1" Steering Extension | 1.5" Steering Extension | 2" Steering Extension |
| US Delivery | US Delivery | US Delivery |
| ~~~~~ | ~~~~~ | ~~~~~ |
| Canada Delivery | Canada Delivery | Canada Delivery |
| ~~~~~ | ~~~~~ | ~~~~~ |
| Int'l Delivery | Int'l Delivery | Int.l Delivery |
Postage and applicable sales tax is added automatically with the ordering buttons above for Priority Mail delivery, please be sure to provide a VALID mailing address. Both type of extensions come with mounting hardware to install on your steering shaft. T. Contact 4Crawler Offroad if interested in purchasing a separate steering extension for your body lift kit, or order above. See the installation instructions for more information.
What about bumpers?
 |
| Typical Front Bumper Brackets |
Body lifts often require bumper brackets to raise the bumpers to match the height that the body was lifted. Pictured above are some typical front bumper bracket kits, showing 3", 2" and 1" brackets for a typical vehicle. These brackets are designed to raise the stock front bumper to match the body lift, since the typical front bumper attaches to both the frame and body. These brackets may also work with aftermarket front bumpers that attach with the stock front bumper mounting holes (typically 2 bolts on each side or in front of the frame - depending on vehicle). The table below lists available front bumper brackets:
| Application | 1"-3" Lift |
| '84-'88 Toyota Pickup | Yes |
| '84-'89 Toyota 4Runner | Yes |
| '89-'95 Toyota Pickup | Yes |
| '90-'95 Toyota 4Runner | Yes |
| '95-'04 Toyota Tacoma | Yes |
| '96-'00 Toyota 4Runner | Yes |
| '01-'02 Toyota 4Runner | See instructions |
| '03-'06 Toyota 4Runner | N/A |
| Toyota {F,B,H}J-6{0,1,2} Landcruiser | N/A |
| Mitsubishi Montero | N/A |
Here is our CAD file for these brackets to make your own
We've sold out of these items.
| US Delivery |
| ~~~~~ |
| Canada Delivery |
| ~~~~~ |
| Int'l Delivery |
What about radiators?
The radiator may need to be relocated with a body lift. This is often the case since the radiator mounts to the body and the engine (and cooling fan) are attached to the frame. Lifting the body offsets the two leading to possible fan/shroud interference or reduced cooling efficiency if the fan moves outside the shroud.
There are a few cases where nothing needs to be done with the radiator mounting. One case is where you have an electric fan attached to the radiator itself and as long as that setup is clear to move up with the body, no relocation may be needed. This will also depend on how the radiator hoses can handle the offset. In some cases, you may find at lifts of 2" or higher, the radiator hoses may become kinked and that might restrict coolant flow. So be sure to inspect both the upper and lower radiator hoses to see how they will respond to the offset caused by a body lift. Another case where the radiator may not need to be relocated is where there is "daylight" between the fan and shroud (or where the fan shroud has been removed). In this case, the radiator can be raised without causing interference with the fan, so as long as the hoses are "happy", no relocation is needed. And a variation of this case is where the lower half of the fan shroud is removable (or has been removed), then the fan has clearance below the shroud and the body lift will cause no interference.
That said, there are some advantages to relocating the radiator back in line with the engine mounted fan, assuming that fan has not been replaced with an electric fan. That is that the fan and shroud are an important part of the cooling system, especially when stopped or when driving at slow speeds, like when going off-road. The shroud and fan work together to maximize air flow through the radiator when the fan is the only source of air flow (note that when driving at speeds of 20MPH or more, the natural air flow from the vehicle's motion is usually sufficient to cool the engine). But we have seen some studies some time ago in one of the off-roading magazines where they tested all sorts of radiator/fan/shroud setups for cooling efficiency and the variation was only in the 5% range from no shroud to a properly fitting shroud. But, if you live in a hot climate and tow a boat up into the mountains with the A/C running, you may need every percent of cooling efficiency you can get. While if you live in a cooler climate, it may make no difference. Like we tell folks, there are no "radiator police" out there that will pull you over to measure your radiator height and write you up if it is not perfect.
Here's a 3D CAD file you can use to make your own radiator brackets.
The drop brackets pictured below may be used on most vehicles that use 4 screws to hold the radiator in place on the front core support. The upper set of brackets feature a 5/16" threaded stud and 3/8" holes spaced at 1" intervals (on the 2" and taller brackets) to allow the radiator to be lowered to match the body lift height.
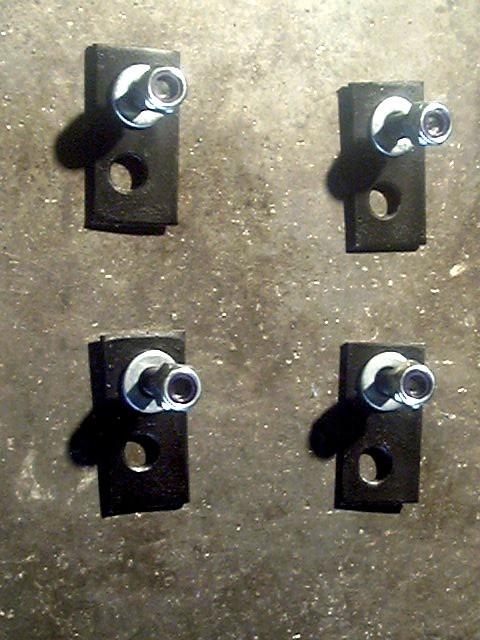 |
 |
 |
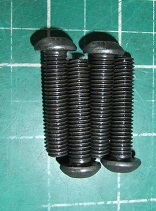 |
| A: 1" Drop Brackets | B: 2" Drop Brackets | C: 3" Drop Brackets | D: Deluxe h/w kit |
We've sold out of these items.
Standard bracket kits shown above (A-C), also available are 1.25" and
1.5". The deluxe kits include 4 - M8 button head screws (D) for later
model Toyota vehicles like the Tacoma pickup, 3rd, 4th and 5th
generation 4Runner, FJ Cruiser, Tacoma, Tundra and Sequoia models, Lexus LX-450/60/70 models.
These screws allow the brackets to be mounted to the threaded holes in the radiator flange and
then the stud on the bracket can be inserted into the hole in the core
support and fastened with the supplied lock nut. Customers have also
used these to relocate other brackets and things like wheel well
liners, so they're not just for radiators.
- RadDropStd, set of 4 brackets: US$20.00 + shipping
- RadDropDlx, set of 4 brackets w/ 4 screws: US$25.00 + shipping
- Ships in USPS 1st class parcel
| US Delivery | Canada Delivery | Int'l Delivery |
|
Standard radiator drop brackets |
Standard radiator drop brackets |
Standard radiator drop brackets |
|
Deluxe radiator drop brackets |
Deluxe radiator drop brackets |
Deluxe radiator drop brackets |
We've sold out of these items.
If you have the standard radiator brackets that need the additional hardware from the deluxe kit (photo D above), you can order just that below.
This is a set of 4 M8 button head screws that allow you to attach the radiator bracket to the threaded holes in
the radiator flange.
- RadDropHW, set of 4 - M8 screws: US$5.00 + shipping
- Ships in USPS 1st class parcel
| US Delivery | Canada Delivery | Int'l Delivery |
|
Dlx. radiator h/w |
Dlx. radiator h/w |
Dlx. radiator h/w |
Bed Spacers for pickups (Hilux and Tacoma):
On many pickup models, the bed (or tray) if directly bolted to the frame via brackets at several locations. In other locations, usually near the front and rear of the bed. Often, around the rear wheel well, there will be one or more locations where a channel under the bed comes close to a part of the frame, usually with a small air gap. These locations serve like an overload leaf on a spring pack. If the bed were to be heavily loaded with bulk cargo, it might start to sag in the middle. If this happens, the bed will make contact with the frame at these contact points and prevent if from sagging further. Examples of such bulk cargo might be sand, gravel, loose bricks, rocks, or firewood, for example. This type of cargo is not self-supporting and might cause the bed to sag. Examples of self-supporting cargo might be milled lumber, dirt bike or ATV, etc. This sort of cargo has the weight more at the front and rear of the bed or spread out over the full length of the bed.
When a body lift is installed, the cab and bed are raised up off the frame. As such, the bed can no longer make contact with the frame if overloaded. This is where bed spacers come in. They can be used to raise the contact point on the frame up close to the underside of the bed like it was before the lift. These spacers can also be used on full bodied vehicles such as 4Runner models where there's a rubber stop under the bed in close contact to the frame.
For an inexpensive spacer, consider cutting some scraps of pressure treated wood to the height of the lift and the width of the frame. Use some construction adhesive to attach that wood to the frame.
Or if you want a ready to install spacer, see below for our bolt-on or weld-on spacers, available in 1", 1.5", 2" and 3" heights to match most common body lift heights. These spacers are made of steel and have a mounting tab for use with a supplied self-tapping screws or they can be welded to the frame if you prefer.
We've sold out of these items.
Part Number Price (US)
BedSpcr1.0 $10.00/pr. 1.0 inch or 25mm
BedSpcr1.5 $12.50/pr. 1.5 inch or 38mm
BedSpcr2.0 $12.50/pr. 2.0 inch or 51mm
BedSpcr3.0 $15.00/pr. 3.0 inch or 76mm
Ships in USPS First Class parcel or Priority Flat Rate envelope
1" bed spacer pictured, other heights look similar, just taller.
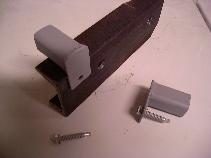 |
|
|
| US Shipping | Canada Shipping | International Shipping |
|
1.0" Bed Spacers |
1.0" Bed Spacers |
1.0" Bed Spacers |
| ~~~~~ | ~~~~~ | ~~~~~ |
|
1.5" Bed Spacers |
1.5" Bed Spacers |
1.5" Bed Spacers |
| ~~~~~ | ~~~~~ | ~~~~~ |
|
2.0" Bed Spacers |
2.0" Bed Spacers |
2.0" Bed Spacers |
| ~~~~~ | ~~~~~ | ~~~~~ |
|
3.0" Bed Spacers |
3.0" Bed Spacers |
3.0" Bed Spacers |
Materials:
We originally started making body lift blocks out of 2 inch round aluminum and this was when we only offered 1 inch tall blocks. Later we bagan to get requests for larger diameter and taller lift blocks. That's when we began using Ultra-High Molecular Weight PolyEthylene (UHMW-PE). This may be something unfamiliar to many people. Polyethylene itself may be a familiar material, commonly used in milk jugs and other plastic packaging. This is typically a low molecular weight material. UHMW on the other hand is a polymer material with the toughness of a metal: composed of long polymer chains with a molecular weight of between 3 and 6 million. UHMW-PE combines the traditional abrasion resistance of metal alloys with the impact and corrosion resistance of synthetic materials.
The resistance to abrasion, impact and corrosion of UHMW-PE exceeds that of many conventional structural materials. It has a number of other valuable characteristics in applications requiring superior wear resistance and sound deadening. Its self-lubricating properties eliminate the need for oil and greases, making it suitable for use in the food industry where contamination from lubricants would pose problems. High abrasion resistance makes it ideal for liners, enabling light aluminum trucks and trailers to carry sharp or abrasive loads. In the manufacture of separators for lead-acid batteries, UHMW-PE meets this demanding application due to its excellent corrosion resistance.
UHMW-PE has a a tensile strength nearly twenty times greater than steel, this stuff is often used in bullet-proof vests and in the new synthetic winch cables. For example, consider the free breaking length (FBL), that is the length of a filament of material that could be suspended before it breaks. Note that the Karman Line, which is the proposed boundary between Earth's atmosphere and outer space is 100km and the height of the ISS is 330-400km:
| Material | FBL (km) |
| Aluminum | 12 |
| Steel | 25 |
| Glass Fiber | 125 |
| Carbon Fiber | 195 |
| Aramid Fiber (Kevlar) | 235 |
| UHMW_PE fiber | 330 |
This is tough stuff, drop one of the blocks and you'd swear it was metal. It is a bear to cut, it took 4Crawler Offroad quite a bit of research and development to find a way to cut the bulk rod into useable blocks.
One last factor that makes UHMW-PE an ideal material for body lift blocks is that it is self-lubricating, i.e. it won't SQUEAK. With metal spacers or even the extruded fiberglass-type blocks, the constant rubbing action of the floor of the body and the blocks can lead to squeaking and on the fiberglass blocks, the friction can start to wear away the material. UHMW-PE is commonly used for bearing material in industrial applications. UHMW-PE has a wide temperature range as well, from below -100°F to +180°F and a melting point of over 280°F. Here is a link to more extensive physical properties of this material.
We do get a few customers that request the aluminum lift blocks. One application is for the FJ80 Landcruiser models where one body mount is located close to the exhaust. Some customer want the higher temperature properties of aluminum compared to UHMW-PE. However, realize that the aluminum lift block is sitting right on top of a rubber body mount bushing which has similar temperature ratings as UHNW-PE. We've had other customers who wanted to get the aluminum lift blocks anodized in a color to match their truck. One such case was a customer building a custom flat bed, where the frame and lift blocks would be exposed and they wanted a specific look.
Another possible body lift block material we've been asked about is polyurethane. After all, isn't polyurethane used in body mount bushings, so why not make the body lift blocks out of the same material? Body mount bushings are designed to allow a little flex between the frame and the body. They are generally 1"/25mm or less in height and are designed with a given amount of compliance to perform this function. However, add an inch or two or three of flexible polyurethane on top of those bushings and you'll find the body swaying from side to side as you drive down the road. You'll end up with way too much flex and that can lead to fatigue in the body mount bolts. Also, polyurethane is very hard to machine, that's why it's more commonly molded into a shape. Polyurethane casting molds are very expensive to make and you need specialized equipment to properly pour and cure the material. Unless one is making large quantities of the same part, it's cost prohibitive to make parts this way.
UV exposure:
One minor drawback to UHMW is that if it is left exposed to sunlight, it can get some surface crazing due to the UV exposure. This typically takes a few years of exposure to show up and since most body mounts are hidden under the truck, this is normally not an issue (reflected light off the ground is usually not an issue). A simple coat of paint, undercoating or bed liner spray will block any UV that may hit the block if it is somehow exposed to direct sunlight through a gap in the body or bed. The crazing is only surface deep and will not affect the strength of the block. We have a test block that has been in direct sunlight for around 20 years now and it has crazing over the surface but only a few 0.01" down, the material is unaffected. The UHMW material is slightly translucent and upon exposure to UV, it turns an opaque white color and that limits the depth of penetration of the UV light to the very surface layer to it will not penetrate to the center of the block under normal conditions. You can also order the blocks pre-colored to avoid this issue as well...
[back to the top]Disclaimer and Limitation of Liability:
This kit will function for its intended use, that is it will lift the body of the vehicle off the frame by the specified amount, the bolts will fit in the blocks and the nuts will screw onto the threads of the bolts. Anything beyond that is totally out of our control. You must realize that this will raise your vehicle's center of gravity, making it less stable in turns and in off-camber situations. It can also increase leverage on body mounts, especially in cases of high speed impacts. This is simple physics and geometry.
Although this kit is made from the highest quality materials possible, it is not a substitute for safe and careful driving. In other words; good, safe on-road and off-road common sense. Know the terrain, vehicle and speed limitations, and obstacles that lay ahead. Please remember to preserve our right to enjoy public lands through the proper use of your off-road vehicle, Tread Lightly by all means.
After researching materials, equipment, and fabrication techniques, 4Crawler Offroad was formed to provide these products at a reasonable cost in order to be able to offer this solution to others who lacked the time, equipment, or expertise to do this themselves.
Aesthetics:
Its funny how the subject of a body lift can polarize a discussion into folks who absolutely hate them and folks who like them. I'll admit I've seen some rather bad examples of body lifted trucks as well as bad examples of suspension lifts including blocks, cut and welded steering components, foot long shackles, and other nightmares of questionable engineering. Some vehicle bodies sit very high on the frame (Nissan and Chevy pickups come to mind) others, like Toyota, seem to sit very low on the frame. In fact, at stock height, a 4Runner frame is barely visible under the body:
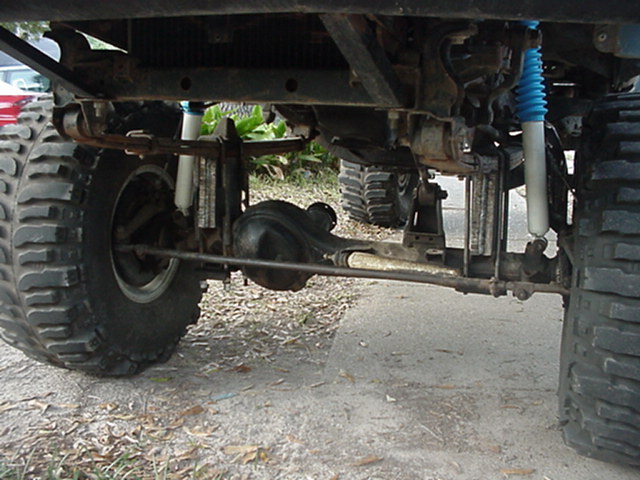
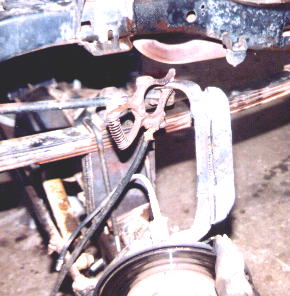
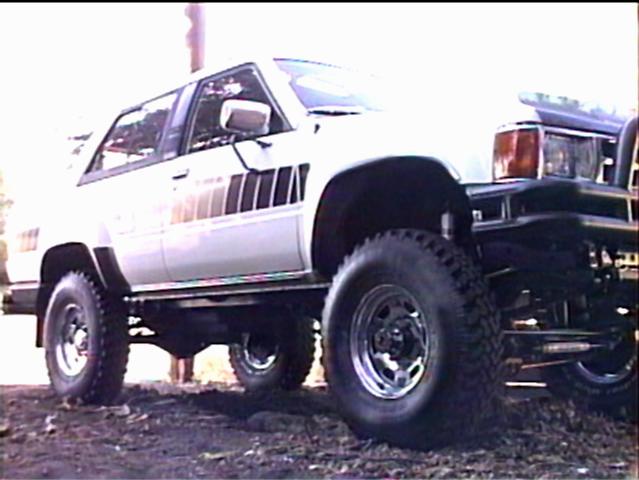
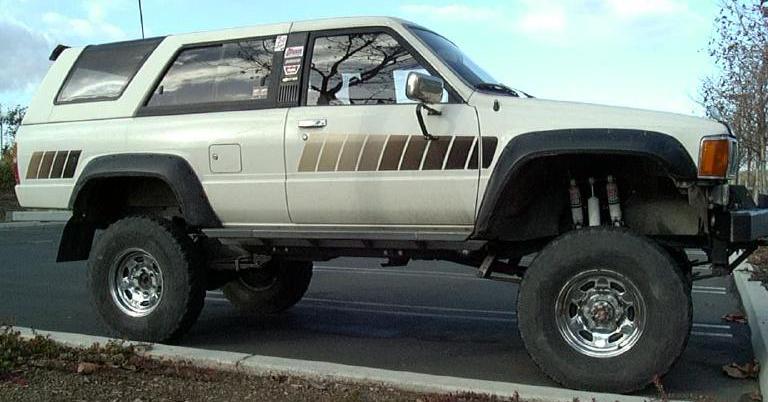
Stock <<<<<<< >>>>>>> 3" Body Lift
In the above photos, you can see my truck when it sat on the stock body mount bushings and 3 years later with a 3" body lift. I think there was more "stuff" hanging down below the body before than after. FYI: Both shots are taken with the same 33x9.50 tires. I do have nerf bars installed in the after shot that were not there in the before picture. I replaced the stock wheel well liners with Lift-Lips designed to cover the gap for a 3" body lift.
With the 3" lift:
- I now have room to fit tall enough shocks so they aren't limiting the suspension travel
- I can run a strong nerf bar straight off the frame
- I can fit a full winch bumper at about the same height as the non-winch bumper I used to run
- I've easily gained a foot of clearance at the back of the vehicle by making a much simpler rear bumper coming straight off the frame
Point is that a body lift can be done in a tasteful manner and can be a starting point for a whole lot of other vehicle improvements. A body lift is not a cure-all, either. But as part of a well integrated system it can be a very useful component. Lest you think the body lift is just for show, when I stuff a 33x15.50 Swamper TSL/SX tire up in those wheel wells, I'm happy for every inch of lift that I have:
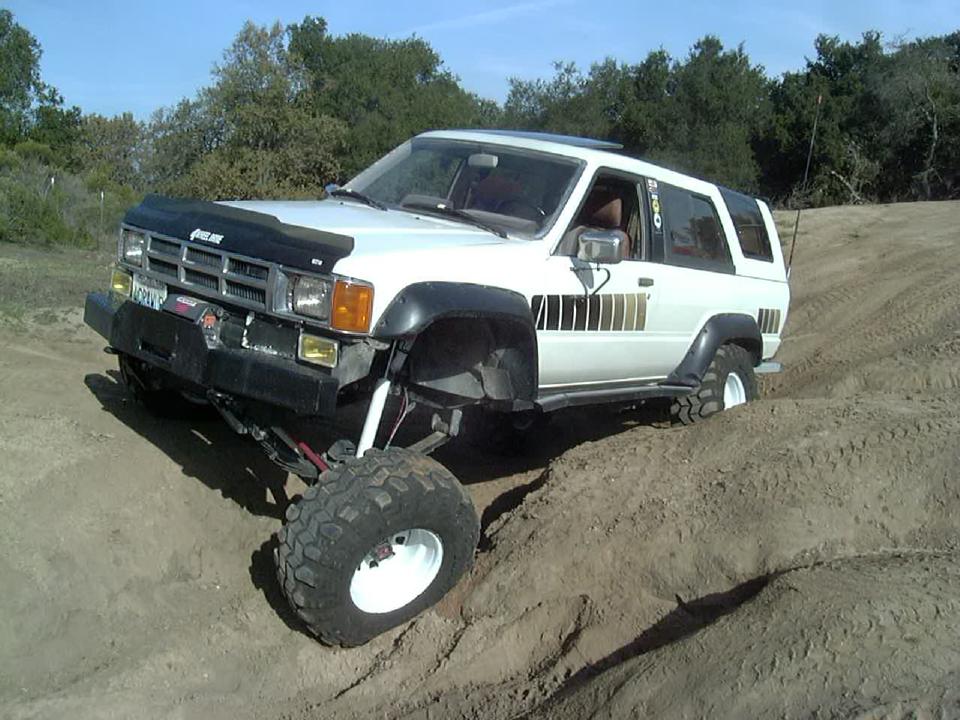
Both front and rear tires are capable of getting stuffed several inches into the wheel wells. At one time, I measured only 5" from the front fender to the top of the rim, meaning I had about 4" of tire above the lip of the fender.
Folks will list many reasons why a body lift is a bad idea. Mostly those concerns seem to revolve around poor or incomplete installations.
-
So just like the person who puts on larger tires and then complains of
a "lack of power" in his truck.
- Well, this is just an incomplete installation, you really should change the axle gearing to restore the original engine RPM and torque range on the road.
-
Or a person who installs a suspension lift then complains about drive shaft vibration or CV joint breakage.
- Again, this is a case of an incomplete installation. You need to address and correct any drive shaft angle/alignment issues and/or take steps to reduce CV joint operating angles to reasonable levels.
So, if someone complains that a body lift messed up the shifter operation, this is another case of an incomplete installation. There are many solutions available to make shifter operation work as well, if not better than stock; including shifter extensions, short throw shift kits, drive train lifts, etc. Or they complain that there is a gap between the body and bumper. Simple fix is to install relocation brackets or modify the bumper to close the gap. And this has the side effect of increasing approach and/or departure angles on the vehicle, which is another aspect of a body lift many folks overlook when they say a body lift provides no increase in ground clearance. While it is true that the frame is not raised, if your front and/or rear bumpers hang down low, these can limit the size of obstacle you can get up on or off of, so there is more to "ground clearance" than the height of the frame or axle above the ground.
What about wheel well liners or Gap Guards?
Another concern many people have about body lifts is the gap between the body and frame, most visible in the wheel wells. I run a set of Lift Lips on my 4Runner. They replace the stock plastic wheel well liners with a heavy rubber material and cover up to a 3" lift. Here's how I installed them on my truck. Not only do they fill the gap but they also help keep water and mud out of the engine compartment.
You can also obtain rubber material from a hardware store and make your own. Use something like sheet rubber, pond liner, rubber roll roofing, sheet vinyl, etc. Remove the old wheel well liner and use it as a template for cutting the new liners. For raw material, use an oil resistant neoprene or EPDM rubber sheet in 1/16" (60-mil or 1.5mm) thickness, or 1/8" (120-mil or 3mm) thickness. Measure the width of your existing wheel well liners, add the height of the body lift and select a suitable material width. Measure the lengths of the front liners and perhaps you can cut 2 of the rear liners out of one length of material, to determine the length needed.
Draw a parallel line to the top, spaced down an amount equal to your lift. Then line the old liner up with the top of the sheet and trace the upper half. Then slide it down to the line you drew and trace the bottom half. Mark and punch out any mounting holes and you now have a copy of the liner that will cover the gap created by the body lift. Reattach it with the factory hardware. On vehicles where no liners exist from the factory, usually just a simple rectangular strip of material will suffice. Mark and drill some mounting holes and attach the liner to the lower lip of the wheel well. If you find the old plastic push pins are missing or damaged, they can be replaced using a rivet nut kit and screws instead. Use stainless steel riv-nuts and stainless or brass screws (I used #10-24 as I recall).
There are a number of sources for custom fit gap guards for a variety of vehicles:
- Amazon search: gap guards for body lift
- Amazon search: Fender Liners Splash Shields, Splash Guards Wheel Well Liners
- DayStar
- Rad Rubber Design
- Andys Autosport
To make a custom fit wheel well liner, remove the existing wheel well liner from the vehicle. Lay the top of the liner flush to the top of the material and trace the upper half. Also, mark all the hole locations for the mounting hardware. Then mark a few places where the bottom of the liner sits and then measure down an amount equal to the height of the body lift, for example 2", from those 2 points. Now slide the original wheel well liner down to those two new marks and trace the bottom half of the existing wheel well liner. Now use a pair of scissors to trim the top and bottom of the material to the lines you traced and punch holes for attaching the liner to the wheel wells. When making cuts, be sure to leave no sharp inside corners. Instead, try to leave about a 1"/25mm radius on all the corners to prevent tearing once the material is installed.
You may be able to cut two liners from one sheet, for example the rear wheel wells on a pickup or 4Runner as those liners are often just a straight piece. Likewise, you may be able to nest uneven shapes from two sides together to fit into one sheet.
Another option is to cut a strip of material a bit wider than the body lift height and afix that to either the top or bottom of the existing wheel well liner. You could use rubber cement, pop rivets or small bolts with nuts and washers to afix the two pieces of rubber together. Essentially, you're re-using the factory pieces and simply extending them for the height of the body lift in order to span the gap between the wheel well and the frame.
[back to the top]Place an Order:
Since all our body lift kits are custom built to your exact needs, it is hard to make an easy order form. Feel free to contact 4Crawler Offroad with your vehicle specs (make, model, year) and your lift needs (tire size, clearance issues, etc.):
[ E-mail link for additional product information or to place an order ]
- State, country or zip code needed for shipping/sales tax calculation:
- Specify the make, model and year, cab style (regular, extra, double cab), 2WD/4WD and cab-only or full bed, various models require slightly different hardware
- Questions?
Ordering/Payment options:
We've sold out of our body lift kits.
[ Return to the main 4Crawler Offroad main page... ]

[Last updated: 10.January.2026 ]
Visitor # since 13.AUG.2001
The latest version of this document may be found at: //4Crawler.com/4x4/ForSale/BodyLiftKit.shtml